Behavioral Model Scoring
- This pre-seeded batch will be available in all workspaces (Production
and Sandboxes ).
Note:
This batch has to be executed in the Production workspace.
- Task 1: Aggregate_Scoring_Base_Features
- Task 2: ML_Scoring
- Task 3: Event_Processing
- Objective folder for this
task:
Home / Modeling / Pipelines / ML4AML / Scenario Model / Batch / Base Features - Model: Retain the default settings.
Note:
- For a fresh installation, do not modify any parameters except the Optional Parameters.
- For upgrade, see the How to Execute Model Scoring/Annual Model Validation with the Batch Framework section.
- Optional Parameters:
- prod_flag: Flag to indicate Training/Scoring scenario. The option is Y or N. For production/ scoring scenarios, the prod_flag should be set to Y.
- model_group_name: Name of the Model Group for which Base Feature Aggregation is created. Example: LOB1.
- model_name: Name of the Model used while importing the model template using Admin Notebook. Example: RMF.
- focus: The model entity name is provided in the
Admin notebook dataframe while creating the model group. The option
is CUSTOMER or ACCOUNT.
For example:
prod_flag=Y,model_group_name=GROUP1,model_name=M1,focus=CUSTOMER
- Edit Task Parameters and Save.
- Objective folder for this
task:
Home / Modeling / Pipelines / ML4AML / Scenario Model / AIF - Model: Retain the default settings.
Note:
- For a fresh installation, do not modify any parameters except the Optional Parameters.
- For upgrade, see the How to Execute Model Scoring/Annual Model Validation with the Batch Framework section.
- Optional Parameters:
- impute_unseen_values: During scoring, a new category, which
was not part of the feature during training, can be replaced with an
existing category, allowing the entity to be scored. Nonetheless,
the output will still display the original category.
For example, {'OCPTN_NM': 'ENGINEER'}. The new occupation name will be replaced by "ENGINEER" in the occupation name feature.
- filtered_out_condition: This is a set of Python conditions
designed to further filter and subset the data. These conditions are
applied specifically to the filtered-out portion of the dataset, but
only when the filtered_out_sample_count is greater than zero.
Let us say only entities with a trxn_amt greater than 100,000 should be scored by the model. However, an institution might want to sample and review entities with amount between 10,000 and 100,000 for Jurisdiction. if so, the following condition can be used.
For example: filtered_out_condition=”TRXN_AM >equalto 10000 & JRSDCN_CD equaltoequalto ‘GEN’”Note:
The operator '=' is not supported in the batch parameter; instead, you can use the string 'equalto' as a substitute. - filtered_out_sample_count: This parameter specifies the number of samples to be extracted from the filtered-out dataset. The filtered-out dataset refers to rows that are excluded after applying user-defined transformations or row-level filters. If the user wishes to obtain samples from these filtered rows, they should provide a value greater than zero for this parameter. Setting it to 0 means the filtered-out dataset will not be considered.
- btl_cut_off_percentile: The percentile value determines the
range from which samples are selected, starting from the nth
percentile of BTL scores up to the model's threshold.
For example, if the btl_cut_off_percentile is 0.5 and the model's threshold is 0.9. All events with a score less than 0.9 will be considered, the score corresponding to the 50th percentile in this population, will be identified (let's say 0.7). Samples will be drawn from events with scores between 0.7 and 0.9.
- btl_sample_count: Number of random samples below the cutoff that should be considered while scoring.
- debug_flag: Used for debugging purposes only. By default, set it to False.
- n_top_contrib: Top N features contributing to
model score. By default, set it to None.
For example: impute_unseen_values=None,filtered_out_condition=None, filtered_out_sample_count=0,btl_cut_off_percentile=0,btl_sample_count=50,debug_flag=Fa lse,n_top_contrib=None
- impute_unseen_values: During scoring, a new category, which
was not part of the feature during training, can be replaced with an
existing category, allowing the entity to be scored. Nonetheless,
the output will still display the original category.
- Edit Task Parameters and Save.
Figure 5-34 Edit Task Parameter for ML Scoring
Note:
Once the batch execution is successful, the results are available in the SM_EVENT_SCORE and SM_EVENT_SCORE_DETAILS tables. For more information on these table structure, see the OFS Compliance Studio Data Model Reference Guide.
- Objective folder for this
task:
Home / Modeling / Pipelines / ML4AML / Scenario Model / Batch / Event Processing - Model: Retain the default settings.
Note:
- For a fresh installation, do not modify any parameters except the Optional Parameters.
- For upgrade, see the How to Execute Model Scoring/Annual Model Validation with the Batch Framework section.
- Optional Parameters:
- model_group_name: Name of the Model Group for which Base Feature Aggregation is created. Example: LOB1.
- model_name: Name of the Model used while importing the model template using Admin Notebook. Example: RMF.
- focus: The model entity name is provided in the
Admin notebook dataframe while creating the model group. The option
is CUSTOMER or ACCOUNT.
For example: model_group_name=GROUP1,model_name=M1,focus=CUSTOMER
- Edit Task Parameters and Save.
Figure 5-35 Edit Task Parameter for Event Processing
Task: Output Overlays
This is an optional task added manually for running the score update notebook with static logic to update scores generated by the ML Scoring task.
Note:
Prerequisites: See the Score Update Notebook for Scenario Model section in theOFS Compliance Studio Use Case Guide.In the Production workspace, the score update notebook can be executed via batch framework.
- On the Orchestration mega menu, click Define Batch.
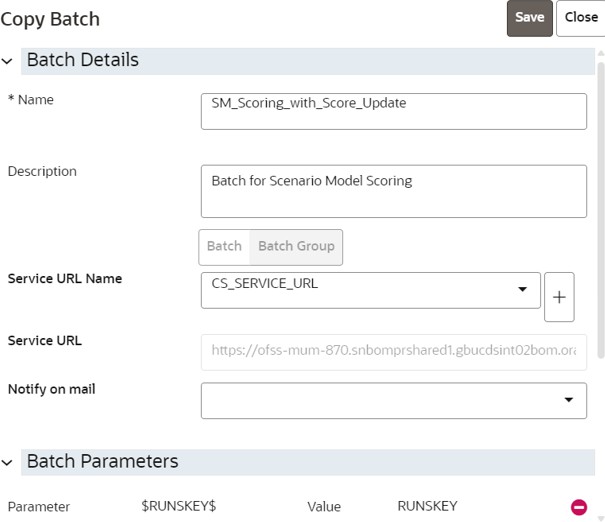
- Search SM_Scoring Batch, and clone the batch using the Copy icon. The Copy Batch page is displayed.
- Provide a new name to the batch and click Save.
- On the Orchestration mega menu, click Define Tasks and select the newly created batch.
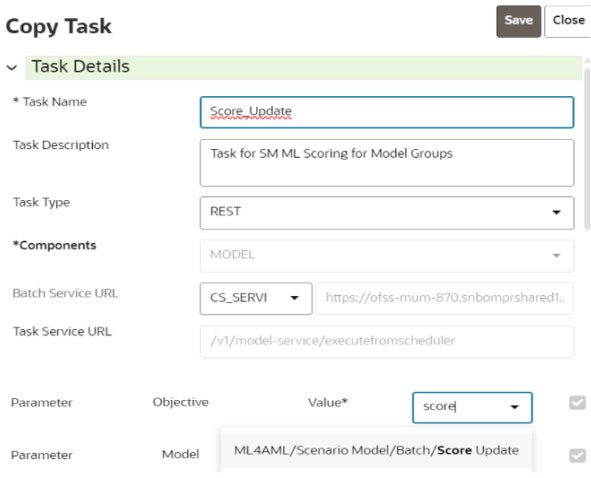
- Copy any existing task using the Copy icon. The Copy Task page is displayed.
- Create a new task and provide the name as Score_Update.
- Select the Model parameter where the draft notebook is present.
- Click Save.
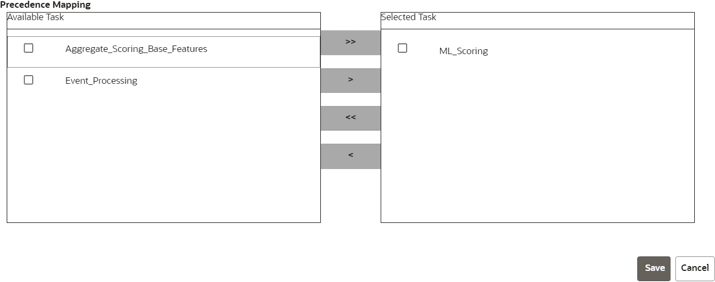
- After the new Task is created, use the Menu icon and adjust the Precedence Mapping of tasks.
- Place the new task after ML_Scoring and before Event_Processing tasks as shown below.
- On the Orchestration mega menu, click Schedule Batches.
- Select the newly created batch, provide the parameters for each
task, and trigger the batch.
The newly created task will pass the control to the new notebook.
Note:
The code in the new notebook will update the scores directly into the production table (SM_EVENT_SCORE_DETAILS). For more information on the table structure, see the OFS Compliance Studio Data Model Reference Guide.


