5.2 Executing Private Watchlist Upload Request

Prerequisite:
  1. Download the Private Watchlist template from the MOS page.
  2. Open the Private Watchlist template and enter the values for all the fields. For more information, see the List of fields for Private Watchlist table in the Private Watchlist section.

    Note:

    The Watchlist ID field is mandatory when uploading a private watchlist record through the API. It must be a whole number (numeric) and can be up to 19 digits long (e.g., 1234567890123456789).
  3. Save the file.

To execute Private Watchlist upload request, follow these steps:

  1. Open Postman or relevant tool.
  2. Copy only the Authorization token that you got from the Getting Authentication request.
  3. Go to Header.
  4. Enter KEY as a Authentication and Description as a bearer (Authorization token) <eyJ4NXQjUzI1NiI6Ikk3cWxndm1Kal...>.
  5. Enter ofs_remote_user as a <username>.
  6. Set the method to POST and enter the following URL: https://{{host_url}}/{{context_namespace}} /watchlist-service/privatewatchlist/importdata/{username}?source=API&isDeleteAndInsert=true

    Figure 5-1 Query Params


    Query Params

    Note:

    Behavior of the isDeleteAndInsert Query Parameter:
    • When isDeleteAndInsert=true:
      • Existing watchlist records are updated.
      • New records are added.
      • Records that are no longer present in the request are deleted from the watchlist.
    • When is DeleteAndInsert=false or not provided:
      • Existing watchlist records are updated.
      • New records are added.
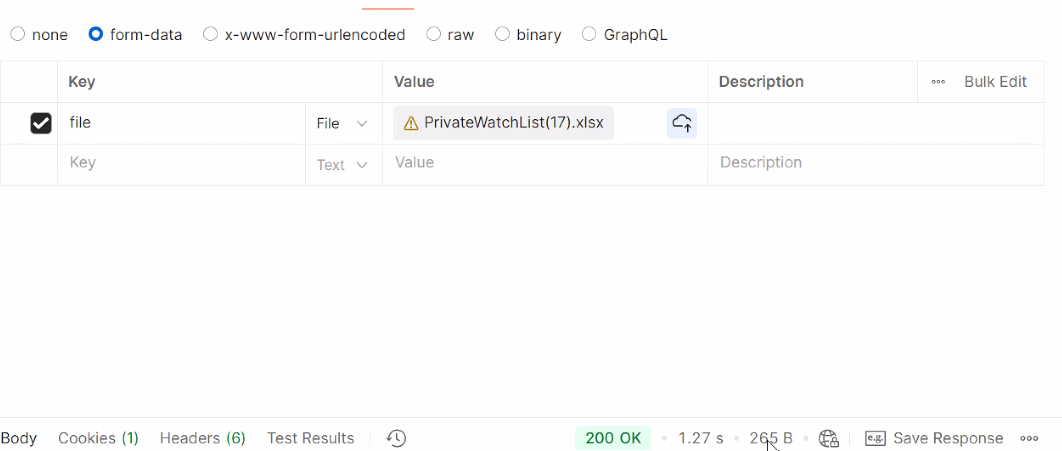
  7. Click the Body tab, select form-data. The form-data screen appears.

    Figure 5-2 The form-data screen


    The form-data screen

    1. In the first row under the Key column, enter file.
    2. Select the value type as File from the drop-down list.
    3. In the Value column, select the type as File from the drop-down and upload the updated Private Watchlist file.

      This setup allows the file to be transmitted as form-data as required by the API.

  8. Click Send.

    Once the request is submitted, you will receive a response confirming the status of the upload.

    Sample Response:
    {
        "MESSAGE": "File uploaded successfully",
        "STATUS": "SUCCESS"
    }

    Table 5-1 Response Parameters

    Response Parameters Description
    MESSAGE Indicates the file upload status.
    Possible messages:
    • If the file is uploaded successfully, File uploaded successfully message appears.
    • If the file is not uploaded due to any errors, Could not upload the file: Is Active Flag is mandatory. Missing mandatory inputs message appears.
    STATUS Indicates the result of the API request.
    Possible values:
    • SUCCESS: The request completed successfully.
    • FAILED: The request is not completed due to errors.