3 Implementation Steps for Data Migration from OWS to CS
This topic describes step-by-step instruction to migrate data from OWS to CS.
To migrate data from OWS to CS:
- Create an empty schema in a Database where you can extract the OWS data.
- Navigate to the
<OWS_Migration_Extracted_Path>/Table
                        Scripts
directory and run the scripts in any order.Note:
Open each file and run the scripts manually. - Navigate to the
<OWS_Migration_Extracted_Path>/Packagedirectory and run all the scripts and compile it. - Navigate to
<OWS_Migration_Extracted_Path>/EDQ_DXIdirectory. The following files are available:- OWS_CS_Cloud_Migration.dxi
- OWS_CS_Case_Migration.properties
- Upload the
OWS_CS_Cloud_Migration.dxifile to the EDQ application from the local directory.To import the OFS Customer Screening Projects, see Oracle Financial Services Sanctions Pack Installation Guide. - Copy the
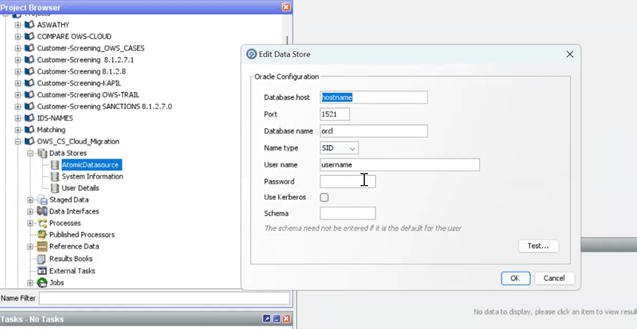
OWS_CS_Case_Migration.propertiesfile and place in the/{domain_name}/config/fmwconfig/edq/oedq.local.home/runprofilesdirectory (EDQ local home). - After uploading DXI file to the EDQ application. Open DXI from EDQ directory and select Data Stores folder in the Project Browser.
- Click AtomicDatasource. The Edit Data Store window is
displayed.
- Update the new data base details and click Ok.
- In the Project Browser, navigate to Jobs. Expand Jobs
and you can view 1.OWS>STAGE Loading.
- Right-click 1.OWS > STAGE LOADING and then click
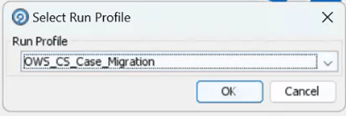
Run with Profile option. The Select Run Profile
confirmation dialog box is displayed.
- From the Run Profile drop-down list, select the OWS_CS_Case_Migration and click OK to run the project.
- After success full run, all OWS data will be populated in the OWS_*
tables.
Note:
While running the 1.OWS > STAGE LOADING table, if there is any break or failure then you need to truncate the tables mentioned in the OWS Tables in the<OWS_Migration_Extracted_Path>/TABLE LIST.xlsxand re-run it. - Execute the following script to generate L_tables.
BEGIN
  P_RUNSKEY := NULL;
  P_DATA_ORIGIN := NULL;
  P_JURISDICTION := NULL;
  P_BUS_DOMAIN := NULL;
  MIS_DATE := NULL;
  FCC_CS_OWS_MIGRATION.A_MIGRATE_OWS_CASES(
    P_RUNSKEY => P_RUNSKEY,
    P_DATA_ORIGIN => P_DATA_ORIGIN,
    P_JURISDICTION => P_JURISDICTION,
    P_BUS_DOMAIN => P_BUS_DOMAIN,
    MIS_DATE => MIS_DATE
  );
--rollback;
END;
Enter the Values for the following parameters in the above script:
- P_RUNSKEY: Enter any value.
- P_DATAORIGIN: Enter the Customer data origin value.
- P_JURISDICTION: Enter the Case Management Jurisdiction.
- P_BUSINESS DOMAIN: Enter the Case management Business Domain.
- MIS_DATE: Enter the date (YYYYMMDD) where it matches the customer data.
Sample Script:
After Successful migration batch run, all the OWS_tables will be converted into L_Tables that will be used to load on CS Cloud. To view the table list, see theBEGIN P_RUNSKEY := 10001; P_DATA_ORIGIN := 'MAN'; P_JURISDICTION := 'AMEA'; P_BUS_DOMAIN := 'a'; MIS_DATE := '20141231'; FCC_CS_OWS_MIGRATION.A_MIGRATE_OWS_CASES( P_RUNSKEY => P_RUNSKEY, P_DATA_ORIGIN => P_DATA_ORIGIN, P_JURISDICTION => P_JURISDICTION, P_BUS_DOMAIN => P_BUS_DOMAIN, MIS_DATE => MIS_DATE ); --rollback; END;<OWS_Migration_Extracted_Path>/TABLE LIST.xlsxsheet.If you want to view the table status, execution time and error details, then run the MIGRATION_AUDIT_TABLE.In the Status Column, 0 refers to table is updated and 1 refers to table is running by package. - To convert L_tables to
.csvfiles, navigate to the<OWS_Migration_Extracted_Path>/CSV_GenerationUtility/bindirectory and perform the following steps:- Open the
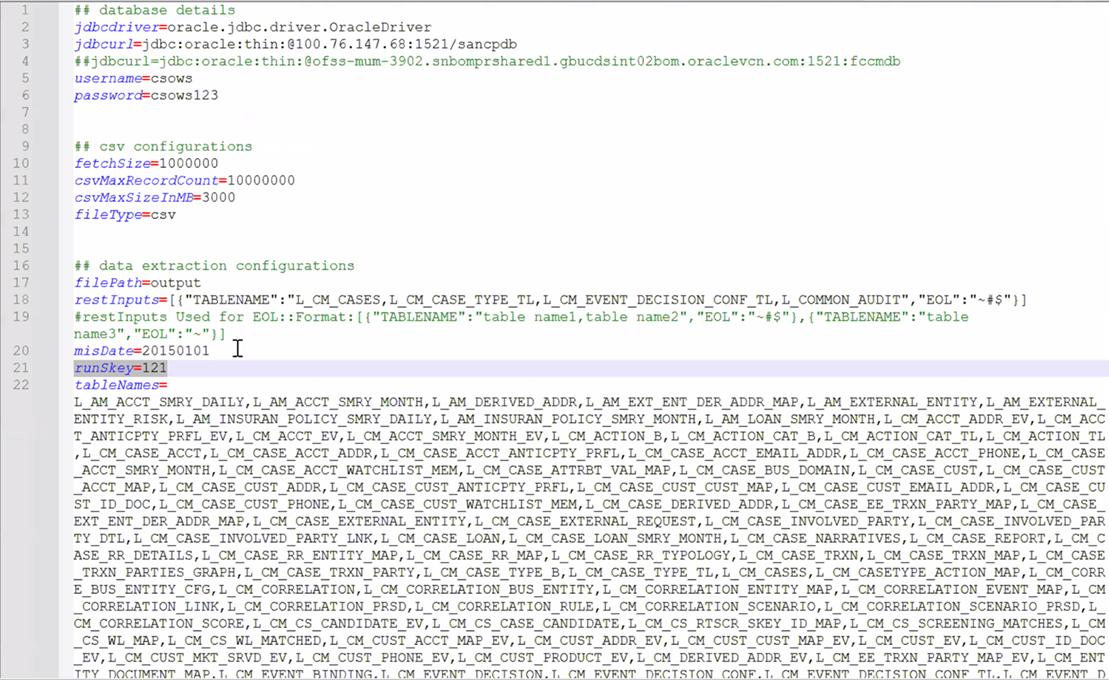
file-generation.propertiesfile and update/enter the following parameters:- jdbcurl
- username
- password
- misDate (YYYYMMDD)
- runSkey
Note:
Enter same MIS_DATE and runSkey values that you entered in step 14.
Figure 3-7 file-generation.properties file
- Save the file.
- Run the
rundb2csv.batfile.The.csvfiles will be generated in the<OWS_Migration_Extracted_Path>/CSV_GenerationUtility/outputdirectory.
- Open the
- On your server, create a folder and provide name as MigrationToSaasCSV.
- Copy the generated CSV files from this
<OWS_Migration_Extracted_Path>/CSV_GenerationUtility/outputdirectory and place in the MigrationToSaasCSV folder. - Copy files from this
<OWS_Migration_Extracted_Path>/Upload_objectstoredirectory and place in the MigrationToSaasCSV folder. - Copy files from this
<OWS_Migration_Extracted_Path>/src_trg_csvdirectory and place in the MigrationToSaasCSV folder. - To get the CS Cloud Object Storage URL, follow these steps:
- Log in to Admin Console.
- Navigate to the System Configuration tab and
click Component Details. The Component
Details window is displayed.
- Click Object Storage Standard tab and copy URL from the Pre- Authenticated URL.
- Navigate to the MigrationToSaasCSV directory and perform the
following:
- Open the
CM_cto.shand enter Pre-Authenticated URL in the objstore value and Save the file. - Open the
CM25days.pyand specify the date list. This date must match with generated CSV files.
- Open the
- Navigate to the
MigrationToSaasCSV/src_trg_csvdirectory and perform the following:- Open the
CM_cto.shand enter Pre-Authenticated URL in the objstore value and Save the file. - Open the
CM25days.pyand specify the date list. This date must match with generated CSV files.
- Open the
- To upload CSV files into the CS Cloud, perform the following:
- Click the Putty icon, and set the
MigrationToSaasCSV folder, and then run the
CM25days.pyfile. - Set the
MigrationToSaasCSV/src_trg_csvdirectory and run theCM25days.pyfile.
- Click the Putty icon, and set the
MigrationToSaasCSV folder, and then run the
- Load the Customer data.
- Load the Amldataload batch to purge staging tables. For more information, see the AMLDataLoad Batch Details section in the Using Pipeline Designer Guide.
- Load the MigIngestion batch to purge the AMIngestion.
- Load the CMIngestion batch to purge the CMingestionTables. For more information, see the CMIngestion Batch Details section in the Using Pipeline Designer Guide.
- Log in to Service Console and from the left Navigation
pane, click Batch Administration >
Scheduler. The Scheduler Service window is
displayed.
- Click Schedule Batch. The Schedule batch window is displayed.
- Select Batch or Batch Group from the drop-down list to execute.
- To execute MigrationDataloadForCMMetadata batch, perform the
following:
- Select the MigrationDataloadForCMMetadata for execution.
- Click Edit Dynamic Parameters, update the MIS date and then click Save.
- Click Execute.After successful execution of the batch, proceed to the next batch.
Note:
If the batch shows any errors, then run the PurgeMigrationCMMetadataLATables batch to clear the data.
- To execute MigrationLAToCMMetadata batch, perform the following:
- Select the MigrationLAToCMMetadata for execution.
- Click Edit Dynamic Parameters, update the MIS date and then click Save.
- Click Execute.After successful execution of the batch, proceed to the next batch.
Note:
If the batch shows any errors, then run the PurgeMigrationCMMetadataTables batch to clear the data.
- To execute MigrationDataloadForCM batch, perform the following:
- Select the MigrationDataloadForCM for execution.
- Click Edit Dynamic Parameters, update the MIS date and then click Save.
- Click Execute.After successful execution of the batch, proceed to the next batch.
Note:
If the batch shows any errors, then run the PurgeMigrationCMLATables batch to clear the data.
- To execute MigrationLAToCaseManagement batch, perform the
following:
- Select the MigrationLAToCaseManagement for execution.
- Click Edit Dynamic Parameters, update the MIS date and then click Save.
- Click Execute.After successful execution of the batch, proceed to the next batch.
Note:
If the batch shows any errors, then run the PurgeMigrationCMTables batch to clear the data.
- After successful execution of the batch, navigate to the Home page.
- Click Oracle Financial Services Crime and Compliance Management Anti Money Laundering Cloud Service. The menu options are displayed.
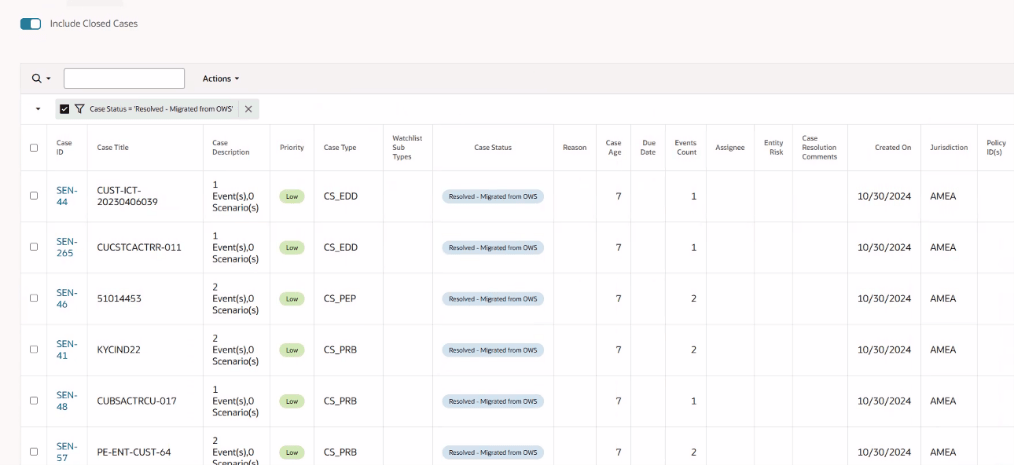
- Click Investigation Hub. The Investigation Hub Home page is displayed.
- Click All Cases button to view the all cases which
includes migrated cases in the application.
For more information on Event Details and Audit History for the selected case, see Using Investigation Hub.


