9.4.1 Creating a Model
Model creation and deployment undergoes a workflow of Model Governance where the following types of users in the system have privileges that restrict the activities, they can do in the model creation and deployment workflow.
Creating Objective (Folders)
Create folders called Objectives within which you can create Models.
- Click Launch Workspace
 next to corresponding Workspace to Launch Workspace and display the
Dashboard window with application configuration
and model creation menu.
- In the Mega menu, click Modeling and
select Pipelines
 from the drop down to display the Model
Pipeline window.
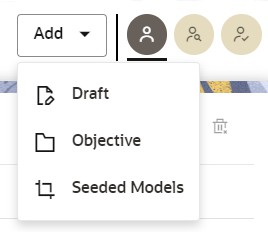
- Click Add and select Objective
from the list to display the Objective Details dialog
box.
Figure 9-19 Select Objective from Add

- Enter details in Objective Name and Description fields in the Add Objective dialog box.
- Click Save.
Creating Draft Models Using Seeded Model
Create Models that are classified as draft models. These models will be reviewed before being sent for Scoring.
- Click Launch Workspace
 next to corresponding Workspace to Launch Workspace and display the
Dashboard window with application configuration
and model creation menu.
- Open the Objective.
- Click Add and select Draft
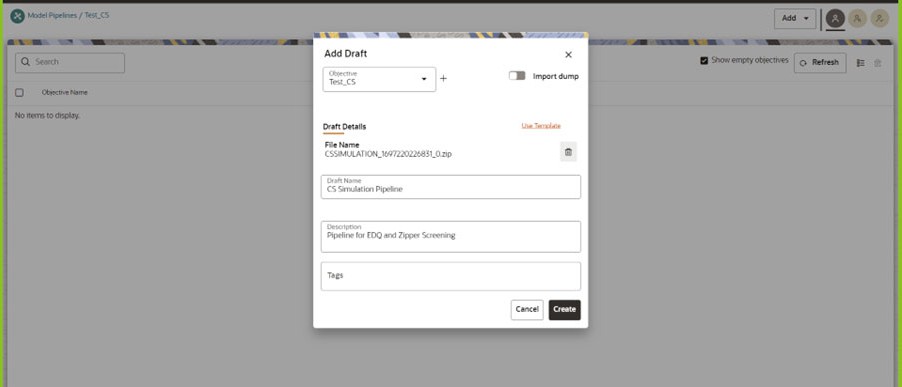
from the list to display the Add Draft dialog
box.
Figure 9-20 Select Objective from Add

- Create New Model is the default setting in the
Model Details dialog box.
To create a new model, follow these steps:
- Click Use Template.
- Select the CS Simulation zip file from the templates. The
available CS templates are:
- CSWLSIMULATION_1697221476336_0.zip (CS Watchlist Screening pipeline, see CS Watchlist Screening Pipeline Figure)
- CSSIMULATION_1697220226831_0.zip (CS Simulation pipeline, see CS Simulation Pipeline figure)
- CSNOPRODSIMULATION_1701856523642_0.zip (Customer Screening Staged Data Simulation Pipeline)
Table 9-6 CS Pipeline and Associated Widgets
Pipeline Widgets CSSIMULATION_1697220226831_0 Customer Screening Batch EDQ - Data Load Event Generation Batch - L1Alert Generation Batch - CS Simulation Statistics - CS Simulation Results - CS Production Results CSWLSIMULATION_1697221476336_0 Watchlist Management Batch EDQ - Watchlist Management Batch CSNOPRODSIMULATION_1701856523642_0 Business Data Load Batch - Customer Screening Batch EDQ - Data Load Event Generation Batch - L1Alert Generation Batch - CS Simulation Statistics - CS Simulation Results - Enter details for Draft Name and Description.
Figure 9-21 Model Details - Create New Model

- Enter a tag in the Tags field.
- Click Create. a model pipeline will be created from the template.
To clone the objects for Batch EDQ and Batch RRF Widgets, follow the subsequent steps:- Navigate to the Design Pipeline page.
- From the pipeline canvas double click on the widget to open the widget details screen on the right side.
- In the widget screen under the Custom Parameters tab, click Copy to open the Clone Objects Window.
- Select the source model ID from the Clone
Objects Window and select the version from which
you want to clone the widget.
Note:
Select the model ID as PROD. For the Batch EDQ widget, the model ID is PRODi (Example: PROD0, PROD1) based on the input in thePROD_edq_project_nameKey. - Click Copy. The CS Widget clone process begins. Once the cloning is completed, the current model ID and version will automatically be populated in the widget screen.
- Click Save to save the widget.
Cloning a Model
You can pick any published model and clone the contents to a new draft in the same objective or clone the content to the current parent draft. The cloned draft can be edited and used further. Audit Trail window also captures the clone information.
- Open a Published Model in Pipeline Designer.
- Select Clone to new Draft to Re-image parent draft with current.