8.1 Post Implementation Steps for Data Migration from OWS to CS
Follow the subsequent steps to migrate/import customer data from OWS to OFS CS
after installing the Sanction Application Pack:
- Create a DBLINK from the Sanctions Atomic Schema to the Enterprise Data Quality
(EDQ) Config Schema. DBLINK act as a connection between the sanctions atomic
schema and EDQ Config Schema.Sample DBLINK format:
CREATE DATABASE LINK {dblinkname} CONNECT TO {edqconfiguser} IDENTIFIED BY {password} USING '(DESCRIPTION =(ADDRESS =(PROTOCOL = TCP)(HOST = {DBServername})(PORT = {portnumber}))(CONNECT_DATA =(SERVER = DEDICATED)(SERVICE_NAME = {servicename})))'; - Login into Sanction Config Schema.
- Run the following script in the Config Schema.
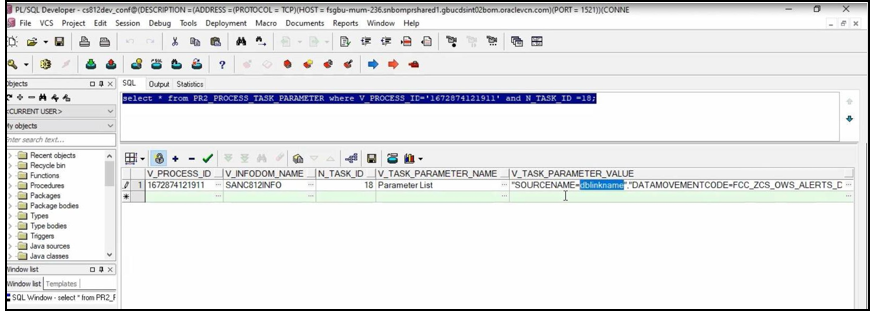
select * from PR2_PROCESS_TASK_PARAMETER where V_PROCESS_ID='1672874121911' and N_TASK_ID =18; - After running the script, in the
PR2_PROCESS_TASK_PARAMETERtable, update the DBLINK name in theV_TASK_PARAMETER_VALUEcolumn with the DBLINK name created in step 1. See the below screen.Figure 8-1 PR2_PROCESS_TASK_PARAMETER table
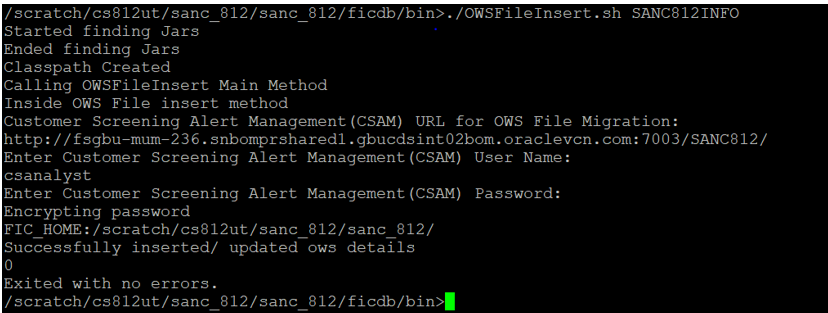
- To move the file data from OWS Server to the CS server, you need to run the
OWSFileInsert.sh, which is present in
ficdb/binpath.If you run theOWSFileInsert.shshell script, it will be inserted in to theCS_APPLN_PARAMStable.Once the entries for theOWS_CS_URLattribute are done inCS_APPLN_PARAMS, if you run the OWS Migration batch from the Run Screen, the OWS File Migration task will read the details fromCS_APPLN_PARAMStable and move the files from OWS Server to CS server.Figure 8-2 OWSFileInsert.sh shell script
- Go to the
fichomefolder in the Sanctions server.Sample file path:/scratch/ofsaabuild/BUILD_HOME/8.1.2.4.0/OFS_CMBT/packs/OFS_SANC/ dist_GENERIC/OFS_SANC/build/partial/fichome - Open the OWSMIGRATION folder.
- Open DXI folder.The following files are available in the DXI folder:
- OWSCS case migration utility.dxi
- OWS_CS_Case_Migration.properties 9.
- Move the
OWSCS case migration utility.dxiandOWS_CS_Case_Migration.propertiesfile to local directory. - Upload the
OWSCS case migration utility.dxifile to the EDQ application from the local directory.For more information on Importing the OFS Customer Screening Projects, see Oracle Financial Services Sanctions Pack Installation and Configuration Guide. - Upload the
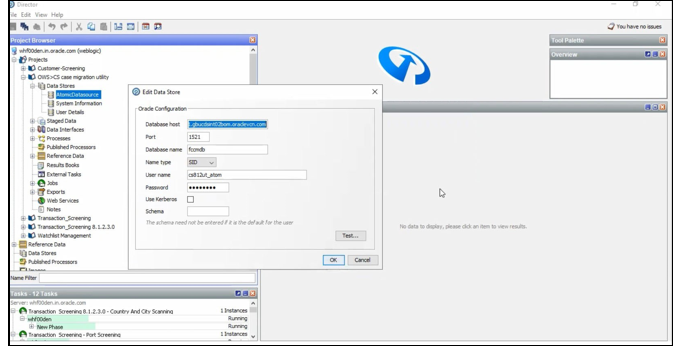
OWS_CS_Case_Migration.propertiesfile to the following path in the EDQ server:/scratch/devuser/Oracle/Middleware/Oracle_Home/user_projects/domains/ base_domain/config/fmwconfig/edq/0edq.local.home/runprofiles - After uploading the DXI file to the EDQ application. Open the DXI from EDQ director and select the Data Stores folder the Project Browser.
- Click AtomicDatasource.The Edit Data Store window is displayed.
- Update the sanctions data base details in the Edit Data Store configuration
window and click OK.
Figure 8-3 Edit Data Store
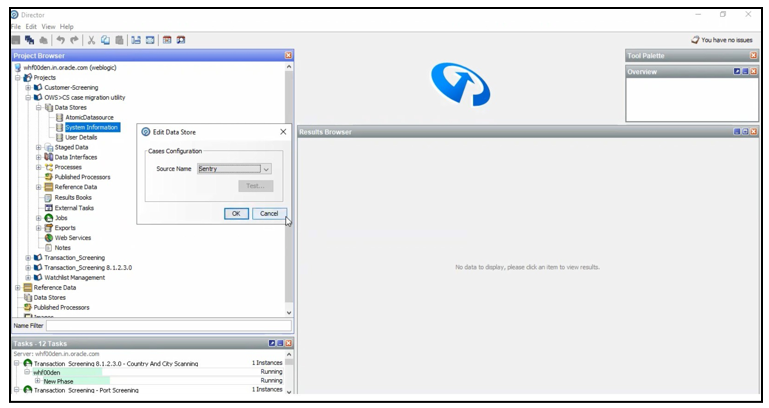
- Click System Information in the Data
Stores folder and select Sentry as source
name.
Figure 8-4 System Information page
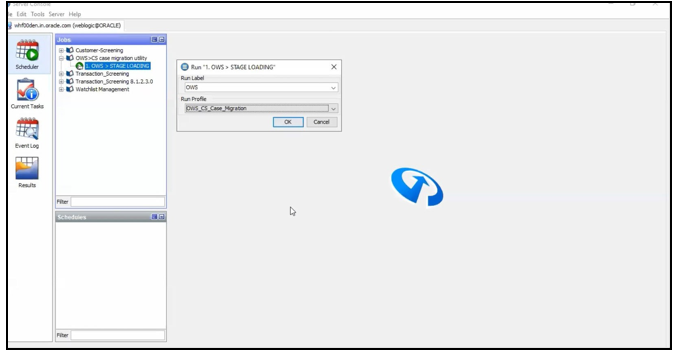
- Go to the EDQ server and login to the Server Console from the Launchpad menu.
- Select OWS>CS case migration utility folder in the Server Console page.
- Run OWS > STAGE LOADING by using the
OWS_CS_Case_Migration.propertiesfile by Right-clicking OWS > STAGE LOADING. - Select OWS_CS_Case_Migration from the Run Profile
drop-down and click Ok to run the project. With the
execution, the results will be populated inside a temporary setup table.
Figure 8-5 Server Console page
Note:
If there is a break or failure in running the OWS > STAGE LOADING, truncate the following tables and re-run step 17.OWS_CS_CASE_ATTACHMENTS;OWS_CS_CASE_COMMENTS;OWS_CS_CASE_HISTORY;OWS_CS_CASE_MASTER;OWS_CS_CASE_ISSUES;OWS_CS_CASE_RELATION;OWS_CS_COUNTRY_PRHB;OWS_CS_ENTITY_WL_DATA;OWS_CS_ENT_CUST_DATA;OWS_CS_IND_CUST_DATA;OWS_CS_IND_WL_DATA;OWS_CS_IND_CUST_ISSUES;OWS_CS_ENT_CUST_ISSUES;
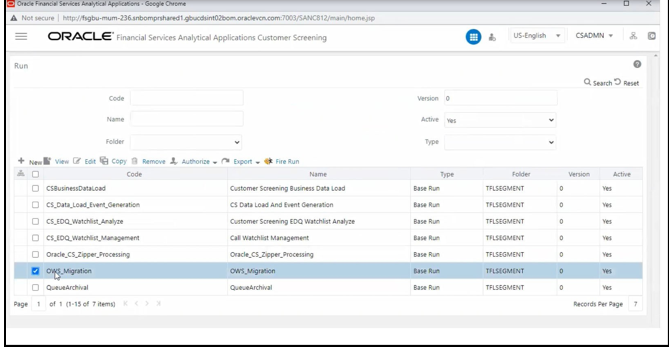
- After running the job, log in to Oracle Financial Services Customer Screening (OFS CS) application.
- Click Common Tasks, then click Rule Run
Framework, and then click Run.The Run page is displayed.
- In the Run page, select the
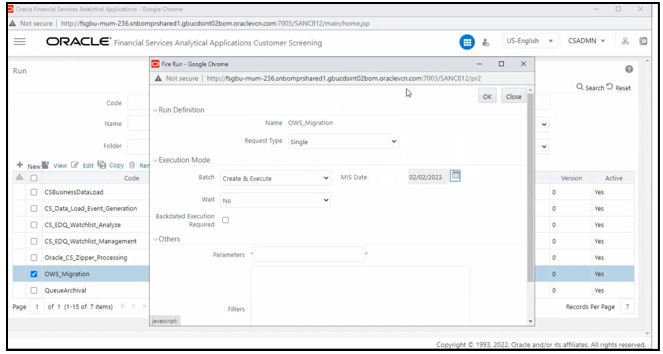
OWS_Migartioncheck box from the table and click Fire Run.The Fire Run page is displayed.Figure 8-6 Run page
- Select single as the Request Type in the Run Definition section.
- Select the Batch value as Create & Execute and select the MIS Date in the Execution Mode section.
- Select Wait as No to create & execute the batch without any delay.
- Click Ok to execute the OWS_Migration batch.A message is displayed after successful batch execution. Click Close to go back to the Run page.
Figure 8-7 Fire Run page
 After the successful execution, the OWS data will get migrated to CS and alert will be generated in the Customer Screening Alert List if there are matches. For more information on Alert List, see Alerts for Migrated OWS Watchlist data section in OFS Customer Screening User Guide.