9.3.1 Populating the Workspace
The workspace is populated with data from source data schema to target data schema. When you are creating a workspace the table definitions are created. The Data movement from production to simulation happens when you populate the screen.
- Navigate to the Workspace Summary page.
The page displays Workspace records in a table.
- Click Action
 next to corresponding Workspace and select Populate Workspace to
populate the Workspace
  with data from source data schema to target data schema in the Populate
Workspace window.
- You ca use the pre-configured template to auto populate the field values and
filters. click Use Template and select
CSJurisdictionFilterTemplate.zipfile from the library list to auto populate the values.Note:
You must replace the SQL Filter ($JRSDCN_CD$) value with the jurisdiction. - You can enter the field values manually. For reference, see the Populate
Workspace table.
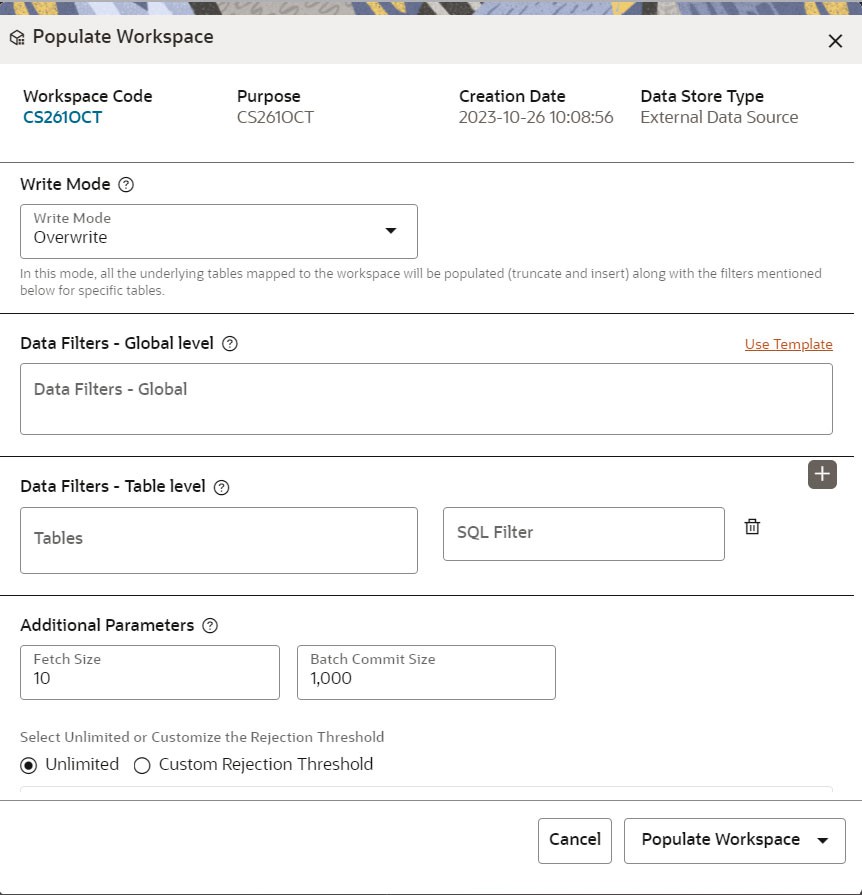
Figure 9-17 Populate Workspace Window

Table 9-5 Populate Workspace
Field Description Workspace Code The code of the Workspace. Purpose The description for the Workspace. Creation Date The date on which the Workspace was created. Data Source Type The source of data. The value can be the OFSAA Data Schema or an external data source. Data Filter - Global
Enter the data filter that needs to be applied on all the tables selected for data sourcing.
For example: If MISDATE is equal to Today, then it is applied to all tables (wherever it is available) for selected Data Sources during population. If this field is not found (MISDATE) in the tables, it is not updated.
Data Filter - Table level
Provide the data filters individually on the tables here.
NOTE:You can provide multiple table names for the same SQL filter.
For example, there are two tables called Student and Employee in the target data source, and below filters are applied:
- MISDATE as Today for Student and Employee tables
- - ID as 1 for Student table
Then,Student table will be populated with MISDATE and ID filters and Employee table will be populated with only MISDATE filter.
Global Filters will not be applicable for those tables on which filters have been applied individually.
If the same table name is provided in more than one rows here, then filter condition is generated as a conjunction of all the provided filters.
Fetch Size Enter the Fetch size of JDBC properties for data upload Batch Commit Size Enter the Batch Commit size of JDBC properties for data upload Write Mode Populate the workspace in appendmode. Rejection Threshold Following two options are available:
- Custom Rejection Threshold
Enter the maximum of number of inserts that may fail for any of the selected tables. You can provide the maximum number of inserts that can fail while loading data to a given table from all the sources. In case of threshold breach, all the inserts into the particular target schema will be rolled back. However, it will continue with populating the next target schema.
- Unlimited
Here,all the errors will be ignored during the data population.
Data Load Available options are SELECTIVE and ALL. Use ALL for first time data population - Click Populate Workspace to start the process.
Note:
You may require approval from an approver to populate the workspace.- When you select Create and Execute Batch option, it allows you to create batch and triggers the batch as well.
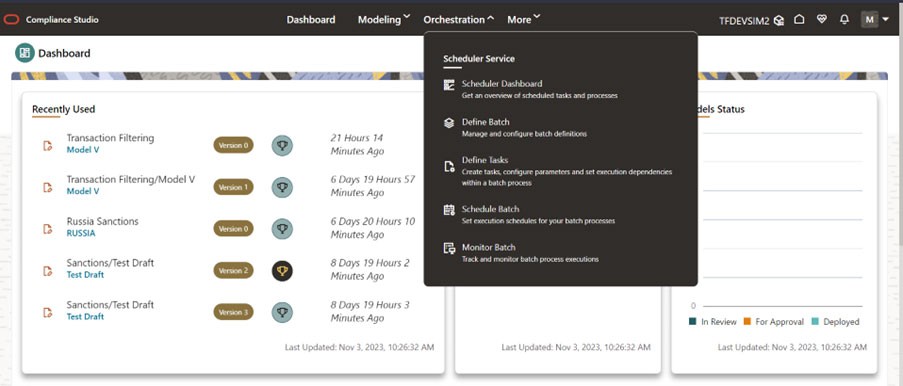
- When you select 'Create Batch' option, it allows you to prepare the batch and then execute or schedule the batch at a later time through Scheduler Service window.
Note:
- You can only run the workspace population for once.
- Any table that is deselected from the data sourcing definition will NOT be dropped.
Figure 9-18 Accessing Scheduler Service from Dashboard
