7.3 Configuring Data Movement from LA to CA
This section describes configuring the data movement from Landing Area (LA) to Consolidation Area (CA).
This is applicable for OBD, OKYC, OCS, OTBAML, and Third-party. In the OOB process, you can run the processes in parallel as well as in sequence. However, you can configure these processes based on your requirements.
For example, you can configure processes based on entity and related data such as account, customer, employee, institution, and so on. The following are OOB processes as part of the Business data movement. These OOB sample processes can be used only for reference purposes.
Sample Processes
These sample processes are designed using OOB Oracle Behavior Detection Business data processes (Oracle Behavior Detection to CA Account Address, Oracle Behavior Detection to CA Customer, Oracle Behavior Detection to CA Employee Email Address, and so on).
The sub-processes used to create a process, from process1 to Process9 are part of OOB Business Data Movement processes. In the out of box batch run, these sub-processes can be run in both parallel and sequence.
You can create processes based on your requirements. The processes are created using sub-processes considering various parameters such as scenario, focus, and associated business data, the volume of records, hardware configuration, and so on.
Table 7-5 Sample Processes
| Process Name | Description |
|---|---|
| Process1 |
This process is designed using the following sub-processes (OBD to CA Account):
|
| Process2 |
This process is designed using the following sub-processes (OBD to CA Customer):
|
| Process3 |
This process is designed using the following sub-processes (OBD to CA Employee):
|
| Process4 |
This process is designed using the following sub-processes:
|
| Process5 |
This process is designed using the following sub-processes:
|
| Process6 |
This process is designed using the following sub-processes:
|
| Process7 |
This process is designed using the following sub-processes:
|
| Process8 & 9 | These processes are designed using all sub-processes. |
- The above process names are used for reference purposes.
- Process 1, 2, and 3 are designed based on a similar entity bucketed into one process.
- Process4, 5, 6, and 7 are designed based on the distribution of the volume of data. For example, if Process4 has a huge volume of data compare to Process5, 6, and 7. You can design the process (business data movement) in such a way that the Process4 runs in parallel with Pro- cess5, internally, Process5, 6, and 7 can run in sequence.
Note:
If the Data Movement (DM) processes in different batch runs are same to fetch the data from a particular source, then additional configuration is required. This configuration avoids the duplicate data in the consolidation area of ECM and negative performance.For example: If the DM processes in AML and KYC batches are the same, then exclude the DM tasks from the latter batch as it will run as part of AML Batch (considering AML batch is configured to run first).
Above step needs to be performed to avoid the following issues:
- If Batch is configured to run in DI (Delete Insert) or MI (Merge Insert) mode, then it will have performance impact due to duplicate task run.
- If Batch is configured to run in IS (Insert Select) mode, then unique constraints will be thrown by the latter batch due to duplicate data.
ECM Business Table Data Synchronization with Source Business Table
The ECM Business and Source Business tables must always be in sync. If the source table data is deleted, corresponding case table data must also be deleted. Any existing data modification will automatically be picked up by the existing ECM batch. But deletion in Source Business tables are not handled.
To avoid data de-synchronization between these tables, the Data Movement (DM) utility has been updated with the following parameters:
- DDI: Data origin DELETE insert - Data will be deleted with filter condition $DATAORIGIN
- TI: Truncate INSERT - Truncate data from the target table and perform insert without filter condition $MISDATE
You can modify the process parameter as DDI or TI to enable full load. Every time it deletes data from the target table and insert all data from the source table.
To configure DDI and TI, you must change the existing Process (For example, BD_CUST_CUST) parameter to DDI or TI.
To modify the existing process for a full load, follow these steps:
- Navigate to Enterprise Case Management Application.
- Go to the Common Task section and select the Run Rule Framework.
- Click Process. The Process Summary window is displayed with the available Processes.
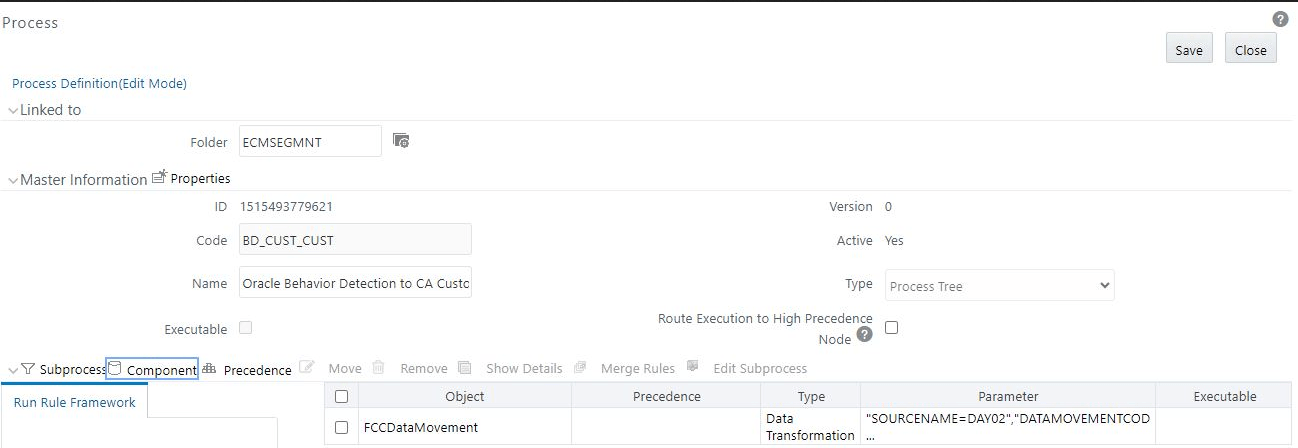
- Search for BD_CUST_CUST and click Edit.
Figure 7-5 Searching a Process

- Click Component.
Figure 7-6 Process Component
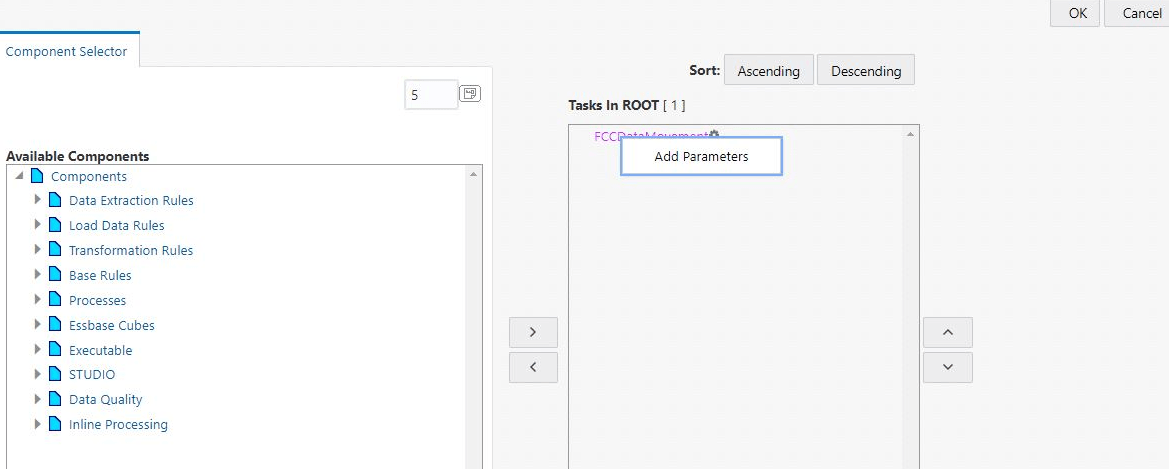
- Right-click on FCCData Movement and then click Add
Parameters.
Figure 7-7 FCCData Movement and Add Parameters
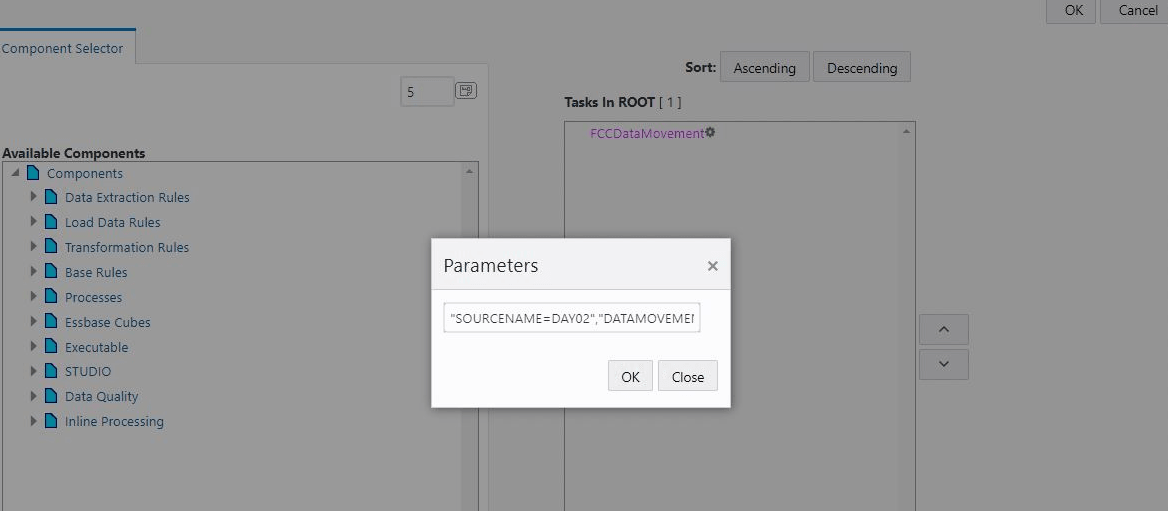
- Replace the existing parameter value with:
"SOURCENAME=DAY02","DATAMOVEMENTCODE=BD_CUST_CUST","LOADTYPE=DBLINK","DATAMOVEMENTOPERATION=DDI".
Figure 7-8 Replace Existing Parameters
- Click OK.
- Click Save and then click No when prompted to save a new version.
Note:
- The FCC_CUST_CUST table is fully refreshed from the CUST_CUST table during batch execution
- The DDI and TI parameters are applicable only for business data movement and look-up
- This data movement DDI and TI is done on the following scenarios:
- Same Database Same Schema
- Same Database Different Schema
- Different Database Different Schema
Using Precedence
- Event lookup should be populated
- Event-related tables should be populated and the sub-processes can run in parallel.
- Surrogate key should be populated for all entities (lookup table, for example, account lookup, customer lookup). The sub-processes can run in parallel.
- Evented data movement processes and business data movement processes can run
in parallel.
Note:
Make sure precedence is set for data movement.
Designing Processes
Figure 7-9 Oracle Behavior Detection processes
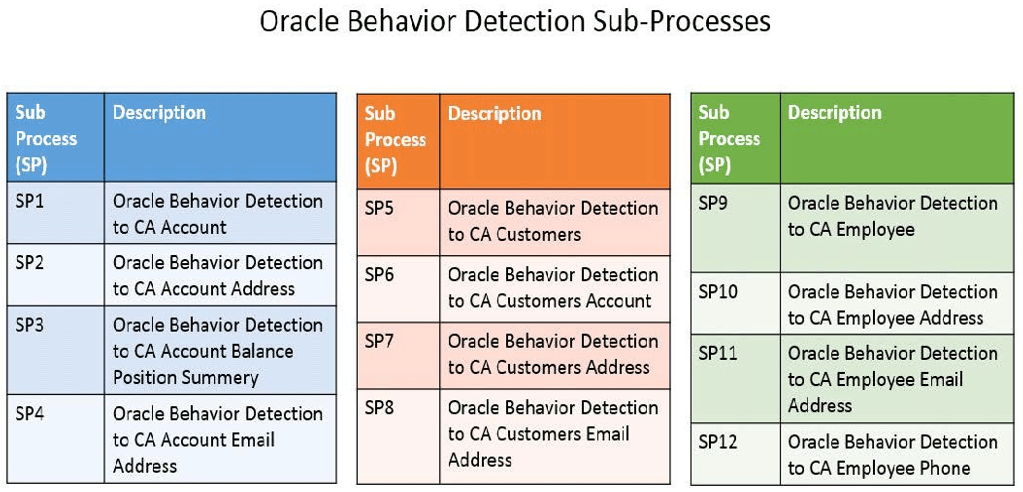
Figure 7-10 Oracle Behavior Detection Sub-processes
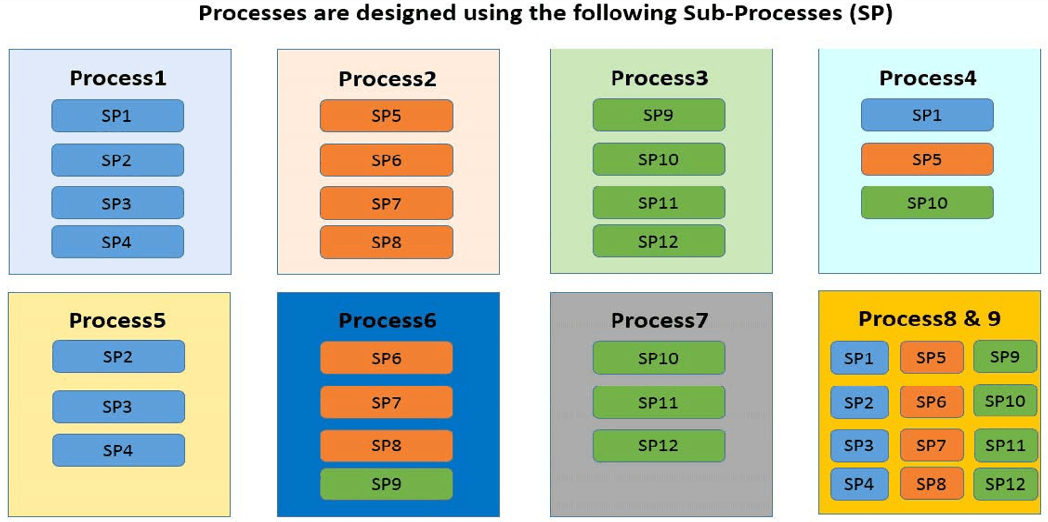
Figure 7-11 Options- processes
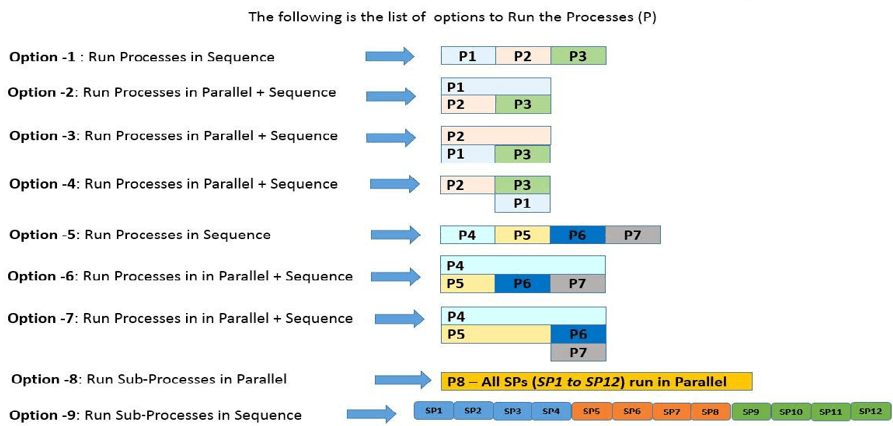
Table 7-6 Options
| Option | Description |
|---|---|
| 1 |
P1, P2, and P3 processes are configured in sequence.
Once P2 is completed, P3 will start and sub-processes SP9, SP10, SP11, and SP12 will run in parallel. |
| 2 |
P1 and P2 will start in parallel and P3 will start only after P2 is completed, irrespective of P1 is completed or not.
Once the P2 is completed, P3 will start and sub-processes SP9, SP10, SP11, and SP12 will run in parallel. |
| 3 |
P2 and P1 will start in parallel and P3 will start only after P1 is completed, irrespective of P2 is completed or not.
Once the P1 is completed, P3 will start and sub-processes SP9, SP10, SP11, and SP12 will run in parallel. |
| 4 |
Only after completion of P2, P3 and P1 will start in parallel.
P3- SP9, SP10, SP11, and SP12, and P1 - SP1, SP2, SP3, and SP4 sub-process will run in parallel only after completion of all sub-processes of P2. |
| 5 |
P4, P5, P6, and P7 processes are configured in sequence. P4 - SP1, SP5, and SP10 will run in parallel.
Once the P6 is completed, P7- SP10, SP11, and SP12 will start in parallel. |
| 6 |
P4 and P5 will start in parallel and P6 will start only after P5 is completed, and followed by P7 irrespective of P4 is completed or not.
Once the P6 is completed, P7 will start and sub-processes SP10, SP11, and SP12 will run in parallel. |
| 7 |
P4 and P5 will start in parallel. P6 and P7 will start in parallel only after P5 is completed, irrespective of P4 is completed or not.
P6- SP6, SP7, SP8, and SP9, and P7 - SP10, SP11, and SP12 sub-process will run in parallel only after completion of all sub-processes of P5. |
| 8 | Once P8 starts, all sub-processes from SP1 to SP12 will run in parallel. |
| 9 | All sub-processes will run in sequence from SP1 to SP12. |
- The same sub-processes should not be part of two processes. For example, you should add P1 and P4 in the same run as they have similar sub-process (SP1).
- The above options are used as samples, you can configure your own options based on the requirement.
To design the above process, see the OFS AAI User Guide.
Adding Transformation Rule
- Navigate to Enterprise Case Management Application.
- Go to the Common task section. Select the Run Rule Framework.
- Click Run. The Run window is displayed.
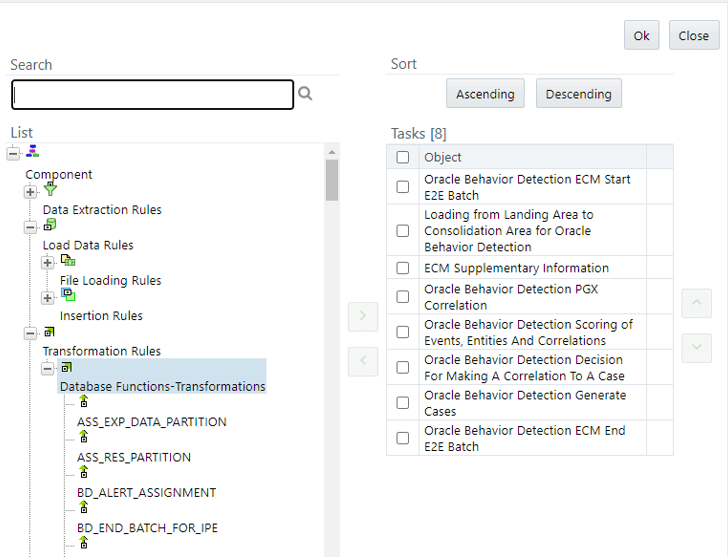
- Go to the List section. Select an application for example (Oracle_BD_Event_Processing) and click Edit. The list of processes for the selected application is displayed.
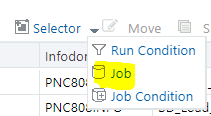
- Select Job from Selector.
Figure 7-12 Add Transformation Rule
- Click Components and select required Transformation Rule,
move to Tasks list using Click Ok. Transformation Rule will be added
to process.
Figure 7-13 Transformation Rule Added
