4.4 Managing User Administration
This section allows you to create, map, and authorize users defining a security framework that can restrict access to the ECM application.
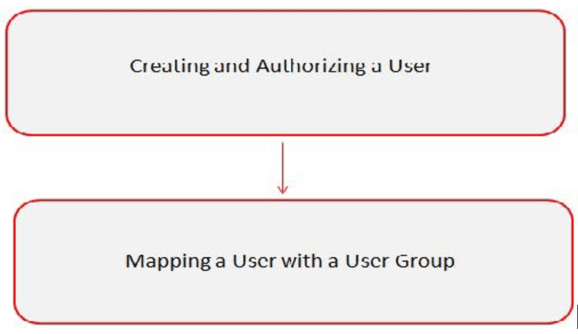
Managing Identity and Authorization Process Flow
Figure 4-1 Managing Identity and Authorization Process Flow

Table 4-3 Administration Process Flow
| Action | Description |
|---|---|
| Creating and Authorizing a User | Create a user. This involves providing a user name, user designation, and dates between which the user is active in the system. |
| Mapping a User with a User Group | Map a user to a user group. This enables the user to have certain privileges of the mapped user group. |
Creating and Authorizing a User
Note:
Make sure the same User ID should not already exist as an organization in the KDD_ORG table.For more information on creating and authorizing a user, see Oracle Financial Services Analytical Applications Infrastructure User Guide.
Load User Configuration Data into CSSMS_ATTRIB_MAST table Using Excel Upload
- Navigate to Financial Services Enterprise Case Management, go to Common Tasks.
- Select Unified Metadata Manager. Click Data Entry Forms and Queries.
- Click Upload. Select Config Schema Upload.
- Select the CSSMS_ATTRIB_MAST table in the Select the table drop-down list.
- InSelect the File to Upload field, click Browse.
In Choose File to Upload window, specify the path of the data file
(Microsoft Excel 2003/2007) which you want to upload. The CSSMS_AT-
TRIB_MAST.xlsx will be available in the /STAGE/ExcelUpload/TEMPLATE path
inside the FTPSHAREfolder.
Note:
You can also use the .xlsx file format for Excel uploads. In case you face any issue with the upload, convert the .xlsx file to .xls and then upload. - Click Select the Sheet button, the Sheet Selector pop-up window is displayed. Select the required sheet from the drop-down list and click OK. If the excel contains multiple sheets, select the sheet from which data is to be uploaded. Else, default the first sheet data is selected for upload.
- In the Upload Type options, select one of the following:
- Incremental: In this type of upload, the data in the Excel sheet is inserted/appended to the target database object. The upload operation is successful only when all the data in the selected Excel Sheet is uploaded. In case of an error, the uploaded data will be rolled back.
- Complete:In this type of upload, the data present in the selected database object is overwritten with the data selected Excel sheet. In case of an error, data in the selected database object will be reverted back to its original state.
- Select Upload. If you have selected the Complete upload type, you must need to confirm to overwrite data in the confirmation dialog.
Creating or Editing a User
- Create or Edit the user for which you must map the Security
Attributes.
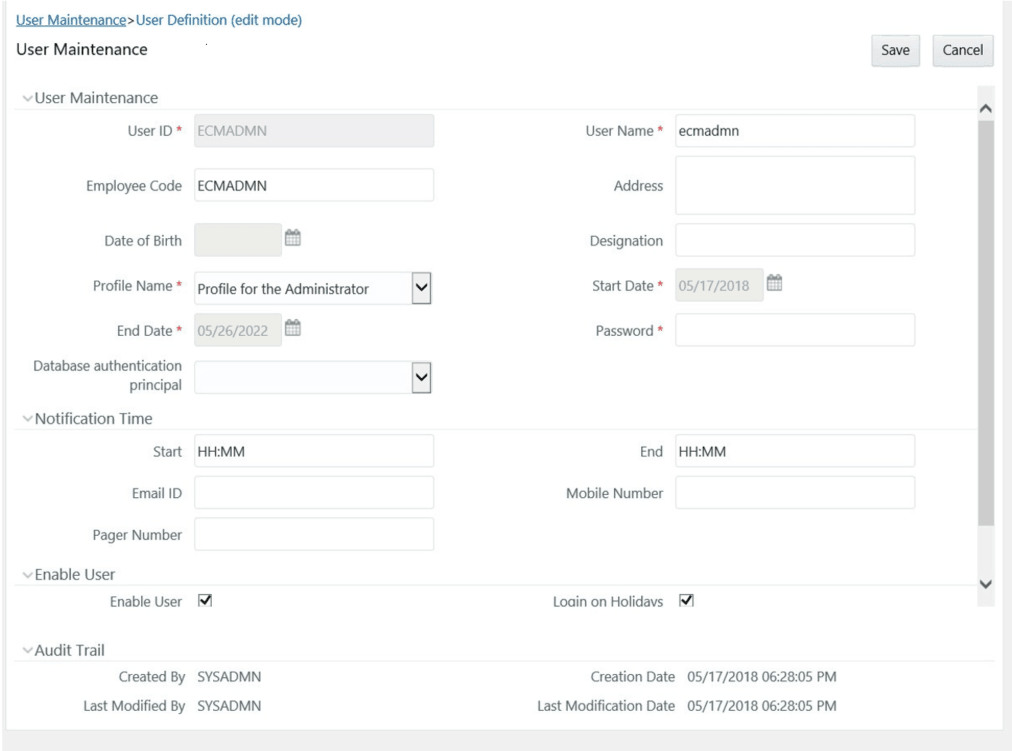
Afterloading the User configuration data into CSSMS_ATTRIB_MAST, a new section is displayed in the User creation screen – User Attributes. This contains the following two fields. The Type of the Field is defined by the Type column in the CSSMS_ATTRIB_MAST.xlsxfile.
- Case Own Flag: The Own Case flag is required for taking ownership of the cases. Allowed Values are Yes and No.
- Line Organization: In the OOB CSSMS_ATTRIB_MAST.xlsx file, the Type defined is 0 (Text- box). You can provide it as 1 (Dropdown) if required and re-upload the Sheet using the Config Schema Upload.
- After updating the fields, click Save.
Figure 4-2 User Maintenance

Mapping a User with a User Group
This section explains how to map Users and User Groups. With this, the user will have access to the privileges as per the role. The SYSADMN user maps a user to a user group in the ECM application.
Table 4-4 Case Management Roles and User Groups
| User Role | Group Name | User Group Code |
|---|---|---|
| Case Analyst2 | Case Analyst2 User Group | CMANALYST2UG |
| Case Supervisor | Case Supervisor User Group | CMSUPERVISORUG |
| Case Viewer | Case Viewer User Group | CMVIEWERUG |
| Case Administrator | Case Administrator User Group | CMMANADMNUG |
| CM Level 1 Analyst* | CM Level 1 Analyst Group | CMANALYSTLVL1GRP |
| CM Level 1 Supervisor* | CM Level 1 Supervisor Group | CMSUPRVISRLVL1GRP |
| CM Front Office Analyst | CM Front Office Analyst Group | CMFRNTOFCANLYSTGRP |
| CMSECROLE | This role can be used for mapping to user groups, which are created only for security Attribute Mapping purposes. User groups mapped to this role will appear in the Mapper Maintenance screen, along with the OOB User Groups. | |
| ECM QC Analyst | This role is defined out of the box. Group must be created in the identity management and associate this role to the created group in User Group Role Map. | |
| ECM QC Supervisor | This role is defined out of the box. Group must be created in the identity management and associate this role to the created group in User Group Role Map. | |
Note:
If a user logs in with multiple roles, then the system will display actions on the Case List and Case Details page based on the highest role. In the Take Action pop up window, if Supervisor and Analyst both roles are mapped to a user, then Analyst actions will be suppressed provided below notation is followed:-
If a user logs in with multiple roles, then the system will display actions on the Case List and Case Details page based on the highest role. In the Take Action pop up window, if Supervisor and Analyst both roles are mapped to a user, then Analyst actions will be suppressed provided below notation is followed:
Supervisor Actions: Action code should be suffixed with S.
Analyst Actions: Action code should be suffixed with A.
- Do not assign Admin roles and Investigation roles (Supervisor, Analyst, Viewer roles) together for a user.
- To get Trusted Pairs admin permission, user role must be mapped with the CMADMNTP (V_FUNCTION_CODE) function
- To get Designate Trusted Pairs in Case’s Event Details page, user role must be mapped with the CMDSGTP (V_FUNCTION_CODE) function
- The Trusted Pairs administration menu will display for users having Trusted Pairs administration permission. To get the permission, user role to be mapped to CMADMNTP (V_FUNCTION_CODE) function. For more information on user role - function map see AAI Administration Guide.
- To get Designate Suppression permission, user role must be mapped with the CMDSGSUP (V_FUNCTION_CODE) function.
- To get Suppression view permission, user role must be mapped with the CMVIEWSUP (V_FUNCTION_CODE) function.
- To get Suppression edit permission, user role must be mapped with the CMEDITSUP (V_FUNCTION_CODE) function.
- The Suppression Administration menu will display for users having Suppression View permissions. For more information on user role - function map see AAI Administration Guide.