4.8 System For Cross-Domain Identity Management (SCIM)
The System for Cross-domain Identity Management (SCIM) simplifies the process of managing user identities in On-Premise applications and services.
Note:
The SCIM configuration applies only to Oracle IAM (SaaS) and does not apply to other SCIM software applications. For other SCIM software/SaaS applications, refer to respective documentation.Creating and Configuring a New SCIM Application
This section describes how to create and configure a new SCIM application.
- Log into IDCS and select Integrated Applications from left panel options.
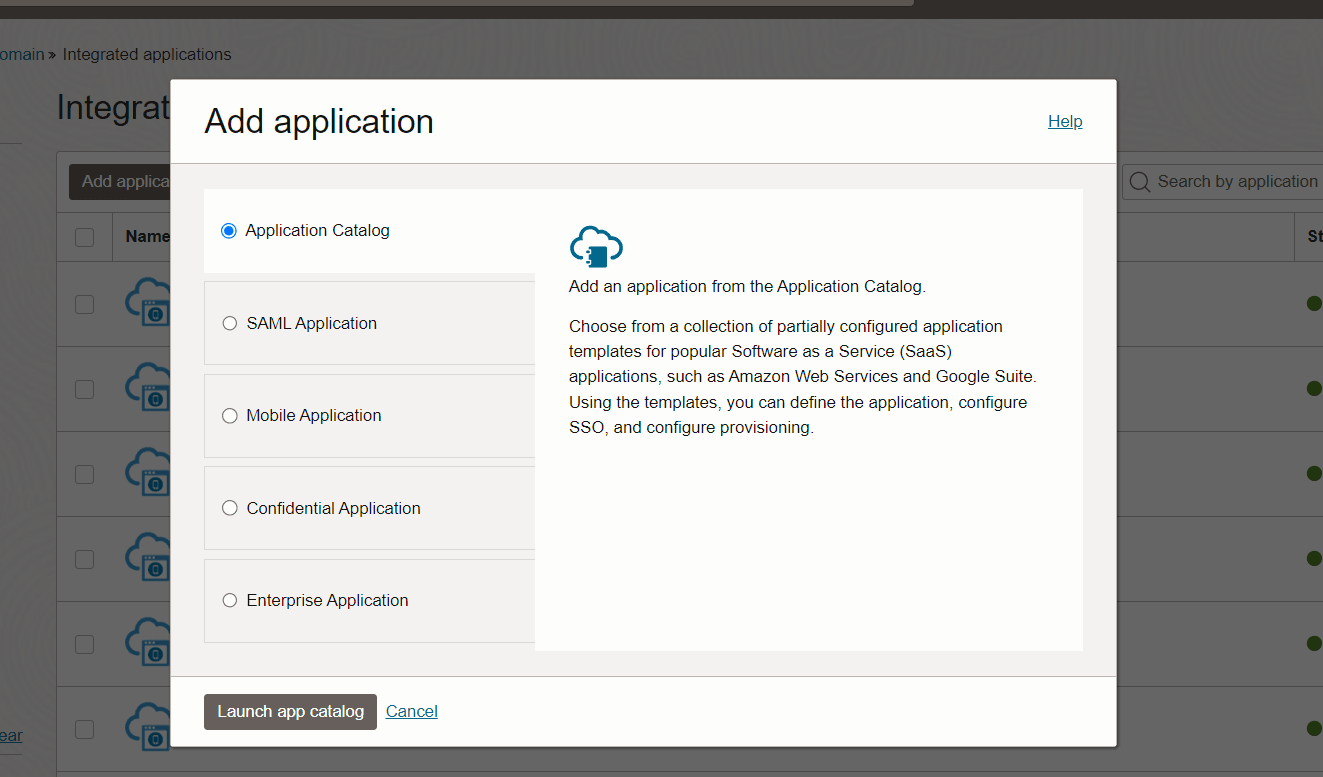
- ClickAddapplication and then click Launch App catalog, to
access the list of available applications.
Figure 4-6 Add Application
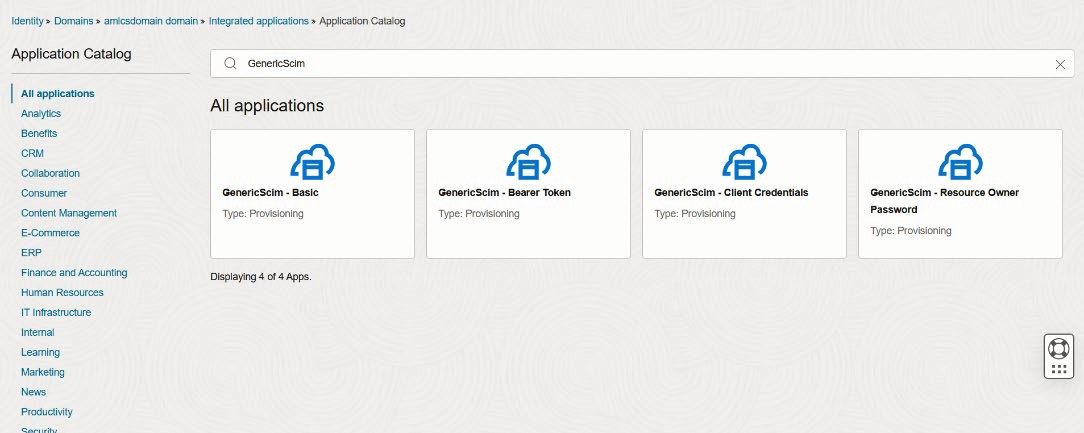
- In the Search applications search bar, type in GenericScim and
select GenericScim – Basic.
Figure 4-7 Select Application
- Enter a unique name and description for the application.
- Click Next or Configure Provisioning.
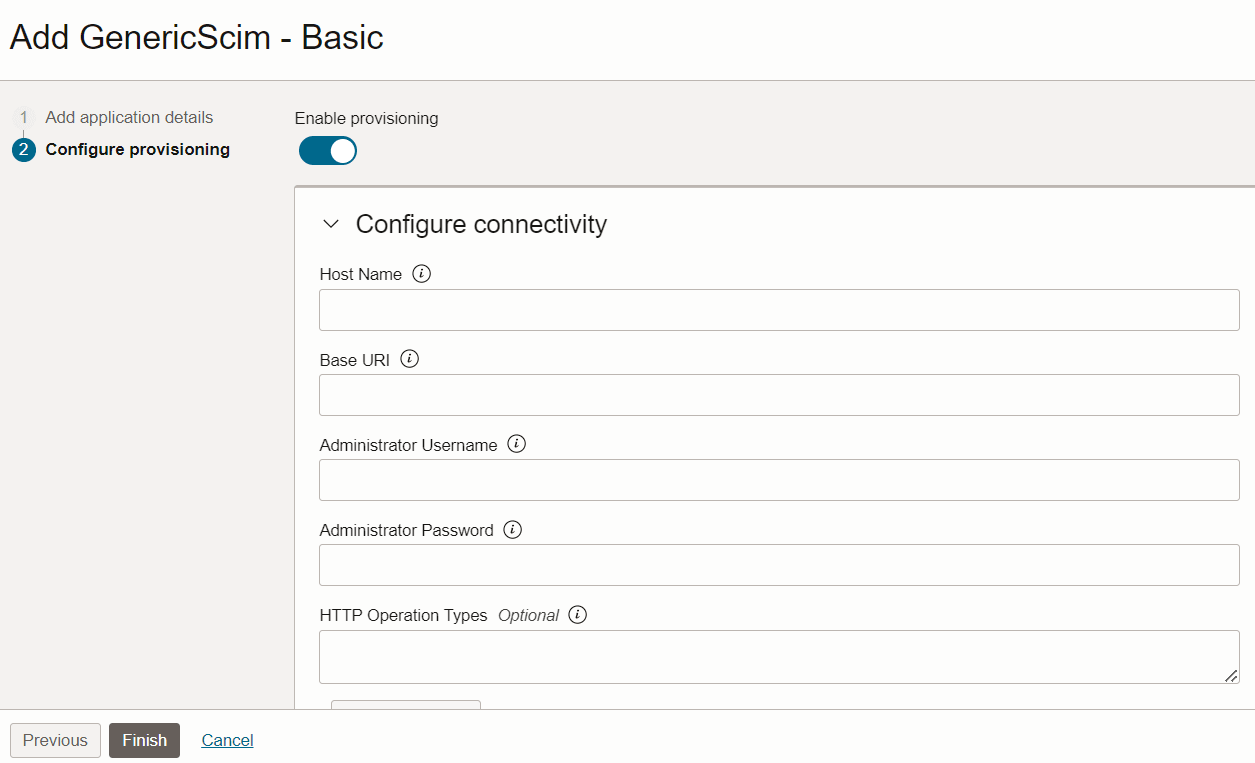
- Enable the Enable Provisioning toggle button, click Confirm to
acknowledge and agree to the Terms of Service and all other applicable terms
for the application, and enter the following details:
- Hostname :<OFSAA_Webserver_IP>
- Base URL :/<context_name>/rest-api/v1/scim
- Administrator Username :SYSADMN
- Administrator Password :<password>
Figure 4-8 Add GenericScim
- Follow the on-screen steps to configure port of SCIM application.
- Click Test Connectivity. A confirmation message is displayed when the connection is established successfully.
Creating an Access Token in Postman, Changing the Port of the Custom SCIM Gateway, and Activating the Application
This section describes how to generate the access token in Postman and change port of the custom SCIM gateway.
- Log into Postman.
- Go to Authorization and select OAuth 2.0.
- Under Configure New Token, enter a name for token, and enter the
following details:
- Grant Type: Client Credentials
- Access Token URL: https://<idcs domain URL>/oauth2/v1/token
- Client ID and Client Secret: Must be taken from IDCS client credential application in the Identity Domain (amlcsdomain3).
- To fetch the Client Credentials, follow these steps:
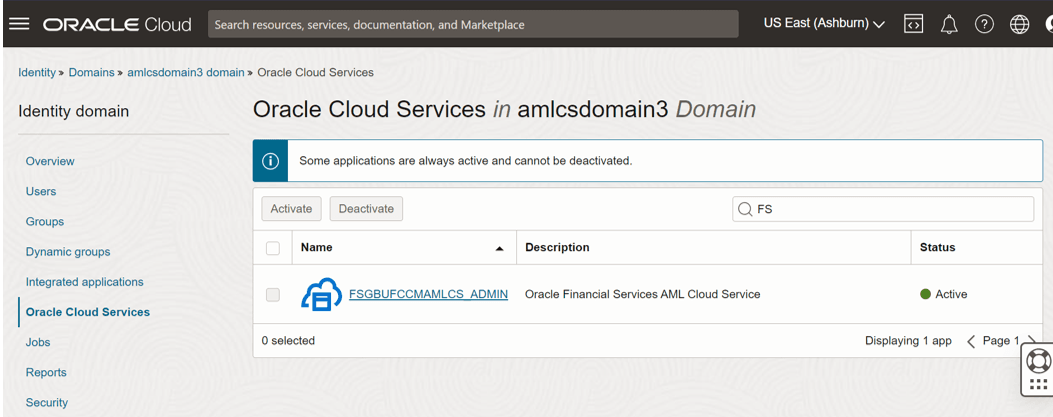
- In IDCS, click Domain.
- Select Oracle Cloud Services.
- In the Search bar, type in FS and select
FSGBUFCCMAMLCS_ADMIN.
Figure 4-9 FSGBUFCCMAMLCS_ADMIN
- Scroll down to OAuth Configurations and copy Client ID and
Client Secret.
- Scope: urn:opc:idm:__myscopes__
- Client Authentication: Send client credentials in body.
- Scroll down and click Get New Access Token.
- Click Use Token.
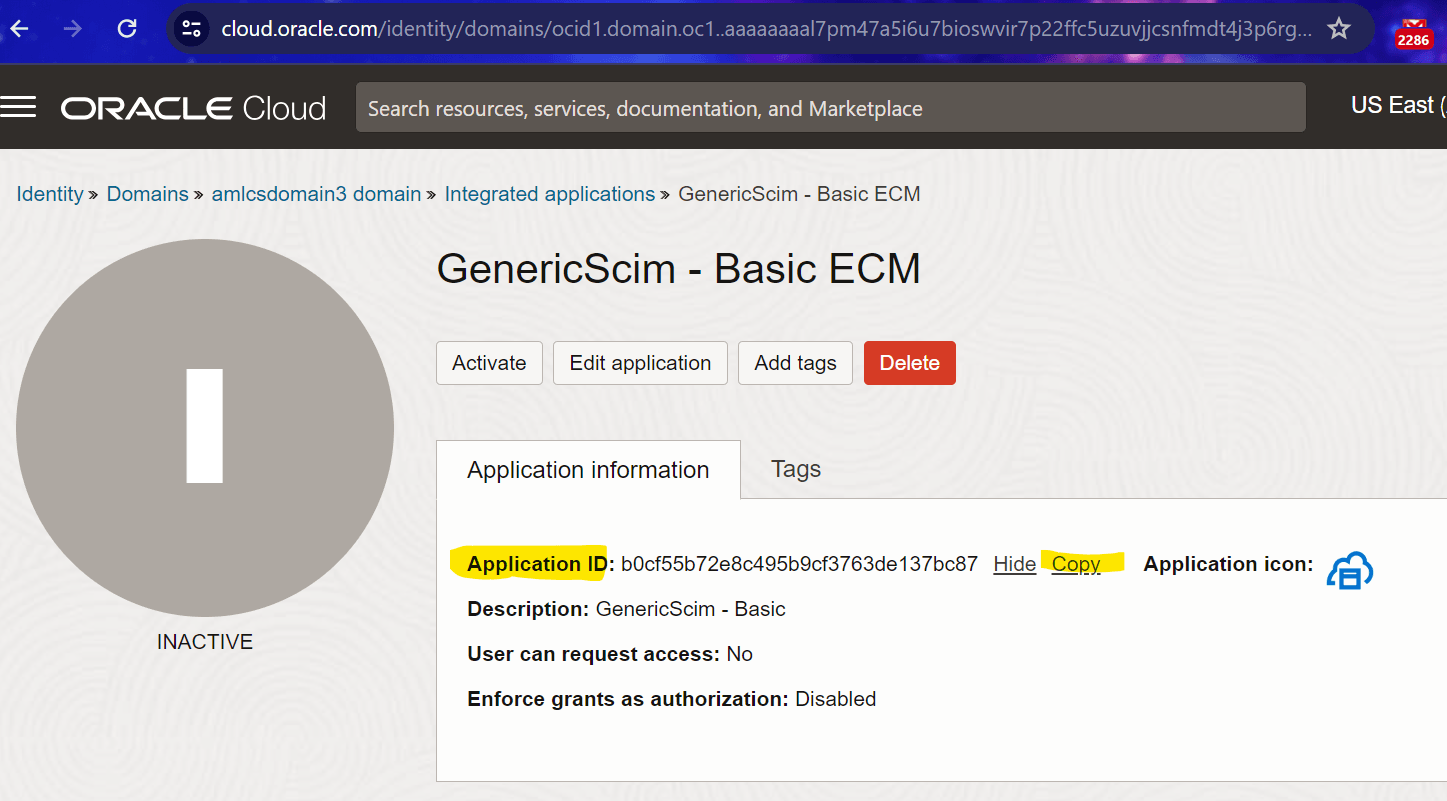
- Change the request type to Patch and paste the URL -
https://<idcs domain url>/admin/v1/Apps/<Application ID>.Application ID must be copied from the IDCS.Figure 4-10 Application ID
- Paste the following JSON in body, update the port number with ECM setup’s
port number, and click
Send:
{ "schemas": [ "urn:ietf:params:scim:api:messages:2.0:PatchOp" ], "Operations": [ { "op": "replace", "path": "urn:ietf:params:scim:schemas:oracle:idcs:extension:managedapp:App:bundleConfigurationProperties[name eq \"sslEnabled\"].value", "value": [ "false"] }, { "op": "replace", "path": "urn:ietf:params:scim:schemas:oracle:idcs:extension:managedapp:App:bundleConfigurationProperties[name eq \"port\"].value", "value": [ "2943"] } ] } - Go to IDCS and click Test Connectivity to check the
configuration.
If successful, 200 OK status is displayed.
- After successful configuration, click Activate.
A confirmation message appears.
- Click Activate application.
Creating and Mapping IDCS Groups for the Corresponding OFSAA Groups
This section describes how to describe IDCS groups for the corresponding OFSAA groups.
- On the left panel, select Groups.
- Click More actions and select Import groups.
- Download the sample zip file and fill the group codes in Groups.csv as
described in the following table.
Table 4-14 Creating IDCS Groups for the Corresponding OFSAA Groups
Display Name Description IPEADMN IPEADMN BIAdminReporter Obiee Report Creator Group CMANALYST1UG Case AnalystI UserGroup CMANALYST2UG Case AnalystII UserGroup CMSUPERVISORUG Case Supervisor UserGroup CMEXECUTIVEUG Case Executive UserGroup CMINAUDITORUG Case Internal Auditor Usergroup CMEXAUDITORUG Case External Auditor UserGroup CMVIEWERUG Case Viewer UserGroup CMMANADMNUG Case Administrator User Group CMINITIATRUG Case Initiator User Group CMANALYSTLVL1GRP CM Level 1 Analyst GRP CMFRNTOFCANLYSTGRP CM FrontOffice Anlyst GRP CMSUPRVISRLVL1GRP CM Level 1 Supervisor GRP RFIUSRGROUP RFI Questionnaire Response Access Group BUSINESSADMIN Business Administrator BUSINESSAUTHORIZER Business Authorizer BUSINESSOWNER Business Owner BUSINESSUSER Business User GUEST Guest IDENTITYMGMTADMIN Identity Administrator IDENTITYMGMTAUTH Identity Authorizer OBJECTADMIN Object Administrator SYSTEMADMIN System Administrator CMREVIEWERUG Case Reviewer UserGroup CMCASEOWNFLUG Case Own Flag UserGroup - Upload the updated csv. All the OFSAA groups must be created in IDCS.
- On the left panel, select Provisioning, enable the Enable provisioning and Enable synchronization toggle buttons.
- Click Save.
- On the left panel, select Import and click the Import button
on the right side.
A confirmation appears indicating that importing is being executing at the background. List of Groups and Users appears once the import is completed successfully.
- Go to Integrated Applications, click the SCIM app, and select Groups.
- Click Assign Groups, search for a group, right-click, and select Assign.
- Click Next, scroll down to the Groups section, and click Add.
- Search and select the corresponding OFSAA group and click
Add.
Note:
Repeat the same steps for all the OFSAA groups one by one. This is a one-time activity needs to be done carefully. - To check the list of OFSAA User Groups, it’s a rest call, call
this endpoint from browser:
http://<<IP address:port
                            number>>/ECM8124UT/rest-api/v1/scim/Groups
.
Creating Users and Assigning to the SCIM app
This section describes how to create and assign users to the SCIM app.
- On the left panel, select Users and click Create user.
- Enter First name, Last name, Username, and Email for the user.
- Click Create and the click Save.
- Once the user is created, on the left panel, select Groups of the particular user, and Assign the required groups.
- On the left panel, select Integrated applications, and Assign the required groups.
- On the left panel, select Integrated applications, and Assign the SCIM application.
Syncing Users from OFSAA to Oracle IAM
This section describes how to sync users from OFSAA to Oracle IAM. These are optional steps and required only if users are already created in OFSAA and must be synced in Oracle IAM.
- Navigate to your SCIM application and go to Importtab.
- Click Import to fetch all the users to Oracle IAM.
- Click Refresh, to check the import status of all the users.
All the existing users in Oracle IAM will be mapped with the users in OFSAA and the remaining ones can be manually created and linked with them.
Modify Users
- Navigate to the users to be modified and click Integratedapplications.
- Click Options (three dots) of the SCIM application and click
Edit,
Only the following fields can be modified in OFSAA application.
Table 4-15 Modify Users
SCIM JSON Attributes OFSAA Mapping Family Name Last name Given Name First Name Middle Name Middle Name Primary Email E-mail Address Groups All the user-group map will be synched
Enable/Disable Users
- Navigate to a user to be enabled/disabled and select IntegratedApplication.
- Click Options (three dots) and click Activate/Deactivate to
enable/disable the specific user.
The user status is also updated in OFSAA. You can verify the user status in the Identity Management.