6.3.6.1 Create Prepayment Rules
You create a Prepayment Rule to define prepayment assumptions for new products.
To create a new Prepayment Rule, follow these steps:
- Click Add icon from the top of the Prepayment Rule Summary page.
Figure 6-102 Add Prepayment Rule
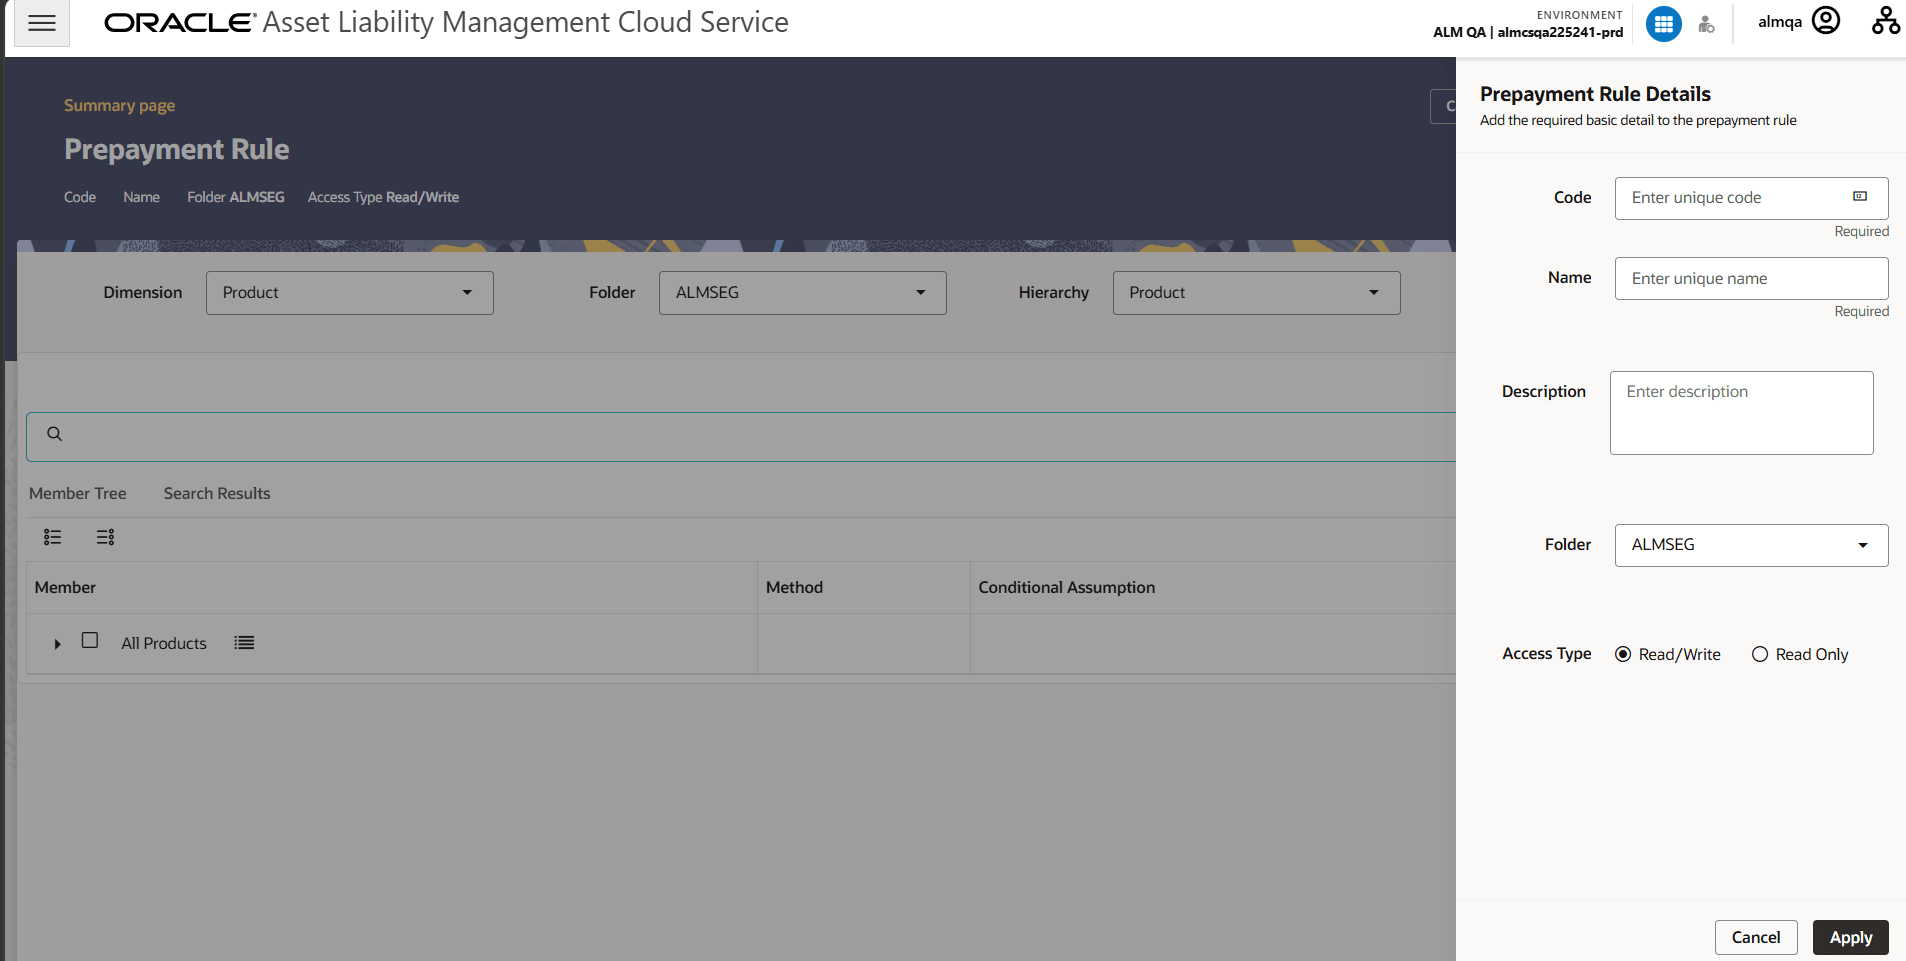
- Enter the following Details.
- Name: Enter the name of the Prepayment Rule.
- Code: Enter the code manually, or click Autogenerate to generate it automatically
- Description (optional): Enter the description of the Prepayment Rule.
- Folder: Select the Folder where the Prepayment Rule needs to be saved.
- Access Type: Select the Access Type as Read-Only or Read/Write.
- Select the Dimension as Common Chart of Accounts, Product,
General Ledger Account, or MDBSS.
Note:
MDBSS is enabled only in ALM Cloud Service.If any member is a currency in the MDBSS hierarchy (for example, INR) and selected currency is different (for example USD), then the member and its children nodes cannot be defined.
You can search the rule on any of the product dimension, searched dimension will be auto-populated while defining the rule; if you like, you can change the default product dimension.
- Select a Currency.
- Select Folder and Hierarchy.
- Select Member Node(s) from Member Tree of Assumption Browser.
The Assumption Browser has following two tabs: Member Tree and Search Results
- Member Tree: Member Tree tab shows the
hierarchical structure and allows you to define rules by selecting the node
members from the browser. Select Node and Click Menu icon next to it to view
the available options.
Figure 6-103 Member Tree
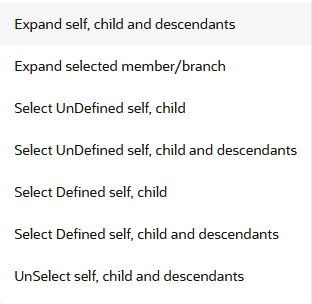
Status of node is also displayed in Member Tree section, for example Selected, and so on. To select member hierarchy, following options are available:
- Expand self, child and descendants: Allows to expand the selected node itself along with its child and descendants.
- Expand selected member/branch: Allows to expand the selected node
- Select UnSelect self, child: Allows to unselect the selected node itself along with its child
- Select UnSelect self, child and descendants: Allows to unselect the selected node itself along with its child and descendants.
- Select Defined self, child: Allows to select the selected node itself along with its child.
- Select Defined self, child and descendants: Allows to select the selected node itself along with its child and descendants.
- UnSelect self, child and descendants: Allows to unselect the selected node itself along with its child and descendants.
Use Show Numeric Code Values (Left) icon to view the code value left to the Node name.
Use Show Numeric Code Values (Right) icon to view the code value right to the Node name.
Here, you can perform the following tasks on the selected node(s):
- Add
- Edit
- View
- Delete
- Copy
- Search Results: You can also search the
members based on the filters. This section shows the searched node(s). To
search a member, follow these steps:
- Navigate to Assumption Browser section of the
Rule Definition page.
Note:
Before using the Member Search in Assumption Browser, you must execute the batch Member_Browser_Refresh. For more information, see note in Create MDBSS section. - Enter the Member ID, Name, Status, or Is Leaf in Search
Criteria.
Figure 6-104 Search Criteria

- Click Search. The searched member(s) will be
displayed in Search Results section of Assumption
Browser.
Figure 6-105 Searching Members

Here, you can perform the following tasks on the searched node(s):
- Add
- Edit
- View
- Delete
- Copy
Click Show Parentage icon to view the Parent-child Node level hierarchy details of selected Node.
Use Show Numeric Code Values (Left) icon to view the code value left to the Node name.
Use Show Numeric Code Values (Right) icon to view the code value right to the Node name.
- Navigate to Assumption Browser section of the
Rule Definition page.
- Member Tree: Member Tree tab shows the
hierarchical structure and allows you to define rules by selecting the node
members from the browser. Select Node and Click Menu icon next to it to view
the available options.
- Click Add from Assumption Browser Section. For more information, see the Defining Prepayment Methodologies.
- Click Save.
Exporting and Importing a Prepayment Rule
The export and import functions support bulk maintenance of prepayment-rule configurations through an Excel workbook.
- Open the required Prepayment Rule.
- Confirm that the correct Dimension, Folder, Hierarchy, and Currency are selected.
- Select Export Excel.
- Save the generated .xlsx file.
- Open the exported workbook in Microsoft Excel.
The exported Excel workbook contains the following worksheets:
- Help — Refer this sheet for template instructions, accepted values, and validation rules.
- Filters List — Valid conditional-assumption filters and their identifiers.
- Interest Rate Curves — Valid interest-rate curves available for market-rate definitions.
- Prepayment Models — Valid prepayment models and their identifiers.
- Currency worksheet, such as USD — The actual prepayment-rule configuration.
The workbook uses a currency worksheet named USD. It contains the rule name, hierarchy information, active currency, and one configuration row for each exported hierarchy member.
Update the exported workbook
Update the currency worksheet by adding or modifying prepayment-rule values for the required hierarchy members.
Upload the workbook
- Return to the Prepayment Rule page.
- Select Import.
- In the Import Excel dialog, drag the updated workbook into the upload area or browse to select it.
- Confirm that the selected file has the .xlsx extension. Select Validate.
Note:
The system validates the workbook before enabling the import. Validation checks include the workbook structure, worksheet names, currencies, hierarchy codes, field values, date ranges, required method parameters, and referenced objects.
Resolve validation errors
- The import dialog displays an error message indicating that the uploaded file contains errors.
- The system generates and downloads an error report.
- Open the error report and review each reported issue.
- Use the reported cell or range to locate the incorrect value in the exported workbook.
- Apply the suggested resolution. Save the corrected workbook.
- Upload the workbook again. Select Validate again.
Note:
Do not select Import until validation completes successfully.
Import the validated rule
- Confirm that the Import button is enabled.
- Select Import.
- Wait for the import-completion confirmation.
- Close the import dialog.
- Review the member tree and prepayment-method details on the rule page.
- Confirm that the imported hierarchy members, methods, filters, dates, and method parameters match the workbook.
- Select Save.