3.2.4 Data File History
The Data File History screen in the OFS Cloud Service allows you to see the data files that are uploaded to the staging tables and their status.
The Data File History summary screen allows you to do the following:
- Search for data files for which the stage data loader batch is already executed.
- Move the data from stage to processing tables.
- Delete the data from the stage or processing tables.
- Scan for invalid members.
- Create invalid members.
- Navigate to the Data Management Tools, select Data File Administration, and then select Data File History to display the Data File History summary screen.
Figure 3-17 Data File History summary page

The summary screen displays the following information of the data files:
- Batch Run ID: The ID used to run the batch.
- File Name: The data file name.
- File Loaded On: The date on which the data file is loaded.
- Records Loaded: The number of records loaded using the data file.
- Records Rejected: The number of records that are rejected from the data file.
- View Details (Icon): Select a Batch Run ID and click the details of the data file.
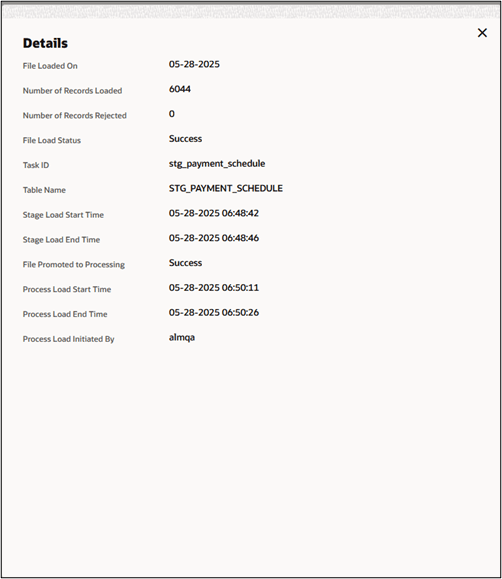
The following illustration is a sample of the data file’s details.
Figure 3-18 File Details
- Promote selected files to Processing (button): To promote the selected file or files for processing. This triggers the Batch Scheduler and queues the selected file or files for processing.
- Advanced Actions (button): There are four options in the Advances Actions. The following table explains the four options and the related information that is required to complete the actions:
Table 3-12 Advanced Actions
Action As Of Date Table Name Data File Specification File Name(s) Delete Data from Staging Required Required Required Optional Delete Data from Processing Required Required Required Required Scan for Invalid Members Required Required Required Optional Create Invalid Members Required Required Required Optional Selecting Scan for Invalid Members or Create Invalid Members opens a separate pop-up window requiring you to select one or more Dimension Name(s) before you can proceed. See the following sections for details.- Click Delete/Scan/Create button as applicable.
- Delete Data from Staging: The staging data uploaded from a data file will be deleted.
- Delete Data from Processing: The processing data uploaded from a file will be deleted.
- Scan for Invalid Members: To scan the staging data and identifying the dimension member codes present in the staging table, but not present in the corresponding dimension tables.
- Create Invalid Members: To populate the dimension tables with members identified in the above scan.
Selecting Scan for Invalid Members opens the Scan For Invalid Members pop-up, used to scan the staging data and identify dimension member codes present in the staging table but not present in the corresponding dimension table(s).
- Click Delete/Scan/Create button as applicable.
- In the Dimension Name field, select one or more dimensions to scan. This field is required. Available dimensions depend on your subscribed services and typically include options such as All, Branch, Common Chart of Accounts, Financial Element, General Ledger Account, Geographic Location, IFRS9 Stage, and Industry.
- Click Scan to start the scan, or Cancel to close the window without scanning.
The report displays the following columns:
- Data File Specification: The Data File Specification associated with the scanned file.
- File Name: The name of the staging file that was scanned.
- Dimension Name: The dimension in which the invalid member was found.
- Member Code: The invalid dimension member code identified in the staging data.
- No Of Occurrence: The number of times the invalid member code occurs in the staging data.
- Scanned By: The user who triggered the scan.
- Scanned On: The date and time the scan was run.
- Is Member Created: Indicates whether the invalid member has already been created in the dimension table (Y/N).
Click Download to export the report, or Cancel to close it.
Selecting Create Invalid Members opens the Create Invalid Members pop-up, used to populate the dimension table(s) with the invalid members identified during a scan.
- In the Dimension Name field, select one or more dimensions for which the identified invalid members should be created. This field is required.
- Click Create to populate the dimension table(s), or Cancel to close the window without creating them.
Help (Button): Click the Help icon to view the Data File History help.
Table 3-13 Scan, Create, and Delete Operations Using Scheduler Services
| Task Code | Task Name | Component | Parameters |
|---|---|---|---|
| 1 * | Scan_Staging_for_Invalid_Members | Scan_Staging_for_Invalid_Members |
|
| 2 | Create_Invalid_Members | Create_Invalid_Members |
|
* Task Code in the above table is for illustration purpose only. You can name them as per your requirements..
Promoting a Data File for Processing
By promoting a Data File for processing, you insert the Data from the staging tables to the processing tables.
To promote a Data File for processing:
- Click on the Table Name icon to display the
Category – Table Names window. This window displays
the Stage Table Names where data is already loaded. The tables are categorized
into different groups and are as follows:
- Transaction Summary
- Ledger
- Others
- Schedule
- Instruments
Each of the above categories lists the tables available to which the data is loaded. The list of categories is dependent on the Metadata from the seeded tables that come with the various OFS Cloud Services and may differ from that shown above based on the services you have subscribed.
- Select the Table for which you want to see the File History from the list.
- Select the relevant As Of Date from the drop-down list. This drop-down list displays different As-of-Dates. These dates are based on processed or not processed data loading. For example, if you have already processed some data on a previous date, this drop-down displays that date and displays the current date.
- Click on Promoted to Processing and select
the following options:
- All: To display all the Data Files that are specified on the selected As-of-Date.
- Yes: To display only the Data Files that are already specified and processed on the selected As-of-Date.
- No: To display only the Data Files that are specified but are in the queue to be processed on the selected As-of-Date.
- Click the Search icon to display the Data Files information as per the option you selected in the previous step.
- Select one of more Batch Run IDs that you want to promote for processing and click the Promote selected files to Processing button. This triggers the Batch Scheduler and schedules the Batch for processing. You can monitor the status using the Monitor Batch screen.
Reloading a Data File
Note:
While defining the Task, ensure that you select Delete Data Loader from the Component drop-down list.