Mounting FSS to Compute Virtual Machine
This section provides details about the required configurations for successful installation and (or) deployment on the Oracle Cloud Infrastructure. For more information, see Generic Documents.
If you are deploying on the cloud server, you must perform the steps mentioned in this
section. This section enables you to mount ftpshare directory across the OFSAA
Processing Tier Compute nodes, and conditionally apply to any other nodes, for high
availability or nonhigh availability deployments.
Note:
Ensure that the ftpshare folder is created and use the mount under which the ftpshare folder was created.To mount the file system to compute Virtual Machine, follow these steps:
- Log in to the Oracle Cloud Infrastructure console.
- Navigate to File Storage and select File
Systems.
Figure 5-1 The File Systems Window

- In the Name column, select the project-specific FSS that has been created. In
this example, click shared_ifrs_storage to open the Details Screen and view the
export path.
Figure 5-2 The Details Screen Displaying the Export Path

- For the required export path, click More , and select Mount Commands.
Figure 5-3 The Details Screen after clicking the More Icon

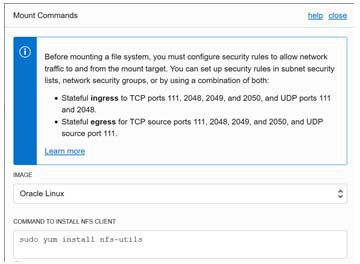
Figure 5-4 The Mount Commands Window

- Ensure that the Oracle Cloud Infrastructure (OCI) team has opened the Ingress or Egress ports.
- In the Mounting Commands window:
- In the COMMAND TO INSTALL NFS CLIENT field, enter
the value
sudo yum install nfs-utils. - In the COMMAND TO INSTALL NFS CLIENT field, enter
the value
sudo mkdir –p /mnt/shared, where/mnt/sharedmust be replaced with your mount value. - In the COMMAND TO MOUNT THE FILE SYSTEM field,
enter the value
sudo mount
                            10.0.14.5:/shared/mnt/shared
, where/mnt/sharedmust be replaced with your mount value and10.0.14.5must be replaced with your storage VM IP address.
- In the COMMAND TO INSTALL NFS CLIENT field, enter
the value
- Click Close.
- Use PuTTY tunneling session to connect to the OFSAA Product
Home1 compute virtual machine with the command,
ssh
                        <ofsaa product_home1>
. - Execute the commands in the fields COMMAND TO INSTALL NFS CLIENT, COMMAND TO INSTALL NFS CLIENT, and COMMAND TO MOUNT THE FILE SYSTEM in sequence.
- To verify that the execution of the mounting commands was successful, try to
verify by accessing a sample text file from OFSAA product home:
- Verify the mount by using the command:
df -k. - Create any text file in this mount.
- Verify that this file is accessible when you connect to the OFSAA Product Home2 compute virtual machine.
- Verify the mount by using the command: