Creating a Data File Specification
The Data File usually contains the Name of the Physical Table on which the specifications are being created and the columns included in the file.
For the complete list of available columns, see the Download Specifications available at MOS Document ID 2959143.1
To create a new Data File Specification, perform the following steps:
- Navigate to the Data File Specification Summary Page and click the
Add icon to open the Data File Specification window.
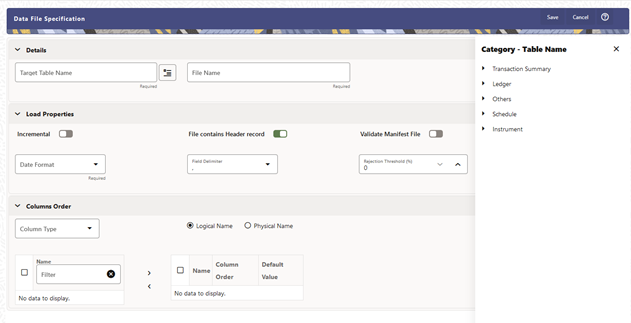
Figure 11-5 Data File Specification

- Under the Details Section of the screen, enter the following details:
- Click on Target Table Name to open a list
Category – Table Names. The tables are
categorized into different groups.
Each of the above Categories lists the Tables available for data loading. The list of categories is dependent on the Metadata from the Seeded Tables that come with the various Cloud Services and may differ from that shown above based on the services you have subscribed.
- Select a Table from the list for which you want to create the Data File Specification.
- Enter a unique Name for Data File Specification with an extension of the file format. The formats supported are TXT, CSV, and DAT types.
- Click on Target Table Name to open a list
Category – Table Names. The tables are
categorized into different groups.
- Under the Load Properties Section of the screen, enter the
following details:
- Select the Incremental toggle switch if the data in
the file is incremental. If the data is a complete load, then do not select
this switch.
This flag identifies if the Data File is incremental or fresh accounts. In the case of incremental accounts, if account 1 is loaded as part of the Data File 1 and needs a correction. In that case, the account is corrected and will be uploaded as part of Data File 2. In this case, Data File 2 is the incremental file.
- Select File contains Header record toggle switch if the file contains a Header Record.
- Select Validate Manifest File toggle switch if you
want to validate the data in the Data File. This validation checks the
Checksum of the file, the number of records that are being loaded from the
file and other additional details such as Date Format and so on. To use this
toggle switch, a prerequisite is to generate a manifest file for the Data
File that is being created and it must be uploaded using the File Upload
process. For more details, see File Upload and Download
section.
This is an optional step. However, if you want to generate a manifest file in JSON format, then enter the following details and save it as a .manifest file. A sample JSON file format is as follows:
{"file_name":"test.dat","as_of_date":"2022-03-24","checksum":"2587cdb6a2b87835c6adfce627671486","record_count":"10","rejection_threshold":"0"}Note:
Ensure that the name of the manifest file is same as the Data File with .manifest extension. For example, if the Data File Name is asset.csv, then the manifest file must be named asset.manifest.Table 11-1 MANIFEST File Details
Property Name Notes file_name Full name of the file, without the leading path. Not validated; Only for information purposes. as_of_date Date for which file contains the data; Not validated; Only for information purposes. checksum Mandatory. The checksum of the file will be validated before loading commences. record_count Mandatory. The number of records in the file (ignoring header-record); will be validated after SQL*Loader completes. rejection_threshold Limit for % of records rejected, for calling the loading as “failed”. This can also be set from the UI. - Select the Date Format from the drop-down list to indicate the Date Format used in the Data File.
- Select the Delimiter used in the Data File.
- Select the Rejection Threshold. You should enter a
number that is greater than or equal to zero.
The Rejection Threshold is used to check the allowed percentage of rows that can be rejected in a Data File. As an example, if you define a 10% Rejection Threshold for a Data File that has 1000 rows, then the Data File Upload fails if more than 100 rows are rejected. If the number of rows rejected is less than 100, then Data File Upload succeeds.
- Select the Incremental toggle switch if the data in
the file is incremental. If the data is a complete load, then do not select
this switch.
- Under the Columns Order section of the screen,
enter the following details. If you enter zero, then none of the records from the
Data File should fail.
- Select the relevant option for Column Type from the following
options:
- Key Columns: The Key Columns are the primary keys of the record. A table displays the Key Columns available for the selected Target Table Name. By default, the primary keys will be selected.
- Dimension Columns: If you select the Dimension Columns, all the Key Processing Dimensions for the selected Target Table are displayed in the drop-down list. This list displays the Placeholder Key Dimensions that are defined as part of the Data Model Extension Process. For more details, see the Data Model Extension User Guide. Select the applicable Dimension Columns and click the Move button to display them in the table on the right-hand side.
- Other Columns: If you select the Other Columns, all remaining columns (simple dimension, dates, measures, and so on) for the selected Target Table are displayed. Select the applicable columns from the list and click the Move button to display them in the table on the right-hand side.
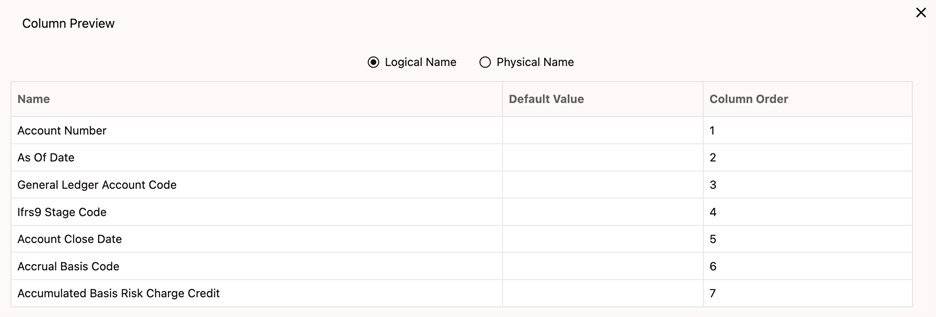
Within the selected Column Type, Column Names can be re-ordered by dragging and dropping. The columns are always ordered by their type, that is, Key Columns will appear before the Dimension Columns and Dimension Columns will always appear before the Other Columns. After saving a definition, if you add a new Dimension Column then it will appear in the order before the remaining Other Columns. For example, assume that the initial definition is saved with the below columns:Figure 11-6 Column Preview
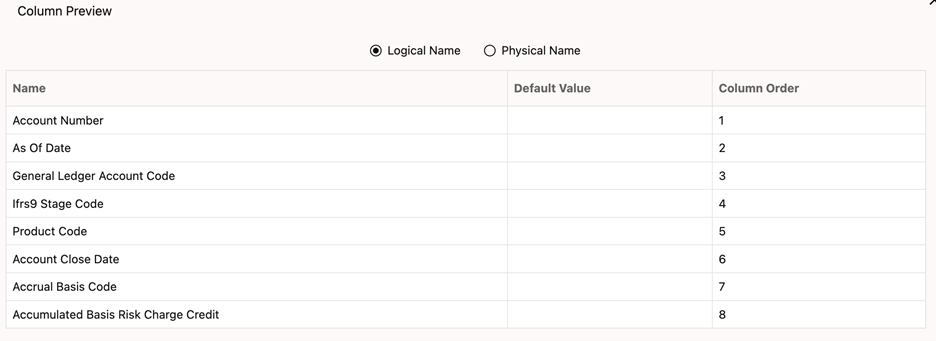
 After this, if a new Dimension Column (say Product Id) is selected, it will push the Other Columns down in order.
Figure 11-7 Columns Preview

The same order must be followed while preparing the Data File.
The default value for each Column can also be given in the table. If the Column Value is null in the Data File, then the default value is used.
- Select Logical Name or Physical Name to display the logical or physical names for the columns in the table.
- Select the relevant option for Column Type from the following
options:
- Click Save to save the file. The newly created file will be listed on the Data File Specification Summary Screen.
- On the Summary Screen, click on the Action icon against the File Name to perform further actions View, Edit, Save as, and Delete.
After you create the Data File, you must upload the file into the Object Store using the File Upload and Download option. If you have created a MANIFEST file for the Data File, you must upload the MANIFEST file too. For more information and procedure to upload or download the file, see the File Upload and Download Utility User Guide.