Defining Non-Maturity Behavior Patterns
Non-Maturity Behavior Patterns are commonly used for deposit products like Checking, Savings, and Money Market Accounts as well as for Credit Card Accounts. These account types are similar in that they do not have Contractual Cash Flows because Customers have the option to deposit or withdraw any amount at any time (up to any established limits).
When working with Non-Maturity Behavior Patterns, your percentage weights, assigned to maturity terms must add up to 100%.
For Manual Model, you can perform the following steps:
- In the Behavior Pattern Details Page, select Non Maturity as the Behavior Pattern Type.
- Select Non-Maturity Products Profile Method as Manual or Non Maturity Products Model. Based on selected Profile Method, Behavior Pattern UI will vary.
Profile Type as Manual
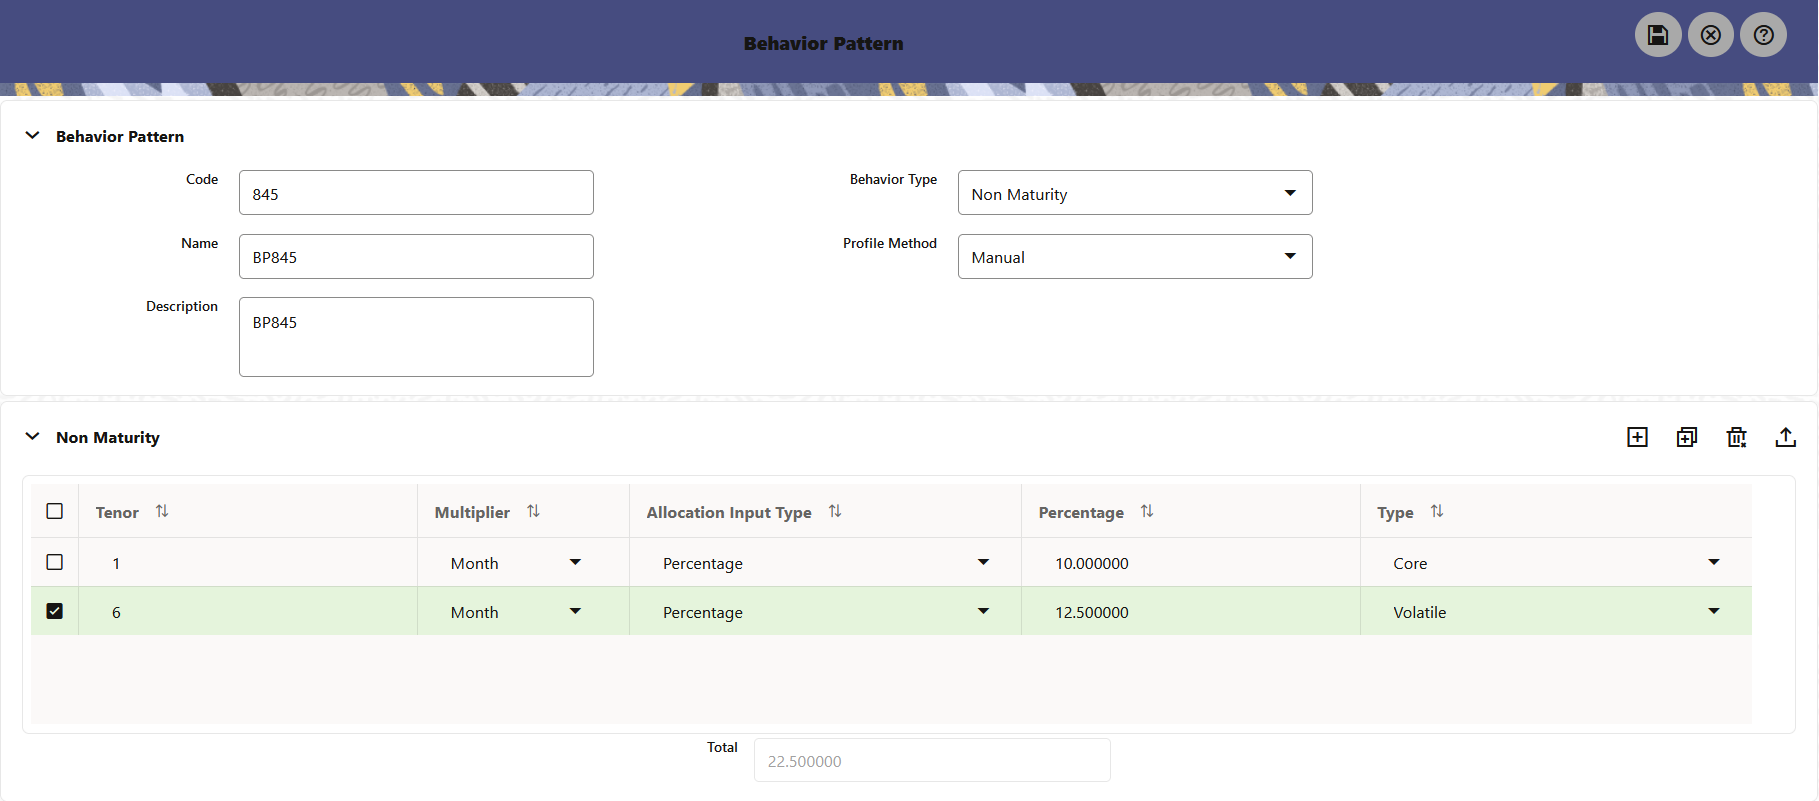
To define Non Maturity Behavior pattern as manual, follow these steps:
Figure 4-37 Profile Method as Manual

- Enter or select the following details:
- Tenor: Used to specify the maturity term for the particular row. For example, if “1 Day”is defined, then the applicable percentage of the balance will runoff (mature) on the As- of-Date + 1 Day.
- Multiplier: Theunit of time applied to the tenor.
The choices are as follows:
- Days
- Months
- Years
- Allocation Input Type: This field has a default value of Percentage for each maturity tier.
- Percentage: The outstanding balance indicating how much of the outstanding balance will mature on the specified term. Enter a number 0 and 100.
- Type: This allows you to classify the Runoff based on the appropriate type. If you select Percentage under 'Allocation Input Type', this allows you to select Core or Volatile.
- Click the Addicon to add additional payment strips to the
Pattern. After defining the initial strip as Volatile, subsequent strips are
usually classified as Core with varying maturity terms assigned.
Note:
There is no difference in behavior from a Cash Flow perspective, but the Runoff Amount will be written to a Principal Runoff Financial Element corresponding to the selected Runoff Type. - Click Add Multiple Row icon to open a window. Enter the number of rows you want to add and click Add Rows.
- To delete a row, select the check box corresponding to the row you want to remove and click the Delete icon.
- Click Save.
The Behavior Pattern is saved and the Behavior Pattern Summary Page is displayed.
Profile Type as Non Maturity Products Model
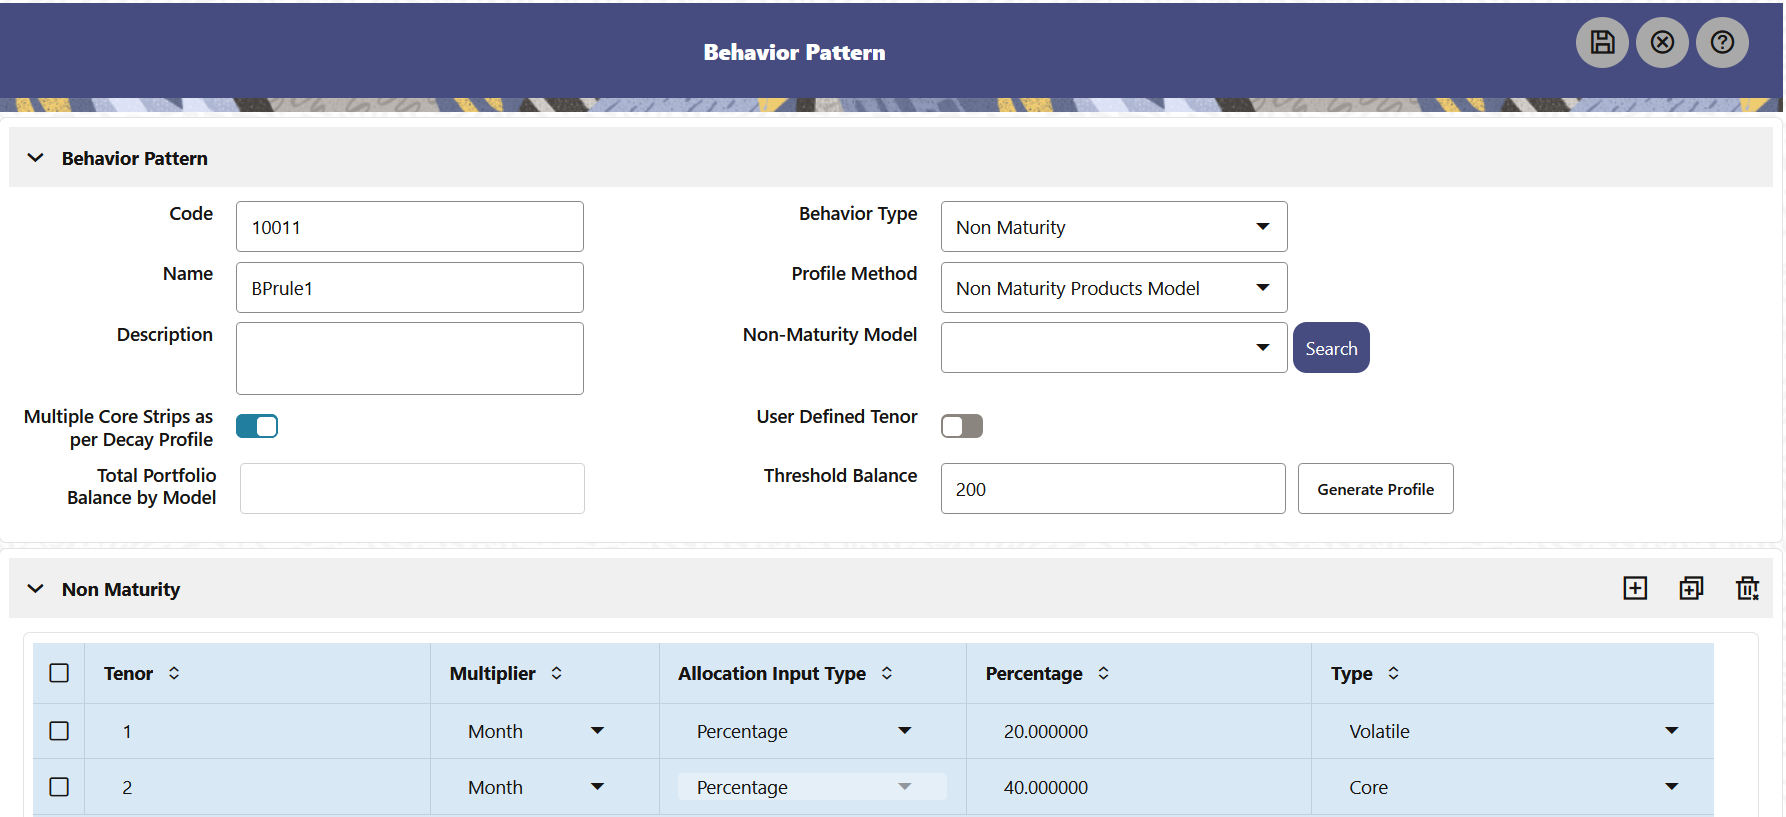
To define Non Maturity Behavior pattern with Non Maturity Product Model, follow these steps:
Figure 4-38 Profile Method as Non Maturity Products Model

- Select the Model from on Non Maturity Model
drop-down. You can search Non Maturity Product Model using product and currency
criterias after clicking Search button.
You can have single Core or Multiple Core strips based on if decay profile is being used:
This will be based on model calculated core balance and corresponding Weighted average life based on calculated decay rate.
Multiple Core and Volatile strips in percentage if “Multiple Core Strips as per Decay Profile” is selected.
Once model is selected, you can define two types of strip definitions:
- Single Core Strip: The model evaluates the core
balance against a total point in time balance.
- Core Calculation:Behavior pattern picks the
core from the underlying model which is defined at certain
portfolio level. Use the Non-Maturity Deposit Model Weighted
Average Life as the tenor.
The core percentage is calculated as:
Figure 4-39 Core Calculation

- Volatile Percentage:This is calculated as:
Figure 4-40 Volatile Percentage

The tenor for this calculation is set at 1 day and in relation to the strip tenor, with a default maturity assumption of "At Maturity".
- Core Calculation:Behavior pattern picks the
core from the underlying model which is defined at certain
portfolio level. Use the Non-Maturity Deposit Model Weighted
Average Life as the tenor.
- Multiple Core Strips as per Decay profile: If this is selected, there are following two options:
- Using Generate Profile: You can select to
Generate Profile with or without thresholds.
Strips will be auto- generated based on decay profile
frequency. For example, if the NMD model's decay profile is
set to a daily frequency, tenors will be auto-populated on a
daily basis.
Total portfolio balance by Model (Model Output): Total balance is the balance available at the latest As of Date in the Historical Period selected for which model is created. For example, if the historical period is from January 1, 2020, to December 31, 2020, and the most recent date is December 31, 2020, the total available balance of all accounts included in the portfolio (based on product and currency) would represent the total Portfolio Balance.
The Threshold Balance option will be active only when the Multiple Core Strips as per Decay Profile toggle button is selected. The default value of this field is
0.0.It accepts only positive numbers or decimals values.
When you use Decay Rate profile from the selected model, the balance keeps reducing using every period’s decay rate till threshold balance is reached. So, no further strips can be created beyond the Threshold balance.
It is recommended to give some valid positive value as threshold balance, else after few initial strips, principal will become small and decaying part will be even smaller. If the number of strips reaches to 500 and the remaining balance is negligible, an error message is displayed.
Once balance is reached equal or less than given threshold, then rest of the balance will run off in immediate next strip.
For example, if the initial balance was 10,000 and the threshold is set at 500, and the decay profile indicates that the balance reaches 500 or less in the 11th strip, then in the immediate next strip (the 12th strip), the entire remaining balance will be deducted. This is necessary because the system needs to account for 100% of the remaining balance, and there is a check in the BP to ensure that the total of all strips adds up to 100%.
The system uses the decay profile/decay rate generated by the model and creates Runoff Profile/Strips as per inputs data frequency to the NMD model which can be in Days/Months and Years. If the frequency is in Days, then the tenor of the defined strips would be days else it would be in months/years as per the model definition.
- Using User Defined Tenor:If this is
selected, then + icon will be available to add strips.
Note:
The User Defined Tenor option will be active only when the Multiple Core Strips as per Decay Profile toggle button is selected. By default, it will be OFF.Enter or select the following details:- Tenor: Used to specify the maturity term for the particular row. For example, if “1 Day” is defined, then the applicable percentage of the balance will runoff (mature) on the As-of-Date + 1 Day.
- Multiplier: The unit of time
applied to the tenor. The choices are as
follows:
- Days
- Months
- Years
- Allocation Input Type: This field has a default value of Percentage for each maturity tier.
- Percentage: The outstanding balance indicating how much of the outstanding balance will mature on the specified term. Enter a number 0 and 100.
- Type: This allows you to classify the Runoff based on the appropriate type. If you select Percentage under 'Allocation Input Type', this allows you to select Core or Volatile.
- Click the Add icon to add
additional payment strips to the Pattern. After
defining the initial strip as Volatile, subsequent
strips are usually classified as Core with varying
maturity terms assigned.
Note:
Click Add Multiple Row icon to open a window. Enter the number of rows you want to add and click Add Rows.
To delete a row, select the check box corresponding to the row you want to remove and click the Delete icon.
As per the defined tenor/multiplier decay rate percentages will be calculated and populated in core allocation. Core allocation input will be percentage if model is used.
- Using Generate Profile: You can select to
Generate Profile with or without thresholds.
Strips will be auto- generated based on decay profile
frequency. For example, if the NMD model's decay profile is
set to a daily frequency, tenors will be auto-populated on a
daily basis.
- Single Core Strip: The model evaluates the core
balance against a total point in time balance.
- Click Generate Profile. It creates the Profile Strips as per
total and threshold balance. The system uses the decay profile/decay rate
generated by the model and creates the strips as per tenors given by the user.
E.g. if per month decay rate is 10% and user has defined first strip as 3
months, then total runoff in first strip will be 30%. Similarly subsequent
strips allocation will be calculated based on user-defined term points. And Once
threshold is reached, system will not do any further calculation but runoff all
remaining balance in subsequent strip itself.
Note:
If number of strips generated is more than 500, then system displays error. - Click Save.
The Behavior Pattern is saved and the Behavior Pattern Summary Page is displayed.