4.7.4 Create New Subledger Definition
Note:
When creating a Subledger definition with a Subledger Attribute, it can only be created with an Approved Subledger Attribute.Note:
If you want to import definitions created by you, then see the Object Migration section in the OFS Analytical Applications Infrastructure User Guide.- In the Subledger Definition pane, click
Add to open the Subledger
Process window.
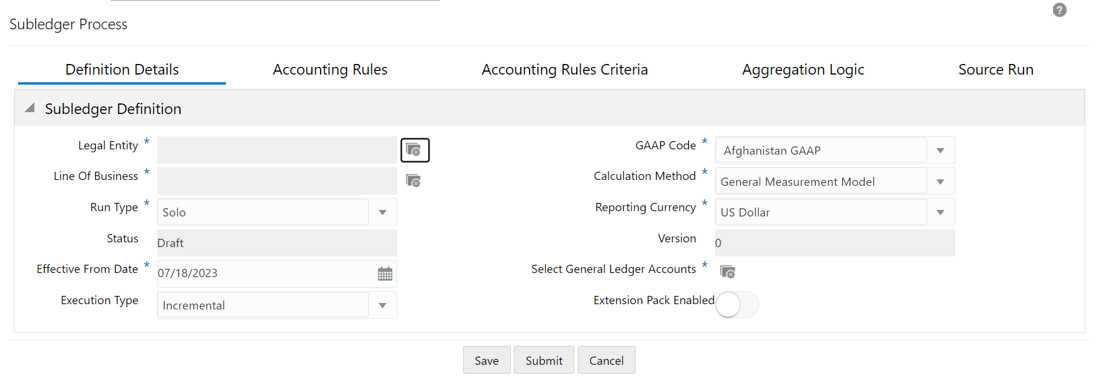
Figure 4-42 The Subledger Process Window

- Populate the Subledger Definition pane in the
Definition Details tab.
Table 4-10 The Subledger Definition pane
Field Description Fields marked with asterisks (*) in the window are mandatory. Legal Entity* Click Hierarchy Selection adjacent to this field. Select the required Legal Entity from the Hierarchy Selection Window.
For more information, see Hierarchy Selection.
GAAP Code* Select aGAAPCode from the drop-down list. Line of Business* Click Hierarchy Selection adjacent to this field. Select the required Legal Entity from the Hierarchy Selection Window.
For more information, see Hierarchy Selection.
Calculation Method Select a calculation method from the drop-down list. The available methods are:
- General Measurement Model
- General Measurement Model Reinsurance
- Long Duration Contracts
- Premium Allocation Approach
- Premium Allocation Approach Reinsurance
- Variable Fee Approach
Status This field is not editable and is in the Draft status when a Subledger Definition is being created. Run Type Select either Solo or Consolidated from the drop-down list. Reporting Currency Select a currency from the drop-down list. Version When creating a definition, the version is set to 0. You cannot change this value. Effective From Date Select an effective date from the Calendar icon. Select General Ledger Accounts Click Hierarchy Selection to select a value from the following fields:
Note: You must create the members and hierarchies in the Member and Hierarchy Maintenance window to populate data in this field. For more information about creating members and hierarchies, see the OFS Analytical Applications Infrastructure User Guide.
- Hierarchy Folder: Select a hierarchy folder from the drop-down.
- Hierarchy: Select a hierarchy from the drop-down.
- Members: Add or remove members from the Selected Members pane. By default, all accounts will appear in this list.
Execution Type This feature enables the execution of Incremental or YTD runs as per the respective calculations and produces entries that are aligned with the CSM engine-generated disclosures.
Select either Incremental or YTD from the drop-down list.
Note: Once a definition is saved, the Execution Type cannot be changed
Extension Pack Enabled When this feature is enabled, Liability Calculation definitions that were created with the Extension Pack feature enabled in the Liability Calculations screen will be available. - Click Save.
- Select the Accounting Rules tab.
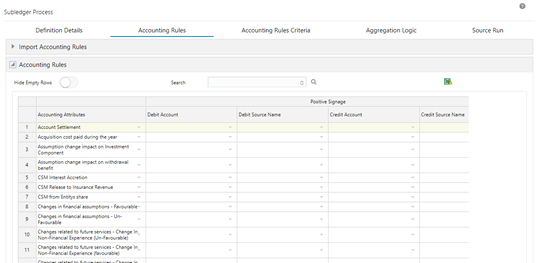
Figure 4-43 The Accounting Rules Tab

- Populate the Import Accounting Rules pane in
the Accounting Rules tab.
Table 4-11 The Import Accounting Rules pane
Field Description Fields marked with asterisks (*) in the window are mandatory. Legal Entity* Click the Hierarchy Selectionadjacent to this field. Select the required Legal Entity from the Hierarchy Selection Window.
For more information, see Hierarchy Selection.
GAAP Code* Select a GAAPCode from the drop-down list. Line of Business* Click Hierarchy Selectionadjacent to this field. Select the required Legal Entity from the Hierarchy Selection Window.
For more information, see Hierarchy Selection.
Calculation Method* Select a calculation method from the drop-down list. The available methods are:
- General Measurement Model
- General Measurement Model Reinsurance
- Long Duration Contracts
- Premium Allocation Approach
- Premium Allocation Approach Reinsurance
- Variable Fee Approach
Run Type* Select either Solo or Consolidated from the drop-down list. Version* When creating a definition, the version is set to 0. You cannot change this value. - On the Accounting Rules page, select the
drop-down arrow to expand the table.
Figure 4-44 The Accounting Rules Tab with the Expanded Accounting Rules pane

- Populate the Accounting Rules pane.
The pane allows you to perform the following actions:
Table 4-12 The Accounting Rules pane
Field Description Hide Empty Rows Click Enable if you want to hide empty rows.
When enabled, the empty rows in the Accounting Rules table are hidden.
Accounting Attributes
Select an attribute from the drop-down list. Debit Account Select a debit account from the drop-down list. Debit Source Account Select a credit account from the drop-down list. Credit Account Select a debit account from the drop-down list. Credit Source Account Select a credit account from the drop-down list. Modify Accounts for Opposite Signage Select this checkbox if you want to modify accounts for opposite signage. Journal Comments Enter the required journal comments for the sub-ledger. Workflow Comments Enter the required workflow comments for the sub-ledger. - Insert a new row before
- Insert a new row after
- Delete selected rows
- Copy
- Export the entries into an Excel spreadsheet that is automatically downloaded into your system.
- If you want to view the information about the GL accounts and account attributes, in the upper-right corner of the table, click the icon to download the Excel file.
- Additionally, click Export Accounting Rules to download the
Excel file on your system.
- Fill the Excel file with the required data.
- Copy the data from Excel and paste it into the respective columns in the Copy Accounting Rules pane.
Note:
You must ensure the following:
- The data in the columns in the application must exactly match the data as per the columns in the Accounting Rules Excel. If the rules data was not added correctly, then the system will give you a validation error and you must add the rules data correctly in the corresponding columns in the application.
- Your system must contain the same GL entries as per the entries in the Debit Account column in the Accounting Rules Excel. If you copy and paste a GL entry that your system does not contain from Excel into the Debit Account column in the application, then the system will not validate it.
- Click Save.
- Click the Accounting Rules Criteria tab.
Figure 4-45 The Accounting Rules Criteria tab

- Click Add to open the Accounting
Rules Criteria Window.
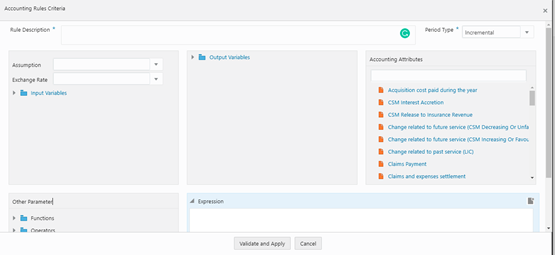
Figure 4-46 The Accounting Rules Criteria Window

- In the Assumptions drop-down list, select an
assumption. You can link an input variable to multiple assumptions for a
single expression. The available options are:
- Closing Position
- Credit Risk
- Current Accident Year Accident Period
- Current Accident Year Prior Accident Period
- Economic Assumptions
- Economic Experience
- Experience Adjustment – Lapse
- Experience Adjustment – Morbidity
- Experience Adjustment – Mortality
- Experience Adjustment – Others
- Future Inflation Assumption
- Lapse Assumption
- Market Volatility
- Morbidity Assumption
- Mortality Assumption
- New Business
- Non Economic Assumptions
- Non-Economic Experience
- Opening Adjustment
- Opening position
- Other Future Assumptions
- In the Period Type drop-down list, select either Incremental or YTD.
- In the Input Variables pane, select the required input variables from the list to populate the Expression pane.
- In the Output Variables pane, select the required output variables from the list to populate the Expression pane.
- In the Accounting Attributes pane, select the required accounting attribute from the list to populate the Expression pane.
- In the Other Parameters pane, select the required functions
and operators. The following are the available functions and
operators:
- Functions
- AND
- ABS
- Case
- Floor
- Greatest
- Least
- MOD
- OR
- Operators
- Greater than
- Plus
- Minus
- Less Than
- Equal
- After you have built your Expression, click Validate and Apply.
- In the Assumptions drop-down list, select an
assumption. You can link an input variable to multiple assumptions for a
single expression. The available options are:
- Click OK.
The condition is added to the accounting attribute.
Note:
A condition can be mapped to multiple attributes but an accounting attribute can be mapped only to a single condition. For example, you have created Condition A and Condition B. You have mapped Condition A to Accounting Attributes A1, A2, and A3. But the same accounting attributes cannot be mapped to Condition B. - Click the Aggregation Logic tab.
The AggregationAttributes tab is displayed and contains the Cohort, Coveragetype, Inceptionyear, Levelofaggregation, Lineofbusiness, Location, Onerousclassification, and Productsattributes.
This tab allows you to aggregate the results and pass journal entries at a chosen consolidated level. Consolidated entries might give added insights into the impact of changes on the chosen grouping.Note:
Only those credit and debit general ledgers' total balances that are associated with an accounting attribute are checked and added to the journal entry. This ensures that only balanced journal entries are passed. If there is an imbalance between the accounting attributes, then the accounting attributes' general ledger balances will not be passed to the journal entries.Figure 4-47 The Aggregation Logic Tab

- Select the checkbox(s) adjacent to the required attributes.
- Click Save.
- Click the Source Run tab.
Figure 4-48 The Source Run Tab

- Select the required source runs. This is the list of CSM or Liability Calculation runs that have been executed. The source runs that appear in this tab, depending on the values that you selected in the Legal Entity, Line of Business, Calculation Method, Run Type, fields in the Definition Details tab.
- Click Save.
- If you want to send it to the approver then click Submit.
After a subledger definition has been submitted for approval, you cannot modify any fields. You can modify the fields only if the Approver has rejected the Subledger Definition.
The Audit Trail pane at the bottom of the Definition window displays the Created By, Creation Date, last modified by, and Last modification date details. The User Comments field enables you to add additional information as a comment.