6.1.6 Defining a New Time Bucket
- In the Oracle Financial Services Analytical Applications Infrastructure home screen,select Financial Services Liquidity Risk Management.
- To open the Time Buckets window, select Liquidity Risk Management, then select Time Buckets on the Left-Hand Side (LHS) menu.
- Click the Add icon.
The Time Bucket Details – New window is displayed.
Figure 6-1 Time Bucket
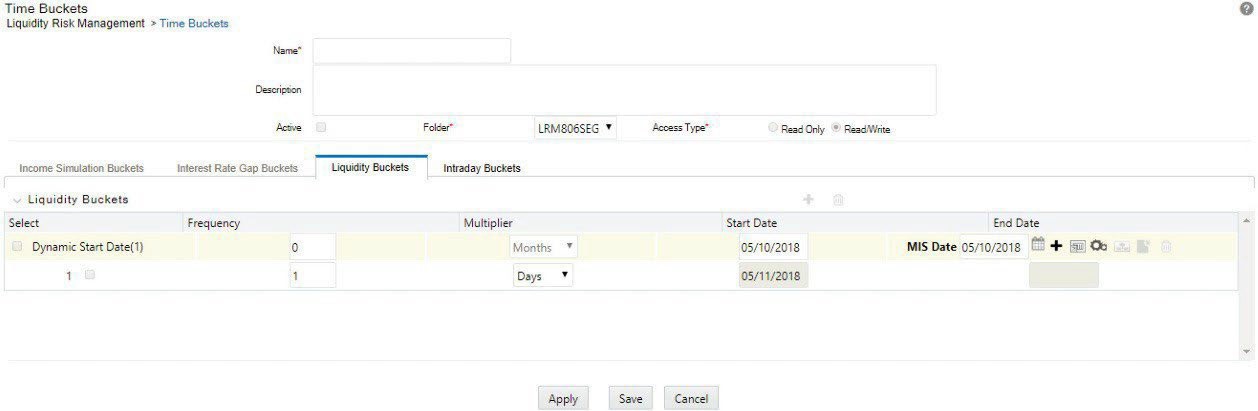
- Enter the time bucket definition Name .
- Enter the time bucket Description .
Note:
Active option and dynamic start date selection are disabled for LRM users. - Select the Folder from the drop-down list.
- Define the Frequency (number of days) and Multiplier (Dates/Months/Years).
Note:
The time buckets tab name must be Liquidity Buckets for the purpose of defining time buckets used in LRM. - Click Calendar to select the Start Date from the MIS Date format.
- You are allowed to add the bucket rows in the following ways:
- Click Add to add individual bucket rows and specify the frequency and multiplier. Or, Add multiple bucket rows by clicking Add multiple Rows, which displays Add Multiple Rows to select 3, 5, or 10 pre-specified bucket rows to be added or add a custom number of rows by specifying the number and click the arrow icon. In this case, frequency and multiplier must be specified by the user individually for each bucket row added.
Or,
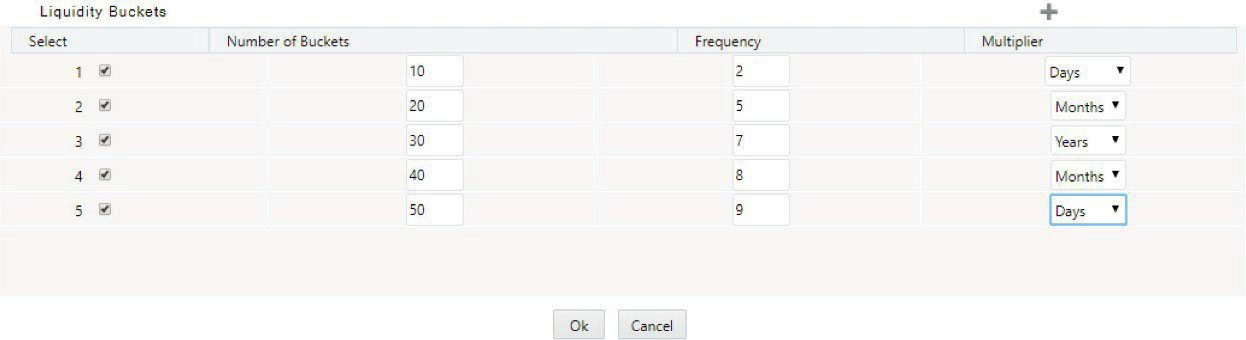
- Specify multiple time buckets of varying lengths by clicking Add Multiple Buckets It opens up a window that allows you to specify multiple time buckets in a single instance as a combination of the number of buckets, frequency, and multiplier as illustrated below.
Figure 6-2 Time Bucket Liquidity Buckets
- Click Add to add individual bucket rows and specify the frequency and multiplier. Or, Add multiple bucket rows by clicking Add multiple Rows, which displays Add Multiple Rows to select 3, 5, or 10 pre-specified bucket rows to be added or add a custom number of rows by specifying the number and click the arrow icon. In this case, frequency and multiplier must be specified by the user individually for each bucket row added.
- Click Add to add new rows. Each row allows you to specify the number of buckets of a particular size to be generated. In the previous example, you can define 10 one day buckets by specifying the number of buckets as 10, the bucket size frequency as 2, and bucket size multiplier as days. The application automatically generates 10 rows of time buckets, each with a bucket size of 2 days as part of the level 0 bucket definition.
- Click OK.
The application saves the bucket definition, and the defined time bucket appears in the Time Bucket Summary window.
Once you define Level 0 time buckets, you can create multiple levels for this definition up to a maximum of 5 levels inclusive of level 0 buckets. This is optional. The time bucket definition is still saved with one level.
- Once you define Level 0 time buckets, click Apply to define multiple bucket levels.
The Time Bucket Grouping icon is enabled to create less granular time bucket levels.
- Click Add levels . The Liquidity Bucket Grouping window is displayed.
Figure 6-3 Liquidity Bucket Grouping
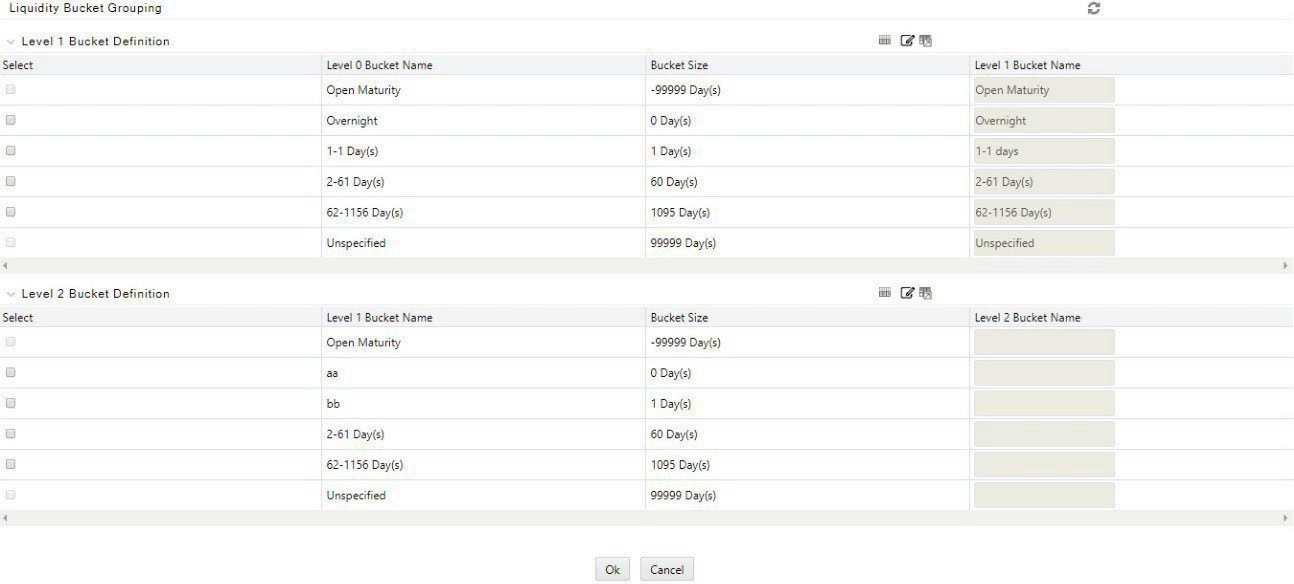
- Click Select icon against a time bucket and click Add to group the time buckets. You can select multiple time buckets that form a single higher-level bucket at a single instance by clicking the last time bucket. A dialog box is displayed to define the Level 1 Bucket name that is, a user- specified name for the higher-level time bucket is created.
- Enter the Node Name and then click OK . Repeat steps 10 and 11 to group the other level 0 buckets into the level 1 bucket.
- Click Refresh to reset all the levels defined for the time bucket definition.
- Once all level 0 buckets are grouped, click Group to save the grouping. On clicking Select Dimension icon, the level 1 grouping is displayed in a new section named Level 2 Bucket Definition.
The process of grouping level 1 bucket to level 2 buckets is similar to Steps 10 through 12.
- Once you have defined your multi-level time buckets, click OK to save the definition. The hierarchy for the specified time bucket definition is now created and can be used for further computations.
Note:
- The application supports up to five levels.
- A multi-level time bucket definition is optional. You can save the time bucket with a level less than or equal to five.
- You cannot modify an intraday bucket to a liquidity bucket or vice-versa. You can only define one bucket at a time.