Creating a PD Model Process Definition
Perform the following steps to create a PD Model Process definition:
- In the PD Model Process table, click Add
to open the PD Model Stitching Process
window.
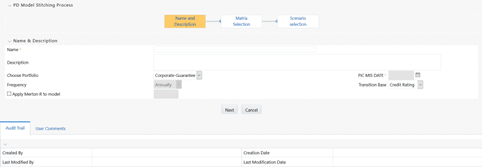
Figure 9-6 The PD Model Stitching Process Window
 The PD Stitching window displays the PD Model Stitching Process and Name & Description tables. The PD Model Stitching Process table displays processes such as Name and Description, Matrix Selection, and Scenario Selection. By default, the Name and Description process is selected.
 - Populate the PD Model Stitching Process form as
tabulated.
Table 9-4 Fields in the PD Model Stitching Process form
Field Description Name Enter a name for the PD Model Process definition. Description Enter a description for the PD Model Process definition. Choose Portfolio Select the portfolio from the drop-down list. FIC MIS Date Select the MIS Date by clicking the Calendar. Frequency The Frequency is set to Annually, by default. Transition Base Select the transition base from the drop-down list. Available options are: - Credit Rating
- Days Past Due
Merton R-Value Select this checkbox if you want to enter the Merton R-Value. If you select this checkbox, then the Metron R-Value field is enabled. - Select the checkbox adjacent to the Apply Model Flag field if you want to apply the model flag.
- Click Next. OR
- Click the Matrix Selection process from the PD Model Stitching Process table to open the Matrix Selection table.
- Click Add from the Matrix Selection table.
- Enter the values in From and To
fields of the Computation Sequence pane. If you have created multiple Computation Sequences, the To field of all the sequences except the final sequence is auto-populated with the previous number to what is entered in the From field of the next sequence.
- Click the drop-down list in the Assign Matrix field and
select the required value. You can also select the checkbox adjacent to a Computation Sequence and click Delete to remove a matrix.
- Click Save to save the changes.
- Click the Scenario Selection process from the
PD Model Stitching Process table. The Scenario Selection table is displayed.
- Click Add to add a new Scenario Selection row.
- Click the drop-down list under the Select Scenarios column and select the required scenario from the list of available scenarios.
- Enter the weight values corresponding to the selected Scenarios in the text
fields in the Weights column. The cumulative number of weights is displayed under the Weights column against the Total field.You can also select the checkbox adjacent to a Scenario and click Delete to remove the same.
- Click Save to save the definition details. The saved definition is displayed under the PD Model Process table in the PD Model Process window.