- User Guide
- Administration
- Data Stores
- Adding a Data Store
Adding a Data Store
- Navigate to Workspace Summary window.
- Click Profile icon and select Data
Stores.The Data Store Summary page is displayed.
- Click Add Store.The Add Data Store window is displayed.
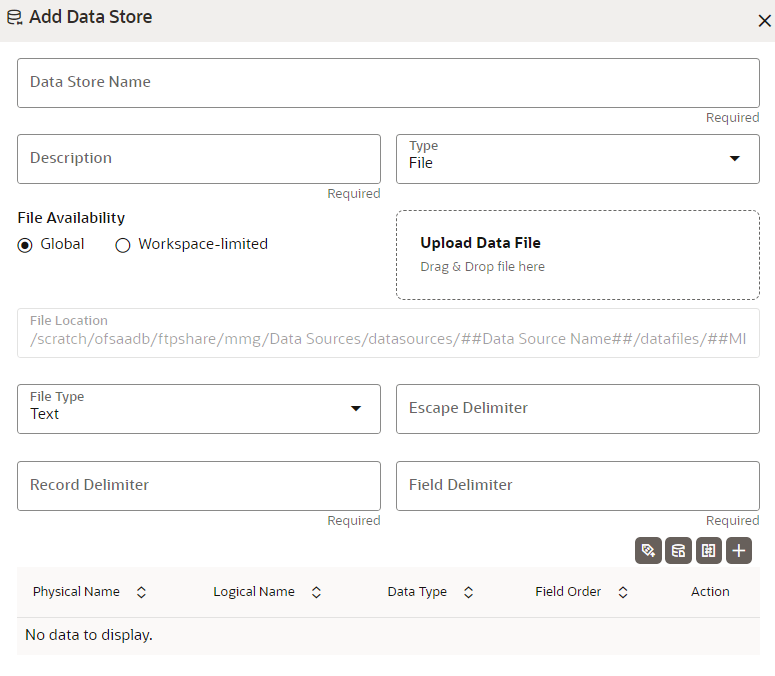
Figure 7-3 Add Data Store with Type File

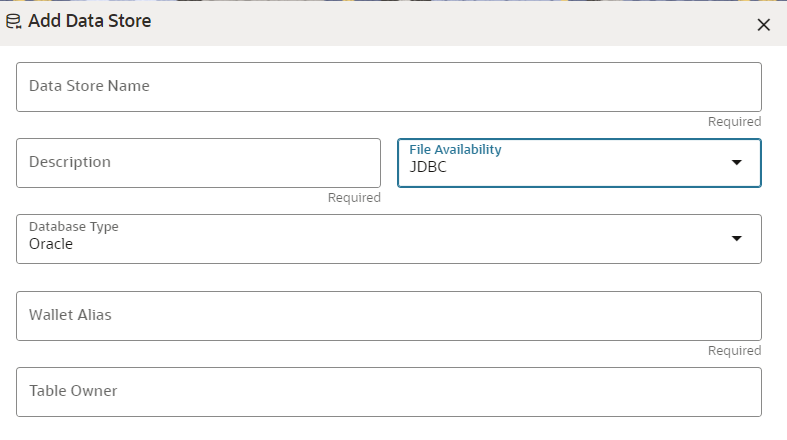
Figure 7-4 Add Data Store with Oracle Database

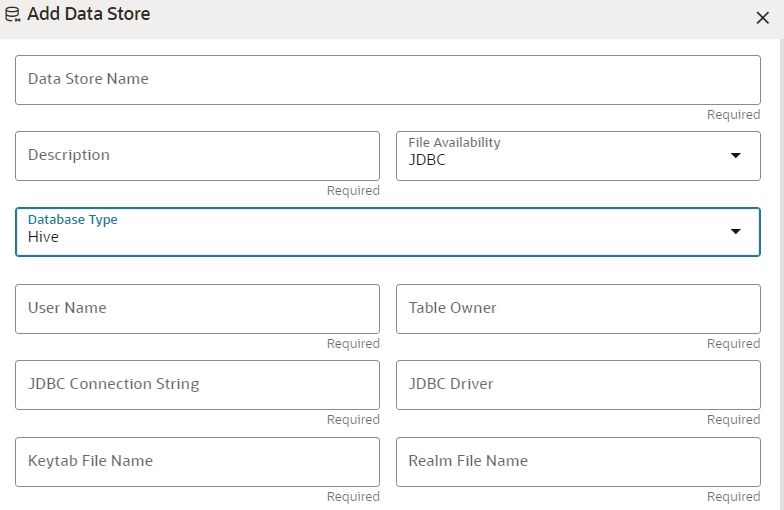
Figure 7-5 Add Data Source with Hive Database

- Enter the required details as shown in the following table.
Table 7-1 Add Data Source
Field Description Data Store Name Enter the connection URL to the database for the data schema. Description Enter the description of database connection. Type Enter the type of the database connection. The supported types are JDBC and File.
- JDBC : If selected, the Database type options Oracle and Hive are displayed.
- File: If selected, the following options are displayed.
<installed path>/ftpshare/mmg/Data Sources/datasources/##Data Source Name##/datafiles/##MISDATE##/*
Workspace-limited: Select this option if you want to fetch the workspace level datasource details. You need to place the file with the datasource details in JSON format in the following location:
<installed path>/ftpshare/mmg/##Workspace##/datasources/##Data Source Name##/datafiles/##MISDATE##/*
Upload Data File: Click to upload data file in text or csv format. Any pre-filled values will be overridden with the selected data file. Once the file is uploaded, you can derive the schema which will auto populate the values based on the file.
File Type : Select the Type as text or csv format.
Escape Delimiter: An escape delimiter is simply a sequence that is recognized and ignored during parsing. Its purpose is to allow the use of escape sequences to embed byte sequences in data that would otherwise be seen as delimiter occurrences. This option differentiates multiple records in one single column from second column. Escape delimiter (eg. "), added in from of multiple records will treat it as multiple records for one single column. For example, if there is a normal delimiter “+” at a given level, and you define an escape delimiter “\+” as shown in the following figure, then aaa+b\+c+ddd will parse as three fields: aaa, b\+c, and ddd. If the escape delimiter were not defined, the sequence would then parse as four fields: aaa, b\, c, and ddd.
Record Delimiter: There is a separation of the records using a delimiter character like a comma, semicolon, hyphen, and so on for the rows. Enter the delimiter in the Record Delimiter field. This is a mandatory field and limited to two characters.
Field Delimiter: There is a separation of the records using a delimiter character for the columns. Enter the delimiter in the Field Delimiter field. This is a mandatory field.
Derive Schema: It is an optional feature that populates the data grid by analyzing schema details from any data file stored in the above specified directory. This is applicable when you upload data file in previous steps.
You can either add the file details using data template or manually.
Click Data File Template icon to select the Data Source entities and click Save.
OR
Click Add icon to add the details such as Physical Name, Logical Name, Data Type, and Field Order manually and click Save.
Click Reorder Grid option to reorder the field orders.
Database Type If the Type field is selected as JDBC, the following options are displayed. Select the Database Type as Oracle or Hive.
NOTE: Selected tables during Hive sourcing should be preexisting in the RDBMS data schema before the workspace population.
If you select Database Type as Oracle (see Figure 10), then following additional fields are displayed to enter details:
- Wallet Alias : Enter the Wallet Alias. This value should be same as configured using Oracle Wallet. For more information, see the Oracle Financial Services Model Management and Governance Installation Guide
- Table Owner: Enter the Oracle Database schema name. This is an optional field.
If you select Database Type as Hive (see Figure 11), then following additional fields are displayed to enter details:
User Name: User Name / Principal is used for Kerberos authentication.
Example: mmg/hostname@ORACLE.COM.
Table Owner: Enter the Hive schema.
JDBC Connection String: Enter the JDBC Connection String.
Example: jdbc:hive2://hostname:10000/default;principal=hive/hive-service-hostname@ORACLE.COM.
JDBC Driver: Supports org.apache.hive.jdbc.HiveDriver and com.cloudera.hive.jdbc4.HS2Driver.
Keytab File Name: Enter the Name of the keytab file present in conf directory.
Example: mmg.keytab
Realm File Name: Enter the Name of the configuration file present in conf directory.
Example: krb5.conf
NOTE:
- Schema population for Hive as target is not supported.
- This is applicable only for Sandbox Workspace.
For more information on setting the environment, see the Oracle Financial Services Model Management and Governance Installation Guide.
- Click Create.The Data Store is created.
Note:
Click Test Connection to check the connection. A success message is displayed.