- User Guide
- Modeling
- Dataset
- View a Dataset
- Profile Summary
- Start Profiling
Start Profiling
Prerequisite: You must create a Dataset with a datasource having columns
with DATA_TYPE as DATE.
To start a Profile:
- Navigate to Dataset Summary page.
- Click Action next to corresponding Dataset and select
View. This window displays the Dataset profiles in a table.
Figure 8-18 Dataset Profiles

- Click Start Profiling or click Settings
. The Profiler Settings page is displayed.
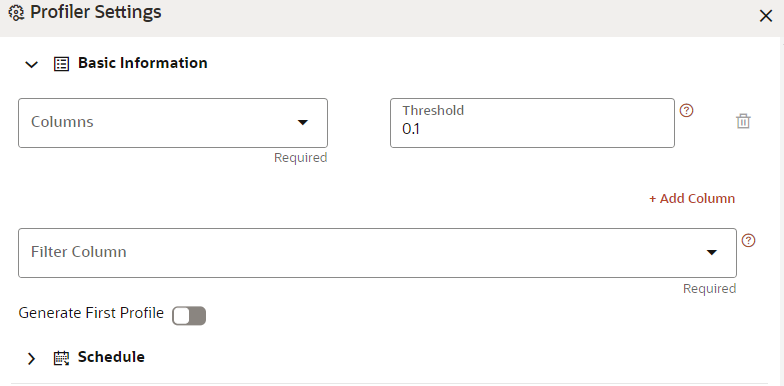
Figure 8-19 Profiler Settings page

- Under Basic Information section, enter the following details:
- Select the required columns from the drop-down. All the numeric options are displayed under the Columns drop down. You can select multiple columns by clicking on + icon.
- Enter the threshold for the columns. Threshold defines the Drift detection threshold for each column and only numerical columns can be selected for profiling.
- Select the required filter column from the drop-down. Filter column contains date column of the dataset to filter.
- Enable Generate First Profile option if you want to generate a profile.
- Under Schedule section, enter the following details:
- Enter a Schedule Name.
- Select the Schedule Type as required:
- Daily: Select to run the schedule everyday.
- Weekly: Select to run the schedule once in a week or the selected days in a week.
- Monthly: Select to run the schedule once in a month or the selected days in a month.
- Click Save.
The Data Profiling has been started and Stop Profiling option is displayed in the Profile Summary screen.For more details on disabling dataset profile, see Stop Profiling section. - Click Generate Profile.The Data Profile is created.Schedule DailyTo schedule the profiler to run daily, perform the following steps:
- In the Profiler Settings screen, select the Schedule Type as Daily.
- Select the start date on which you want to run the profiler.
- Select the end date on which you want to stop your schedule.
- Enter the time at which you want to run the profiler.
- Click Save.
Schedule WeeklyTo schedule the profiler to run weekly, perform the following steps:- In the Profiler Settings screen, select the Schedule Type as Weekly.
- Select the start date on which you want to run the profiler.
- Select the end date on which you want to stop your schedule.
- Enter the time at which you want to run the profiler.
- Select the day on which you want to run the profiler. You can select multiple days to run the profiler.
- Click Save.
Schedule MonthlyTo schedule the profiler to run monthly, perform the following steps:- In the Profiler Settings screen, select the Schedule Type as Daily.
- Select the start date on which you want to run the profiler.
- Select the end date on which you want to stop your schedule.
- Enter the time at which you want to run the profiler.
- Select the month on which you want to run the profiler. You can select multiple months to run the profiler.
- Select the date on which you want to run the profile of the selected month to run.
- Click Save.