- Profitability Analytics Cloud Service User Guide
- Operations
- Object Migration
- Object Import Definitions
- Creating Object Import Definitions
7.2.4.1 Creating Object Import Definitions
You can create Import definitions and add Import Objects using the Object Migration (Import) feature.
- Click Add in the Object Import Summary page to view the Migration Definition page.
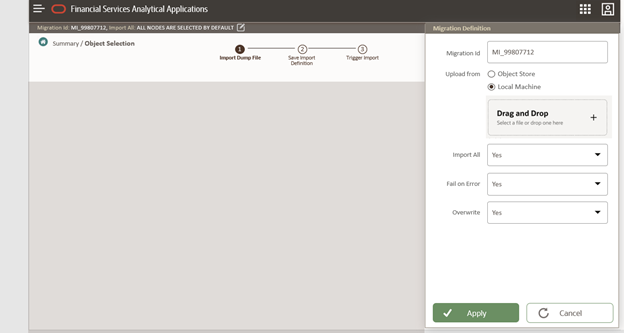
- Enter the following details, in the Migration Definition
page.
- ID - The
Unique
Name
for the
New
Import
Object
definition.
The migration ID should not contain any space and exceed 30 characters. Underscore (_) and hyphen (-) are allowed.
- Dump File -Select the .DMP file to be
uploaded for creating the Import definition.
Figure 7-1 Importing Dump File
 You can select the dump file using one of the following options:
- Select the option Object Store, to select the dump file (.DMP file) from the list of dump files available in the same environment.
- Select the option Local Machine and click Drag and Drop, to add a .DMP file, from the local directory. You can only Add Dump file that are downloaded using Download Dump file option.
Note:
- Uploading a dmp file either created or edited locally will generate an error.
- You can rename the .DMP file, if required. Ensure to follow the naming convention. For more information, refer toFile Naming Conventions for Migrate Objects.
- Import All - Select an option to
import the objects that are associated with the selected object type.
You can edit this option if required, in the Object
Selection page.
- Yes - Imports all the objects that are included in the dump file.
- No - Imports only those objects that you can select in the Object Selection page.
- Fail on Error - Select an option to proceed with the
definition creation in case of an error. You can edit this option if
required, in the Object Selection page.
- Yes - Stops the creation process, if error is generated.
- No - Creates the import definition even when error is generated. The object with the error is not included in the object creation.
-
Overwrite - Select an option to overwrite the existing
definition. You can edit this option if required, in the
Object Selection page.
- Yes - Replaces the existing Import definition.
- No - Creates a new Import definition.
- ID - The
Unique
Name
for the
New
Import
Object
definition.
- Click Apply to save the details. The Import definition is created and Object Selection page is displayed. You can add objects to this import definition.
- Click Add to include objects to the definition.
- Select the required Object Type from the Object Types
drop-down list.Objects that are defined in the environment with respect to the selected object type are are listed. For example, if Schedule is selected as the Object Type, all the Objects defined with respect to Schedule, in the environment are only listed.You can also enter the first few letters of the object name in the Search Field, to narrow down the search.
- Click the check box adjacent to each object, to include the objects associated with a specific object type, to the import definition.
- Repeat steps 4, 5 and 6, to include objects associated with various object types.
- After adding all the required objects, click Save.The Import definition is saved successfully and a confirmation message is displayed. The new definition is listed in the Object Import Summary page and the status is set to Saved.
- If you want to Save and Export the Definition, click Import.