6.3.3.2.1.3 Defining Coefficient Values
Once the Key and Target dimensions have been defined, the next step is to define the coefficients for the cross product of Key and Target dimensions. Click on the Generate Grid button placed at the bottom right corner of the Dimension Selection tab, to generate the matrix for the cross product.
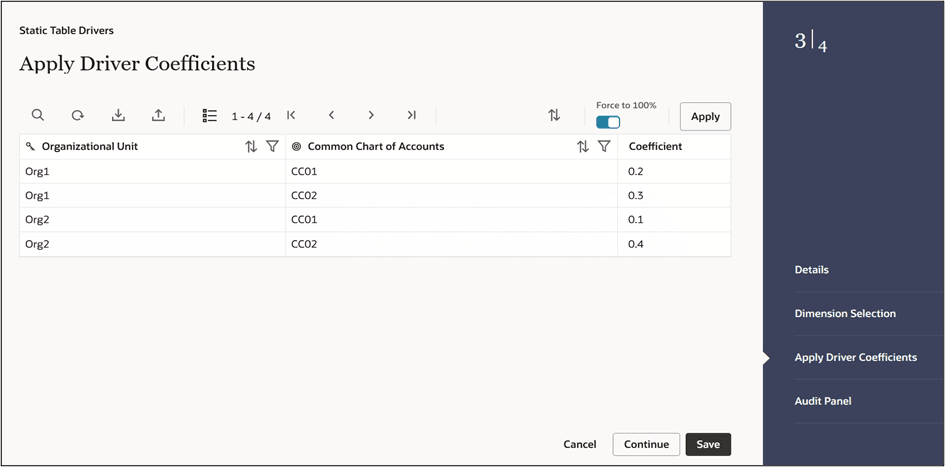
After the matrix is generated, the user is automatically taken to the ‘Apply Driver Coefficients’ tab that now displays a data entry table. Assign the coefficients to combinations of Key dimension values and Target dimension values.
Figure 6-65 Static Table Drivers – Apply Driver Coefficients Tab

After the coefficients are defined, click Apply to apply the changes. You can click on Dimension Selection tab to view or edit the Key dimensions and the Target dimensions used. Once the definition is modified, the coefficient matrix needs to be re-generated by clicking the Generate Grid button once more.
Select either Yes or No for the value of the Force to 100% allocation method by toggling it On or toggling it Off respectively. (see the toggle button near the top right of the Definition tab). The default value for Force to 100% is Yes.
Static Driver Table rules are similar in many ways to Dynamic Driver rules. Select Yes for the value of Force to 100% when you want to perform a distribution using non-normalized statistics such as headcount, square footage of occupancy, and so on. If you are using a normalized set of driver statistics (statistics that sum to 1.00 or 100%) or if you are combining activity counts with activity rates, you need not use Force to 100%.
When you use Force to 100% in a Static Table Driver rule, balances are distributed on a percent-to-total basis within each row visible on your Coefficient data entry table. For example, for the above coefficient values, balances are distributed from Company A to Cost Center 1 and Cost Center 2 in proportions of 10% and 90%; and balances would be distributed from Company B to Cost Center 2 and Cost Center 3 in proportions of 40% and 60%.
Click Save to validate and save your rule.
Click Cancel to close the rule without saving any changes you may have made. This control is only active when you are in Edit mode.