6.3.4.2.4 Table Data Screen
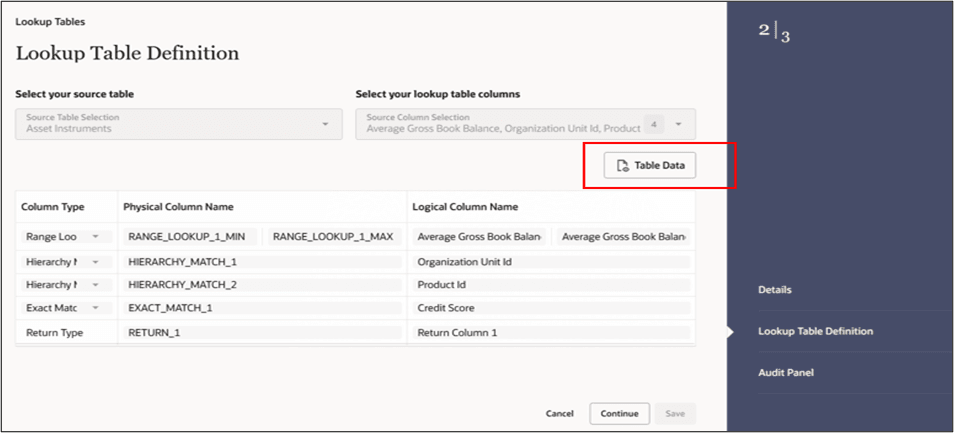
User can input data into the created Lookup Table through a screen called the Lookup Table Data screen that can be invoked from the Lookup Table Detail screen opened in View mode. The user needs to click the button ‘Table Data’ to open the Lookup Table Data screen. The Table Data button is enabled only for the Lookup tables that has reached the 'Table Created' state.
Users can view, add and delete data from the lookup table through this Lookup Table Data screen.
Figure 6-71 Lookup Table Definition in View mode – Table Data button

Once invoked, the Lookup Table Data screen displays the lookup table columns and the data contained in the lookup table. The default launch of the Lookup Table Data screen looks like the following:
Figure 6-72 Lookup Table Data screen – default launch

The Lookup Table Data screen allows several operations on the selected lookup table data.
- Add Row: Enter the number of rows you want to add, and then click this button to add the number of new rows to the Lookup table.
- Delete Row: Click this button to delete a single row or multiple rows from the Lookup table.
- Remove Blank Rows: Clicking this button removes all the blank rows present in the Lookup table, at one go.
- Export: To export the Lookup table data in .xls format.
- Import: To import data (in the form of a .xls file) into the Lookup table screen.
- Save: After the new rows are added, enter the values for the rows and click Save. This action saves the values of the rows in the database for the lookup table, and then closes the screen.
- Apply: Clicking Apply saves the values of the rows in the database for the lookup table while not closing the screen. This enables the user to continue in the same screen while the values entered also gets saved in the database.
Adding rows to the blank Lookup table increases the row counter simultaneously. In the following screenshot, when we add two rows in the table, we see that the row counter has increased to 2, indicating that the table contains 2 rows. This helpful in the case of a table that has a large number of rows.
Figure 6-73 Lookup Table Data screen – adding two rows

Error checking has been introduced for Import functionality where an erroneous file import would be restricted into the Lookup Table Data screen. When an erroneous file is tried to be imported through the Import action, we get the following error.
Figure 6-74 Lookup Table Data screen – erroneous file import

An error file (in .xls format) will be generated in this case, in the set Downloads folder that shows the errors for each erroneous cell in the file. The error details will be provided as comments in the .xls file for each erroneous cell. The error file may look like the following.
Figure 6-75 Lookup Table Data screen – error file
