Configuring Pipelines

You can configure pipelines that you have created as your requirements change.

To configure pipelines, follow these steps.

Note:

Pre-configured pipelines cannot be edited. You can only edit user-defined pipelines.
  1. Navigate to the Pipeline Designer page.
  2. Click the name of the pipeline that you want to configure. The pipeline opens in the Pipeline Designer page.
  3. Drag and drop the required widgets from the widgets pane located in the upper-right corner of the designer pane.
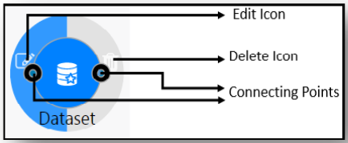
  4. Hover over a widget and click Edit Edit iconto configure a widget.

    Figure 3-1 Dataset Widget Details

    This image shows where to find the action icons on the Dataset widget.
    For more information on the widgets in the various types of pipelines, see the following sections:
    • Widgets in Data Pipelines
    • Widgets in Scenario Pipeline
    • Widgets in Scoring Pipelines
    • Widgets in Customer Screening Pipelines
    • Widgets in Transaction Filtering Pipelines
    • Widgets in KYC Onboarding Pipelines
    • Widgets in KYC Batch Pipelines
    • Widgets in KYC Risk Factor Pipelines
    • Widgets in Watch List Pipelines
  5. Click and hold the connecting point of a widget, and drag and drop to the connecting point of another widget to connect the widgets. If you do not connect the widgets to complete the flow of the pipeline, your pipeline will not work as expected.
  6. Click Save Save icon.The Pipeline Save dialog box is displayed.