Home
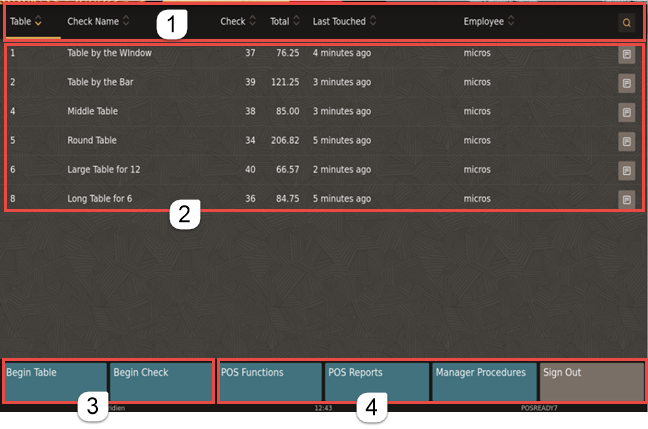
After you sign in to the workstation, the home page appears. The home page shows open check details and provides access to point-of-sale functions.
Figure 1-10 TSR Home Page on Workstations and Tablets

The following table describes the areas called out in the image.
Table 1-6 TSR Home Page
| Callout Number | Area | What You Use It For |
|---|---|---|
|
1 |
Header |
Sort check details by tapping column headers. A yellow line appears beneath the column that is being sorted. Click the Search
icon ( |
|
2 |
Check details |
View details such as the table number, check name and number, total, and employee. If there are no checks with a table name, the Table column is not visible. If there are no checks with a table number, the Table Number column is not visible. If the Table and Check Name columns are all the same, the Check Name column is not visible. Click the View Check icon ( |
|
3 |
Begin check buttons |
Click Begin Table to begin a check by table number or table ID. The system prompts for a table number or name, and then moves to the Transaction page. Click Begin Check to have the workstation automatically generate the next check number and move to the Transaction page. |
|
4 |
Functions panel |
Access non-check functions using POS Functions. For example, complete cash drawer operations and printing operations. Access reports, such as financial reports and check reports using POS Reports. Access functions, such as edit menu items and edit menu item availability using Manager Procedures. Return to the Sign In page using Sign Out. |
Unsent Checks Warning
Warning messages appear on POS clients when a device with unsent checks is disconnected from the Check and Posting Service (CAPS). The messages appear as a translucent yellow banner at the top of all pages outside a transaction. They do not appear when a transaction is in progress so as not to distract from, or slow down, the order taking process.
After posting a transaction, there is a 30-second delay to enable checks to send before a warning message appears. The warnings make the server aware of an issue so that they can either move the device back into network range or alert a manager that there is a connection issue.
The warning messages show the number of unsent transactions on the device so that when a solution is found, servers can see the number decrease and know that the issue has been resolved. Warnings appear on Android devices and Linux workstations for TSR, QSR, and Bar operations when the device is offline from CAPS. The warning messages appear by default and cannot be switched off.
Figure 1-11 TSR Unsent Checks on Workstations and Tablets

Parent topic: Table Service Restaurant Operations