- Configuration Guide
- Interfaces with Simphony
- Inserting the Extension Application Files for OPERA
Inserting the Extension Application Files for OPERA
-
Simphony release 2.8 or later
-
OPERA Interface release 8.7.3.7 or later
- Run the SIMPH2_ENH_IFC[version number].exe setup application on the Simphony application server.This application verifies the Simphony installation and copies the following files to the
[Drive letter]:\MICROS\Custom\EnhancedInterfacefolder:-
CONTENT_EnhIFC_Config.txt
-
McrsExtDialogsML.dll
-
MF_ENH.isl
-
MF_ENH_Android.isl
-
android.htm
-
- If you cannot start the setup application on the Simphony
application server because of access or user right limitations, but
have access to EMC from your local PC, use the /LOCAL parameter to
star the application.
This method only works for version 270. That is, SIMPH2_ENH_IFC270.exe. Running the application through this methods does not verify the Simphony installation, and it is your responsibility to ensure that the Simphony requirements are met. This method copies the required files into the sub-folder
Custom\EnhancedInterfacebeneath the folder you selected in the setup application. - Select the Enterprise, property, revenue center, or zone, click Setup, and then click Extension Application.
- Click the Insert icon to add a record.
- Enter the record name in the Name field (for example, OPERA), and then click OK.
- Double-click the record to open it in form view.
- On the General tab, click the Insert Application Content button.
Figure 57-3 Extension Application Insert Application Content Button

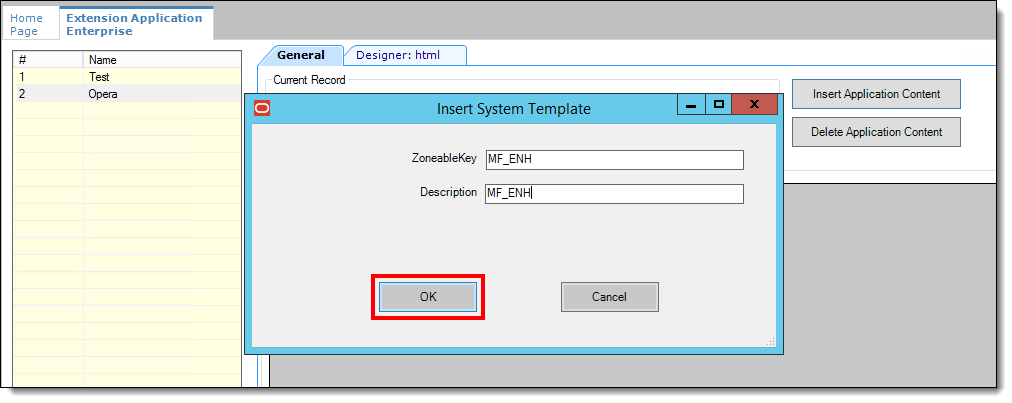
- Enter MF_ENH for both the ZonenableKey and Description fields,
and then click OK.
Figure 57-4 Inserting Application Content Records

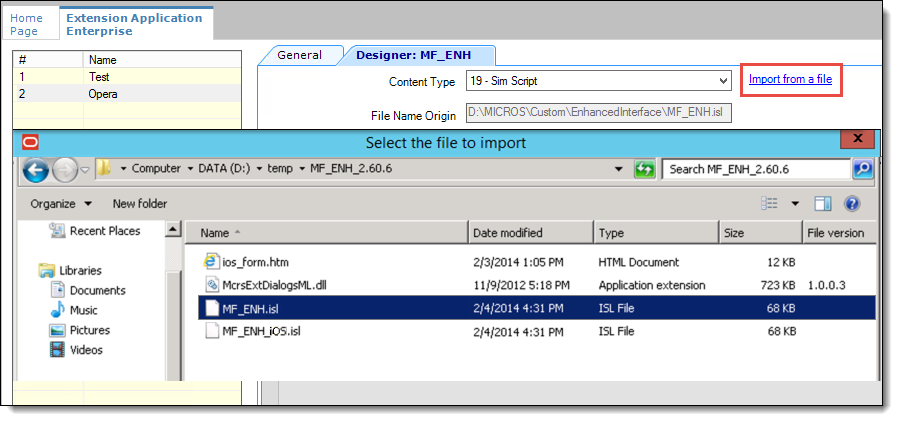
- On the Designer tab, select 19 - Sim Script as the Content Type.
- Click the Import from a file link.
Figure 57-5 Importing Content From File

- Browse to and select the MF_ENH.isl file, and then click Open.
- On the General tab, enter MF_ENH.isl in the Disk File Name column.
Disk File Name entries must exactly match the name of their associated SIM scripts and DLL file names. These entries are case-sensitive.
- In the Option Bits column, click the ellipsis point (...) button, and then select 2 - Main SIM Content.
- In the Target column, click the ellipsis point (...) button, and then select 1 - Win32.
- Repeat Steps 7 through 9 to insert a new application content
and import the MF_ENH_Android.isl file with the following settings:
-
ZonenableKey: Enter MF_ENH_ANDROID.
-
Description: Enter MF_ENH_ANDROID.
-
Content Type: Select 19 - Sim Script.
-
Option Bits: Select 2 - Main SIM Content
-
Disk File Name: Enter MF_ENH_ANDROID.isl.
-
Target: Select 10 - Android.
-
- Repeat Steps 7 through 9 to insert a new application content
and import the McrsExtDialogsML.dll file with the following settings:
-
ZonenableKey: Enter McrsExtDialogsML.
-
Description: Enter McrsExtDialogsML.
-
Content Type: Select 3 - DLL.
-
Disk File Name: Enter McrsExtDialogsML.dll
-
Target: Select 1 - Win32.
-
- Repeat Steps 7 through 9 to insert a new application content
and import the android.htm file with the following settings:
-
ZonenableKey: Enter html. The ZoneableKey entry for the android.htm file must match html, and it is case-sensitive.
-
Description: Enter html.
-
Content Type: Select 23 - Text.
-
Target: Select 10 - Android.
-
- Click Save.
- For multi-tenant environments, you must configure the content
information as Extension Application content. In these environments
the content feature cannot be used.
- Insert a new application content for the enhanced interface by clicking the Insert Application Content button.
- Configure the following fields:
-
ZonenableKey: Enter EnhIFC_Config (case sensitive).
-
Description: Enter EnhIFC_Config (case sensitive).
-
Content Type: Select 23 - Text.
-
Target: Select 10 - Android.
-
- Click Save.
- Insert the content information as outlined in Configuring OPERA Content Information.
Parent topic: Interfaces with Simphony