- Installation Guide
- Simphony Installation
- Simphony Installation for an All-in-One Server
Simphony Installation for an All-in-One Server
The Oracle Food & Beverage Compatibility Matrix provides more information on compatibility between R&A and Simphony.
- Log in and download the Simphony installation application from the Oracle Technology Network (OTN) website at https://edelivery.oracle.com/.
- Run the Setup file, and then click Next to continue the installation.
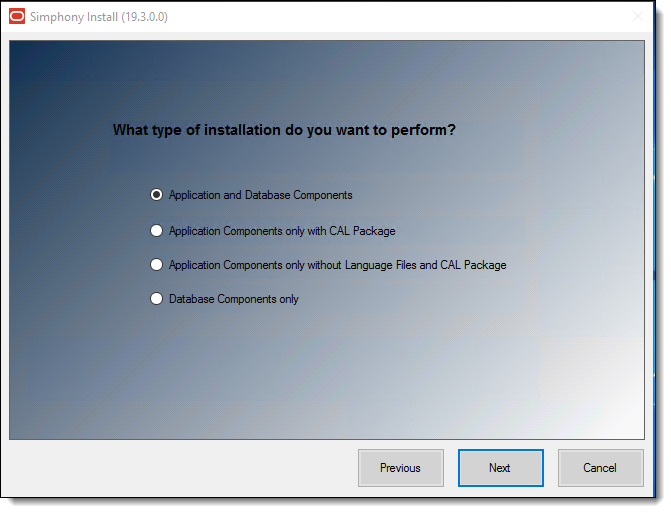
- Select Application and Database Components, and then click Next. List of
Simphony Components and Services contains more information.
Figure 3-1 Simphony Installation Application
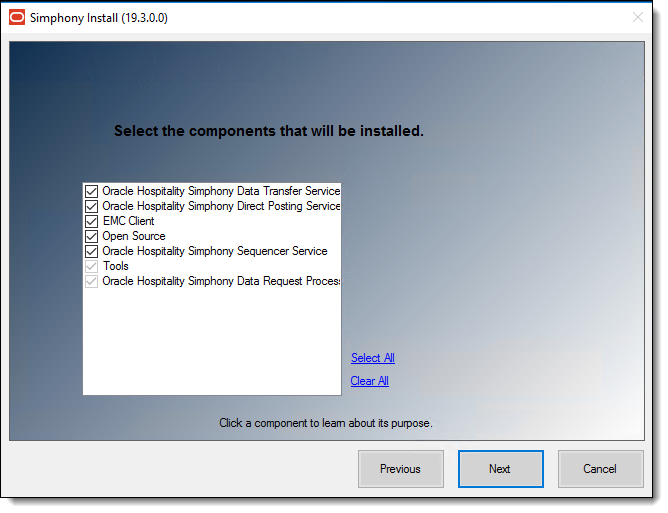
- Select all of the components, and then click Next. The Simphony Data Request Processing Service is
installed by default, and is used for Import/Export tasks.
Figure 3-2 Simphony Install Component Selections
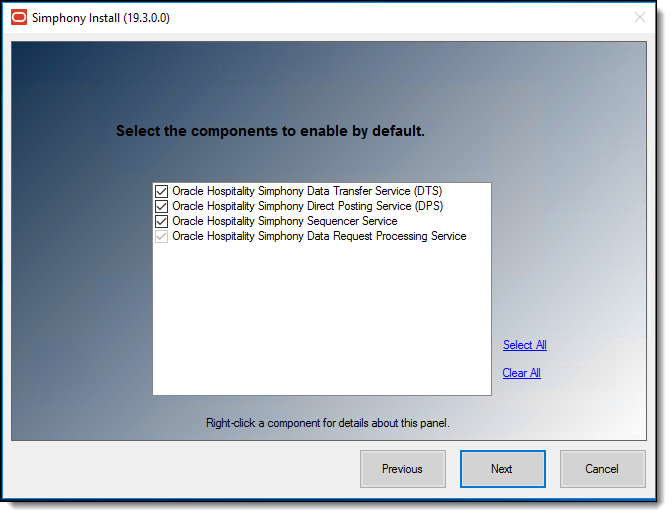
- Select all of the components that are to be enabled by
default, and then click Next.
Figure 3-3 Simphony Install Components to Enable by Default
- If you are not using a Load Balancing server and are using
the Import/Export feature or plan to use the Simphony Engagement Cloud
Service:
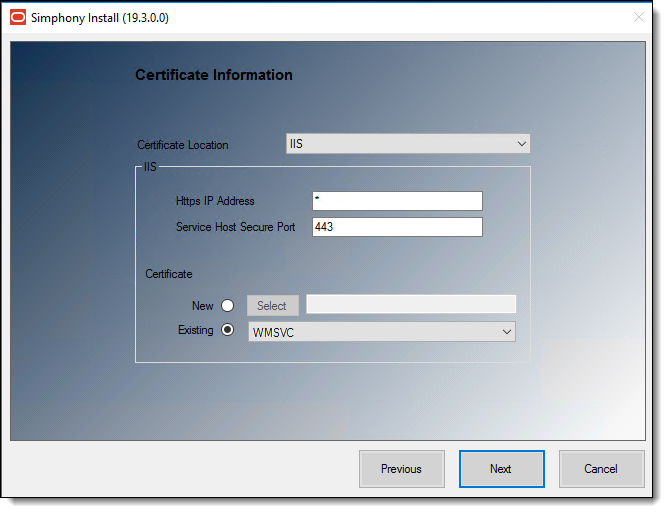
- Select IIS for the Certificate Location field.
- To add a new certificate, select New, click Select, enter or select the certificate location, and then enter the Password for the certificate.
- To add an existing certificate, select Existing, and then select the certificate from the drop-down list.
- Enter the port number in the Service Host
Secure Port field.
See Requesting and Installing Secure Certificates for more information about requesting and installing secure certificates.
If you define a Service Host Secure Port number other than the default of 443, you need to configure the IIS Bindings of each Application Pool to the new port. To add IIS Bindings, refer to Binding Secure Server Certificates to IIS and the Microsoft TechNet Library at https://technet.microsoft.com/en-us/ for more information.
- Enter the IP address of the server for the Service
Host Name (computer name) in the Https IP Address field. If the server is using a Domain Name System (DNS) or Host
file mapping, you can enter the name of the server instead of the
IP address.
Figure 3-4 Simphony Install Certificate Information
- Click Next.
For the All-in-One Server installation scenario, skip Steps 9, 10, and 11.
- If you are using the Import/Export Service or plan to use the Simphony Engagement Cloud Service, on Oracle RAC or a Load Balancing server, select LoadBalancer for the Certificate Location field.
- Enter the port number in the Service Host Secure
Port field.
-
If you define a Service Host Secure Port number other than the default of 443, you need to enable that port on the Load Balancer server.
-
If you define a Service Host Secure Port number other than the default of 443, you need to configure the IIS Bindings of each Application Pool to the new port. To add IIS Bindings, refer to Binding Secure Server Certificates to IIS and the Microsoft TechNet Library at https://technet.microsoft.com/en-us/ for more information.
-
You can define any free port number for the Service Host Port. If you define a port number other than the default 443, you must manually change the port number when you install subsequent services.
-
If you plan to install Reporting and Analytics on the same server as Simphony, do not assign port number 8081 for the Service Host Port. This is the default port number assigned to the Red Hat JBoss server for Back Office Reports.
- Select IIS in the Certificate Location field.
- To add a new certificate, select New, click Select, enter or select the certificate location, and then enter the Password for the certificate.
- To add an existing certificate, select Existing, and then select the certificate from the drop-down list.
-
- Click Next.
Figure 3-5 Service Host and Default Gateway Addresses
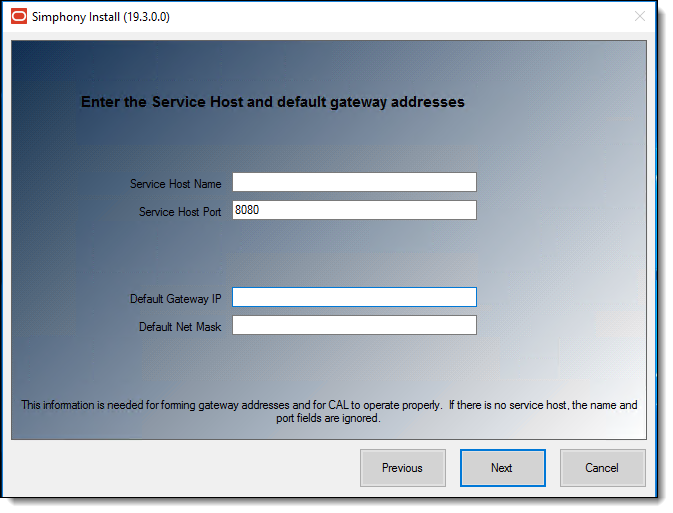
- Enter the Service Host Name and Service Host Port number, as well as the Default Gateway IP and Default Net Mask IP addresses, and then click Next.
- Select Oracle Database, and then click Next:
- For your Oracle Database, select Oracle.
For All-in-One installation scenarios, the installation application installs an Oracle 19c client (even if you are using Oracle Database 12c as a platform). If you are using Oracle Database 19c, the installer does not install an Oracle 19c client.
- Click OK to install the Oracle 19c Database client if prompted to do so.
- For your Oracle Database, select Oracle.
- Enter or select the location to install Simphony, and then
click Next twice.
Oracle Food and Beverage recommends that you install the Simphony application on a separate partition from where the Microsoft Windows or Oracle Linux for MICROS operating system resides (usually the C:\ drive).
- To install Simphony with a blank database:
- Select Blank Database.
- Enter a strong Username and Password to comply with Payment Card Industry (PCI) security guidelines. The credentials that you enter here are used to create the Simphony super user to access the EMC.
- Confirm the password, and then click Next.
Oracle Food and Beverage recommends separating the Transaction and Security databases onto different servers for additional security.
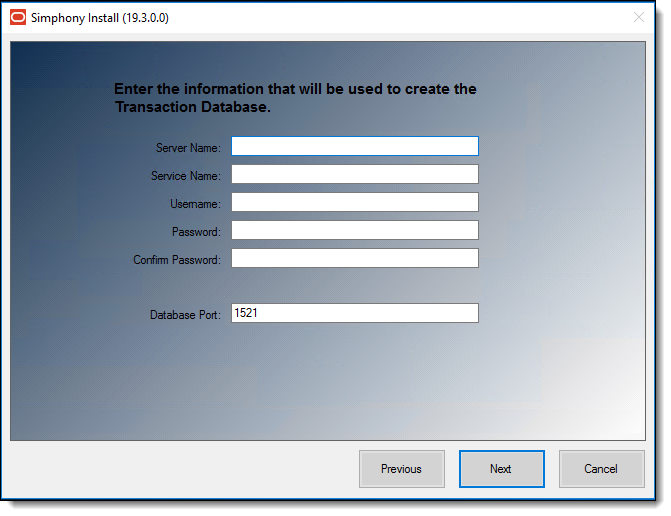
- Enter the following information that is used to connect
to the transaction database, and then click Next
- Server Name: Enter the name of the transaction database server.
- Service Name: Enter the name of the service (TNS alias).
- Username: Enter your transaction database access user name.
- Password: Enter your transaction database access password.
- Confirm Password: Re-enter the password from the previous step.
- Database Port: Enter the port number used to access the transaction database server, and then click Next.
Figure 3-6 Transaction Database Information
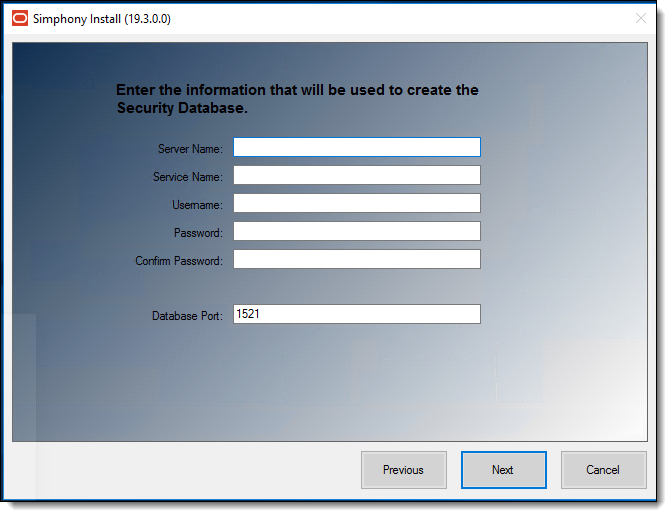
- Enter the following information that is used to connect
to the existing security database, and then click Next.
- Server Name: Enter the name of the security database server.
- Service Name: Enter the name of the service (TNS alias).
- Username: Enter your security database access user name.
- Password: Enter your security database access password.
- Confirm Password: Re-enter the password from the previous step.
- Database Port: Enter the port number used to access the security database server, and then click Next.
Figure 3-7 Security Database Connection Information
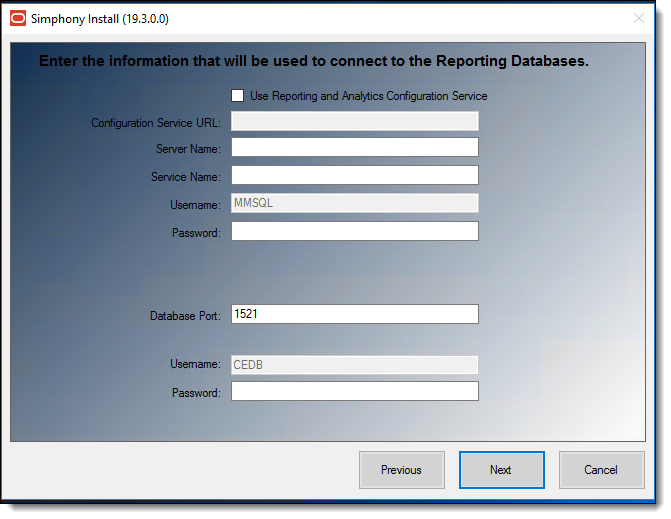
- Enter the following information to connect to the reporting
database server or the Enterprise Back Office (for Reporting and Analytics)
portal.
If you are using cloud-based Enterprise Back Office (EBO) version 20.1 for Reporting and Analytics (R&A):
- Use Reporting and Analytics Configuration Service checkbox: Enable this checkbox to use the Enterprise Back Office portal (which includes R&A 20.1). When this checkbox is enabled, all irrelevant fields are automatically disabled and grayed out.
- Configuration Service URL: Enter
the URL containing the Fully Qualified Domain Name (FQDN) of the cloud-based
server running the Reporting and Analytics Configuration Service.
You must also include the Port Number. For example,
https://FQDN:7002/ConfigurationService/v1, where 7002 is the assigned port number.If you are not utilizing R&A version 20.1, do not enable the Use Reporting and Analytics Configuration Service checkbox and enter the following:
- Server Name: Enter the name of the reporting database server.
- Service Name: Enter the name of the service (TNS alias).
- Username: Enter (or verify) your reporting database access user name.
- Password: Enter your reporting database access password.
- Database Port: Enter the port number used to access the reporting database.
- Username: Enter (or verify) your reporting database access user name.
- Password: Enter your reporting database access password, and then click Next.
Figure 3-8 Simphony Install Reporting Database Connection
- You have the option to configure Multi-Factor Authentication (MFA) if you already have your SMTP email servers set up and validated. MFA Configuration During the Installation of Simphony contains instructions about configuring MFA during the installation process.
- Click Confirm.
- After the installation completes, click Finish to exit the Simphony setup.
- Click Yes to restart the computer.
- Proceed to Post-Installation Tasks to continue.
Parent topic: Simphony Installation