Connecting Reporting and Analytics to Simphony

With Simphony version 2.10 or later (which includes the Simphony 18.2, 19.1.x, 19.2.x, 19.3, and 19.4 releases), if you use Reporting and Analytics (R&A) version 9.0 Patch 8 or later (including the R&A version 9.1), the steps outlined below are no longer required. Core Simphony reports are now available to set up by default from within the R&A application.

If you are using R&A version 8.5.1, complete the following steps. Before you connect to R&A, you need to have:
  • At least one property in the Enterprise. The Oracle Hospitality Simphony Configuration Guide contains more information about adding properties to the Enterprise.

  • Organizations and report locations created in R&A for your properties in the Enterprise. The Hospitality Enterprise Back Office Installation Guide contains more information about the prerequisite configurations that are required when creating organizations and report locations.

To identify the location of R&A on the system, perform the following steps:

  1. In the EMC, select the Enterprise level, click the Setup tab, click Enterprise Parameters, and then click the Reporting and Analytics tab.

    Note:

    If you selected the Use Reporting and Analytics Configuration Service checkbox while installing Simphony, all irrelevant fields are automatically disabled and grayed out.
  2. In the Reporting and Analytics Machine Name field, enter the name of the computer that is running the MICROS Portal Service.
  3. Select the Enterprise level, click the Setup tab, and then click Properties.
  4. Double-click a property to open it.
  5. Select the Report Location for the property.
  6. If the Report Location is not available in the drop-down list:
    1. Click Edit, and then create a Report Location.

      Figure 4-1 Enterprise Properties R&A Setup


      This figure shows the starting point for configuring R&A setup for a property.
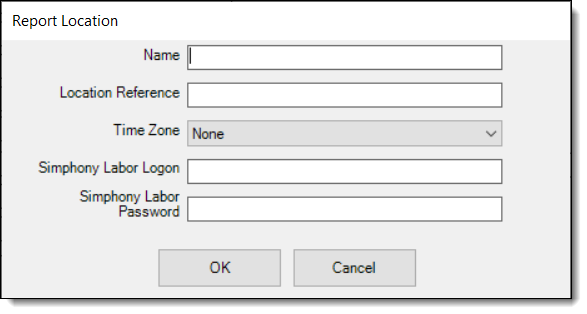
    2. Complete each field (required) as described below:
      • Name: Enter the property name.

      • Location Reference: Enter the Property ID. This must be unique.

      • Time Zone: Select the time zone from the drop-down list that matches the property’s time zone.

      • Simphony Labor Logon: Enter a unique user name.

      • Simphony Labor Password: Enter a unique password.

  7. Click OK, and then click Save.

    Figure 4-2 Report Location Configuration


    This figure shows the Report Location configuration window.
  8. Repeat Steps 4 through 7 for all properties in the Enterprise.