Workstations

Add a SimphonyTransaction Services Generation 2 (STS Gen2) workstation or validate that an existing STS Gen2 workstation is configured for GloriaFood. The STS Gen2 workstation must be a Check and Posting (CAPS) Service Host and the Type must be POS API Client.

If you have more than one POS API Client workstation type available in a revenue center, Oracle Food and Beverage recommends enabling at least two workstation devices that can receive checks and orders as this will provide resiliency should one of the workstations become unavailable.
  1. Log in to EMC.
  2. Determine the name of your CAPS workstation by selecting your location (property), clicking the Setup tab, and then clicking the Property Parameters module.
  3. Click the Workstations tab.
  4. In the Service Hosts section under the Type column, locate the Check and Posting record; the associated Service Host is the name of your CAPS workstation. Write down the name of this CAPS workstation exactly as it appears under the Service Host column.
  5. Close the Property Parameters module.
  6. Click the Workstations module under Hardware/Interfaces.
  7. In the Type column, locate any workstations that show POSAPI Client.
    • If you see a POSAPI Client workstation record, proceed to Step 8.

    • If POSAPI Client workstation records do not exist, proceed to Step 9.

  8. Complete the following steps for an existing POSAPI Client workstation record:
    1. Double-click the POSAPI Client workstation to open the record.
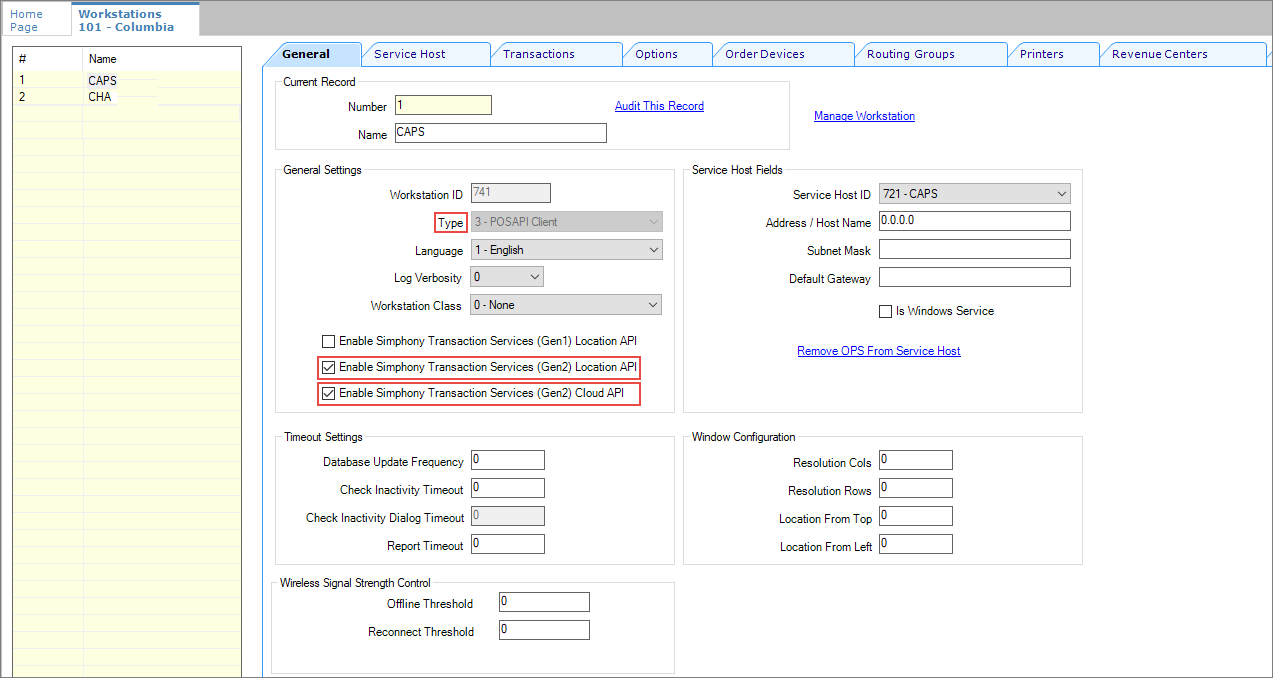
    2. Enable the following options:
      • Enable Simphony Transaction Services (Gen 2) Location API

      • Enable Simphony Transaction Services (Gen 2) Cloud API

      Figure 3-1 Workstation General Settings


      This figure shows the Workstation module, General tab.
    3. Is the Service Host ID shown on the General tab the same workstation name found in Step 4?
    4. Is the Default Order Type shown on the Transactions tab consistent with your desired default order type?
    5. If the values for 8-c or 8-d above already exist and are correct, click the Revenue Centers tab, and confirm that the revenue center to be used in this integration is selected. If not, select the desired revenue center, and then click Save. Proceed to Revenue Center Parameters.

      If the answer to 8-c or 8-d above is ‘No’, proceed to Step 9 to add a new POSAPI Client workstation.

  9. Complete the following steps to add a POSAPI Client workstation:
    1. Click the insert icon (This image shows the Insert icon, which is a green circle with a white plus sign.) on the toolbar and add a new workstation record named STSCAPS.
    2. Set the Type to 3 - POSAPI Client.
    3. Enable the second and third transaction services options:
      • Enable Simphony Transaction Services (Gen 2) Location API

      • Enable Simphony Transaction Services (Gen 2) Cloud API

    4. Set the Service Host ID to the workstation identified in Step 4.
    5. Click the Transactions tab and select the Default Order Type.
    6. Click the Order Devices tab, and then enable the order devices on which online orders will print.
    7. Click the Revenue Centers tab and select the revenue center to be used in this integration.
    8. Click Save.
    9. Proceed to Revenue Center Parameters.