- User's Guide
- Oracle Argus Affiliate Configuration
- Creating User Accounts
- Adding Users
- Using Organized By
Using Organized By
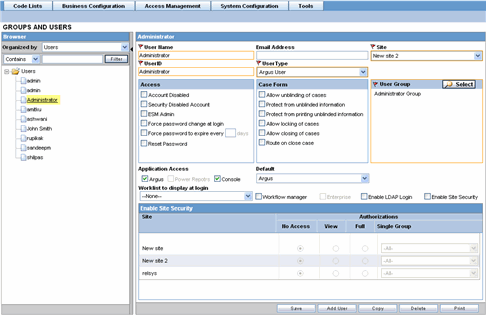
The filtering browser is in the top-left corner of the left panel. This section can be filtered on the basis of any of the two combinations displayed below.

For example, if you enable Organized by Groups, the generated data will be visible in a tree-format, in the left panel, based on the entire categorization of Groups and Users
Whereas if you enable the Organized by Users, then only the User list will be available in the tree view in the left panel.
Using the contains or starts with you can specify whether your search should contain or start with specific alphabets.
For example, the filtering criterion defined above will search for all Users that contain the word "admin".
- Select a User and click to view the user details in the right panel.

Note:
You can alternatively click Add User or Add New User to create a new user.
Use Copy to make an editable copy of an existing user.
Use Delete to delete a user.
- Enter the User Name. This should be a unique name associated with this user.
- Enter the User Id. This is the unique user name associated with the user.
- Enter the Email Address of the user.
- Select the Site from the drop-down list. The user is assigned to this site.
- Select the User Type from the drop-down list.
- Select the language from the drop-down list in Modify Language Narrative.
- This is the language the user has access to in the multi-lingual fields.
- Select the following options in Access, as per your
requirements.
Field Name Purpose Account Disabled
Enables the administrator to disable the account.
Security Disabled Account
Enables the administrator to disable the account depending upon the number of consecutive unsuccessful login attempts.
When unchecked:
The login procedure keeps track of the number of consecutive unsuccessful attempts at logging into the system. If the count reaches three, the login procedure will always fail the password validation and lock the user out.
Administrators with rights to user maintenance can reset the login attempts for the user to unlock the account.
When checked:
The login procedure to keep track of the consecutive unsuccessful attempts at logging into the system does not apply.
ESM Admin
Enables the administrator to give the Oracle Argus Safety user access to the ESM Mapping utility.
Force Password change at login
Ensures that password is changed at login.
Select this field to force Oracle Argus Safety users to change their password, when they log in to the application for the first time.
Force password to expire every x days
Enter the maximum number of days for the user(s) to retain user password.
Reset Password
Select this field to reset the user password.
- Select the following options in Case Form, as per your requirements.
Field Name Purpose Allow unblinding of Cases
Select this to allow the user to unblind a study case.
A user with no rights of unblinding a case cannot see the Study Drug field.
Users with Unblinding rights see a yellow tag "Unblind" adjoining the Concentration of product field.
The Broken by Sponsor' option in Blinding Status drop-down is enabled.
User has to enter password when on selecting the "Broken by Sponsor" option
Protect from unblinded information
Allows the Administrator to protect a user from unblinding information such as Study Drug, Concentration, Dosage Regimens and Total Dosage.
Protect from printing unblinded information
Select this to disable the user from printing unblinded information.
Allow locking of cases
Select this to allow the user to lock cases.
Allow closing of cases
Select this to allow the user to close cases.
Route on Close Case
Select this to disable the case routing dialog which appears when the users selects Case Actions -- Close Case on the case form.
- Select the User Group.
- Enable the Application Access for different applications such as Oracle Argus Safety, Power Reports or Console.
- Select the Default application access from the drop-down list, for the user.
- Select the default worklist to be displayed on logging onto Oracle Argus Safety from the Worklist to display at login drop-down list, for the user.
- Select the Workflow manager checkbox to give the user more rights within the system.
- Select the Enterprise checkbox to configure a 'Workflow
Manager' user as an 'Enterprise user'.The user can view cases of any site outside its site too. This field is enabled only when the 'Workflow Manager' field is checked.
- Select the Enable Site Security checkbox to enable site based security data for the user.
- This is made possible through the Site Access Configuration dialog.
- The Site Access Configuration section enables a user to get access to additional sites.
- The administrator can select the access level by selecting from the options available in this dialog.
The following table describes the access levels in this dialog:

- Select the Enable LDAP Login checkbox to allow the user to be authenticated against the active directory server.
- Click Save to add the newly created Oracle Argus Affiliate user.
Parent topic: Adding Users