PSR/ReSD Details
Subject of Report
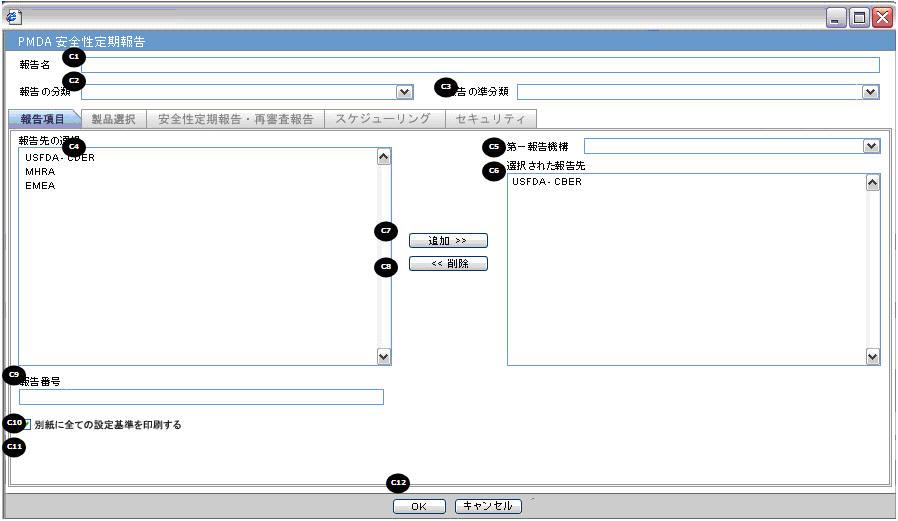
| Field Name | Description |
|---|---|
|
Report Name |
Manually Input a Name for the Report. It is displayed in the Reports > PSR Reports dialog box. |
|
Report Category |
Manually Input a Name for a Report Category. It is displayed in the Reports > PSR Reports dialog box. |
|
Primary Report Agency |
This list contains the Regulatory Authorities configured in List Maintenance > Regulatory Authorities (LM_REGULATORY_CONTACT table). If there is no Japanese Authority name configured, the English name is listed. The system allows you to select multiple agencies from the List of Agencies such that the report can be submitted to multiple agencies at the same time.The primary agency can be defined in this drop- down.When Japanese Message Profile is not configured in Console J for the selected Primary Agency, or when you add the agency with PMDA E2B (R3) or (R2) in the Report Configuration, an error message is displayed as: Selected Primary Agency doesn't have configured Message Profile (I or J) in Argus Console > Reporting Destination/EDI. Once you click OK, the selection of the Primary Agency goes back to the previous selection. This check is executed when you try to go to the other tab, or click OK to save the configuration. |
|
Report Number |
Manual entry text field that allows you to enter a report number. |
|
Print all configuration criteria on separate cover page |
Check box to print out the configuration of this report when the report is printed. When this is clicked, the Configuration page is printed at the beginning of the PSR/ReSD word print output. The page numbering of the PSR/ReSD does not include the Configuration page. |
Product Selection
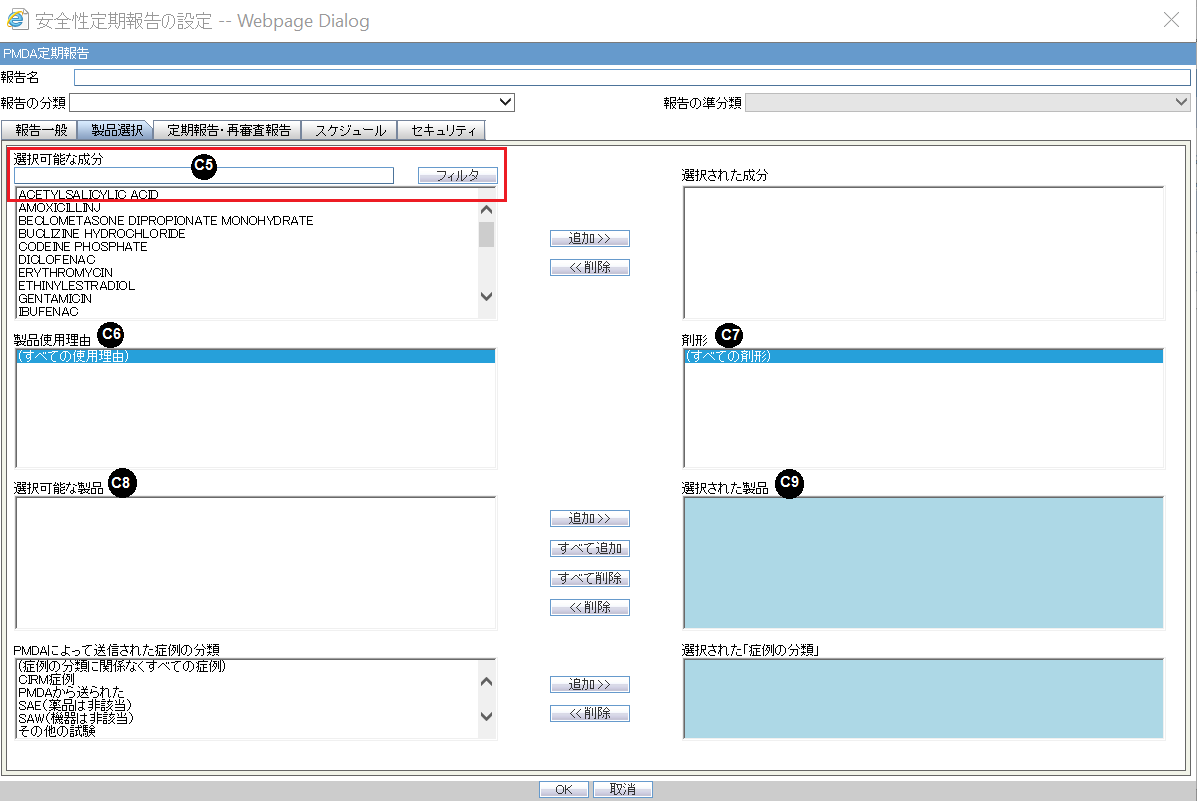
| Field Name | Description |
|---|---|
|
Available Ingredients |
This list contains the Ingredients used for the products configuration. It is stored in the LM_PF_INGREDIENT_J table once a product has been configured. The system allows filtering the Ingredients within the available list of Ingredients by a entering the Ingredient name and clicking the Filter button. The search is performed in Japanese ingredient name only. If the name is blank, enter English ingredient name. |
|
Indication |
This list contains the Indication configured for the product containing the ingredient in C5 section. Use this to narrow down the products displayed in C8. The system allows to multi-select Indications using the standard Windows functionality of CTRL+CLICK. If Japanese name is not available, the English name is displayed. |
|
Available Products |
This list is auto-populated once the Ingredient has been selected and displays all products from the LM_PRODUCT J table, containing the ingredient selected in C5 section. The format is Product name (Formulation, Concentration concatenated with the Concentration Units). If Japanese name is not available, the English name is displayed. The withdrawn products are displayed as well. |
|
Selected Ingredients |
When an ingredient has been selected, all products containing that ingredient are displayed in Available Products section. Multiple Ingredients can be selected at once to form a PSR product family. |
|
Formulation |
This list contains the formulation configured for the product using the ingredient in C5 section (LM_FORMULATION table). Use this to narrow down the products displayed in C8.The system allows to multi-select formulations using standard Windows functionality of CTRL+CLICK. If Japanese name is not available, the English name is displayed. |
|
Selected Products |
This list contains products that are selected from the Available Products list (C8). When at least one product is selected, the field has a blue background color. If the license is not withdrawn at the starting date of the PSR investigation timeframe, include the license in PSR and ReSD. |
|
Classification for cases sent by PMDA |
First option in this list is All cases irrespective of Case Classifications. Also, all the Case Classifications configured in the Codelist > Flexible Re-Categorization > CASE_CLASSIFICATION are listed under this left side box. Japanese names are given preference over English names while displaying. |
|
Selected Case classifications |
This list contains classifications that are selected from the classification for the cases sent by PMDA list. |
Additional Information
- When no Japanese ingredients, indication, or formulation is configured in the Console, the English names are displayed.
- If the product is added or deleted in the Product Selection section before the PSR/ReSD status is marked as Submitted, it displays a warning pop-up: If the content of selected product is changed, IBD, JAD, and Assigned date can possibly be changed. Do you want to proceed?).
- If you add or delete the products in the Product Selection section before the first PSR report is marked as Submitted, it updates the IBD, Japan award date, and Assigned Date based on the new product set.
- In the "Selected Case classifications" box, if the option All cases irrespective of Case Classification is already selected, and if the user tries to select any case classification to the right box, then a warning message appears as below with the OK button.
Option "All cases irrespective of Case Classifications" is already selected. Please do not select any other classification.
Click on OK button retains the values as it is without any changes.
- If there is already one or more case classification selected, and if the user tries to select "All cases irrespective of Case Classifications" to the right box, then a warning message appears as below with the OK and Cancel buttons.
If you select 'All cases irrespective of Case Classifications', all other case classifications are removed from the selection. Do you want to proceed? If OK, is clicked, the value
 moves to the selected box. Move back all other options from right box (if available) to left box. If Cancel is clicked, then no changes is made to the options already selected.
- When you copy an existing submitted PSR report, and JAD, IBD, Assigned dates are non-editable (you have not clicked the RESET button yet) and If you change the product selection, JAD, IBD and Assigned dates do not change. When this occurs, the following warning message is displayed:
Because the configuration has the record of past investigation period, JAD, IBD, and Assigned Date for scheduling configuration will not be changed by modifying the Selected Products. It is necessary to use the Reset button and re-configure the investigation period if new PSR needs to be created based on modified product selection.
- All the forms printed as PSR and ReSD have only the information regarding the selected product in this configuration window.
Periodic Safety Report/ReSD
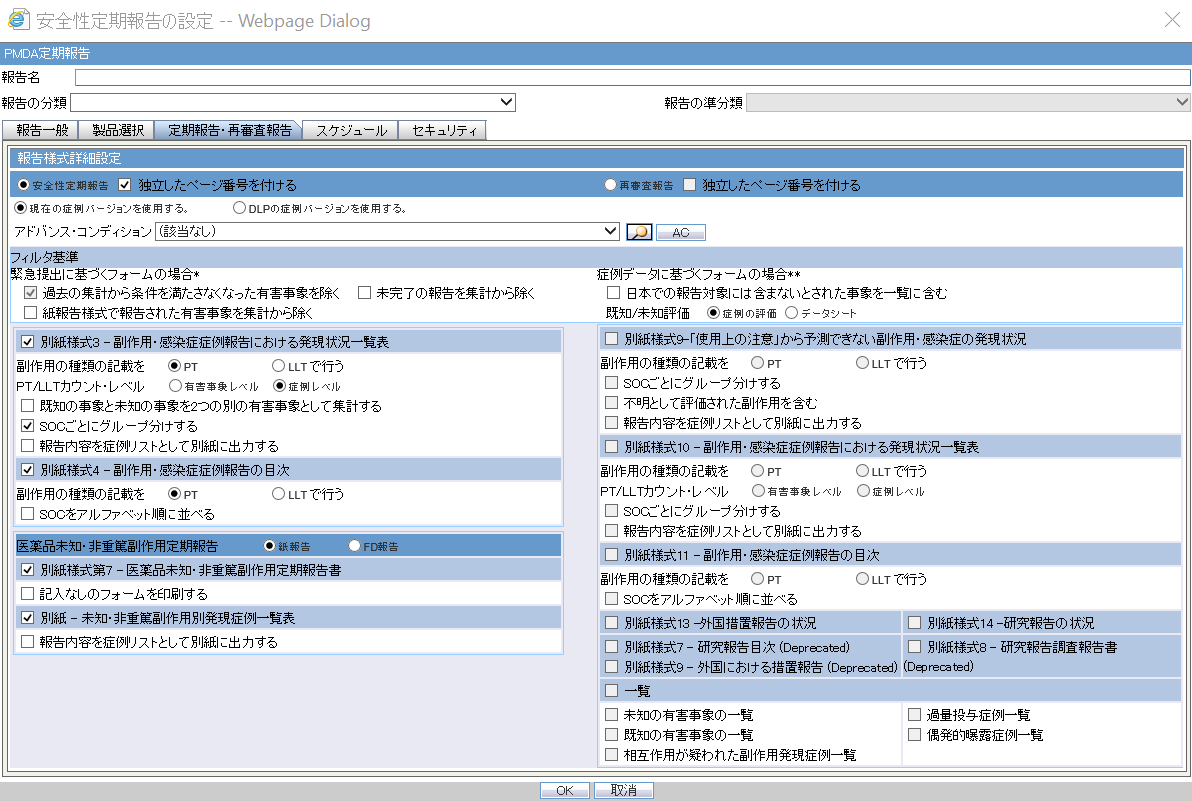
| Field Name | Description |
|---|---|
|
Forms configuration |
This field represents the main title of the UI. |
|
Periodic Safety Report |
This radio button is available to select either PSR or ReSD, so that you can create PSR and ReSD independently.This is selected as Default |
|
Re-examination Submission Dossier |
This radio button is available to select either PSR or ReSD, so that you can create PSR and ReSD independently. |
Data counting configuration
| Field Name | Description |
|---|---|
|
Count Configuration |
NA |
|
Exclude events which don't meet the condition from the past data |
When this is checked, the events that were reported in the past PSR, but do not meet the condition at the end of current investigational timeframe are subtractedEvent was downgradedReport was nullifiedWhen this occurs, following message is printed under the first table of form 3: Among the Events that were count in the past report, there are nullified/became non-reportable during this investigational time frame. This is not checked by default. |
|
Exclude events which were reported by Paper report form |
When this is checked, the events that were reported by Paper Form during the investigational time frame are excluded. This is always checked and disabled. |
|
Exclude Incompletion report from output |
When this is checked, the events reported as incompletion report during the investigational time frame are excluded. This is not checked by default. |
|
Include AE marked as Not include for the report in Japan |
When this is checked, the events in the cases that
have checkbox for "Not include for the report in Japan" (Case
Form > Japan Event tab > |
|
Listedness Assessed on |
When this is set to Case Assessment, Japanese marketed license listedness for the PSR products from the Case Form > Event Assessment tab is used for listedness determination. If the event is unlisted against at least one such license, it is printed as unlisted. "Unknown" is counted as "Unlisted". When this is set to Datasheet, Japanese marketed license datasheets for the PSR products as configured in Console at the time of PSR report generation is used for listedness determination. If the event is unlisted against at least one such license, it is printed as unlisted. A license is considered valid if it's Award Date <= End Date and Withdrawn Date >= Start Date. Blank Award Date or Withdrawn Date can be considered as valid. |
PSR Report Form 3
| Field Name | Description |
|---|---|
|
Form 3 Selection (check box) |
If this is checked, PSR Form3 is printed. This is checked by default. |
|
Print Only the Term Preferred Term (radio button)Lower Level (radio button) |
This field allows you to decide which term (PT or LLT) is to be printed on the form3.PT is selected by default. |
|
PT/LLT Count Level |
If Event based count is selected, if same PT/LLT code appears in the case/E2B more than once then it is counted that many times. If Case based count is selected, if same PT/LLT code appears in the case/E2B more than once then it is counted as one. Infection count that is printed in the '()' follows the same logic as PT/LLT If the Event is marked as Infection for any of the entry case level is selected by default. |
|
Count Listed & Unlisted as two separate events |
If this is checked, if the same reaction is marked as Listed for one entry in the Case and Unlisted for the other entry then, it is counted as two separate Events. If this is unchecked, if the same reaction is marked as Listed for one entry in the Case and Unlisted for the other entry then, system goes with conservative approach and it is counted as Unlisted. This check box is enabled only if the "PT/LLT Count Level" is set to "Case Level Count". This is unchecked by default. |
|
Classify based on SOC |
If this is checked, the PSR Form 3 PT/LLT section is grouped by SOC. In this case, the name of the SOC is listed at top of the section, and --- is used for separator between SOC and PT/LLT. Bold line is used for separating the groups. This is checked by default. |
|
Print the report content as Case Listing in the separate paper |
When this is checked, the case listing of the report content is printed out on a separate paper. All the configuration reflects the case listing. This is not checked by default. |
PSR Report FORM 4
| Field Name | Description |
|---|---|
|
Form 4 Selection (check box) |
If this is checked, the PSR Form4 is printed. This is checked by default. |
|
Print Only the Term |
This field allows you to decide which term (PT or LLT)is to be printed on the form4.PT is selected by default. |
|
Order SOC Alphabetically (check box) |
If this is checked, the SOC is printed in alphabetical order. If not checked, the SOC order is same as that of the MedDRA order. This is not checked as default. |
Non-Serious Unlisted PSR Report
| Field Name | Description |
|---|---|
|
Drug Non-Serious, Unlisted PSR |
This field represents the title of the section. |
|
Paper ReportFD Report |
Radio buttons:When Paper Report is selected, Paper report format is generated.When FD Report is selected, CSV report format is generated.When FD report is selected, both 7-1 and 7-2 forms are checked in the checkboxes and these cannot be edited. Paper Report is selected by default. |
PSR Report FORM 7 - 1
| Field Name | Description |
|---|---|
|
Form 7-1 Selection (check box) |
If this is checked, the PSR Form7-1 is printed. This is checked by default. |
|
Print Blank Form |
By checking this, the blank form is printed. This is not checked by default. |
PSR Report FORM 7 - 2
| Field Name | Description |
|---|---|
|
Form 7-2 Selection (check box) |
If this is checked, the PSR Form7-2 is printed. This is checked by default. |
|
Print the report content as Case Listing in the separate paper |
When this is checked, the Case listing of the report content is printed out on a separate paper. This is not checked by default. |
|
Separate Page Numbering (check box) |
When this is checked, the Page number is independent (starts from 1) for each form. This is checked by default. |
|
Use Current Case VersionUse DLP Case Version |
This radio button control is only displayed if DLP is enabled. Use Current Case Version is selected by default.Based on the PSR Configuration for DLP, the report is executed accordingly using latest Case Revision or using the DLP Case Revision. |
ReSD Report FORM 10
| Field Name | Description |
|---|---|
|
Form 10 Selection (check box) |
If this is checked, the ReSD Form 10 is printed. This is checked by default. |
|
Print Only the Term Preferred Term (radio button)Lower Level (radio button) |
Allows you to decide which term (PT or LLT) you want to print on Form 10.PT is selected by default. |
|
PT/LLT Count Level |
Allows you to filter the report based on the following options: Case Level Count (Default) Event Level Count Note: The data inclusion criteria for this column is same as PSR Form 3. |
|
Classify based on SOC |
If this is checked, the PSR Form 3 PT/LLT section is grouped by SOC. In this case, the name of the SOC is listed at the top of the section, and --- is used as separator between SOC and PT/LLT. Bold line is used for separating the groups. This is checked by default. |
|
Print the report content as Case Listing in the separate paper |
When this is checked, Case Listing of the report content is printed out on a separate paper. This is NOT checked by default. |
ReSD Report FORM 11
| Field Name | Description |
|---|---|
|
Form 11 Selection (check box) |
If this is checked, the ReSD Form 11 is printed. This is checked by default. |
|
Print Only the Term |
Allows you to decide which term (PT or LLT) is to be printed on form11. PT is selected by default. |
|
Order SOC Alphabetically (check box) |
If this is checked, the SOC is printed in alphabetical order. If this is not checked, the SOC order is same as that of the MedDRA order. This is not checked by default. |
ReSD Report FORM 9
| Field Name | Description |
|---|---|
|
Form 9 Selection (check box) |
If this is checked, the ReSD Form 9 is printed. This is checked as default. |
|
Print Only the Term |
This field allows you to decide which term (PT or LLT)is to be printed on the form 9. PT is selected by default. |
|
Order SOC Alphabetically (check box) |
If this is checked, the SOC is printed in alphabetical order. If not checked, the SOC order is same as that of the MedDRA order. This is not checked as default. |
|
Include Reactions assessed as Unknown |
If this is checked, report includes all the Reactions where either the Assessment is Unlisted or Unknown or Blank. If this is unchecked, report includes all the Reactions where either of the Assessment is Unlisted. |
|
Print the report content as Case Listing in the separate paper |
When this is checked, Case Listing of the report content is printed out on a separate paper. This is NOT checked by default. |
ReSD Report FORM 13
| Field Name | Description |
|---|---|
|
Form 13 Selection (check box) |
If this is checked, the ReSD Form 13 is printed. This is checked by default. |
ReSD Report FORM 14
| Field Name | Description |
|---|---|
|
Form 14 Selection (check box) |
If this is checked, the ReSD Form 14 is printed. This is checked by default. |
ReSD Report Tabulations
| Field Name | Description |
|---|---|
|
Tabulations |
If this is checked, all the tabulations in the section are checked and included in the print. This is checked by default. |
|
Tabulation for Unlisted Events |
When checked, this tabulation is included in the print. This is checked by default. |
|
Tabulation for Listed Events |
When checked, this tabulation is included in the print. This is checked by default. |
|
Case Overview Tabulations |
When checked, this tabulation is included in the print. This is checked by default. |
|
Overdose Tabulation |
When checked, this tabulation is included in the print. This is checked by default. |
|
Accident Exposure Tabulation |
When checked, this tabulation is included in the print. This is checked by default. |
Additional Information
- Separate page numbering always follow the previous form of PSR and ReSD. The following is the order of the page numbering sequence:
PSR Form 3, 4, 7, 7-2, ReSD Form 10, and 11.
- When you select PSR, ReSD using the radio button, the system selects all the forms available for each set of report automatically. By default, PSR is selected and PSR forms are selected.
- If the radio button is used to select the PSR form, the previously checked forms on the ReSD are unchecked. If the radio button is used to select the ReSD form, the previously checked forms on PSR are unchecked. While the PSR is selected, the ReSD section is disabled. While ReSD is selected, PSR section is disabled.
- If you close the configuration and opens again, the configuration on the UI remains as it was at the time of the last operation.
- You are allowed to change the configuration parameters for PSR Form 3, 4 and ReSD Form 10, 11; even if there are any past (non-editable) timeframe rows.
- When you check the Print the report content as Case Listing in the separate paper, the Case Line Listing along with the report content is printed on a separate paper.
- The Case Listing is printed only for the current timeframe for PSR form 3, ReSD Form 10 and PSR Form 7-2.
- This line listing is independently printed (using separate page) regardless of the Configuration Printing check box status. If you checked the option to print out the configuration content and Case Listing, the Case Listing is appended after the configuration content.
- The order of the print is Configuration > Form 3 Line Listing > Form 7-2 Line Listing > All the actual reports
- The Case Line Listing report does not follow the Separate Page option. The Case Line listing is always separated and starting from page 1 for each form.
- For PSR and ReSD Forms inclusion criteria of E2B, PMDA Paper form, or Case data, mapping logic and report format, refer to the Oracle Argus Safety Report Mapping Guide > PSR Mapping document and ReSD Mapping document.
PSR Form 3 Case Line Listing

| # | Field Name | Description |
|---|---|---|
|
1 |
PSR/ReSD Case Line Listing |
This field represents the section title. |
|
2 |
Periodic Safety Report |
This field represents the 2nd title. |
|
3 |
Periodic Safety Report form #3 |
This field represents the title for Form 3 section. |
|
4 |
Types of adverse event |
The List of AEs are printed using exactly the same rule and order as that of the PSR Form 3. |
|
5 |
Case Number |
All the reported AE's case numbers are printed in this field. These case numbers are separated by comma. |
|
6 |
Number of AEs reported during this timeframe |
Number of the AEs available also on the PSR form 3 for this report's investigational timeframe. |
PSR Form 7 Case Line Listing

| # | Field Name | Description |
|---|---|---|
|
1 |
PSR/ReSD Case Line Listing |
This field represents the section title. |
|
2 |
Non Serious, Unlisted Periodic Safety Report |
This field represents the 2nd title. |
|
3 |
List of non-serious, Unlisted adverse event |
This field represents the title for Form 7-2 section. |
|
4 |
(form 7 body) |
This section is always same as the PSR form 7. |
|
5 |
Case Number |
The Argus case numbers are added using this field. |
ReSD Form 10 Case Line Listing
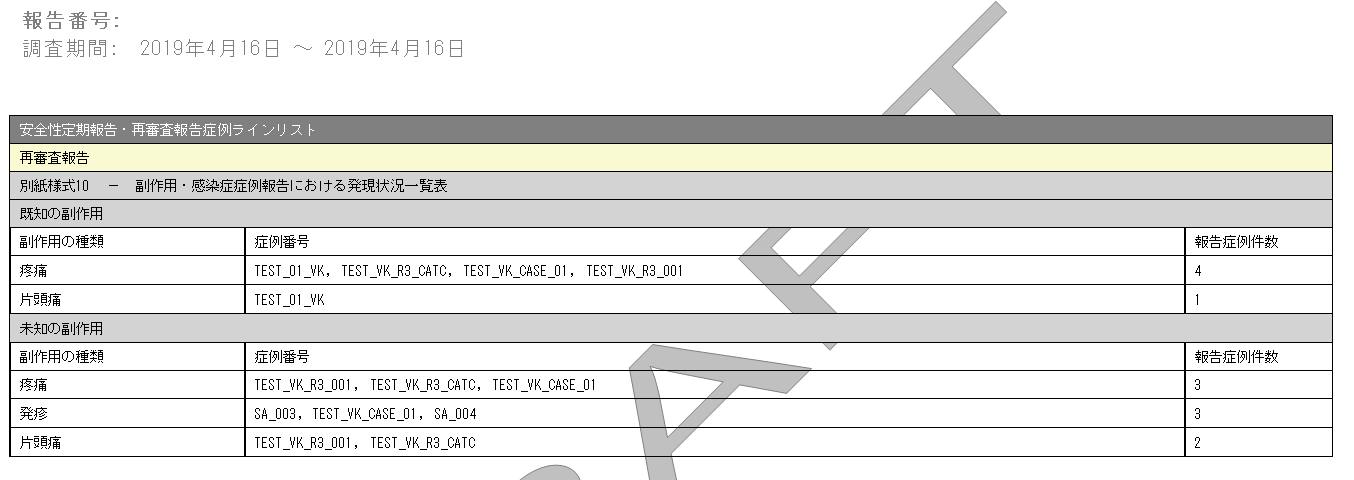
| # | Field Name | Description |
|---|---|---|
|
1 |
PSR/ReSD Case Line Listing |
This field represents the section title. |
|
2 |
Re-examination submission dossier |
This field represents the 2nd title. |
|
3 |
ReSD Form #10 |
This field represents the title for Form 10 section. |
|
4 |
Types of adverse event |
List of AEs are printed using exactly the same rule and order as that of PSR Form 3 with Listed and Unlisted events as two separate sections. |
|
5 |
Case Number |
All the reported AE's case numbers are printed in this field. These case numbers are separated by comma. |
|
6 |
Number of AEs reported during this timeframe |
Number of the AEs available also on the ReSD form 10 for this report's investigational timeframe. |
Scheduling
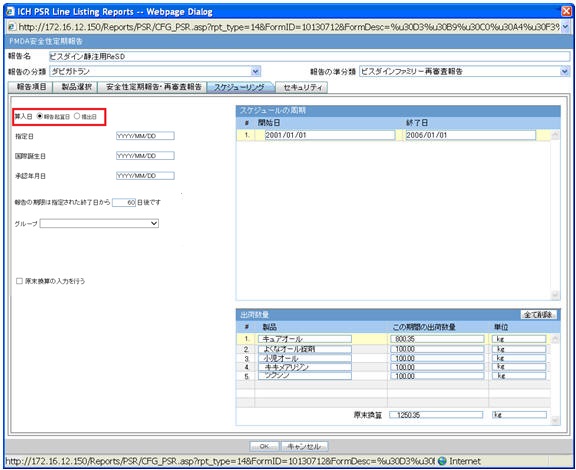
| Field Name | Description |
|---|---|
|
Inclusion Date |
Select one of the options to configure the inclusion date: Aware Date (Default)—If this is selected, then inclusion logic checks the Aware date of the submitted E2B/Paper report (CMN_REG_REPORTS.AWARE_DATE) to lie within the reporting time frame and only those reports are considered. If multiple initial or follow-up E2B/Paper reports fall within the current timeframe, then only the latest report for that series is considered. Date Submitted—. If this is selected, then inclusion logic checks the Submitted date of the E2B/Paper report to lie within the reporting time frame and only those reports are considered. If multiple initial or follow-up E2B/Paper reports fall within the current timeframe, then only the latest report for that series is considered. |
|
Delivery quantity |
This field represents the title of the section. This section displays the delivery quantity information for each timeframe row, when that row is clicked. |
|
Clear All |
When you click this button, all the entered information on this UI is cleared (The data entered by you only. For example, the Delivery Quantity and Delivery Unit for all the products in the Delivery Quantity section is removed but the product names remain in each row. When this is clicked, a confirmation window with the following message is displayed: If you continue, the entered information is erased. Do you want to continue? The content in the UI is deleted when you enter OK. No actions are taken on the table if you select Cancel in the message window. |
|
Products |
Product names used in this PSR appear as default. The names can be changed only at first report generation. From second report, names are read-only unless they are newly added. The maximum text length is 70. |
|
Delivery quantity during this period |
This field represents the text entry for numbers. The maximum text length is 12 (including the decimal point and number). Only numeric character and decimal point are allowed. |
|
Unit |
Type ahead functionality with console J Unit (J). For the units data that does not have unit(J), if unit (J) is not available, the field is left blank. You can change the unit only at first report generation. |
|
Total Amount |
Text entry for number. Only when the entered units are the same, the calculated total from above is displayed in this field. Maximum text length is 15 (including the decimal point and number). Only numeric character and decimal point are allowed. |
|
Entering the Delivery Quantity |
Delivery quantity table is entered into the report only when this is checked. This is unchecked by default. If this is not checked, the Delivery section of the report is blank (unchecking does not delete the values in UI). |
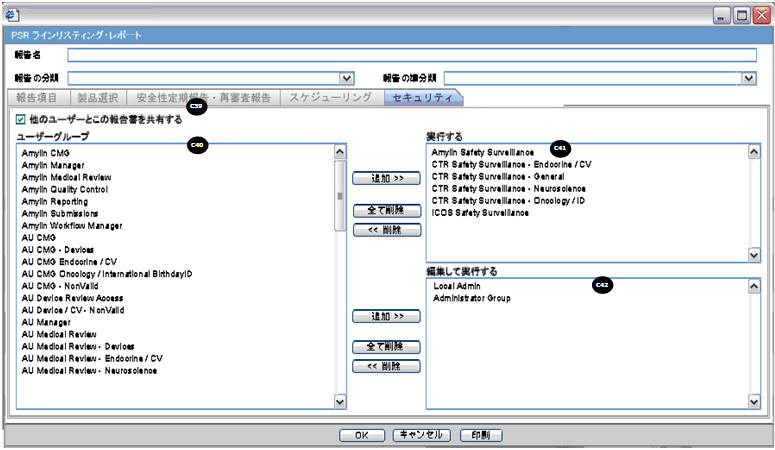
Security
Printing PSR / ReSD
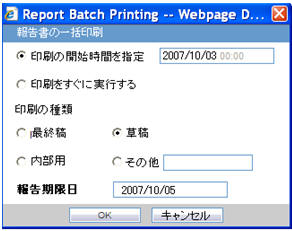
| Field Name | Description |
|---|---|
|
Report Batch Printing |
NA |
|
Run at |
You can specify the time of Reporting using this field. The date entry is in Japanese. |
|
Run Now |
This field represents the Print now option. |
|
Print As |
You can select printing option from Final, Draft, Internal, or Other. |
|
Other |
NA |
|
Due Date |
Automatically populate the calculated value by using the due days. |
Generating the Document
Generation of the document is executed using the following process:
- Click View Report in the Reports > Compliance > Periodic Reports.
- Check-out the report from the View and edit PSR/ReSD pop-up.
- Edit the checked-out word document
- Check-in using the same View and edit PSR/ReSD pop-up.
- Publish the PDF file (converting from the checked-in word doc)
Printing Requirements
- The system allows you to Print the Report and update the Report output in the Word document.
- The change of the configuration for the same investigation timeframe can be done multiple times only before the status is changed to Submitted. The changes in the configuration after the Submitted status of the PSR is applied on the next investigational time period.
- From the Reports > Compliance > Periodic Reports, selecting View Report allows you to View the PSR/ReSD Report in Word document to upload the report.
- When the J user opens Reports >
Compliance > Periodic
Reports from the menu, the Japanese UI is displayed for
Periodic report list. The pop-ups for the PSR View and Edit are
Japanese.
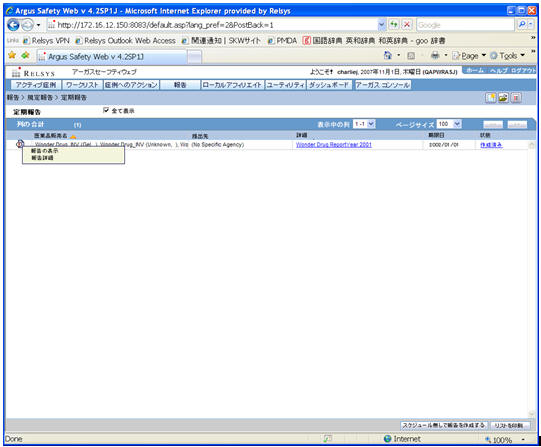
Field Name Description Trade Name
The J UI displays available Japanese data. When Japanese data is not available, the English data is displayed. The Trade Name section displays the multiple trade names using comma separated list of the selected products. The Trade Name displays the original product selected: English or Japanese. If PSUR was created for the English product names, the English product name is used in the list. If the PSR is created with the Japanese product names, the Japanese product name is used in the list. If the selected product in the PSR does not have the Japanese Trade name, the English trade name is displayed for that PSR.
Destination
The Japanese UI displays the available Japanese data. When Japanese data is not available, the English data is displayed. When Destination is not available, display No specific receiver.
Description
The Japanese UI displays the available Japanese data. When Japanese data is not available, the English data is displayed.
Due Date
English date format is DD-MMM-YYYY.Japanese date format is YYYY/MM/DD
Status
Status appears in Japanese in the Japanese UI, and in English in English UI and can have the following possible values:
Deleted
Scheduled
Generated
Approved
Disapproved
Submitted
New Data Available
No Longer Required
- When the J user opens Reports >
Compliance > Periodic
Reports from the menu, the Japanese UI is displayed for
Periodic report list. The pop-ups for the PSR View and Edit are
Japanese.
- The report output is in Word Document. This works in the similar way as ePSUR publishing where you are allowed to edit the Word output outside the system and once generated, can publish the FINAL Word Document.
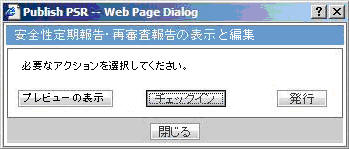
- When the report is generated and never checked out, the center button display Check-out to let you revise the document. At this time, Publish button is disabled.
- Check-out can be executed by one user only. Other users cannot check in the checked-out files.
- Once the check-out is executed, the Check-out button is changed to the Check-in button. This button is used to check-in the revised checkout file.
- When the file is checked-in, the center button is changes to the Check-out button.
- When the file is not checked-out or not published, you can check-in/check-out the file as many times as you want.
- When the file is not checked-out or not published, the group which has the access rights to this report can execute the check-in, check-out, and publish.
- The View button is always enabled (regardless of the check in/check out status). It displays the latest updated Word document or the PDF after final Publish.
- The Publish button is enabled after at least one time of the check-in action. The Publish button is disabled when the document is checked-out.
- Once the final Word file is created, the Word document is saved in the repository. All the past PSR word output are saved. When you update the Word document and uploads it, the system overwrites the automatically generated document in the database.
- Once the Publish button is executed and the PDF file is created, the Check-Out button is grayed out and disabled.
- Once the document is checked-in, the Check-in button is changed to Check-out, and the Publish button is enabled to publish the PDF report from the Word document.
- The Publish button converts the checked-in Word document to the PDF file.
- Once Publish is done, the Word document is no longer available. The Check-in / Check-out button is disabled only when the PSR is published and the label is changed to Check-out.
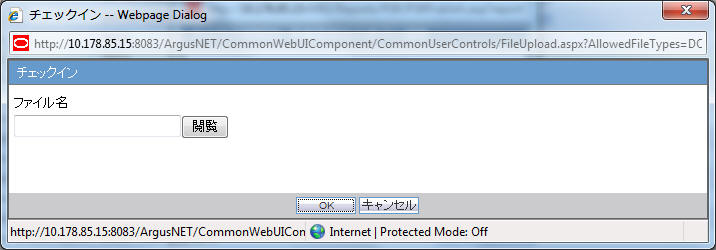
- When the Check-in button is clicked, the following pop-up is displayed to specify the file name. This can be done by either specifying the file name in the text box, or selecting the location using the Browse button.
- If the data is changed manually in the Word document, this change is not applied to the next report. The report needs to be changed again.
- The configuration of the PSR/ReSD can be edited while the PSR is checked-out. The change is affected only when the PSR is created again.
Deleting PSR / ReSD
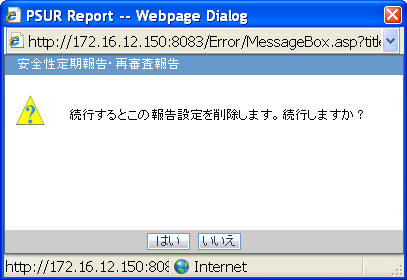
Click Yes in the prompt shown below to delete the PSR/ReSD report.
Parent topic: Periodic Safety Report