View and modify the site details for a request
An approval user or partner user can review and, if necessary and your role allows it, modify the self-service site details, primary contact information, and receiving hours entered for a request to correct any minor mistakes, such as typos, an incorrect address or telephone number.
To view and modify the site details:
- Open the Navigation pane, and select Requests. The All Requests page opens.
- In the All Requests page, find the request associated with the site you want to modify, and select View in the Actions column. The Review Self-Service Site - [Site Name] page opens.
- At the top of the Review Self-Service Site - [Site Name] page, select the Details tab. For example:
Scroll down to view all the information on the page.
![Review Self-Service Site - [Site Name] page - Details tab Review Self-Service Site - [Site Name] page - Details tab](img/site_details_blur.png)
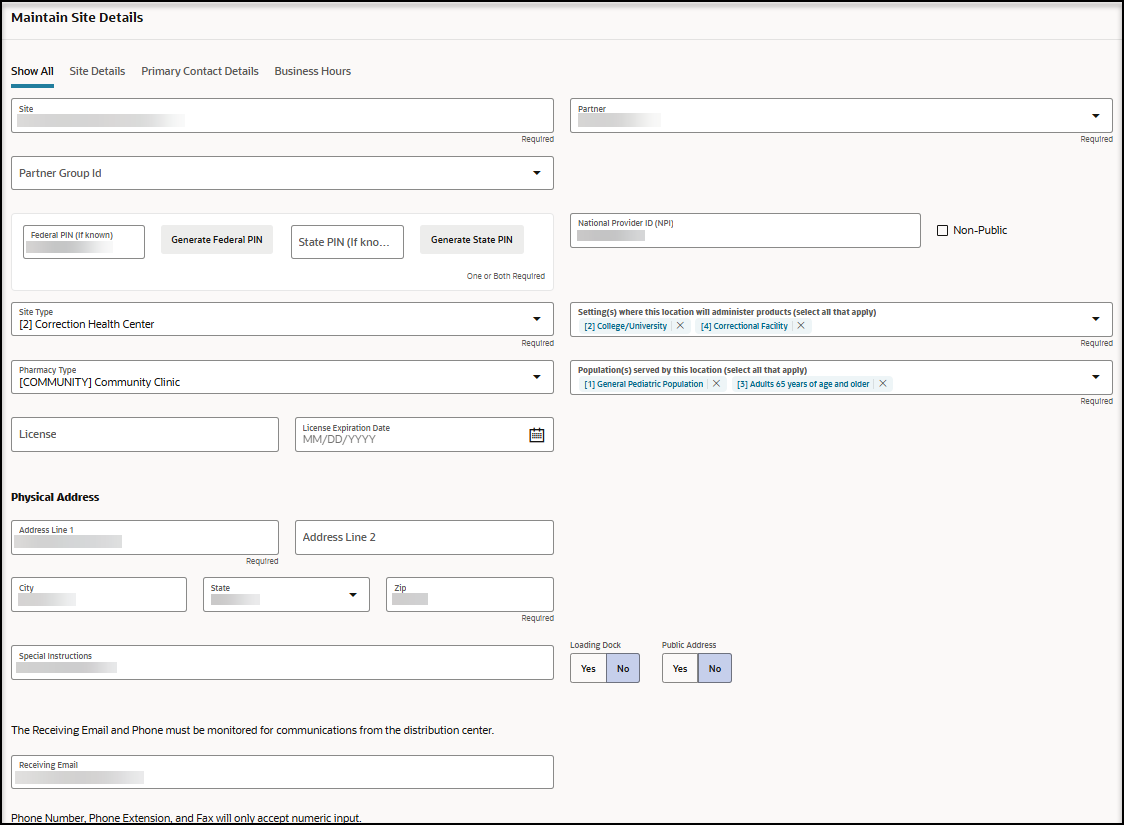
- At the top right, select Edit Details. The Maintain Site Details panel opens. For example:
Note:
The Maintain Site Details panel includes multiple sections including Site Details, Physical Address, Primary Contact (Requestor) Details, and Business Hours. Scroll down to view all the sections. Select a tab at the top of the panel to show all the sections or just one section.
- At the top of the Maintain Site Details panel, update the following site details, as needed:
- Site—Required.
- Partner—Required.
- Partner Group Id
- Partner Organization Id
- Federal PIN—Required. Either a Federal PIN, a State PIN, or both PINs are required.
Note:
Select Generate Federal PIN to auto-generate a unique Federal PIN. - State PIN—Required. Either a Federal PIN, a State PIN, or both PINs are required.
Note:
Select Generate State PIN to auto-generate a unique State PIN. - National Provider ID (NPI)
- Non-Public
- Site Type—Required.
- Setting(s) where this location will administer products (select all that apply)—Required.
- Pharmacy Type
- Population(s) served by this location (select all that apply)—Required.
- License
- License Expiratrion Date—Select the calendar icon to select a date.
- In the Physical Address section, update the following information, as needed:
- Address Line 1—Required. The Address Line 1 field accepts all alphabet characters (upper and lower case), any numbers, and the special characters # @ \ . : ( ) ; , / ' - .
- Address Line 2—The Address Line 2 field accepts all alphabet characters (upper and lower case), any numbers, and the special characters # @ \ . : ( ) ; , / ' - .
- City—The City field accepts all alphabet characters (upper and lower case), any numbers, and the special characters . and ' .
- State
- Zip—Required.
- Special Instructions
- Loading Dock—Select Yes or No.
- Public Address—Select Yes or No. You can set one physical address per site to be a public address (for use by external product tracking applications). You cannot set a hub address as a public address.
- Receiving Email
- Receiving Phone
- Receiving Extension
- Receiving Fax
- In the Approximate number of patients/ clients routinely served by this location section, update the following information, as needed:
- Enter a number into the field for each group of patients/clients, or select Unknown.
- Enter a zero "0" if the location does not serve the age group.
- Select Not applicable if needed (for example, for commercial vaccination service sites).
- In the Primary Contact Details section, update the following information, as needed:
- First Name—Required.
- Last Name—Required.
- Email—Required.
- Job Title—Required.
- Phone
- Phone Extension
- Fax
- Contact Verified
- In the Business Hours section, update the days and hours the address can receive deliveries, as needed:
- For each day and in the Holiday row, if the location is open 24 hours, in the 24 Hours field, select the toggle button until the white button appears on the right. When you select this option, the Opening and Closing drop-down menus are not available.
- For each day and in the Holiday row, if the location is not open 24 hours, in the 24 Hours field, select the toggle button until the white button appears on the left. When you select this option, the Opening and Closing drop-down menus are available.
- Select the opening time from the Opening 1 drop-down menu, and select the closing time from the Closing 1 drop-down menu.
- Use the Opening 2 and Closing 2 drop-down menus if the location has separate opening periods. For example, if your location is open Monday through Friday with a daily lunch closure.
- Select Save.
Parent topic: Manage requests