10 Package Plans
The Package Plan manages components purchased at a fixed package value. Package components are typically comprised of cabin charge, food and beverage, and/or tours or spa. These posting are generally routed from the Point of Sale (POS) system to SPMS through an interface.
Setting up a Package Plan Template
Setting up the Package Plan elements will determine the package value the guest is entitled to, and the correct amount to reduce from the package plan per consumption.
Defining the Required Parameters
The parameter set forth determines the posting behavior for the package, and this is set up in Administration, Database Parameter Setup, Package group.
PAR_GROUP Package
Table 10-1 Parameter Group Package
| PAR Name | PAR Value | Description |
|---|---|---|
|
Default Payment Department |
Defines the default Package Payment Code. |
|
|
Default Posting Department |
Defines the default Posting Department for package plan. |
|
|
Default Refund Department |
Defines the default Refund Department code. |
|
|
Default second posting department |
Defines the posting department code used for 2nd posting in package plan. |
|
|
Do not allow post package to both buyer and payer |
0,1 |
Defines where the posting will be posted as set in Parameter, Package, Package Plan Routing. 0 = Posting will be posted to both party – buyer and payer. 1 = Will post to 1 party – either buyer or payer. |
|
Enable Package Auto Balance |
0,1 |
Enable Package Auto Balance balances the Package Posting by line item. 0 = Disable 1 = Enable |
|
Max Item Per Check |
0,>0 |
Defines the maximum number of items allowed per check. 0 = Unlimited, >0 = Max X item per check |
|
Package Plan Before Routing |
0,1 |
Defines whether to apply posting as package before or after routing. 0 = Apply package after routing 1 = Apply before routing |
|
Prepaid Package System Account |
System default is Null. Setting value to 0 will disable un-posted prepaid package. This applies to reservation import only. |
|
|
Process Package Plan when move posting |
0,1 |
Defines the type of posting shown when posting is moved. 0 = Posting remain as originally posted regardless whether package is assigned, e.g. package posting as package even without package assigned and regular posting as regular even if package is assigned. 1 = Package posting will become regular posting if the guest does not have a package assigned. Regular posting will become package posting if the guest has a package assigned. |
|
Prompt Signature during purchase package |
0,1 |
Define whether signature is required during purchase. 0-No signature required 1-Signature required only for package price > 0, If the package apply is > 1 person, only 1 signature is required. |
|
Service Charge Offset Department |
Defines the Department Code used to offset transaction with pos_pp_id>0 and pos_exclude_sevchg=0. This is a Debit posting. |
|
|
Service Charge Offset System Account |
Defines the System Account assigned for offsetting package transactions. |
|
|
Synchronize changes in Templates to Package Plan |
This setting auto populate changes made in a template into a package plan template. This only applies when “all cruise is checked”. |
|
|
Prepaid Package System Account |
Repository account for Unposted Package Plan. |
Defining a Package Template
-
Select Administration from the menu.
-
From the drop-down menu, select Package Plan, and Template Setup.
-
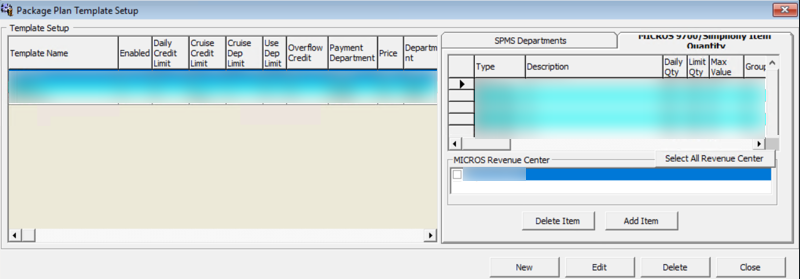
Click New.
Figure 10-1 Package Plan Template Setup
-
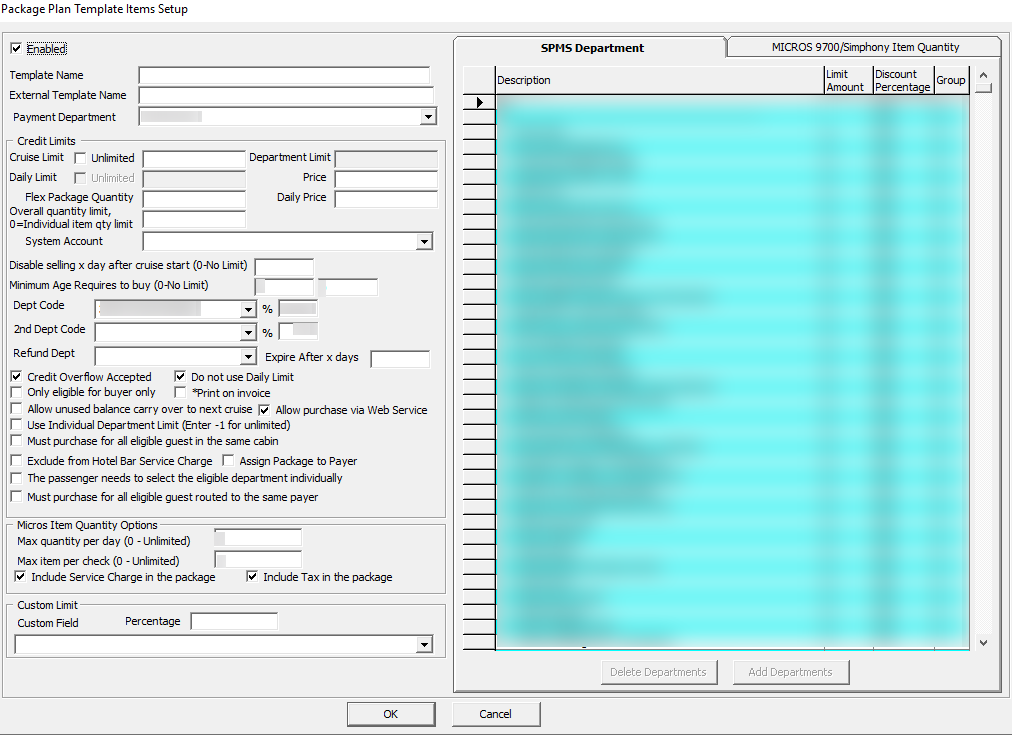
Enter the relevant fields such as Template name, Payment Department, and/or Credit Limit.
Package Plan Template
Figure 10-2 Package Plan Template
Field Definitions
Below table describes the available fields in Package Plan Template.
Table 10-2 Field Definitions for Package Plan Template
| Field Name | Field Definitions |
|---|---|
|
Template Name |
User definable template name. |
|
External Template Name |
User definable external template name. |
|
Payment Department |
Default Payment Department. Enter this if you have not set them in Parameter, Package, Default Payment Department. |
|
Credit Limit Controls |
|
|
Cruise Limit |
Check only if package has unlimited value. |
|
Department Limit |
The limit is based on Parameter, Use individual department limit (enter -1 for unlimited). |
|
Daily Limit |
Determines the daily limit allowed for a package. Checked if value is unlimited. Function is enable when Parameter, Do not use Daily Limit is unchecked. |
|
Price |
Package purchased price. |
|
Flex Package Quantity |
Defines the quantity allowed for a flexi package. Quantity specified include count indicated in SPMS Department and Micros Item Package. The item in the same group will be counted as 1 quantity if the group is not = 0. |
|
*Daily Price |
This is a dynamic pricing where the sales price decreases
dynamically when the cruise day is reduced.
|
|
Overall Quantity Limit, 0 = individual item qty limit |
Defines the limit of item quantity allowed per package. If limit = 0, the limit is based on quantity set within the individual item. |
|
System Account |
Defines the system account used for prepaid package posting. If no account is defined, it uses the default set in Parameter, Package, Prepaid Package System Account. |
|
Disable selling x day after cruise start (0 - No limit) |
Defines the available sale days of the package after cruise
starts.
When the calculated value >=X day, then the package is not available for sale by days specified. |
|
Minimum Age Requires to buy (0 - No Limit) |
Defines the minimum required age for purchase of a package plan. If value is >0 and the guest age is less than the value set, the package will not display in the drop-down list. |
|
Department code |
Defines the Default Posting Department code for the package. You may set a % of postings to be posted to this department, and the % is definable in Parameter, Package, Default Posting Department. |
|
2nd Department Code |
If the 1st Dept is not set to 100%, the remaining postings will be posted to the 2nd Dept. This requires a 2nd Dept Code Parameter, Package, Default second posting department. |
|
Refund Dept |
Defines the Default Refund Department code use to offset a package during refund. This reference to Parameter, Package, Default refund package. |
|
Credit Overflow accepted |
Option to split remaining credit on last package transaction. When the posting amount is > than package, it will post as a normal posting. |
|
Do not use daily limit |
Determines the posting limit to use, either a Daily Limit or Cruise Limit. |
|
Only eligible for buyer only |
If a passenger has purchased a package and at the same time has other passengers routed to his/her account, the package will only apply to transactions posted to the person that purchased the package. |
|
*Print on Invoice |
Option to print the package postings on invoice. User is required to include the filter in the Invoice Report to show/hide the package posting based on this parameter. |
|
Allow unused balance carry over to next cruise |
Option to enables the unused balance of a package to be carried over to the next cruise. |
|
Use Individual Department Limit (Enter -1 for unlimited) |
Defines the limit allowed for each individual department. Enter the limit in Department Limit field besides Cruise Limit (see item no. 5) if checked. |
|
Must purchase for all eligible guest in same cabin |
Option to automatically posts the purchased packages to all guest in same cabin that are eligible for package plan. |
|
Exclude from Hotel Bar Service Charge |
Option to exclude the Hotel Bar Service Charge from the Service Charge calculation. The service charge postings
will have |
|
The passenger need to select the eligible department individually |
This enables the flex package handling, an option that allows a number of eligible items for posting, and is primarily use in Flexi Package. |
|
Must purchase for all eligible guest routed to the same payer |
When enabled, system will post the same package to all guest routed to the same payer. |
|
Assign Package to Payer |
Option to assign the package to the payer. This box is applicable to price packages only. |
|
MICROS Item Quantity Options |
|
|
Max Quantity per day (0-unlimited) |
Defines the maximum POS quantity allowed per day. 0 = Unlimited |
|
Max Item Per Check (0-unlimited) |
Defines the maximum POS Item allowed per check. If the parameter Max Item per check defined, system will post the lowest value to the package. |
|
Include Service Charge in the package |
Option to post the Service Charge associated to the transaction to the package. |
|
Include Tax in the Package |
Option to include the Tax charge associated to the transaction to the package. |
|
Custom Limit |
|
|
Custom Field |
Option to specify custom credit limits for the same package; for example specify an all inclusive package and then specify a custom cruise limit via Reservation Import in a pre-specified database field. This function only work on packages with cruise limit and daily limit, and is not applicable to packages by department limit and QTY package. |
|
Others |
|
|
This package is for all cruises |
Option is only available in Package Plan setup. Checking the box enables the package for all cruises. |
|
SPMS Department/Micros 9700/Simphony Item Quantity |
|
|
SPMS Department/Micros 9700/Simphony Item Quantity |
Defines the department and quantity to be included in the package. |
Adding SPMS Departments Code to a Package Template
-
In the Package Plan, Template Setup, select the template name from the list.
-
Click Edit.
-
In the SPMS Department tab, click Add Department.
-
Select the department code, and click OK to save.
Note:
You may select the department codes either by the group defined or individually. -
To add more department codes, repeat the steps above.
Adding MICROS 9700/Simphony Item Quantity Code to a Package Template
Adding the eligible MICROS 9700/Simphony Item Quantity Code to a package plan template determines where each transaction from MICROS/Simphony POS will be accepted as a package plan component when posting to the guest account.
-
In the Package Plan, Template Setup, select the template name from the list.
-
Click Edit.
-
In the Micros 9700/Simphony Item Quantity tab, select the Revenue Center, and then click Add Item.
-
Choose the menu item to display using the radio button. At the top of the Add Micros Item window, use the Search bar or Filter by Family Group.
-
Select the menu item to add, and use the
CTRL+key for more item selection. -
Enter the quantity in Cruise Quantity field, and click OK to save.
-
To add more menu items, repeat steps 3 to 6.
Defining SPMS Departments Code Limit
A limit can be set for each eligible department, either by amount, percentage, or group.
-
In the Package Plan, Template Setup, select the template name from the list.
-
Click Edit.
-
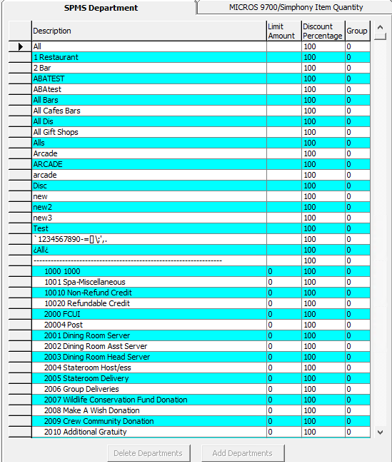
Select the department code listed in SPMS Department tab.
Figure 10-3 Adding SPMS Departments
-
Enter the limit by double clicking on either the Limit Amount, Discount Percentage, or Group.
-
Limit Amount: This is limit amount and is enabled by the Use Individual Department Limit parameter.
-
Discount Percentage: This sets the limit by percentage.
-
Group: Field used to group items in flexi package.
-
-
Click OK to save.
Defining MICROS 9700/Simphony Item Quantity Limit
-
In the Package Plan, Template Setup, select the template name from the list.
-
Click Edit.
-
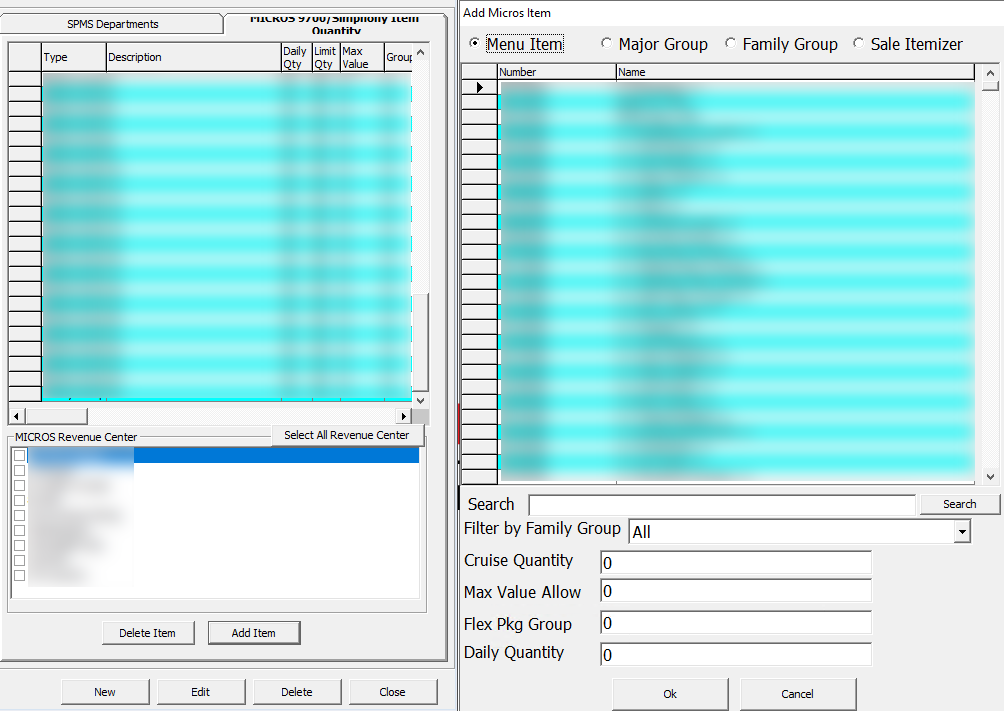
Select the department code listed in MICROS 9700/Simphony Item Quantity tab.
Figure 10-4 Adding Menu Items
-
Enter the limit by double-clicking on either the Daily Qty, Limit Qty, Max Value Allow, or Group.
-
Daily Qty (Quantity): Quantity allowed per day on item selected.
-
Limit Qty: Quantity allowed per cruise.
-
Max Value Allow: The maximum item price allowed within the package.
-
Group: Field used to group items in flexi package.
-
-
Click OK.
Configuring Package Plan
Setting Up a Basic Non-Selling Price Package
A Basic Non-Selling Price Package is an allowance accorded by the Ship to the guest in a package form, usually comprises of a selection of department codes, has a cruise limit and these packages are not sellable. Below is an example for a package that comprises of all food department with a package spending value of $300.
-
Select Administration from the menu.
-
From the drop-down menu, select Package Plan, and then select Template Setup.
-
Click New.
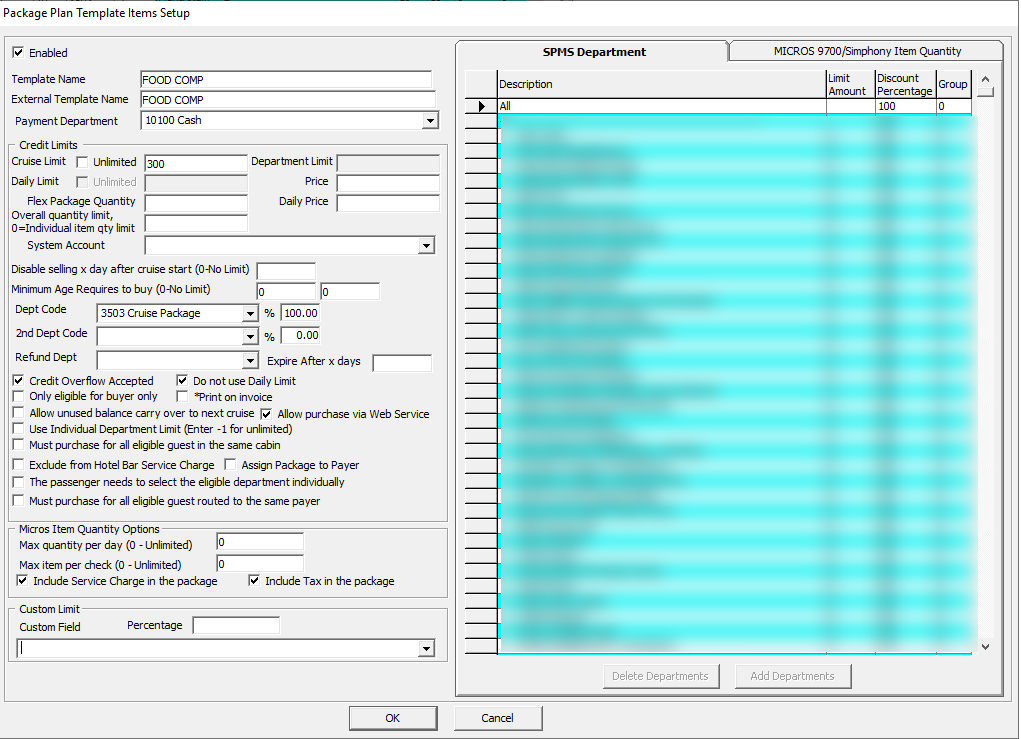
-
Name the template and define the cruise limit, e.g.: $300.
-
Select All Foods under SPMS Department to add all the sub-department classified under the food category.
Figure 10-5 Package Plan Template - Item Setup
-
Click OK, exit from the Template Setup, and navigate to the Package Plan Setup.
-
In the Package Plan Setup, click New to add the package for cruise, making them available for sale or to be assigned.
-
Select the template created earlier from the drop-down list, and click OK.
Figure 10-6 Example of Basic Non-Selling Price Package

Setting Up a Basic Selling Price Package
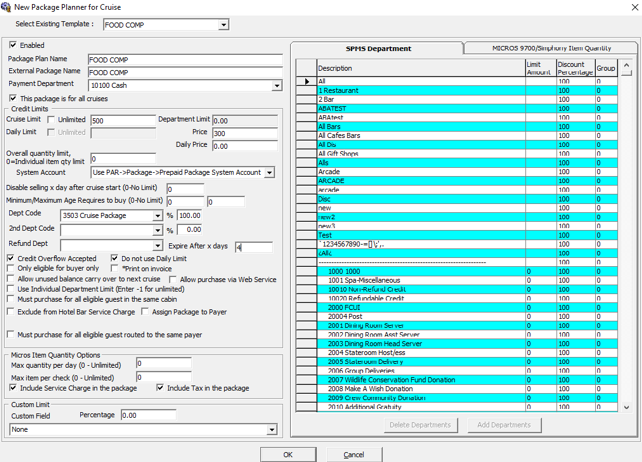
A Basic Selling Price Package is a price based package that comprises on a group of departments, for example, All Food department. This type of package is sellable and has a spending limit. Below is how to set up a sellable package using the template created earlier. For example, package comprises of all Food department with a spending value of $500 and selling price at $300.
-
Repeat steps 1 to 7 of the above setup.
-
From the drop-down menu, select Package Plan, and then select Package Plan Setup.
-
Click New and select a template from the drop-down list.
-
Enter the Package Plan Name and External Package Name.
-
Change the Cruise Limit, e.g.: $500 and enter the selling Price, e.g.:$300
-
Enter the number of days in ‘Disable selling X day after cruise start’, if you wish to disable the selling of package x days after the cruise starts, e.g.: Cruise starts on 10 and X day is 5, package will be disabled from selection on the 16th.
-
Click OK.
Figure 10-7 Example of Basic Selling Price Package
Setting Up a Flexi Non-Selling Price Package
The Flexi Non-Selling Price Package function is similar as the Basic Non-Selling package. The only exception is, it provides user the flexibility in choosing the department to be included in the package during package assignment. For example, package is inclusive of All Beverage department with the cruise limit of $300.
-
Select Administration from the menu.
-
From the drop-down menu, select Package Plan, and then select Template Setup.
-
Click New.
-
Name the template and define the cruise limit, e.g.: $300.
-
Select the department group under SPMS Department to add all the sub-department classified under this category, for example, All ALC Beverage.
-
In the Package Plan Template Items Setup, Credit Limit section, check “The passenger needs to select the eligible department individually” option, to enable department code selection during package assignment.
-
Click OK, exit from the Template Setup, and then navigate to the Package Plan Setup.
-
In the Package Plan Setup, click New to add the package for cruise, making them available for sale or to be assigned.
-
Select the template created earlier from the drop-down list, and click OK.
Setting Up a Flexi Selling Price Package
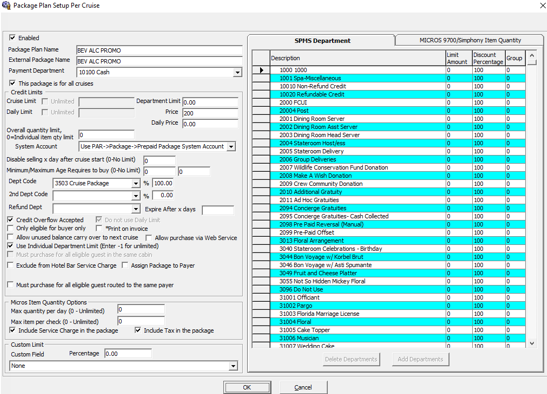
The Flexi Selling Price Package function is similar as the Basic Selling package. The only exception is, it provides user the flexibility in choosing the department to be included in the package during package assignment and has a selling price. For example, package include All Beverage department with a cruise limit of $300 and selling price at $200.
-
Repeat steps 1 to 7 of the above setup.
-
From the drop-down menu, select Package Plan, and then select Package Plan Setup.
-
Click New and select a template from the drop-down list.
-
Enter the Package Plan and External Package Name.
-
Change the Cruise Limit, e.g.: $300 and enter the selling Price, e.g.:$200.
-
Click OK.
Figure 10-8 Example of Flexi Selling Price Package
Setting Up a Quantity Non-Selling Price Package
The Quantity Non-Selling Price Package function is similar as the Basic Non-Selling package, and this package works in tandem with POS Systems. This type of packages has a limit set on item quantity allowed per day, per check, or per cruise from the POS System. Below is an example for a package that comprises of items from Food Major Group with a maximum quantity per day as 0 and Maximum Item per check at all revenue center is 3, cruise quantity is 10, and with maximum value of the item at $100.
-
Select Administration from the menu.
-
From the drop-down menu, select Package Plan, and then select Template Setup.
-
Click New.
-
Name the template and define the cruise limit, e.g.:$300.
-
Under the Micros 9700/Simphony Item Quantity tab, select all revenue center this package is eligible to, and then click Add Item.
Note:
The total number is based on Micros/Simphony Department setting. -
In the Add Micros Item window, select Major Group, and then highlight all the items under the group.
-
Enter the Cruise Quantity, and then click OK.
-
In the Package Plan template Items Setup, Micros Item Quantity section, select option “Include Service Charge in the package” and “Include Tax in the package”.
-
Click OK, exit from the Template Setup, and then navigate to Package Plan Setup.
-
In the Package Plan Setup, click New to add the package for cruise, making them available for sale or to be assigned.
-
Select the template created earlier by quantity from the drop-down list, and click OK.
Figure 10-9 Example of Quantity Non-Selling Price Package

Setting Up a Mixed Selling Price Package
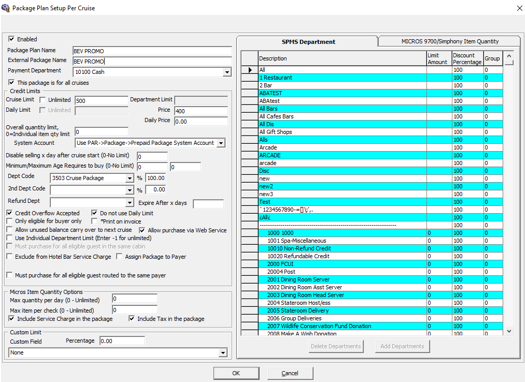
The Mixed Selling Price Package is a combined package elements quantity and base package. The package comprises of Micros/Simphony Quantity and SPMS Department. Below is an example for a package that comprises of all non-alcoholic Beverage department with the cruise limit of $500, selling price at $400, Sales Itemizer of 1, Cruise quantity of 5, and a maximum value of $100.
-
Select Administration from the menu.
-
From the drop-down menu, select Package Plan, and then select Template Setup.
-
Click New.
-
Name the template and define the cruise limit, and selling price, e.g.:$500 and $400 respectively.
-
In the SPMS Department tab, select the department group, and then navigate to Micros 9700/Simphony Item Quantity tab, and select all revenue center this package is eligible to, and then click Add Item.
Note:
The total number is based on Micros/Simphony Department setting. -
In the Add Micros Item window, click the Sales Itemizer radio button, and then highlight Sales Itemizer 1.
-
Enter the Cruise Quantity and the Maximum value, e.g.: Quantity 5 and value is $100.
-
Click OK. Exit from the Template Setup, and then navigate to Package Plan Setup.
-
In the Package Plan Setup, click New
to add the package for cruise, making them available for sale or to be assigned. -
Select the template created earlier by quantity from the drop-down list, and then click OK.
Figure 10-10 Example of Mixed Selling Price Package
Setting Up a Mixed Selling Package
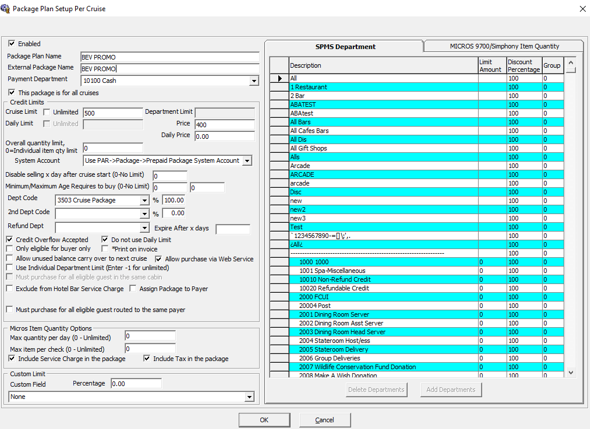
The Mixed Selling Price Package is a combined package of quantity and flexi base package where user is able to select the department codes or Micros/Simphony Items to include in the package when assigning or purchasing the package. Below is an example of a package that include All non-alcoholic Beverage department with the cruise limit of $500, selling price at $400, and Major POS group selection.
-
Select Administration from the menu.
-
From the drop-down menu, select Package Plan, and then select Template Setup.
-
Click New.
-
Name the template and define the cruise limit, and selling price, e.g.:$500 and $400 respectively.
-
Under the Credit Limit section, check “The passenger needs to select the eligible department individually”, to enable the flexibility in selecting the department codes entitled by the package.
-
In the SPMS Department tab, select the department group, and then navigate to Micros 9700/Simphony Item Quantity tab, and select all revenue center this package is eligible to, and then click Add Item.
-
In the Add Micros Item window, click the Major Group radio button, and set the group number accordingly.
Note:
The total number is based on Micros/Simphony Department setting. -
Enter the Cruise Quantity of the selected item and the Maximum value allowed, e.g.: Quantity 5 and value as 4.
-
Click OK. Exit from the Template Setup, and then navigate to Package Plan Setup.
-
In the Package Plan Setup, click New
to add the package for cruise, making them available for sale or to be assigned. -
Select the template created earlier by quantity from the drop-down list, and then click OK.
Figure 10-11 Example of Mixed Flexi Price Package
-
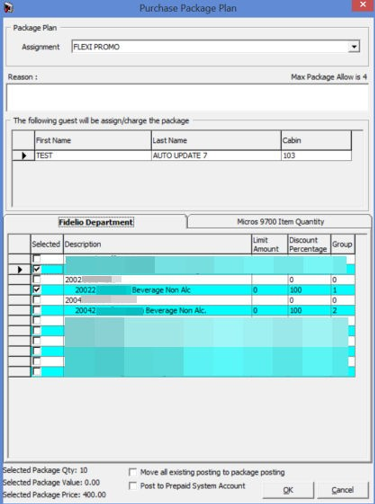
User is then required to select the items when assigning/purchasing the package in the guest account.
-
If group 1 is selected, all the items set in group 1 are automatically highlighted, as shown below.
Figure 10-12 Flexi Package Plan Selection Screen
Package Plan Assignment
The Package Plan function enables the end-users in customizing a cruise package that suits its guest requirements. The Package Plan function not only provide them the flexibility in combining different food and beverage outlets, excursions or activities, it also helps boost the sales in some areas.
Assigning/Purchasing a Package Plan
Assigning the right package to the guest account will enable transactions to be posted accurately throughout the cruise, and this is performed in the Management, Guest Handling module.
-
Log in to Management module, and select Cashier.
-
Select Guests from the drop-down menu to open the Guest Handling screen.
-
In the Guest Handling screen, search and select the guest record using guest name or cabin number.
-
On the selected guest record, click Disc,Route,Pkg tab, and then Package Plan tab.
-
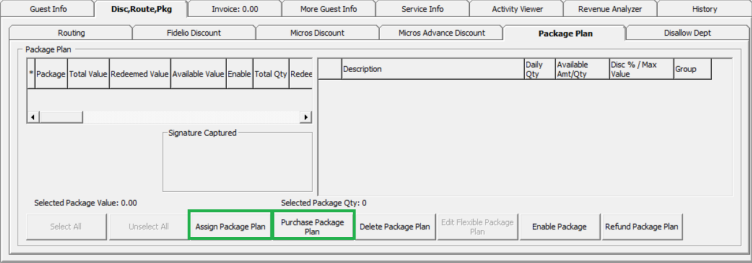
Select one of these options:
-
Assign Package Plan: To assign an available package that does not have a pre-set purchase price.
-
Purchase Package Plan: To purchase a package setup with the purchase price.
Figure 10-13 Package Plan Options
-
-
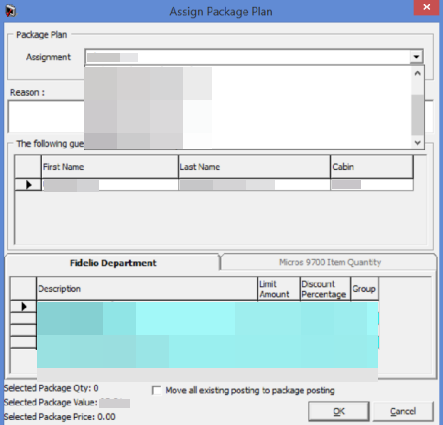
To assign/purchase, select the available Package from the drop-down list, and enter the Reason.
Figure 10-14 Package Plan Assignment Screen
Note:
Only check ‘Move all existing posting to package posting’ when you wish to move the existing posting to package plan. For example: A guest purchased the package part way through the cruise, and past posting that meets the package elements are to be considered as package plan. -
Click OK.
-
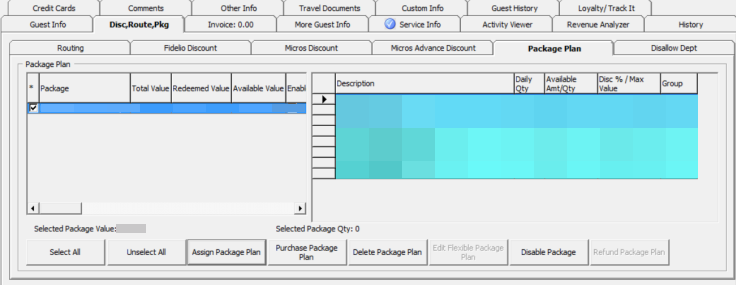
Information’s pertaining to the package is displayed in the Package Plan tab and status is Active.
Figure 10-15 Package Plan Assigned/Purchased
Refunding a Package Plan
The unused package plan can be refunded to the guest at the end of the cruise. Below are the steps to refund a Value based package, Quantity based, and Mix package.
-
Log in to Management module, and select Cashier.
-
Select Guests from the drop-down menu to open the Guest Handling screen.
-
In the Guest Handling screen, search and select the guest record using guest name or cabin number.
-
On the selected guest record, click Disc,Route,Pkg tab, and then Package Plan tab.
-
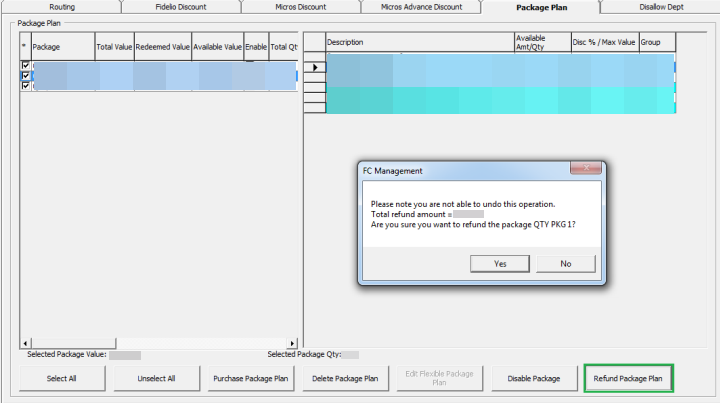
Select Refund Package Plan.
Figure 10-16 Package Plan Refund Option
WARNING:
Once a refund is processed, it is not possible to reverse the changes. This process also disables the package plan. -
Once the package plan is refunded, system will disable the package and displays the remaining value/quantity for references only. In the event where the posting is more than the package price, system will prompt that the refund is not allowed.
Routing a Package Plan Posting
Routing of a package plan posting are dependable on two parameters; Do not allow post package to both buyer and payer parameter and Package Plan Before Routing parameter.
In the event where both payer and buyer have a package, all postings will go to the payer. Once the payer package is fully utilized, subsequent postings are posted into the payer account as normal posting.
Auto Balancing a Package Plan
An Auto Package Plan balancing may be set using Enable Package Auto Balance as 1 parameter, and System will auto balance the package invoice/account after each transaction, and reducing the total package value or quantity at the same time.
Figure 10-17 Package Plan Invoice Screen
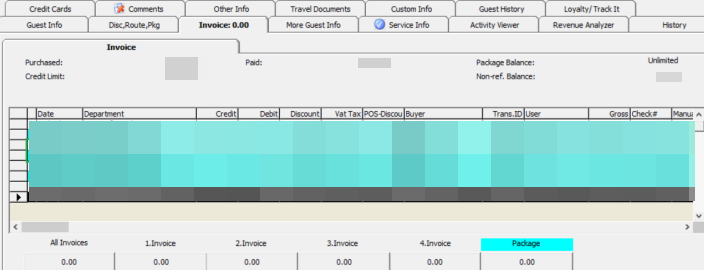
If the above parameter is set to 0, manual balancing of the package invoice/account is required using the Pay Invoice function.
To Manually Balance a Package Invoice
-
Log in to Management module, and select Cashier on the menu bar.
-
Select Guests from the drop-down menu to open the Guest Handling screen.
-
In the Guest Handling screen, search and select the guest record using the guest name or cabin number.
-
Navigate to the Invoice tab, and then click the amount button under the Package Invoice.
Figure 10-18 Settling a Package Plan

-
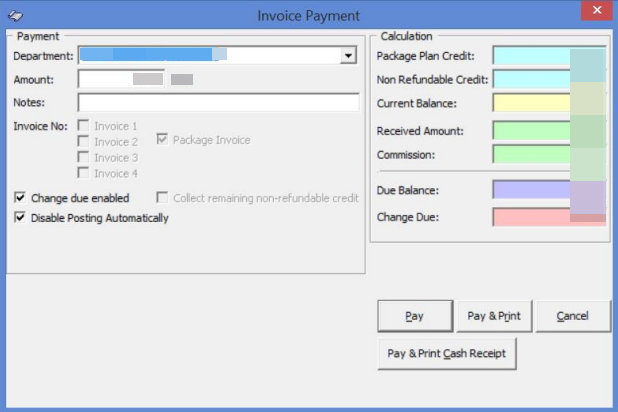
Choose the Payment method and verify the amount to settle when prompted, and click Pay or Pay&Print to pay and print the invoice at the same time.
Figure 10-19 Paying an Invoice
Note:
This process reduces the Package Invoice balance accordingly.POS Interface
An interface setup is required for the Point of Sales Systems such as MICROS 9700 or Simphony to communicate with the Management module, enabling a charge to be posted to the guest account. The setup may differ on both systems, and are described in the following chapter.
Setting Up MICROS 9700/Simphony Interface
To configure any settings for Micros 9700/Simphony interface, you are required to establish a connection to the MICROS DB using the Net Manager program, and then followed by setting up the required parameters in the Administration, System Setup, Parameter.
As majority of the settings are managed within the system parameters, they are defined below:
PAR_PROMO
Table 10-3 Parameter Group Promo for Micros Server
| PAR Name | PAR Value | Description |
|---|---|---|
|
Micros Server Name |
Micros Database Service Name. |
|
|
Micros Server Type |
Database Platform MICROS 9700 is installed on: 0 - Oracle 1 - Microsoft SQL Server |
|
|
Micros User Name |
Micros Database User Name. |
|
|
Micros User Password |
Micros Database User Password. |
To set up the MICROS 9700/Simphony Interface
-
Log in to Administration and select Administration on the menu bar.
-
Select System Setup from the drop-down list, and then select Database Parameter Setup.
-
Select Promo group from the tree-view.
-
Enter the Micros Server Name, Micros Server Type, Micros User Name and Micros User Password.
Note:
A faster package enquiry can be obtained by specifying the IP address and Service Name in parameter, Promo, Micros Server name.
Setting Up Web Service Connection for Advance Micros Interface
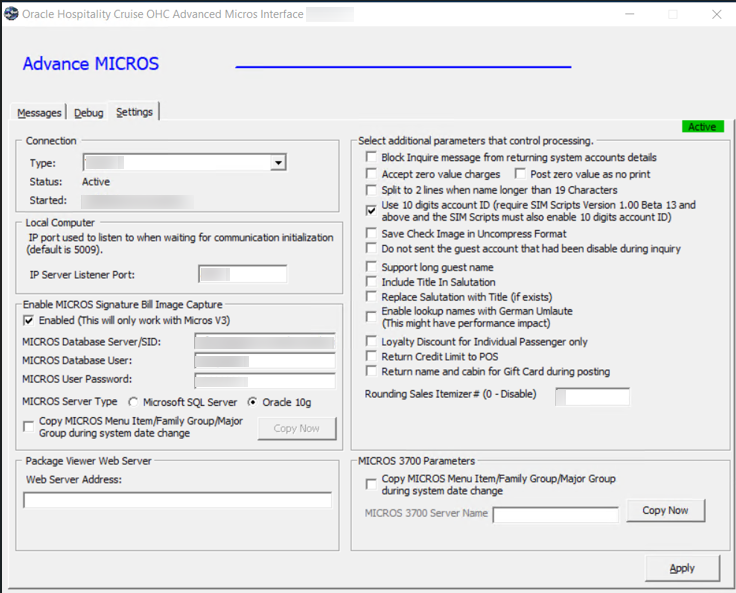
Setting up a Web Service Connection enables user in enquiring the guest information including package purchased, and the look up for sellable package in Advance Micros Interface. The Advance Micros Interface configuration is slightly different to Micros 9700 interface, and below figure shows where information’s are entered.
-
Launch OHC Advanced Micros program and go to the Settings tab.
-
Under Pack Viewer Web Server, enter the Web Server Address, User Name and Password.
-
Click Apply.
Figure 10-20 Advance Micros Interface
Other Setup
In order for POS User to view the guest information such as guest profile, a package purchased and remaining package plan, bill look up and many more, a Micros Picture View application must be configured at MICROS POS. Please consult MICROS Specialist for configuration of such application.
Setting Up Simphony Interface
As majority of the settings are managed within the system parameters, they are defined in PAR_PROMO parameter, as below:
PAR_PROMO
Table 10-4 Parameter Group Promo for Micros Server
| PAR Name | PAR Value | Description |
|---|---|---|
|
Micros Server Name |
Micros Database Service Name. |
|
|
Micros Server Type |
Database Platform Simphony is installed on: 0 - Oracle 1 - Microsoft SQL Server |
|
|
Micros User Name |
Micros Database User Name. |
|
|
Micros User Password |
Micros Database User Password. |
To Set Up the Simphony Interface
-
Log in to Administration, and select Administration.
-
Select System Setup from the drop-down list, and then select Database Parameter Setup.
-
Select Promo group from the tree-view.
-
Enter the Micros Server Name, Micros Server Type, Micros User Name, and Micros User Password.
Note:
A faster package enquiry can be obtained by specifying the IP address and Service Name in parameter, Promo, Micros Server name. -
Under Parameter group Simphony, enter the property ID in Micros Simphony Property Number to copy the DB.
Note:
The property ID is obtainable from Simphony Properties Enterprise System.
Setting Up Web Service Connection for Simphony
Setting up a Web Service Connection enables user in enquiring the guest information including package purchased, and the look up for sellable package in Simphony system.
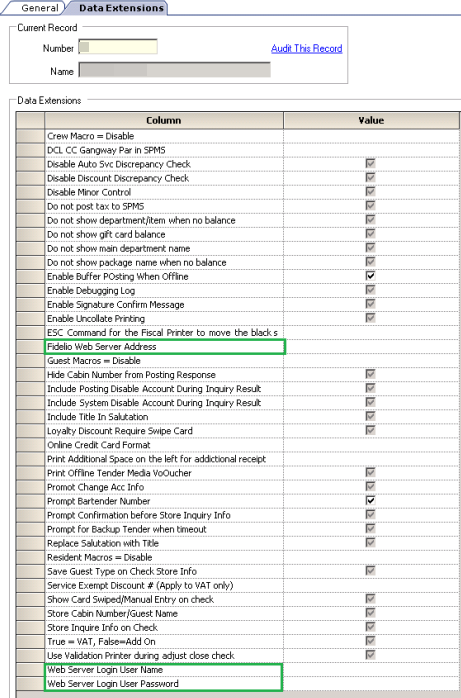
-
Log in to Simphony–EMC and go to Properties Enterprise tab.
-
On the left of the window, choose the properties you wish to connect to.
-
Double-click on the selected properties, and then go to Data Extension tab.
-
Enter the value of these extension field:
-
Fidelio Web Server Address
-
Web Server Login User Name
-
Web Server Login User Password
-
Figure 10-21 Simphony Data Extension Table
Data Import via DGS ResOnline
With the Shore Side office taking reservations and selling the packages, data from the 3rd party system can be imported into Oracle Hospitality Cruise Shipboard Property Management System (SPMS).
Setting Up Data Import Parameter
Prior to importing any data from 3rd party systems, following parameters must be enabled, allowing unposted package plan to be captured in one single location. The parameter in reference is Package, Prepaid Package System Account and is accessible in Administration, System Setup, Parameter.
Handling Prepaid Package Plan
When importing data from 3rd party system via Data Import or DGS ResOnline, System will insert a ‘Y’ in PPP_PREPAID column, indicating that the package is a prepaid package. Data without PPP_PREPAID=Y will be posted to the Pre-Cruise invoice of the guest.
Figure 10-22 Sample Data Import Fields

-
Log in to Management and select Cashier.
-
Select Unposted Package Posting to display the unposted package posting.
-
Select the item and click Post to post the package amount to the system account. The package will then be shown in the Guest Account.
WARNING:
System will not check for unposted package posting when checking out the guest account.
Figure 10-23 Unposted Package Postings Screen

Importing Data Import Package Template
A package template can be imported from ship to ship so that a standard set of information is ported into the SPMS. In order to use this function, user must be granted with access rights 4494 - Import Package Template and 4495 - Export Package Template.
Figure 10-24 OHC Tools - Import/Export Package Template

-
Log in to OHC Tools and select Import/Export tab.
-
Click the Import Package Template on the ribbon bar.
-
When prompted, select the Package Template XML that you would like to import.
-
By default, all the packages in the XML file are selected. To de-select, uncheck the line item in Selected column.
-
Click Import to import the package template.
-
Records are inserted accordingly into the following table- PPT, PPI, PPTI, and PPTR.
Note:
System removes the PPTI and PPTR records and re-insert a new record if any update were done in the PPT table.Figure 10-25 Import Package Template Screen

-
Log in to OHC Tools and select Import/Export tab.
-
Click the Export Package Template on the ribbon bar.
-
Package Template XML list is shown and available for export.
-
By default, all the packages template in the XML file are selected. To de-select, uncheck the line item in Selected column.
-
Click Export to export the package template.
-
Choose the file location and file name to export to, and then click Save.
Figure 10-26 Export Package Template Screen

User Security Group
This section describes the user security access group for Package Plan handling. The security privileges are assigned in the User Security module.
Table 10-5 Package Plan Functionality Access Rights
| Security Reference No | Description |
|---|---|
|
256 |
Package Plan Configuration |
|
257 |
Template Setup |
|
258 |
Package Plan Setup |
|
4542 |
Management Module - Unposted Package Posting |
|
590 |
Management Module - Package Plan Assignment |
|
591 |
Management Module – Package Plan Status |
|
4648 |
Management Module – Package Plan |
|
4203 |
Data Import Module – Advanced Package Plan |
|
4494 |
Data Import Tools – Import Package Template |
|
4495 |
Data Import Tools – Export Package Template |
Scenarios
This section describes the various behavior of the posting, depending on the package plan setup.
Package Posting Sequence from Micros Interface
-
Menu Item
-
Family Group
-
Sales Itemizer
-
Major Group
-
Normal Invoice Posting
Gift Card Posting with Insufficient Value
-
For Quantity base package, System will post the charge to the cabin as normal posting.
-
For Department base package, System will post to Department package posting if the Department exist. Otherwise it will post as normal posting.
Posting with Item and Department Package in the Same Check
In the event where package plan has parameter, Package, Max Item Per Check is <> 0 define, System will always deduct the Item quantity first, then department package.
Package Status - to Change the Item Package Posting to Normal Posting
-
You are allowed to move the item package posting to normal posting. When the posting is moved back to as package posting, it will become a Department package posting, if the Department package posting is available.