2 Environment Setup
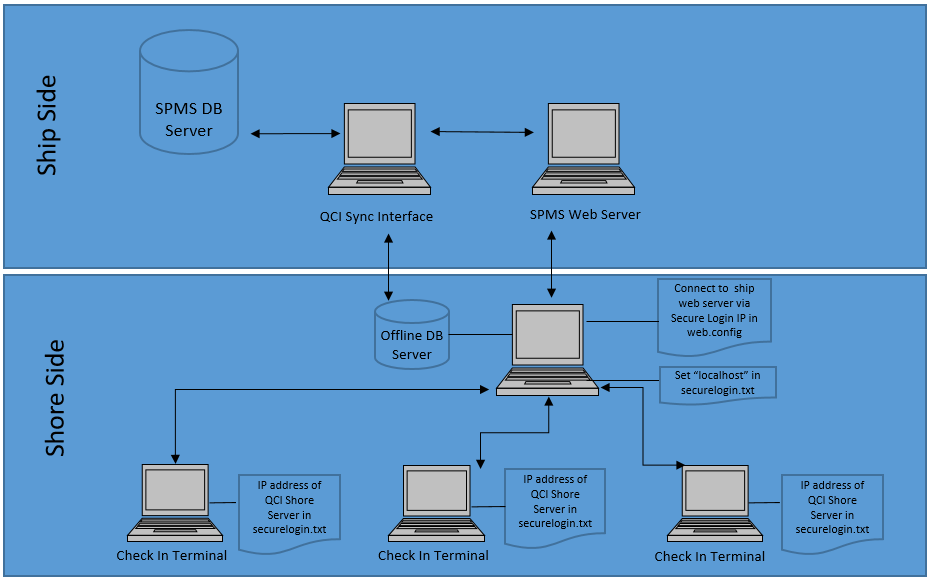
The diagram below illustrates the data flow for QCI Offline Check In environment at the Shore Side.
Figure 2-1 Environment Setup

Environment Setup for PC Running QCI Sync Interface
-
The interface computer must be pre-installed with an Oracle Full Client installation that allows the QCI Sync Interface to access the Oracle import and export utility.
-
Ensure the connection to the ship database is established. If the connection is not established, create an instance to connect the QCI Sync Interface running on shipside, and connect to the ShipDB. The Connection Name of the ship database is SPMSShipDB and points to the database service name (SID) UID.
-
Establish the database connection to the Shore database. The Connection Name of the Shore database is QCISHORE and points to database SID QCISHORE.
-
The Client PC will obtain the OHCSecurity.par file from the ship IIS Web Server when connected.
Environment Setup for QCI Shore Database Server and Shore Secure Server
-
The server must be pre-installed with Oracle Database Server Installation. The version of Oracle Database Edition of the QCI Shore database and Ship database must be identical. For example, if the ship is running on Oracle 19c, then the Shore QCI database must also run on Oracle 19c.
-
Create a blank QCISHORE database that has an existing user. Both the ship and the Shore QCISHORE database password must be identical. If a different password is used, the connection will show Disconnected.
-
Ensure that the database connection to the Shore Database is established.
-
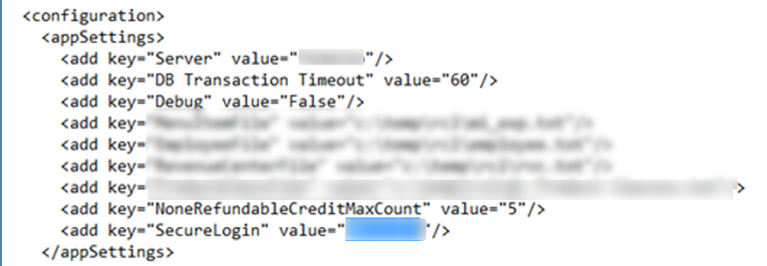
The server must be pre-installed with SPMS Web Service. In web.config, define the Connection Name of the Shore Database (ShoreDB) installed on the server and the Shore WebService IP at SecureLogin. This is to make sure the server acts as a Secure Server when hosted at shoreside, allowing clients to connect to it.
Figure 2-2 QCI Sync WebService Configuration

-
The server must be pre-installed with SPMS for OHC Tools and OHC Advanced Quick Check In. The securelogin.txt must point to QCI Shore Database Server’s web server.
-
Run the Windows Command Prompt as a Windows Administrator. Navigate to the Installed SPMS Application folder. For example,
C:\Program Files (x86)\Oracle Hospitality Cruise. Run the OHC Tools using the following command: “OHC Tools.exe” /m -
Click the Upgrade DPAPI Key button. At the Security Login prompt, choose the Shore Database TNS and enter the Database Password for authorization.
-
Key in the passphrase and click the Update button. The passphrase MUST be same the as Ship database.
-
Upon completion, the encryption password and encryption key (OHCSecurity.par) are stored in QCI Shore Database Server’s Web Server.
Environment for PC Running OHC Advance Quick Check In at Shore Side.
-
The server must be pre-installed with Oracle Client Installation.
-
Ensure the database connection to the Shore Database is established.
-
The SID of the Shore Database (ShoreDB) must be the same as the Ship Database (ShipDB). For example; the SID of ShoreDB is SPMSShoreDB and points to the QCI SHORE database.
-
The server must be pre-installed with OHC SPMS for the OHC Advanced Quick Check In to run and connect to shore database. The securelogin.txt must point to QCI Shore Database Server’s web server in order to obtain encryption password (OHCSecurity.par) at the shore.
Important:
If there are other ships using the same SID as the shore database, for example, Ship A and Ship B connect using the same TNS name and references the QCI Shore database, and before you perform a new Start Offline Mode on each ship, remove the OHCSecurity.par if it exist in QCI Shore Server and restart the IIS.
Ensure you remove the OHCSecurity.par at all check in terminals too.