3 Performing a Secure Shipboard Property Management System Installation
This chapter presents planning information for the SPMS installation.
For information about installing the SPMS, see SPMS Installation Guide at the Oracle Help Center.
Pre-Installation Configuration
-
Apply critical security patches to the operating system.
-
Apply critical security patches to the database server application.
-
Create the required Oracle Database objects per the instructions in the SPMS Installation Guide available at Oracle Help Center.
-
Acquire the Secure Sockets Layer (SSL) compliant security certificate from the Certification Authority.
Shipboard Property Management System Installation
You can perform a custom or a typical installation of the SPMS. Perform a custom installation to avoid installing options and products you do not need. If you choose to perform a typical installation, remove or disable features that you do not need after the installation.
The installation requires the user running the installation to have an Administrator privilege assigned. Users without the required access might complete the installation but it may not be successful.
When creating a database, enter a complex password that adheres to the database hardening guidelines for all users.
-
For a Microsoft Windows 10 user, ensure the Microsoft .NET Framework 4.8 is turned on in Window Features before installing the Oracle Full Client and CruisePropertyManagementDesktopApps_23.1.exe.
-
Download the CruisePropertyManagementDesktopApps_23.1.exe from the Oracle Software Delivery Cloud.
Web Services Installation
This section describes the steps to install the OHC Web Services and other required Microsoft Windows components.
Installing WebServices
See section Setting Up SPMS .Net Secure Server and Setting Up SPMS .Net WebServer of SPMS Installation Guide for steps to complete the installation.
REST API / Web Apps Server Installation
This section describes the steps to install the REST API/ Web Apps and other required components.
Installing REST API/ Web Apps Server
See section Installing SPMS REST API / Web Apps Server of SPMS Installation Guide for steps to complete the installation
Cross-Origin Resource Sharing (CORS)
Put in place the Cross-Origin Resource Sharing (CORS) protocol and use the domain list to limit options for requests. Do not use an asterisk (*) as an origin value; it allows access from all hosts.
Establishing a Connection
Web Service Connection
-
Ensure the Simphony Extensibility DLL version is the same as SPMS.
-
Go to Simphony Properties Enterprise and select the option “Fidelio Web Server Address”, and then change the SPMS web service to
https://<ip address>/OHCTransactionsSevices/OHCTransactionsServices.asmx
Web Service Database Connection
Edit the ‘web.config’ file in C:\inetpub\wwwroot\OHCTransactionsService and define the SPMS database server name under <appSetting>.
<appSettings>
	  <add key="Server" value="<SERVER NAME>" />
	</appSettings>
WebService File Path Configuration for Simphony
-
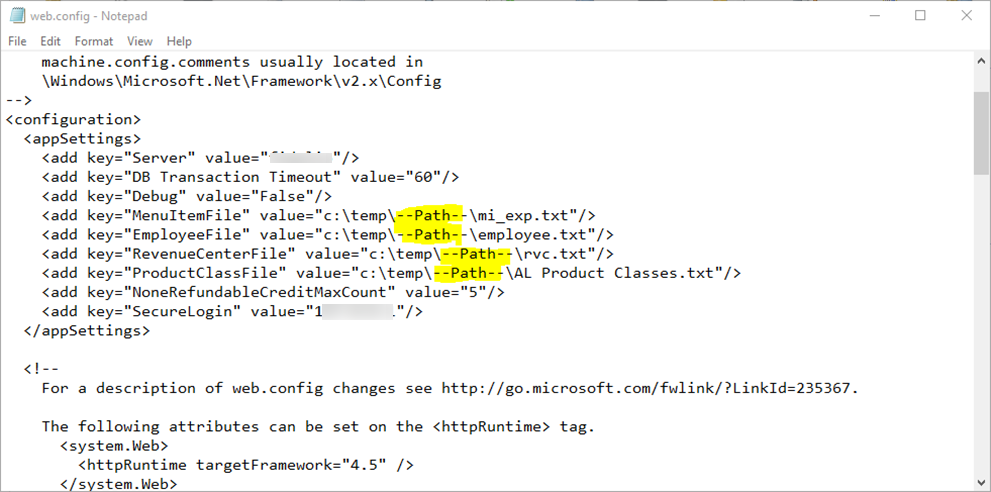
Edit the ‘web.config’ file in
C:\inetpub\wwwroot\OHCTransactionsServiceand change the file path name where themi_exp.txt, employee.txt, rvc.txt, andAL Product Classes.txtfiles will be saved. -
Change the --Path-- according to the path you created in the
c:\temp\folder. The path can be the ship name or ship code and it is user-definable.
Figure 3-1 Simphony File Path

WebService Configuration for OPI
Edit the
‘web.config’ file in C:\inetpub\OHCOPIWebServices and to define the SPMS database server name (SOURCE) and password
(PASSWORD) under <connectionStrings>.
<connectionStrings>
<add name="OHCEntities" connectionString="metadata=<a target="_blank" href="res://*/OHCModel.csdl|res://*/OHCModel.ssdl|res://*/OHCModel.msl;provider=Oracle.ManagedDataAccess.Client;provider">res://*/OHCModel.csdl|res://*/OHCModel.ssdl|res://*/OHCModel.msl;provider=Oracle.ManagedDataAccess.Client;provider</a> connection string="DATA SOURCE=[SOURCE];PASSWORD=[PASSWORD];PERSIST SECURITY INFO=True;USER ID=<USER ID>"" providerName="System.Data.EntityClient" />
</connectionStrings>If Wallet is applied,
<connectionStrings>
<add name="OHCEntities" connectionString="metadata=<a target="_blank" href="res://*/OHCModel.csdl|res://*/OHCModel.ssdl|res://*/OHCModel.msl;provider=Oracle.ManagedDataAccess.Client;provider">res://*/OHCModel.csdl|res://*/OHCModel.ssdl|res://*/OHCModel.msl;provider=Oracle.ManagedDataAccess.Client;provider</a> connection string="DATA SOURCE=<IP Address>:<Port No>/<Service Name>;PASSWORD=[PASSWORD];PERSIST SECURITY INFO=True;USER ID=<User ID>"" providerName="System.Data.EntityClient" />
</connectionStrings>