Internal Gate
-
Select the horizontal lines menu at the top left corner.
-
From the Gateway Security menu, select Gateway Movement, and then select Internal Gate sub menu.
-
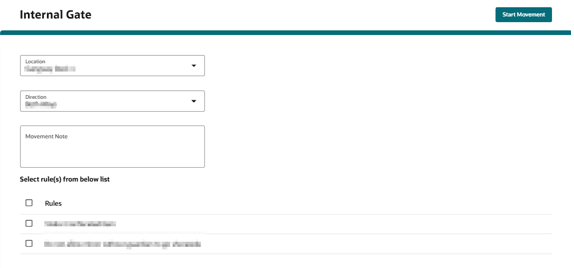
On the Internal Gate Settings page, select a value for all the mandatory fields or optional fields:
-
Location - the value is obtained from the Administration menu under Gate Location.
-
Direction - Both ways, Outwards, Inwards.
-
Movement Note - This is optional. This movement note is displayed in the successful movement card view.
-
Rules - This is optional. The list is obtained from the configuration in OHC Administration module, Administration menu, Security Alert Setup.
Figure 15-26 Internal Gate Settings
-
-
Select the Start Movement button. The system redirects to the People Movement page where the selections appear at the top of the page together with the current Harbor.
Note:
Before you start the People Movement process, make sure the Gate Location name does not exceed more than 50 characters.Figure 15-27 People Movement Page

Change Internal Gate Location, Direction
-
On the People Movement page, select Actions button.
-
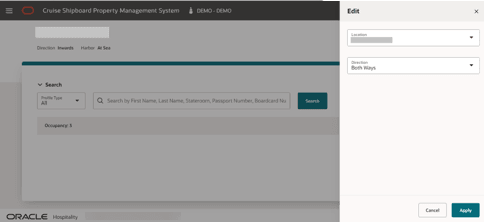
Select Edit button. An Edit drawer opens on the right.
-
Select Location, then select Direction.
-
Select Apply button.
-
Select the Cancel button or ‘X’ icon to close the edit drawer and return to the previous screen.
Figure 15-28 Edit Drawer
Reset Internal Gate Location Occupancy Count
-
On the People Movement page, select Actions button.
-
Select Reset button.
-
The system displays a confirmation, ‘Reset Occupancy?’
-
Select Reset - The location count update to 0.
-
Select Cancel - To close the dialog box and everything remain unchanged.
-
To access the Reset option, you need to have the access rights Role Manager, Gateway Security, Internal Gate, Reset granted.
Perform People Movement using RFID Card
-
On the Internal Gate page, without placing the cursor at the search profile field, place the RFID card near the tablet RFID sensor.
-
When the scanned RFID card number matches a profile, the movement from entry to exit of the location or vice versa is performed.
When the scanned RFID card number does not match a profile, the system will display 'Please check the card and try again'. A card view will be displayed once the movement process complete and a people’s movement sound is played if it is configured.
-
When the scanned RFID card number matches multiple profiles, a list of matching profiles will appear in the result view along with a banner message “We couldn’t allow entry/exit. Multiple records found.” Continue the movement with Step 3 of Manual Profile Information Search, step 3.
Note:
Resident profile movement will be based on parameter General - Use Resident.Perform People Movement using Board Card
-
On the Internal Gate page, select Scan button.
-
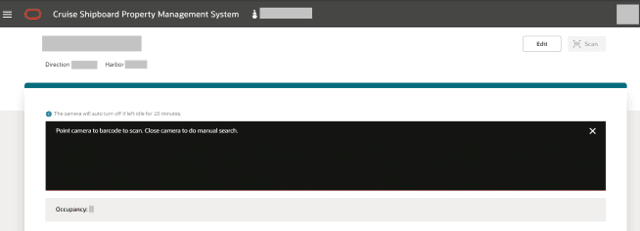
This opens the camera, launches the scan function, and hide the manual search section.
-
To scan the barcode, point the camera to the barcode.
-
When the scanned barcode matches a profile, the system performs the movement from entry to exit of the location or vice versa. When the scanned barcode does not match a profile, a message 'Please check the card and try again' appears. The system will validate the selected rule and display either an error message or confirmation message based on the outcome.
A card view will be displayed once it passes all the rules and complete the movement along with movement note, if it is configured.
-
When the scanned barcode matches multiple profiles, a list of matching profiles will appear in the result view and system display a banner message “We couldn’t allow entry/exit. Multiple records found.” Continue the movemnet with Step 3 of Manual Profile Information Search.
Note:
-
The scanning section and camera switches off when left idle for 10 minutes, and a message will appear.
-
The supported barcode type is:
-
Code 128, Code 39
-
Interleaved 2 of 5
-
EAN-8, EAN 13
-
Figure 15-29 Barcode Scanning
Perform People Movement using Board Card on Micros Handheld 500 Build-in Barcode Scanner
-
On the Internal Gate page, select the barcode scanner button on the device and the green light will appear. Point the barcode scanner to the barcode.
-
When the scanned barcode matches a profile, the system performs the movement from entry to exit of the location or vice versa. When the scanned barcode does not match a profile or it matches multiple profiles, the system will display “Please check the card and try again”. A card view will be displayed once the movement process is completed and a people’s movement sound is played if it is configured.
-
When the scanned barcode matches multiple profiles, a list of matching profiles will appear in the result view with a banner message “We couldn’t allow entry/exit. Multiple records found.” Continue the movement with Step 3 of Manual Profile Information Search.
Note:
The supported barcode type is:-
Code 128, Code 39
-
Interleaved 2 of 5 (need to specify min and max digit length in device)
-
EAN-8, EAN 13
Manual Profile Information Search
-
Select an accordion icon right-facing arrow “>” to expand Search.
-
Select the Profile Type and enter either the Search by First Name, Last Name, Stateroom, Manning Number, Passport Number, Board Card Number, External Board Card Number, Booking Number or Contactless ID in the search bar, then select the Search button.
-
All the matching records are shown in the results view. Select a record.
-
The system displays a pop-up with a profile picture, profile full name along with confirmation message based on the direction and profile location.
-
For profile that is not in any location, system displays ‘Do you want to allow this person to enter this location?’
-
Select Allow. The system will validate the selected rule and display either an error message or confirmation message based on the outcome. If all rules passed, the system displays successful movement at the Entry card view. This card view will display a movement note if it is entered.
-
-
For profile that is in other location, system displays wrong direction error message. You can define your message from OHC Administration, Administration, System Setup, Labels Setup, GNG031. Next, a people’s movement sound is played if it is configured.
-
Select Cancel to terminate the people movement process, and the system navigates back to the search screen.
-
For profile that is in current location, system displays ‘Do you want to allow this person to exit this location?’
-
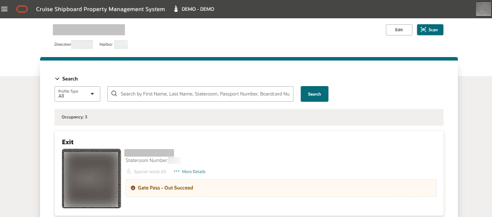
Select Allow. The system will validate the selected rule and display either an error message or confirmation message based on the outcome. If all rules passed, the system displays successful movement at Exit card view and a people’s movement sound is played if it is configured. This card view will display a movement note if it is entered.
-
-
For profile that is in different location, system displays ‘Do you want to allow this person to exit from the previous location <old location name>?’
-
Select Allow. The system will validate the selected rule and display either an error message or confirmation message based on the outcome. If all rules passed, the system displays movement at Exit card view and a people’s movement sound is played if it is configured. This card view will display a movement note if it is entered.
-
-
For profile that is not in any location, system displays wrong direction error message. You can define your message from OHC Administration, Administration, System Setup, Labels Setup, GNG030
-
Select Cancel to terminate the people movement process, and the system navigates back to the search screen.
-
For profile that is not in any location, system displays ‘Do you want to allow this person to enter this location?’
-
Select Allow. The system will validate the selected rule and display either an error message or confirmation message based on the outcome. If all rules passed, the system displays successful movement at the Entry card view and a people’s movement sound is played if it is configured. This card view will display a movement note if it is entered.
-
-
For profile that is already in the same location, system displays ‘Do you want to allow this person to exit this location?’
-
Select Allow. The system will validate the selected rule and display either an error message or confirmation message based on the outcome. If all rules passed, the system displays successful movement at the Exit card view and a people’s movement sound is played if it is configured. This card view will display a movement note if it is entered.
-
-
For profile that is in a different location and want to go into this location, system displays ‘Do you want to allow this person to exit from the previous location <old location name> then move into this location?’
-
Select Allow. The system will validate the selected rule and display either an error message or confirmation message based on the outcome. If all rules passed, the system displays successful movement at the Entry card view and a people’s movement sound is played if it is configured. This card view will display a movement note if it is entered.
-
Select Cancel to terminate the people movement process, and the system navigates back to the search screen.
-
Figure 15-30 Profile Search
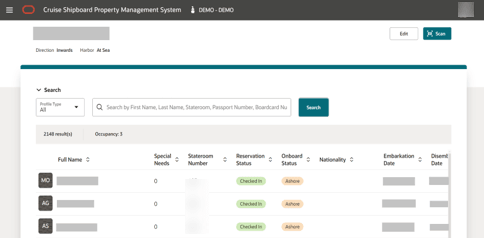
Figure 15-31 Gate Pass - In Succeed
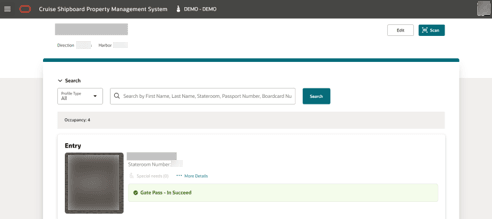
Figure 15-32 Gate Pass - Out Succeed
Occupancy Count
-
page navigation to People Movement page.
-
browser refresh.
-
editing the profile type from Profile Type field.
-
selecting the Search button.
-
selecting any record in the Profile listing.
-
confirming the selection from the message box by selecting the Allow button.
-
selecting the special needs hyperlink from the profile listing.
-
tapping the RFID card.
-
selecting the special needs hyperlink in the card view.
-
selecting the more details hyperlink in the card view.
-
selecting the Apply button in the Edit drawer.
Note:
The count presented varies depending on the parameter value in General - Use Resident. If the value is set to 1, the resident count is included in occupancy count.Special Needs
-
Select the Special Needs link in the card view.
-
A Special Needs drawer opens on the right, showing the assigned special needs.
-
total special needs count.
-
selected special needs.
-
remarks.
-
-
To close the special needs drawer and return to the previous screen, select the Close button or ‘X’ icon.
Note:
If the profile has no special needs, the Special Needs link is disabled in the card view.More Details
-
Select the More Details link in the card view.
-
A More Details drawer opens from the right, showing the profile details. See the table below for field names and descriptions.
-
To close the More Details drawer and return to the previous screen, select the Close button or “X” icon.
Note:
Resident profile will be shown based on General - Use Resident parameter
Table 15-5 Profile Details
| Field Name | Description |
|---|---|
|
Profile Type |
Guest, Resident, Crew or Visitor will be shown |
|
Picture |
Profile picture |
|
Full name |
First name, middle name, last name, salutation, other first name, other name |
|
Stateroom Number |
Stateroom number |
|
Reservation Status |
Current Reservation Status |
|
Onboard Status |
Status either Onboard or Ashore |
|
Muster Status |
Location of assembly/muster station |
|
Age Type |
Age type of passenger either Adult/Minor |
|
Gender |
Gender of the passenger selection |
|
Position |
Position of the Crew |
|
Department |
Assigned department of the Crew |
|
Birth Date |
Date of birth |
|
Age |
Profile age, calculated based on date of birth |
|
Nationality |
Nationality |
|
Manning Number |
Assigned manning number of the Crew |
|
Special Needs Description |
List of Special Needs |
|
Special Needs Remark |
Additional comments/remarks of the Passenger’s Special Needs. (Visible if the remark has a value, otherwise it will be ‘-‘) |
|
List of Travelers |
List of travelers for the selected guest/resident. It displays the Picture, Full name, Stateroom, Age |