1 SPMS Configuration
To enable the OPI Handling, login to the Administration module, go to System Setup menu, then Database Parameters, and set the Parameter value to “OPI” under ‘Not Specified’ group, CC Transfer Format.
OHC OPI Web Service
See SPMS Installation Guide Setting Up SPMS Web Server section at Oracle Help Center for steps to install OHC OPI Web Services and OHC OPI Daemon Service.
Note:
If the SPMS Webserver is installed on a different machine,
you need to copy the below two parameters into your C:\Users\Public\Documents\Oracle
Hospitality CruiseOHCSettings.par, and ensure that there
is a new line at the end of the file.
[#OPI Interface.Parameter.OPIInterfaceURL=#]
[#OPI Interface.Parameter.ClientPort=#]
When the SPMS
DB password is updated, the <connectionString> section password needs to be refreshed manually in the file: C:\inetpub\OHCOPIWebServices\Web.config.
OHC OPI Daemon Service Configuration
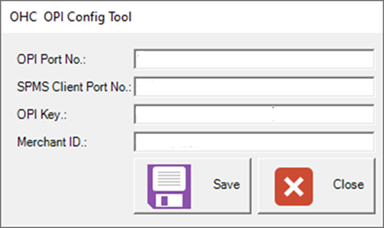
To configure the Daemon Services, run the OHCOPIDaemonConfigTool.exe from C:\OHCOPIDaemonService\ and input the
require information for each field, then save the settings.
Table 1-1 OPI Daemon Service Configuration Fields
| Field | Description |
|---|---|
|
OPI Port No. |
The OPI Port Number. |
|
SPMS Client Port No. |
The SPMS Client Port Number. |
|
OPI Key |
The Key generated in OPI Configuration – IFC 8 Key. |
|
Merchant ID |
The Merchant ID set up in OPI Configuration. |
Figure 1-1 OPI Configuration Wizard

OHC OPI Manager
-
Run OHC OPI Manager.exe from
C:\Program Files (x86)\Oracle Hospitality Cruise. -
Navigate to the Configuration tab.
-
Click Connection under Setup pane.
-
Enter the following options:
Table 1-2 OPI Manager Connection Settings
Description Value OPI Interface URL
This is where OHC OPI Daemon is installed (in format ws://ip address:)
SPMS Client Port No.
The same SPMS client Port Number that defined in OPI Daemon Config Tool.
OPI Daemon Port No.
The same OPI Daemon Port Number that defined in OPI Daemon Config Tool.
Workstation No.
Workstation Number of the client.
Merchant ID
Combination of OPERA Chain and Property Code values defined in OPI Configuration, for example, CHAIN|PROP1.
-
Click the Test Connection to confirm the connection to OHC OPI Daemon is established.
-
Click on Parameter under Setup pane, select OPI Web API Service URL and insert the hostname or IP with port number where the OHC OPI Web Service is installed, for example,
https://localhost:<PortNo>/.
SPMS Parameters
This section describes the parameters used by OPI Handling. They are accessible from Administration module, System Setup, Parameter, or OPI Manager module, Configuration, Parameter.
PAR_GROUP General
Table 1-3 PAR_GROUP General
| PAR Name | PAR Value | Description |
|---|---|---|
|
Allow payment for Declined Authorization |
1 |
0 – Do not allow payment if authorization is declined but allow when offline. 1 – Allow payment if authorization is declined or offline. 2 – Do not allow payment if authorization is declined or offline. |
|
Allow Settlement Voiding |
1 |
0 – Allow voiding, no message will be prompted. 1 – Allow voiding, message will be prompted. 2 – Do not allow voiding. |
|
Disable C/Card and Posting when auth is decline |
0 - No credit card deactivation and no posting disabled. 1 - We will deactivate the credit card first if there is no more active credit cards, the guest posting will be disabled. 2 - There is credit card deactivation, but no posting disable. |
|
|
Disable Posting Automatically |
0 - Posting is allowed, 1 - Posting disable. |
|
|
CC Negative Payment Allowed |
1 - Allowed negative cc payment, 0 - Disallow negative cc payment. |
PAR_GROUP OPI
Table 1-4 PAR_GROUP OPI
| PAR Name | PAR Value | Description |
|---|---|---|
|
Do not allow if card expire on the debark month |
0 |
1 - Do not allow /0 - Allow, If the card has an expiry on the expected debark registration month. |
|
Enable Multiple Credit Card |
0 |
0 - No, 1 - Yes. Allow registration of multiple credit card. |
|
Enable Online Settlement |
1 |
Online Settlement Handling. 0 – Settlement handled by OPI Manager. 1 – Send to Online Settlement. |
|
Incremental Calculation Formula |
1 |
1-Total invoice amount + (Total invoice amount * Top Up Percentage), 2-Total invoice amount - Total authorization amount, 3-Total invoice amount, 4-Total invoice amount - Total authorization amount + (Total invoice amount * top up percentage). |
|
Incremental Top Up Percentage |
10 |
Percentage for incremental top up. Example, insert 10 for 10%. |
|
Initial Authorization Amount |
250 |
Default initial authorization amount for all card types swiped at the terminal in online mode. |
|
Initial Authorization Formula |
1 |
1 - Fix amount, 2 - Fix amount x day of stay, 3 - By Department setting on minimum authorization amount. |
|
No. of retry for Outstanding Incremental Process |
3 |
Number of retries on the outstanding incremental payment request. |
|
Number of Transaction per batch |
100 |
Maximum number of transaction to process on each submitted batch. |
|
OPI Daemon Timeout |
20 |
Response Time out from OPI Daemon (in seconds). |
|
OPI Web API Service URL |
http://localhost:xxxx/ |
URL for OPI Web API Service. |
|
Online Incremental Limit |
1 |
The limit for incremental processing by batch or immediate. If the posting amount is greater than the value in PAR, send it for processing immediately. Otherwise send by batch. |
|
Enable Online Initial Authorization |
1 |
0 - Initial authorization. is handled by Batch Manager. 1 - Send to Online initial authorization. |
|
Credit Card Expiry Date Format |
MMYY |
Sets the credit card expiry date format to display in 'YYMM' or 'MMYY'. |
|
Enable Auto Incremental Authorization |
0 |
Enable/Disable incremental authorization handling. 0 - Disable, 1 - Enable. |
|
Number of Transaction per Tokenize batch |
50 |
Maximum number of transactions to process on each submitted batch for Get Token tab. |
|
Elapsed time to send for online request |
30 |
Time interval seconds to send for online request. |
|
Credit Card Refund |
1 |
Allow user to enable or disable Credit Card Refund handling, default parameter value = 0. 0 - Disable Credit Card Refund handling. Credit Card Refund button not visible. 1 - Enable Credit Card Refund handling. Credit Card Refund button visible. |
|
Payment Service Regulation |
PSD2: Uses PSD2 legislation for authentication processes Blank/ other value: Uses standard workflow without specifying any payment service regulation |
Setup
This section describes the various system codes set up within the Administration module.
Department Setup
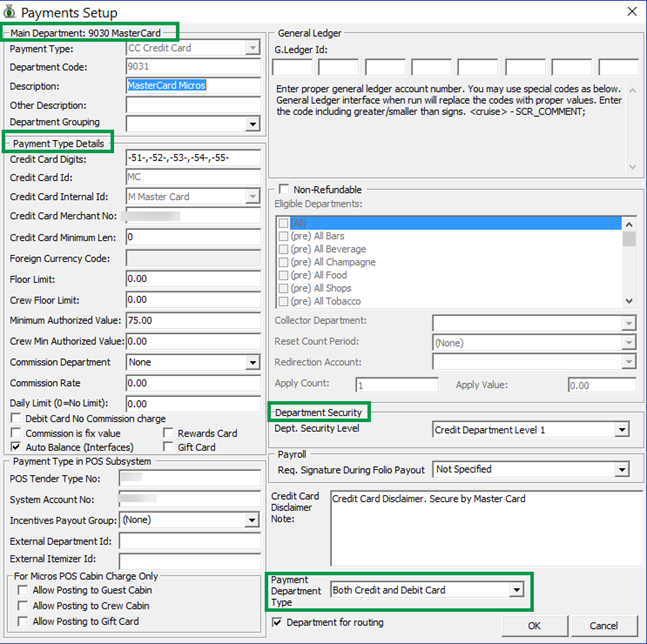
To post a charge/payment, a debit/credit department code of a credit card type is required. The code is set up in the Administration module, Financial Setup, Department setup.
-
Log in to the Administration module and select Financial Setup, Department setup from the drop-down list.
-
Click the New button at the bottom right of the screen to create a Sub-Department code.
Figure 1-2 Department Code Setup

-
In the Main Department section, enter the credit/debit card information such as Payment Type, Department code, and Description.
-
In the Payment Type details section,
-
Enter the two digits of the first set of the credit card number in the Credit Card Digits field.
-
Enter the Credit Card ID. For example, MC - MasterCard, VI - Visa, and so on.
Note:
You must map the Credit Card ID to the OPI Issuer ID.Table 1-5 OPI Issuer ID
Issuer ID Card Type AB
AliPay
AL
Alliance
AX
American Express
CU
China UnionPay
CD
China UnionPay Debit
DD
Debit
DC
Diners Club
DS
Discover
GC
Gift Card
JC
JCB
ME
Maestro
MC
MasterCard.
MD
MasterCard Debit.
PC
PayPal
VA
Visa.
VD
Visa Debit
VE
Visa Electron
VP
V Pay
WE
WeChat Pay
BC
Giro Card
-
Select the corresponding Credit Card Internal ID from the drop-down list.
-
Enter the Credit Card Merchant Number provided by the Service Provider.
-
Select the Commission Department from the drop-down list and update the Commission Rate in percentage.
-
Check the Debit Card No Commission charge if the commission is not applicable.
-
-
Under the Department Security access, select the relevant security level from the drop-down box.
-
Select the relevant Payment Type under Payment Department Type - either Credit and Debit cards, Credit card, or Debit card.
Note:
This field determines if the payment type is a Credit Card or Debit Card. -
Click OK to save the form.
Receipt Setup
You can generate a payment receipt upon payment, which requires you to set up a report template. A Standard Credit Card receipt template is available in the Administration module, System Setup, Report setup, _Receipts group.
Contact Oracle Support if you wish to configure a customized receipt format.