4 Post-Installation Configuration
This section explains additional security configuration steps that you can be perform after installing the SilverWhere application.
Operating System
Turn On Data Execution Prevention (DEP)
Turn on DEP if required. See Microsoft product documentation library at https://learn.microsoft.com/en-us/.
Turning Off Auto Play
Turn off Auto play if required. See Microsoft product documentation library at https://learn.microsoft.com/en-us/.
Turning Off Remote Assistance
Turn off Remote Assistance if required. See Microsoft product documentation library at https://learn.microsoft.com/en-us/.
Software Certificates
If a Secure Sockets Layer (SSL) certificate is required, it must be configured either on the load balancer or in the IIS web server for communication to web services. Secure Sockets Layer (SSL) usage on the SilverWhere Security Server is mandatory.
The Self-signed certificate should be used only if the customer fails to provide a certificate from a Certificate Authority (CA). See SilverWhere Installation Guide for information about the installation of secure certificates.
Password Overview
The configuration of SilverWhere user passwords are performed in the SilverWhere .Net application under the User Setup Module. Administrators are recommended to configure a strong password policy after the initial installation of the application and review the policy periodically.
Password verification functions are used to ensure that the user
password meets the minimum requirements for complexity. Check and
ensure the PASSWORD_VERIFY_FUNCTION parameter for
the user profile created in the Database is not NULL.
Maintaining Strong Passwords
Ensure that passwords adhere to the following strength requirements:
-
The password must be at least 8 characters long.
-
The password must contain letters, numbers.
-
Must not choose a password equal to the last 3 passwords used.
Password Lifetime
Password expiration is used to ensure that users change their passwords
regularly. It also provides a mechanism to automatically disable temporary
accounts. Set the PASSWORD_LIFE_TIME parameter for
user profile in the Database.
Configure User Accounts and Privileges
When setting up users for the SilverWhere application, ensure that they are assigned the minimum privilege level required to perform their job function.
Set INACTIVE_ACCOUNT_TIME in the profiles assigned
to users to automatically lock accounts that have not logged in to
the database instance in a specified number of days. It is also recommended
to audit infrequently used accounts for unauthorized activities.
Concurrent Sessions and Constraints
The database user by default has unlimited concurrent connections
but this may result in memory resource exhaustion or Denial-of-Service
attacks. It is advisable to set the SESSIONS_PER_USER for this. We recommend that you check for disabled constraints,
and determine where applicable, if they need to be disabled, deleted,
or enabled as these are a potential cause for concern.
Security Recommendations
Disable web server directory listing: Misconfigured or using default configuration on web servers may lead to several issues that could aid malicious hackers in their attacks. One common web server issue is directory listing. Many leave it enabled by mistake, thus creating an information disclosure issue, leaking sensitive information, allowing everyone to see all the files and directories on a website.
Below are the steps to disable directory listing
-
Open the IIS Manager.
-
Select the Webservice for which you want to disable the files from the listing.
-
Double-click the Directory Browsing icon in the IIS section.
-
Click Disable. and restart the IIS.
-
Open IIS Manager.
-
Select the website you want to disable these verbs for.
-
Double-click the Request Filtering icon in the IIS section.
-
Click Deny Verb
-
Enter a verb name, for example, “TRACE”, then click OK
-
Repeat the same for deny verb “TRACK” and click OK
-
Restart IIS.
Access-Control-Allow-Origin for SWAuthentication
Cross-Origin Resource Sharing (CORS) is a HTTP-header based mechanism that allows a server to indicate any origins (domain, scheme, or port) other than its own from which a browser should permit loading resources. If there is no validation on the origin header, origin reflection takes place and this would open the site to vulnerability.
Origin Reflection - The value passed in the origin header is reflected within the Access-Control-Allow-Origin header. This allows browsers the access to resources, thus making the site vulnerable. If the Access-Control-Allow-Credentials is set to true, this would increase the attack vector drastically.
Hence it is important to set a validation using the below steps.
-
Open the web.config of the SWAuthentication web service.
-
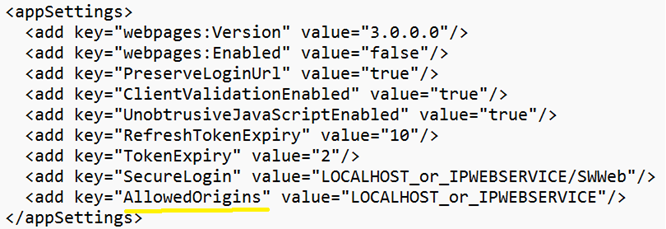
In the appSettings section, add the key for “AllowedOrigins” (see example below). Then, enter the origin value allowed to access resources of SWAuthentication web service, separating the value with a comma.
Figure 4-1 Sample AllowedOrigins in appsettings

-
Save the web.config file and restart the IIS Server.
Safeguarding communication for SWWeb
To secure the communication between SWWeb and the SilverWhere applications (such as SWMobile and SWMobileUpdaterService), Bouncy Castle cryptography is utilized. Through encrypting requests and responses, sensitive data transmitted over the network is shielded from eavesdropping and tampering, thus ensuring the confidentiality and integrity of the communication channel.
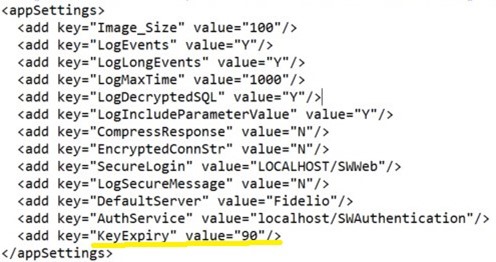
To maintain security, it's essential to securely manage the secret key used for encryption and decryption. Key rotation serves as one strategy to bolster security. The frequency of key rotation hinges on the Key expiry value specified in the web.config file, with a default value set to 90 days. This value can be updated at any time within the SWWeb web.config file.
-
Access the web.config file of the SWWeb web service.
-
Within the app settings section, adjust the value of "Key Expiry" to the desired duration.
Figure 4-2 Sample KeyExpiry in appsettings

-
Save the web.config file and restart the IIS Server.
Steps to remove "X-Powered-By" in Response Headers of webservice
The X-Powered-By header describes the technologies used by the webserver. This information exposes the server to attackers. Using the information in this header, attackers can find vulnerabilities easier.
The HTTP header "X-Powered-By" reveals the version of IIS being used on the server. This can be disabled by:
-
Open the IIS Manager
-
Select the website that Secret Server is running under.
-
Select "HTTP Response Headers"
-
Select the "X-Powered-By" HTTP Header and select "Remove"
Repeat the above steps for SWWeb, SWAuthentication and SWReservation.