Using the Desktop ID Document Scanner
ID Scanner Operational Conditions
-
Access OPERA Cloud from a workstation where the scanner is connected and the scanning hardware and drivers are installed.
-
Your location is a property. Identification document scanning is not available from a hub location.
-
Identification document scanning is available for Guest and Contact profile types.
Scanning ID Documents During Check In
Note:
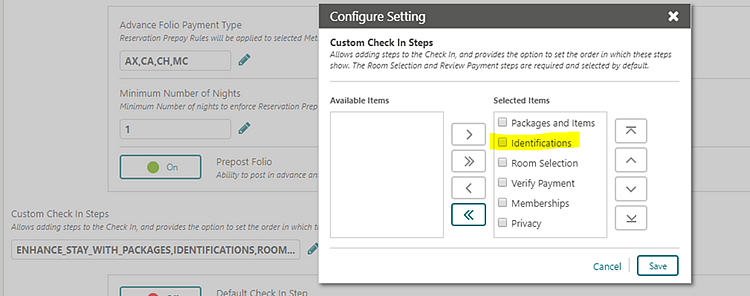
The Identifications panel must be selected for the Custom Check In Step OPERA Control. For more information, see OPERA Controls — Front Desk-
Commence the reservation check in. See Checking in Reservations.
-
Click the Identifications link in the status bar.
-
Place a valid ID Document in the scanner.
-
Click Scan ID Document to initiate the scanner.
-
A comparison page displays two sections: Existing Profile Details and Compare and Edit Scan Results. The Existing Profile Details section on the left side displays the existing details for the profile and is read only. The Compare and Edit Scan Results section on the right side displays the details retrieved from the scanned document. You can compare the details and edit scan results if needed.
-
Identification document scanning is available for Guest and Contact profile types.

-
Values in checked fields are updated in the profile when saved.
-
If the scanned value is different than the existing profile value, the check box will be checked by default. To draw attention to this value point, a warning icon appears. If you do not want to override the existing value for the specific field, you can manually uncheck the check box next to the field.
-
If the scanned value is populated, but the same field in the profile is blank, the check box will be checked by default and the scanned value will be saved. The warning icon appears.
-
You can also manually select the check box and update the value in the field, and the update will be saved to the profile details.
-
-
The Address section in the Existing Profile Details panel has an Address Type to select an address type to display the existing address details.
-
The Address Type is populated with the profile primary address by default. You can update the Address Type by selecting a different value from the list.
-
The Add as New switch allows you to add the scanned address to the existing list of addresses on the profile. When active, the address from the scan does not replace the address that appears in the Existing Profile, instead the address is added into the profile as new.
-
To update the existing address with new details, switch the Add as New switch Off (default).
-
The Make Primary switch allows you to set the address from the scanned details as primary for the profile (it does not matter if this is a new address or an address that will override an existing address showing in the profile). This switch is Off by default.
-
-
Review and click Save to update the profile.
-
The scanned image of the identification document is saved as a profile attachments when the Stored ID Document Image Type OPERA Control is set to Full Image or Face Image.
-
Scanning ID Document Directly from Identification panel
-
From the OPERA Cloud menu, select Client Relations, select Profiles, and select Manage Profiles.
-
Enter search criteria and click Search.
-
In the search results, click I Want To. . . and select Identifications or open the profile and click Identifications in the Profile Presentation.
-
Place a valid ID Document in the scanner.
-
Click Scan ID Document to initiate the scanner
-
A comparison page displays two sections: Existing Profile Details and Compare and Edit Scan Results. The Existing Profile Details section on the left side displays the existing details for the profile and is read only. The Compare and Edit Scan Results section on the right side displays the details retrieved from the scanned document. You can compare the details and edit scan results if needed.
-
Select the values to update in the profile.
-
Click Save.
-
The scanned image of the identification document is saved as a profile attachments when the Stored ID Document Image Type OPERA Control is set to Full Image or Face Image.
-
Parent topic: Managing Profile Identification and Personal Details