J-DSUR Details
Subject of Report
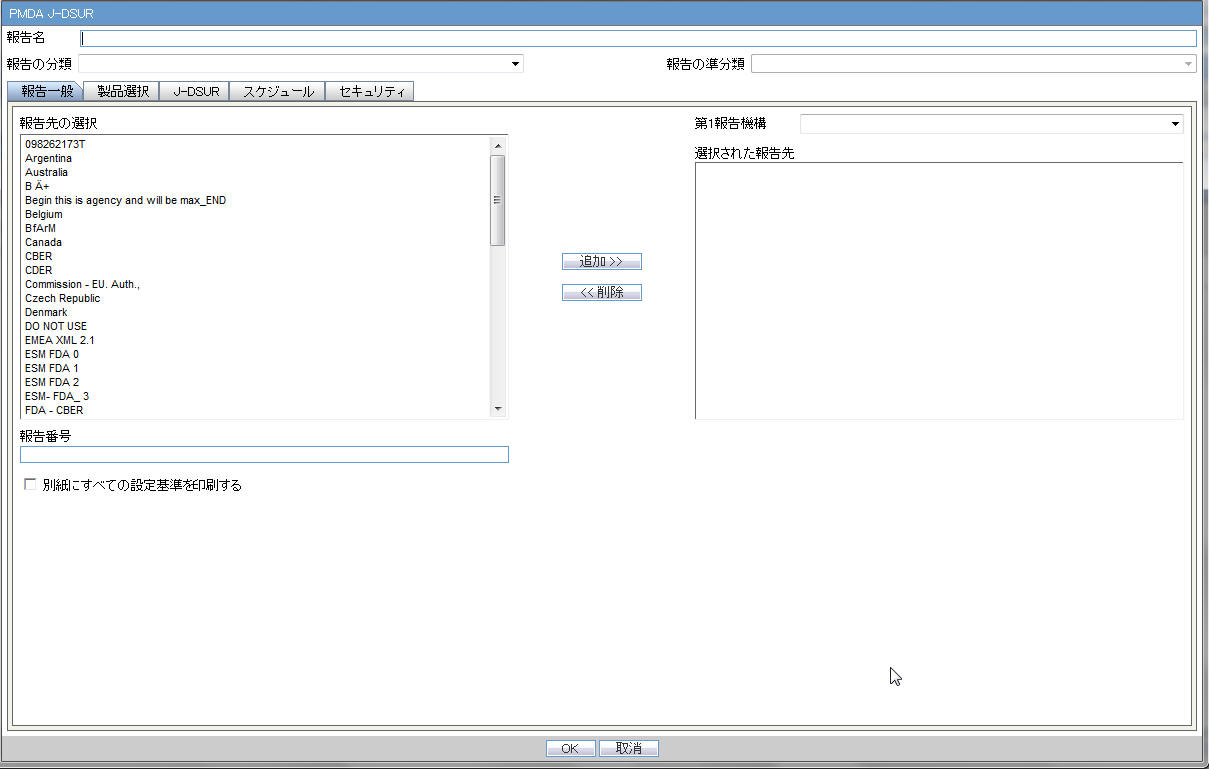
| Field Name | Description |
|---|---|
|
Report Name |
Manually Input a name for the report that is displayed in the Reports > J-DSUR Reports dialog box. |
|
Report Category |
Manually Input a name for a Report Category that is displayed in the Reports > J-DSUR Reports dialog box. |
|
Primary Report Agency |
This list contains the Regulatory Authorities configured in List Maintenance > Regulatory Authorities (LM_REGULATORY_CONTACT table). If there is no Japanese Authority name configured, the English name is listed. The system allows you to select multiple agencies from the List of Agencies so that the report can be submitted to multiple agencies at the same time. The primary agency can be defined in this drop-down list. When Japanese Message Profile is not configured in Console J for the selected Primary Agency, the following error message is displayed: Selected Primary Agency doesn't have configured Message Profile (I or J) in Argus Console/Reporting Destination/EDI. Once you click OK, the selection of the Primary Agency goes back to the previous selection. This check is executed when you try to go to the other tab, or click OK to save the configuration. |
|
Report Number |
Manual entry text field that allows you to enter a report number. |
|
Print all configuration criteria on separate cover page |
This field represents the check box to print the configuration of this report when the report is printed. When this is clicked, the Configuration page is printed at the beginning of the J-DSUR Word print output. The page numbering of the J-DSUR does not include the Configuration page. |
If the Japanese Agency Name is not configured in the Console, the English name is displayed on the screen for that agency.
Product Selection
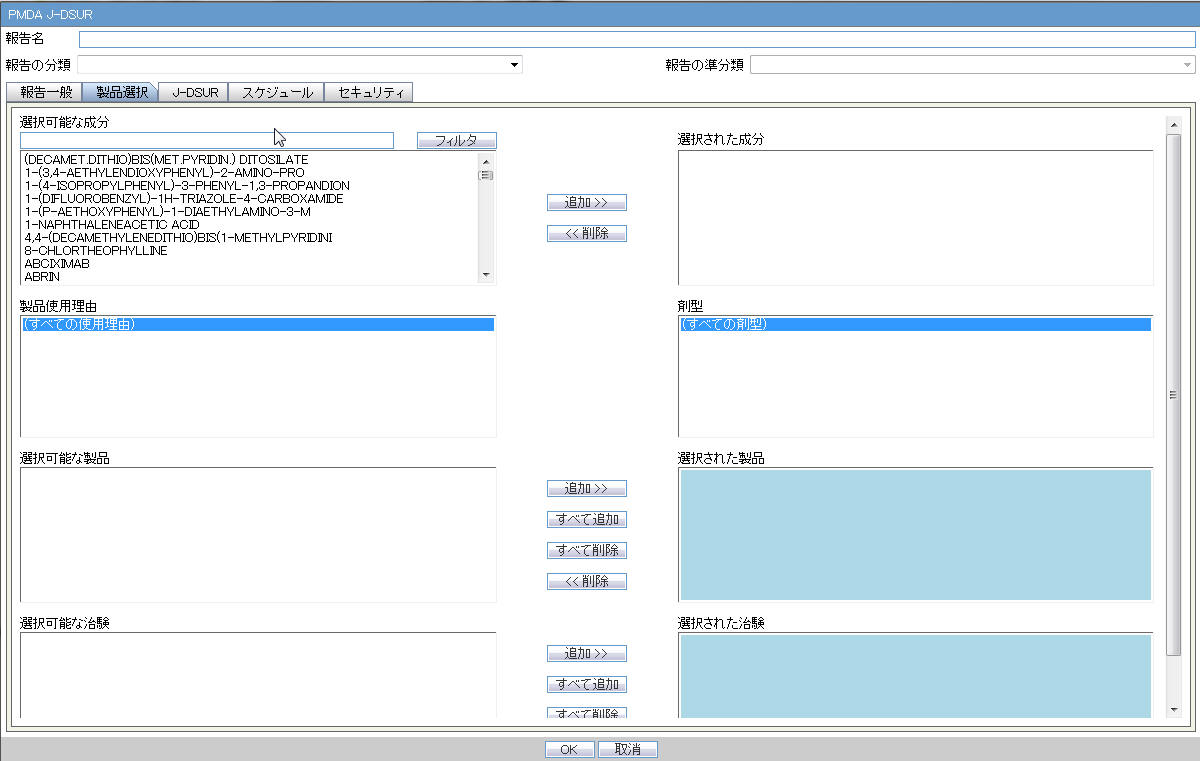
| Field Name | Description |
|---|---|
|
Available Ingredients |
The system allows filtering the Ingredients within the available list of Ingredients by entering the Ingredient Name and clicking the Filter button. The search is performed in Japanese ingredient name only. If the name is blank, then enter English ingredient name. |
|
Indication |
This list contains the Indication configured for the product containing the ingredient in C5 section. Use this to narrow down the products displayed in C8.The system allows to multi-select Indications using standard Windows functionality of CTRL+CLICK. If Japanese name is not available, display the English name |
|
Available Products |
This list is auto-populated once the Ingredient has been selected and displays all products from LM_PRODUCT J table, containing the ingredient selected in C5 section. The format is Product name (Formulation, Concentration concatenated with the Concentration Units). If the Japanese name is not available, the English name is displayed. The withdrawn products are displayed as well. |
|
Selected Ingredients |
This list contains the Ingredients used for the Products Configuration. It is stored in the LM_PF_INGREDIENT_J table once a product has been configured. When an ingredient has been selected, all products containing that ingredient are displayed in Available products (C8) section. Multiple Ingredients can be selected at once to form a J-DSUR product family. |
|
Formulation |
This list contains the formulation configured for the product using the ingredient in C5 section (LM_FORMULATION table). Use this to narrow down the products displayed in C8.The system allows to multi-select formulations using standard Windows functionality of CTRL+CLICK.If Japanese name is not available, the English name is displayed. |
|
Selected Products |
This list contains products that are selected from the Available Products list (C8). When at least one product is selected, the field has a blue background color. If the license is not withdrawn at the starting date of the J-DSUR investigation timeframe, include the license in J-DSUR. Data Entry Discipline: When the new product is available because the new product with the same ingredient released in the J-DSUR, you need to manually set up the new configuration. When no Japanese ingredients, indication, or formulation is configured in the Console, the English names are displayed. When you copy an existing submitted J-DSUR report, the Assigned dates remain editable. In such a scenario, if you change the product selection, the Assigned dates do not change. All the forms printed as J-DSUR have only the information regarding the selected product in this Configuration window.When a product is moved to Selected Products field, but this does not have the Clinical Compound Number, the following error message is displayed: Selected product doesn't have a Clinical Compound Number. It is necessary that the study product license has at least one Clinical Compound Number in order to include in the report. If License # as well as Clinical Compound Number is not available, then for J users, if Trade Name (J) is available then it will display <License Authorization Country> (<License Type>) <Trade Name (J) from Console J>. Else <License Authorization Country> (<License Type>) <Trade Name from Console> is displayed. |
|
Available Studies |
Lists the available studies. |
|
Selected Studies |
Lists the selected studies. |
Available/Selected Studies multi-select shuttle controls
- Available Studies field dynamically lists all the company configured studies in Console, which consists of the selected J-DSUR products. The Study ID (J) value from Console > Study Configuration must be listed.
- These 2 shuttle controls have Add, Add All, Remove, and Remove All buttons to Select/Remove studies between Available and Selected Studies fields.
- If any product is added/removed from the Selected Product field, the Available and Selected Studies fields are also updated dynamically.
- The Selected Studies field is displayed in blue background, same as that of the Selected Products fields.
- If Selected Studies fields do not contain any study, clicking on OK button displays the following error message and brings the focus back on the Selected Studies field:
At least one domestic study must be selected in order to proceed with the configuration.
J-DSUR
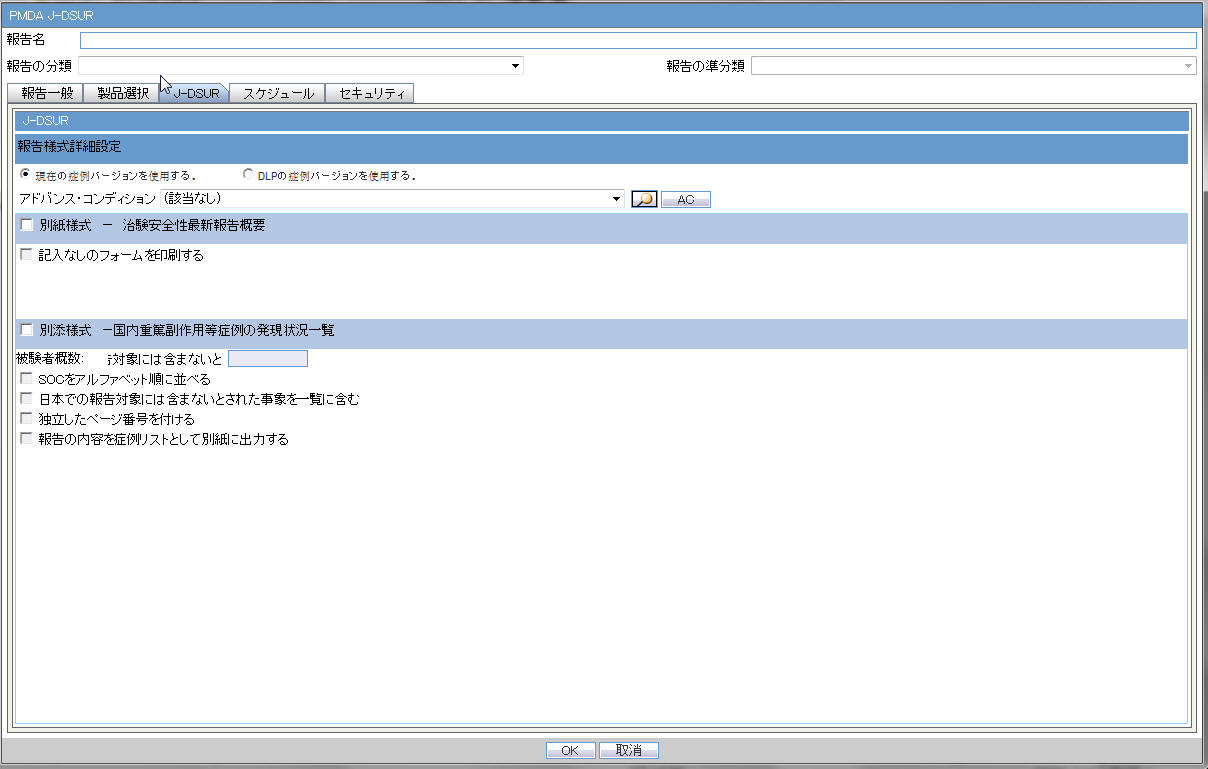
| # | Field Name | Description |
|---|---|---|
|
1 |
Forms configuration |
This field represents the main title of the UI. |
|
2 |
J-DSUR |
This field represents the title of the set of configuration forms. |
J-DSUR Form 1
| # | Field Name | Description |
|---|---|---|
|
3 |
Report form - Clinical Trial Safety Update Report Overview |
This field represents the title of the form to be configured. |
|
4 |
Print Blank Form |
This check box is used to print the blank form. |
J-DSUR Form 2
| # | Field Name | Description |
|---|---|---|
|
5 |
Report form - Serious AE Case Occurrence Status Listing |
This field represents the title of the form to be configured. |
|
6 |
Number of subject: Study__ |
This is a manual data entry (Numeric only) field. You can enter total number of subject for this entire clinical study for domestic. The Maximum digits for this number is 7 for both fields. |
|
7 |
Order SOC Alphabetically (Check box) |
If this is checked, the SOC is printed in alphabetical order (alphabetically based on their English names). If not checked, the SOC order is same as that of the MedDRA order. |
|
8 |
Include foreign AE marked as "Not include for the report in Japan" (Check box) |
When this is checked, the system includes AEs in the foreign cases that have flags for Not include for the report in Japan (available in the Case Form > Event tab) |
|
9 |
Use Current Case VersionUse DLP Case Version |
This radio button control is only displayed if DLP is enabled. Use Current Case Version is selected by default. Based on the J-DSUR configuration for DLP, the report is executed accordingly using latest case revision or using the DLP case revision. |
|
10 |
Separate Page Numbering (Check box) Note: When separate page numbering is not used, it always follows the previous form of J-DSUR. Order of the page numbering sequence is following: J-DSUR Form Cover, Line Listing |
When this is checked, the page number becomes independent (starts from 1) for J-DSUR Line Listing. |
|
11 |
Print the content of the report as case listing on separate page |
If this is checked, Case Listing of the J-DSUR Line Listing content is printed on a separate page. Note: The Case Listing is printed after the configuration content, and using following style guide template for listing. |
|
12 |
OK |
Confirm the operation. |
|
13 |
Cancel |
Cancel the operation. |
StyleGuide_CaseList.doc
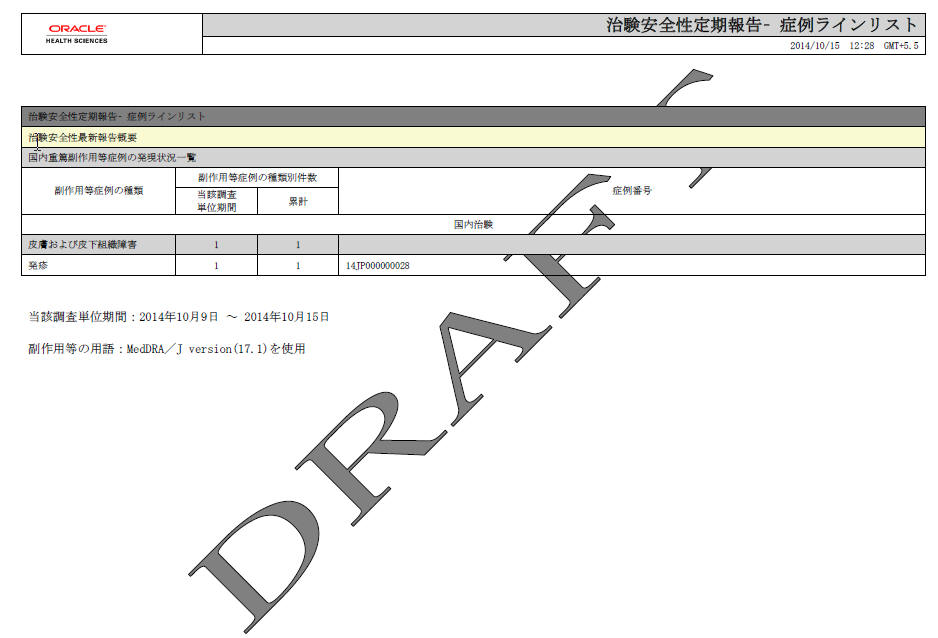
| # | Field Name | Description |
|---|---|---|
|
1 |
Periodic Safety Report - Case Line List |
Static text |
|
2 |
Clinical Study Serious Event Case Periodic Report |
Static text |
|
3 |
Serious AE, etc. Case Occurrence Status Line Listing |
Static text |
|
4 |
AE, etc. Case classification |
Static text |
|
5 |
AE, etc. Case Count |
Static text |
|
6 |
This investigation period |
This column has the same output as the printed J-DSUR |
|
7 |
Cumulative Total |
This column has the same output as the printed J-DSUR |
|
8 |
Case Number |
Case Numbers that have counted events are listed with the comma used as a separator. |
|
9 |
Clinical Study |
Static text. This section only considers the cases, which contain the studies configured as Selected Studies in the Product Selection tab. |
|
10 |
SOC |
This field has the same output as the printed J-DSUR. The Case Listing is not printed for this section. |
|
11 |
Event sectopm |
This field has the same output as the printed J-DSUR. The Case listing is printed for this section. |
|
12 |
This investigation time frame: YYYY?MM?DD????YYYY?MM?DD? - TBD |
This field has the same output as the printed J-DSUR. |
|
13 |
Terms for AE: MedDRA/J version ( ) was used. |
This field has the same output as the printed J-DSUR. |
Scheduling
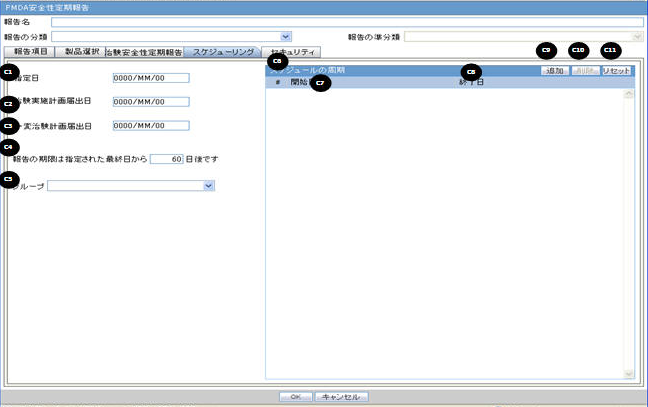
| Field Name | Description |
|---|---|
|
Clinical Study Plan Submit Date |
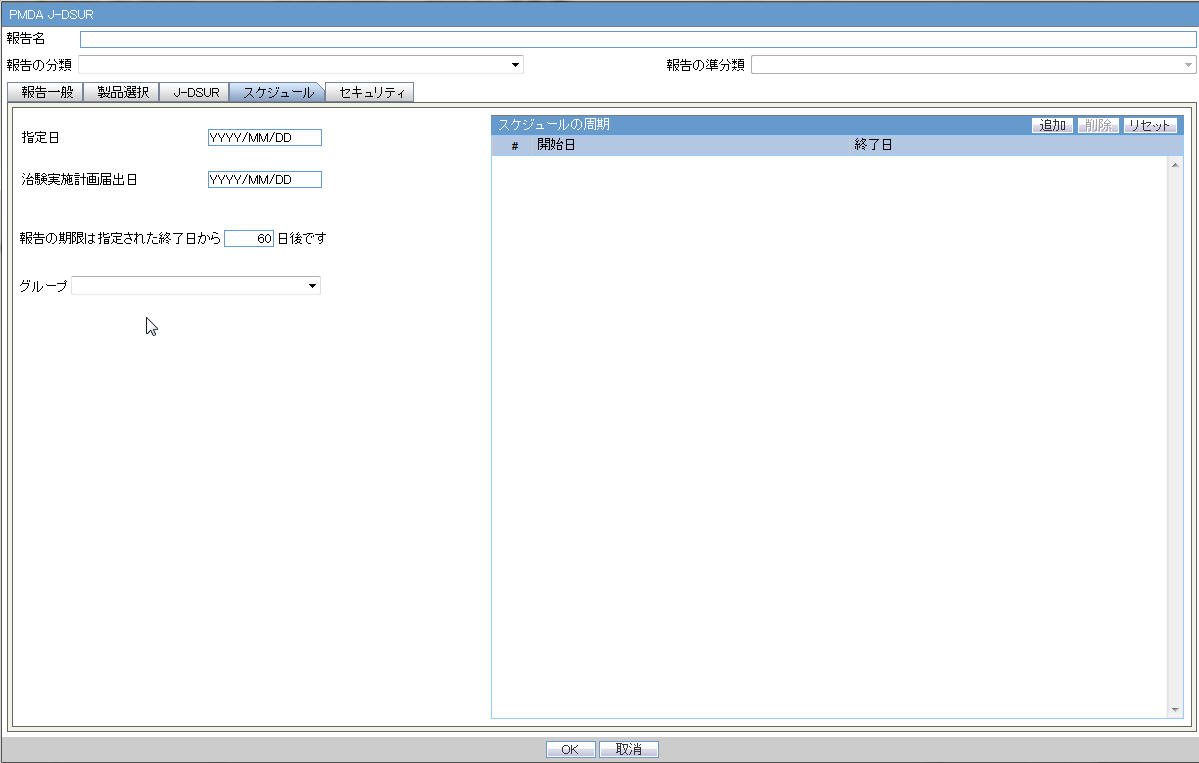
This is a manual data entry text field. It is an editable text field. If OK is clicked, the new value remains in the field. If Cancel is clicked, the original value is replaced with the entered value in the field. CSPSD is an editable field, if the J-DSUR is not in Submitted state and it does not have any previous non-editable timeframes. Once a J-DSUR is marked as Submitted, this field becomes non-editable. |
|
Report is due ___days after specified end date |
This option allows you to specify the due date of the J-DSUR, xx days after the end date specified for the scheduling period. The value entered in this field is added to the current end date and displayed in the printing UI as due date. |
|
Group |
This option allows you to specify which Argus group is responsible for the Periodic report, once scheduled by the application. The report appears on the designated group's worklist for Reports. |
|
Start Date |
This field is a date entry field for the reporting timeframe starting period. It allows you to enter the starting date of each J-DSUR timeframe starting period. The first Report Timeframe Start Date is auto-calculated as per the Assigned Date. The Start Date for the first timeframe is editable till the report is submitted. Start Date of the new row always has the next date of the previous End Date pre-populated as read-only, and End Date can be added only one at a time. The Start Date of the J-DSUR is auto-populated and reset as per the Assigned Date value, only if the first timeframe row (first start as well as end date) is editable. The Start Date of the J-DSUR is not updated based on the Assigned date, if this first timeframe row is non-editable. Whenever Start Date is auto-updated and end date is already specified, the system displays the following warning message: Start Date for the reporting period has changed. Please update the End Date accordingly. When you enter the Start Date which is older than the latest End Date (previous row), the system displays the following error message: Start Date must be same day, or after the latest end date. By clicking OK, the wrong Start Date is removed. Note: The J-DSUR contains the number of events from Submitted to the Japanese Agencies and non-reportable events within the Reporting Period. |
|
End Date |
This field is a date entry field for the reporting timeframe ending period. It allows you to enter the ending date of each J-DSUR timeframe starting period. This is an editable field. When you enter the End Date which is earlier than the same timeframe's Start Date, the system displays the following error message: End date must be after the Start Date By clicking OK, the wrong end date is removed. Note: The J-DSUR contains the number of events from Submitted to the Japanese Agencies and non-reportable events within the Reporting Period. The System does not allow you to edit the previous reporting period and only allows to edit the current reporting period. |
|
Add |
You can add editable row by clicking this button. You can add only 1 reporting timeframe which can remain in Editable state in a J-DSUR in single configuration. All the previous reporting timeframes are always in non-editable state. By default, in a freshly configured J-DSUR (non-submitted, non-copied), there is no timeframe row to begin with until you add one row using the Add button. Whenever the first timeframe row is added, the Start Date is auto-populated based on the Assigned Date.When you generate a J-DSUR, it is generated based on the last editable timeframe row.Once the report is marked with the Submitted status, all the timeframe rows are marked as Non-editable. If you do not have any editable timeframe row available in the J-DSUR, only then Add button is enabled. Else, it is always disabled. The Add button adds editable fields for Start and End date. Each row has a number that starts from 1 and is incremented for each timeframe. |
|
Delete |
You can delete the editable row by clicking this button. The Delete button cannot delete the non-editable row. For removing previous non-editable rows, you can use the RESET button. This makes sure that you do not delete any timeframe rows which J-DSUR has already submitted. When this is selected, the following warning message is displayed to confirm the operation: Would you like to delete the highlighted row? |
|
Reset |
When this button is clicked, all the existing timeframe rows (editable as well as non-editable) are deleted. Else, the past Start and End date records are non-editable. When the Reset button is clicked, the following warning message is displayed: By using Reset, all the past data will be removed. Do you want to proceed? If you click OK, proceed with the reset. If you select Cancel, leave the past data in the schedule table. When you make copy of a configuration, the Assigned Date, CSPSD, and CTPCSD are non editable unless the Reset button is used. |
Security
Printing J-DSUR
Generating the Document
The generation of the document is executed using the following process:
- Click View Report in Reports > Compliance > Periodic Reports
- Check-out the report from the View and edit J-DSUR pop-up.
- Edit the checked-out Word document
- Check-in using the same View and edit J-DSUR pop-up
- Publish the PDF file (converting from the Checked-in Word document)
Printing Requirements
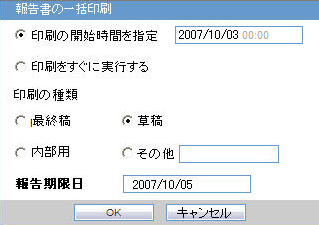
- The system allows you to print the report and update the report output in the Word document. The watermark is printed on the report when the Draft, Internal or <Other> is selected for printing.
- The change of the configuration for the same investigation timeframe can be done multiple times only before the status is changed to Submitted. The changes in the configuration after the Submitted status of the J-DSUR is applied on the next investigational time period.
- From the Reports > Compliance > Periodic Reports, selecting View Report allows you to view the J-DSUR Report in the Word document to upload the report.
- When J user opens Reports > Compliance > Periodic Reports
from the menu, Japanese UI is displayed for Periodic report list. The
pop-up for the J-DSUR view and edit is in Japanese.
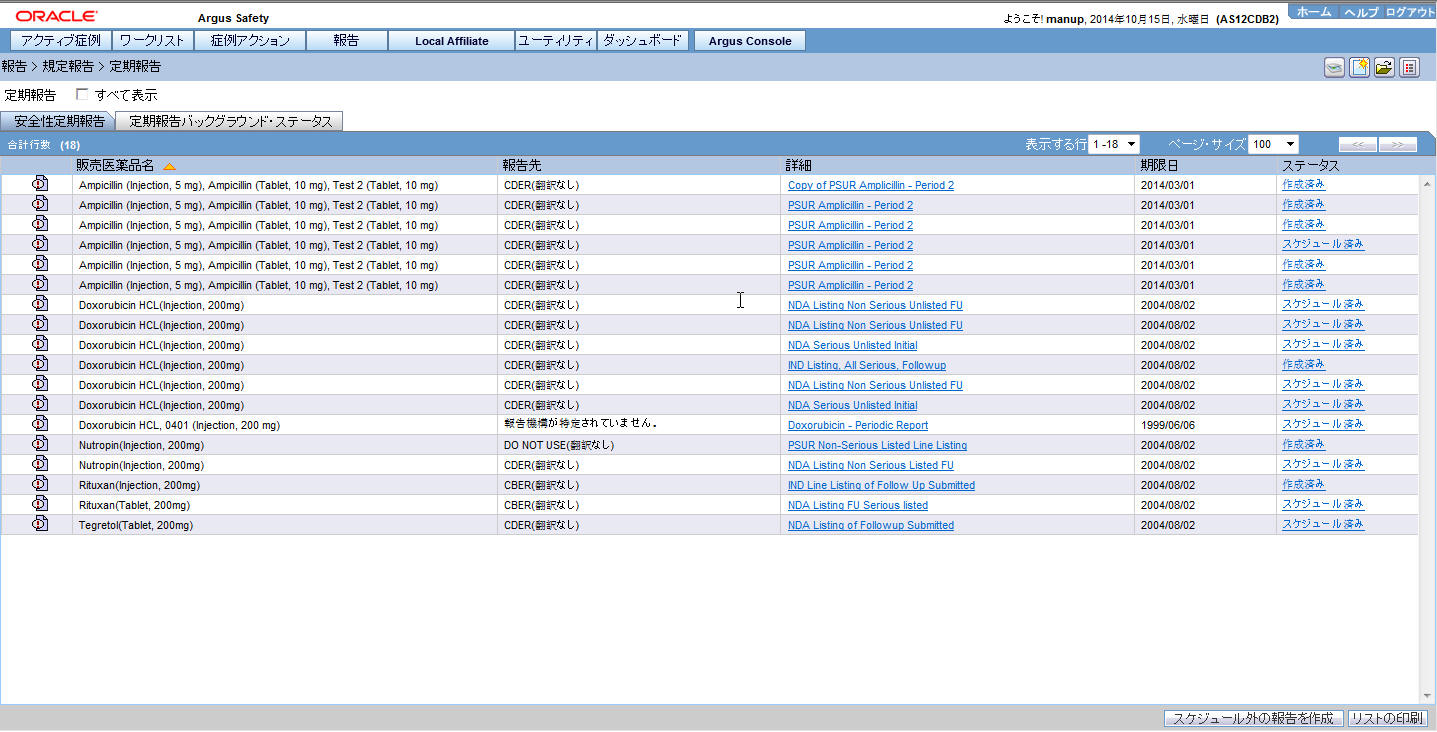
# Field Name Description 1
PERIODIC REPORTS
Lists the Periodic Reports.
2
View All
Enables you to view all the reports.
6
Trade Name
The Japanese UI displays available Japanese data in this field. When Japanese data is not available, the English data is displayed.
7
Destination
The Japanese UI displays available Japanese data. When Japanese data is not available, the English data is displayed. When Destination is not available, No Specific Receiver is displayed.
8
Description
The Japanese UI displays available Japanese data in this field. When Japanese data is not available, the English data is displayed.
9
Due Date
The English date format is DD-MMM-YYYY.The Japanese date format is YYYY/MM/DD.
10
Status
The Status appears in Japanese in Japanese UI, and in English in English UI and can have the following possible values:
Scheduled
Generated
Approved
Disapproved
Submitted
New Data Available
No Longer Required
- Trade Name section:
The Trade Name section displays the multiple trade names using comma separated list of the selected products.
The Trade Name displays the original product selected: either English or Japanese. If PSUR was created for the English product names, the English product name is used in the list. If the J-DSUR is created with Japanese product names, the Japanese product name is used in the list.
If the selected product in the J-DSUR does not have the Japanese Trade Name, the English Trade Name is displayed for that J-DSUR.
- When J user opens Reports > Compliance > Periodic Reports
from the menu, Japanese UI is displayed for Periodic report list. The
pop-up for the J-DSUR view and edit is in Japanese.
- The report output is a Word Document. This works in the similar way to ePSUR publishing where you are allowed to edit the Word Output outside the system and once generated, can publish the FINAL Word Document.
- When the report is generated and it has been never checked out, the center button displays Check-out to revise the document. At this time, the Publish button is disabled.
- Check-out can be executed by one user only. Other users cannot check-in the checked-out files.
- Once the check-out is executed, the Check-out button is changed to the Check-in button. This button is used to check- in the revised checkout file.
- When the file is checked-in, the center button becomes the Check-out button.
- When the file is not checked-out or not published, you can check-in/check-out the file as many times you want.
- When the file is not checked-out or not published, the group which has access rights to this report can execute the Check-in, Check-out, and Publish.
- The View button is always enabled (regardless of the Check-in/Check-out status). It displays the latest updated Word document or the PDF after final Publish.
- The Publish button is enabled after the check-in has been performed at least once. The Publish button is disabled when the document is checked-out.
- Once the final Word file is created, the Word document is saved in the repository. All the past J-DSUR Word outputs are saved. When you update the Word document and upload it, the system overwrites the automatically generated document in the database.
- Once the Publish button is executed and the PDF file is created, the Check-Out button is disabled.
- Once the document has been checked-in, the Check-in button is changed to Check-out, and the Publish button is enabled to publish the PDF report from the Word document.
- The Publish button converts the checked-in word document to the PDF file.
- Once Publish is done, the Word document is no longer available. The Check-in/Check-out buttons are disabled only when the J-DSUR is published and the label is changed to Check-out.
- When the Check-in button is clicked, the following pop-up is
displayed to specify the file name. This can be done by either specifying the
file name in the text box, or selecting the location using the
Browse button.

- If the data is changed manually in the Word document, this change is not applied to the next report. You need to change the report again.
- The configuration of the J-DSUR can be edited while the J-DSUR is checked-out. The change is affected only when the J-DSUR is created again.
Deleting A J-DSUR
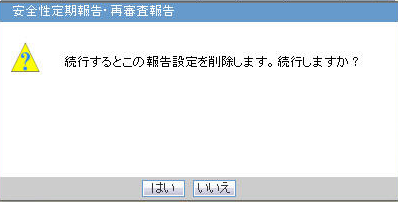
Click Yes on this dialog box to delete the report configuration.
Click No to exit without deleting.
Parent topic: Clinical Study Periodic Safety Report (now J-DSUR)