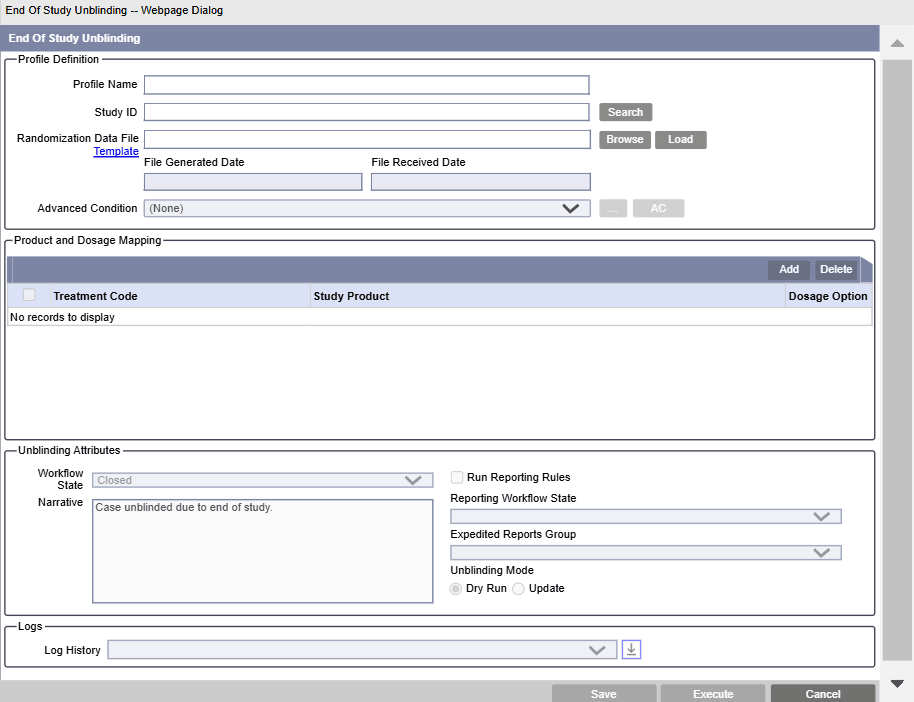
Configure an unblinding profile
You can create a new unblinding profile, view or modify an existing unblinding profile.
To create a new profile:
- Go to
Argus > Utilities > Argus Unblinding > Unblinding
                            Advanced
. - Click New Profile.
- Enter the information in the following sections:
- Profile Definition
- Product and Dosage Mapping
- Unblinding Attributes
- Logs

- Click Save.
Profile Definition
- In Profile Name, enter a unique name for the profile.
- To select a Study ID, click Search adjacent
to this field.
- In the Study Search
dialog, search by study ID or project ID.
The result list for the search for study ID displays studies that are marked as Eligible for unblinding belonging to the same enterprise as your log-in.
- From the search result, select the Study ID.
There can only be one profile for one Study ID. Same Study ID cannot be associated with different profile names.
Once a profile has been saved at the first entry, the selected study ID and profile name cannot be changed.
- In the Study Search
dialog, search by study ID or project ID.
- In Randomization Data File, browse to a
Patient Randomization data file (PRD) file, and click
Load.
Note:
Make sure you have obtained the complete set of PRD data from the external official source. Also, the PRD file must be an Excel file (.xls or .xlsx) in a fixed template (columns must contain data in the prescribed order and column names).(Optional) Click Template to download the randomization file template. The default name of this file is EOSU PRD Template. The certified file size if upto 2MB.
The PRD file can contain multiple rows of patient data in the following order without altering the header names:- Study ID
- Country
- Centre
- Patient Randomization Number
- Treatment Code
- Patient ID
Note:
Leading zeros and spaces in the PRD file are trimmed by the Argus Unblinding system during validation.When loading is complete, the PRD loading report and the PRD file can be downloaded to view the valid and invalid rows with relevant messages. To download the files in .ZIP format, click the Download PRD File & Loading Report icon next to the Load button. In case of discrepancies in the PRD file, relevant error message appears when you click Load.
The profile is automatically saved on the first successful load, and the Load button is disabled. The Load button is enabled only when you select a new PRD file for loading, and overwrites the existing file.
Without a successfully valid loaded randomization data, product mapping and execution of profile is not possible. If the loading report has all invalid rows, you will not be able to execute the profile.
Table 9-1 PRD file validation logic
| Field name | Validation logic | Mandatory/Optional |
|---|---|---|
| Study ID | Match to data in LM_STUDIES. STUDY_NUM | Mandatory |
| Country | Match to data in LM_COUNTRIES. COUNTRY | Optional |
| Centre | Match to data in LM_CENTERS. CENTER_NO | Optional |
| PRN [Patient Randomization Number] | Match to data in CASE_PAT_INFO.PAT_SUBJ_NUM. | The PRD file must have either PRN or Patient ID. |
| Patient ID | Match to data in CASE_PAT_INFO.PAT_ID. | The PRD file must have either PRN or Patient ID. |
| Treatment Code | This value is mapped to study drugs in the unblinding
profile.
Maximum size allowed is 10 characters. |
Mandatory |
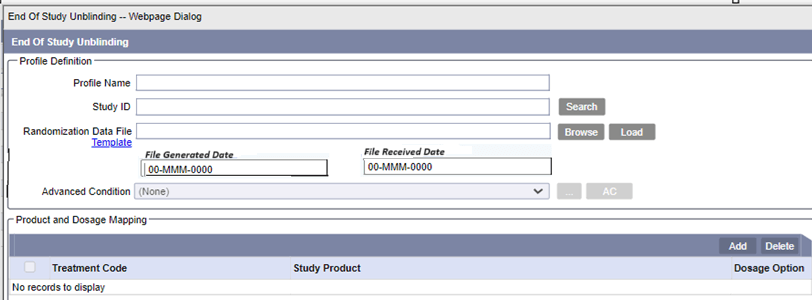
File Generated Date (Optional)

Displays the date when the randomization data file is generated in the clinical system and the values entered are used as the Follow-up Received date.
This field is enabled after you successfully load and save a PRD file.
The supported format is 00-MMM-0000. Partial dates, such as ??-Jun-2023 are not supported and trigger error messages.
This field is optional. If you do not enter a file generated date, then the system defaults the profile execution date during the execution.
File Received Date (Optional)
Displays the date when the randomization data file is received by the system and the values are used as the Safety Received date.
This field is enabled after you successfully load and save a PRD file.
The supported format is 00-MMM-0000. Partial dates, such as ??-Jun-2023 are not supported and trigger error messages.
This field is optional. If you do not enter a file received date, then the system defaults the profile execution date during the execution.
Either both File Generated Date and File Received Date are optional or both need to be set. These dates reset to 00-MMM-0000 if you load a new PRD file.
Advanced Condition (Optional)
Select a standard advanced condition to restrict cases that are executed for unblinding. You can select an existing advanced condition or create a new one and attach the same.
You can apply only those advanced condition for which you have permissions.
Product and Dosage Mapping
This section is enabled only when a PRD file is successfully loaded for this unblinding profile.
- Treatment Code - The data on this tab is
arranged into records, the number of records being derived from PRD for every
treatment code belonging to the study ID.
Note:
Treatment codes are provided by the clinical source data and need not be the same as study names in Argus. Additionally, they need not be the same as the treatment group defined in Argus.One record per distinct treatment code from the PRD is displayed and must have a treatment code - product pair along with Dosage options.
For example, if the randomization data contains two treatment codes DIASTUDY and DIASTUDY1, then this section allows you to define the study drug for those two treatment codes.
- Study Product - This drop-down contains a
list of all blinded products (Drugs, Devices, Vaccines) and treatment groups
defined for Study ID (all study names/arms) specified in the
Argus
                        Console > Business Configuration > Study Definition (Blinded company
                        and non-company Products)
. - To map multiple products for the same treatment code to enable unblinding of
comparator products, click ADD in the product mapping
section. This creates a new blank record with first available treatment code as
default.
- Select a treatment code from the Treatment Code drop-down that list all the valid treatment codes from PRD.
- Select the study product from the Study Product drop-down which is populated as described in the above point.
- Select Dosage for the newly added row after
selection of the study product. The available options are:
- Add to Existing Dosages - Allows you to define values for a set of dosage regimen fields. When the unblinding profile is executed, a record is created in the Dosage Regimen section of the case in addition to any existing dosage regimen records for the relevant study drug.
- Replace All by Following Dosages - Allows you to define values for a set of dosage regimen fields. When the unblinding profile is executed, dosage records are created in the Dosage Regimen section of the case, and replaces any and all existing dosage regimen records for the relevant study drug.
- Remove All Existing Dosages - The Dosage fields are disabled and cannot be edited. You cannot edit or add any new dosage information. When the unblinding profile is executed, all dosage regimen records belonging to the relevant drug are deleted.
- No Changes to Dosages (default) - The Dosage fields are disabled and cannot be edited. You cannot edit or add any new dosage information. When the unblinding profile is executed, all dosage information in the Case Form is retained without any changes.
If you update an existing Dosage option from No Changes to Dosages to any other option or add new dosage rows, the Select button changes to Update.
Select the Dosage Regimen for the treatment code based on the dosage rules defined at treatment-study drug level. You may define one or more dosage for each treatment code-study drug in this section.
- Click OK to save changes.
- The Study Product dropdown displays the Treatment Group in parentheses next to each name. The dropdown lists all products that are part of the study and all arms. If the study has Treatment Groups configured, then the dropdown displays only products from all arms that belong to a Treatment Group.
Unblinding Attributes and Mode
- Narrative (Optional) - Enter a standard piece of narrative that is
appended to the existing Case Narrative upon successful completion of the cases
unblinding.
By default, this field displays the text Case unblinded due to end of study. You can edit as per your requirement.
- Workflow State - Select a workflow state in which a case is placed when unblinding is successfully completed, and no expedited report has been scheduled by the unblinding procedure. By default, the state is Closed. When you select the Closed state, the cases are archived after unblinding.
- Reporting - Check the Run Reporting Rules
check box to run all reporting rules configured in Argus, and schedule reports
against the cases that are unblinded by the unblinding process. By default, this
check box is unchecked.
When checked, the Reporting workflow state and Expedited reports group fields are enabled. Reporting workflow state is a mandatory field for execution.
Reporting workflow state lists all the available workflow states. This field takes precedence over Workflow State when the report is scheduled for the case.
Expedited reports group lists all the available user groups. When the Run reporting rules option is set, the default value is set to blank. Else, you can select a group to which the report is assigned when scheduled. The system first checks for a group name and assigns that as the responsible group for the scheduled report. If no value is found, it checks for a group name assignment in Reporting rules. If that is also not configured, then the Responsible Group is left blank for scheduled reports.
- Unblinding Mode - Select a mode to execute the unblinding process.
The availble modes are:
- Dry Run mode (default) - Acts as a preview of the unblinding execution after unblinding and closing of case is successfully completed. It produces the execution log files and exception log files without actually unblinding the cases and saving the changes to the database.
- Update Mode - Commits all the changes done during the unblinding processing to the database. The execution and exception logs are generated with details.
Parent topic: Argus Unblinding Advanced