B Appendix: Modularity Tool Options for Non-Template Customers
Merchandise Financial Planning Cloud Service supports modularity options which allow non-template MFP customers to create a start-up initial configuration using MFP GA as a base configuration from the MFP Starter Kit. This appendix provides details about modularity options, assumptions, initial setups to use modularity options, available modules, and limitations of the modularity functionality.
MFP Modularity Options
MFP GA has a basic set of roles and functions within each role that we call modules. Each module may comprise using a certain set of measures, rules, or workflows within the configuration. This modularity tool provides options to enable or disable a few modules within each role and allows customer to create a new base configuration that you can further customize to use as your non-template configuration. Following are the current assumptions and limitations about this modularity option available within the MFP Starter Kit.
Assumptions:
-
Every time you use this modularity tool, the Configuration created is always against the released MFP GA configuration available in the Starter Kit. Currently it’s only against the MFP GA Retail Configuration.
-
Any further changes to configuration to generated base configuration or upgrade related changes needs to be manually maintained by customer as regular non-template configuration.
-
Currently any modularity tool functionality will not change the hierarchy structure or data interface structure of any GA measures. Meaning that existing GA integrations are not impacted.
-
The previous functionality will not change
batch_controlfiles, dashboardjsonsandinterface.cfgmappings. If any modularity functionality has impacts, it needs to be managed by implementors as documented in this appendix.
Modularity Tool Setup and Usage
The modularity tool is available as part of the MFP Starter Kit and it is currently enabled for Config Tools when launched from the MFP Starter Kit under Utilities option.
Figure B-1 Modularity Tool Option
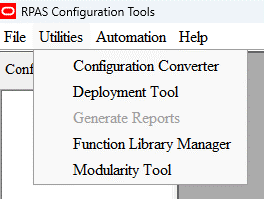
In order to use the modularity tool’s available options, perform these additional setup steps.
-
Install
node.json your Windows machine.The recommended version is
node.jsof v20.18.1 (LTS) which can be installed fromhttps://nodejs.org/en/download/prebuilt-installer. Thenode.jsis usually installed underc:/Program Files.Note:
In the installation wizard, do not select the Tools for Native Modules option.
-
Update the Path variable.
Below the System variables section, select the Path environment variable and click Edit. Add
/cygdrive/c/Program Files/nodejs/nodeto the Path environment variable. -
Restart the Cygwin terminal and verify the set up before opening the ConfigTools.
$ node -vv20.18.1$ which node/cygdrive/c/Program Files/nodejs/node
After installing node.js and you have restarted
the Config Tools, then select the modularity tool option to launch
the window for you to choose the available modules. Config tools provides
a view to choose the available modules grouped in different tabs and
for modules grouped for different roles. You can choose the modules
you want and then provide the Output Config Path location where you
want to save the generated configuration. Click OK to run your
modules.
MFP Modules
The modularity tool allows you to select various pre-defined planning modules that can applied to the GA MFP Retail configuration. The current MFP GA configuration is vast and is set up at an incredibly detailed level which impacts the time taken by the Implementor to trim it down to get an initial or base configuration before even starting the customization required by customers. Applying these modules to simplify the GA MFP configuration will benefit the Implementor in reducing the time and effort spent on the config modification using the base GA template.
Note:
After the modules are applied to the GA template, the solution is no longer a GA template and becomes a custom configuration.
Each module represents a specific logic removal and modification of measures and rules associated for a given workbook template. This utility only runs against the base GA MFP Retail configuration and can not be applied to custom configuration or any other Oracle GA Retail application. Prior to applying the modules, the Implementor needs to establish the customer’s requirements so that the correct modules could be applied to create a base configuration for the implementation. This is so that all necessary modules are applied at once as it does not support running modules on top of a non-GA MFP Retail base configuration.
The following modules are pre-defined for GA MFP Retail solution for each template:
Figure B-2 Merch Target Module
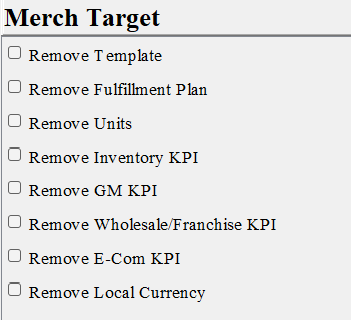
Figure B-3 Merch Plan Module
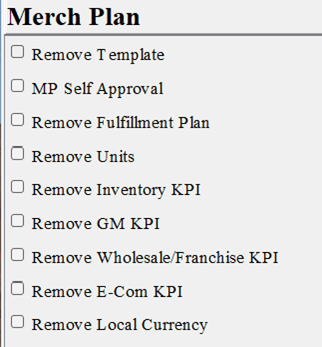
Figure B-4 Location Target Module
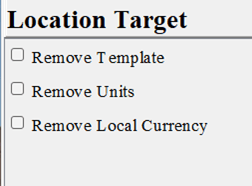
Figure B-5 Location Plan Module
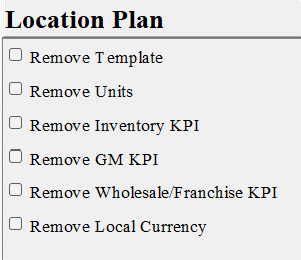
Remove Template Changes
The following changes are expected when applying Remove Template to each template.
Remove Template for Merch Target:
-
Remove Workbook - Create Merch Target.
-
Remove the Rules set associated with Create Merch Target workbook.
Remove Template for Merch Plan:
-
Remove Workbook - Create Merch Plan.
-
Remove the Rules set associated with Create Merch Plan workbook.
Remove Template for Location Target:
-
Remove Workbook - Create Location Target.
-
Remove the Rules set associated with Location Target workbook.
Remove Template for Location Plan:
-
Remove Workbook - Create Location Plan.
-
Remove the Rules set associated with Create Location Plan workbook.
Remove Template for Units:
-
Remove unit of measure (UOM) associated to Units (U) from the GA configuration, all measures or rules associated with Units will be removed.
Remove Template for Local Currency:
-
Remove unit of measure (UOM) associated to Local Currency (LC_UOM) from the GA configuration, all measures/rules associated with LC_UOM will be removed.
Remove Template for Inventory KPI:
Removes all measures and rules associated with the following list of metrics in the Inventory and Receipt Module.
Table B-1 Inventory and Receipt Module
| Metric | Label |
|---|---|
|
AEOPP |
Avg EOP per Location |
|
BOP |
BOP |
|
BOP1 |
BOP Reg+Promo |
|
BOP2 |
BOP Clr |
|
BOS |
Beginning of Season Inventory |
|
BOS1 |
BOS Reg+Promo |
|
BOS2 |
BOS Clr |
|
CAvInv |
Avg Inv |
|
ConsInv |
Cons Inv |
|
CTO |
Cum Turn |
|
EOP |
EOP |
|
EOP1 |
EOP Reg+Promo |
|
EOP2 |
EOP Clr |
|
InvAdj |
Inv Adj |
|
InvDV |
Inv Devaluation |
|
InvDV1 |
Inv Devaluation Reg+Promo |
|
InvDV2 |
Inv Devaluation Clr |
|
LastStk |
Last Period EOP |
|
MiscAdj |
Misc Adj |
|
MOC |
Move to Clr |
|
MOS |
MOS |
|
NOO |
Net On Order |
|
OO |
On Order |
|
OOAdj |
On Order Adj |
|
OTB |
OTB |
|
PORcpt |
PO Receipt |
|
Rcpt |
Receipts |
|
Redn |
Reductions |
|
RInvA1 |
RMF Shrink Inventory Adjust |
|
RInvA2 |
RMF Non-Shrink Inventory Adjust |
|
SellThr |
Sell Thru Alert |
|
StkSls |
Sales to Stock |
|
TranIn |
Transfers In |
|
TranInB |
Transfers In Book |
|
TranInI |
Transfers In ICT |
|
TranIO |
Transfers In/Out |
|
TranOut |
Transfers Out |
|
TranOutB |
Transfers Out Book |
|
TranOutI |
Transfers Out ICT |
|
TSInv |
Inventory Change |
|
TTranIn |
Total Transfers In |
|
TTranOut |
Total Transfers Out |
|
Turn |
Forward Cover |
Remove Template for GM KPI:
Removes all measures and rules associated with the following list of metrics in the Margin Module.
Table B-2 Margin Module
| Metric | Label |
|---|---|
|
CMU |
CMU |
|
COGS |
COGS |
|
GM |
GM |
|
GMROI |
GMROI |
|
NGM |
Net GM |
|
Royal |
Royalties |
|
Shrk |
Shrink |
|
VndFnd |
Vendor Funds |
Remove Template for Fulfillment KPI:
Removes all measures and rules associated with the following list of metrics in the Fulfillment Module.
Table B-3 Fulfillment Module
| Metric | Label |
|---|---|
|
BISSC |
Buy In Store Ship to Customer |
|
BOPIS |
Buy Online Pick Up in Store |
|
BORIS |
Buy Online, Return in Store |
|
BORO |
Buy Online, Return Online |
|
BRtn |
BORIS return |
|
BRtn1 |
BORIS Return Reg + Promo |
|
BRtn2 |
BORIS Return Clr |
|
FFRef |
Fulfillment Refresh |
|
IMS |
Pick In Store |
|
IMS1 |
Pick up in Store (Reg+Promo) |
|
IMS2 |
Pick up in Store (Clr) |
|
InCngStk |
Store to Warehouse Restocking |
|
MTD |
Returns Back to Online |
|
MTD1 |
Returns Back to Online (Reg+Promo) |
|
MTD2 |
Returns Back to Online (Clr) |
|
OnStk |
Warehouse Restocking $ |
|
ORtn |
Online Returns |
|
Restk |
Restocking Cost |
|
STC |
Ship to Customer |
|
STC1 |
Ship to Customer (Reg+Promo) |
|
STC2 |
Ship to Customer (Clr) |
|
StrStk |
Store Restocking $ |
Remove Template for Wholesale and Franchise Module KPI:
Removes all measures and rules associated with the following list of metrics in the Wholesale and Franchise Module.
Table B-4 Wholesale and Franchise Module
| Metric | Label |
|---|---|
|
MkdWF |
Markdown due to W/F |
|
WFGM |
W/F Gross Margin |
|
WFMkD |
W/F Markdown |
|
WFMkU |
W/F Markup |
|
WFNSls |
W/F Net Sales |
|
WFPoC |
W/F Location |
|
WFRet |
W/F Owned by Retailers |
|
WFRtn |
W/F Returns |
|
WFSls |
W/F Sales |
Remove Template for E-com KPI:
Removes all measures and rules associated with the following list of metrics in the E-commerce Module.
Table B-5 E-commerce Module
| Metric | Label |
|---|---|
|
ConvRate |
Conversion Rate |
|
Canc |
Cancel |
|
COrdr |
Customer Order |
|
FulFill |
Fulfilled |
|
AvgTrans |
Avg Gross Transaction Size |
|
BkOrd |
BackOrder |
|
BOCanc |
BackOrder Cancel |
|
BOFulFill |
BackOrder Fulfilled |
|
Traffic |
Traffic |
|
Demand |
Demand |
MP Self Approval:
This module updates the Merch Plan approval process to be a self approval process instead of submitting the plans to Merch Target approval. It updates the current Submit Plan rules to approve plan directly to CP/OP and removes Merch Target Approve Plan rules.
Note:
This modularity utility only affects the measures and rules by removing or unregistering them. It does not directly update the Workbook and Taskflow automatically. The output base configuration after running the utility requires the Implementor to update the Workbook and Taskflow level modification as part of the customization.
The following details an example use case of running the modularity tool to create a base MFP Retail configuration from the GA configuration.
Table B-6 MP Self Approval Module Use Case
| Roles | KPIs | Local Currency | Fulfillment Planning | Units | Wholesale / Franchise | E-com KPIs | Approval |
|---|---|---|---|---|---|---|---|
|
Merch Target |
Inventory & Receipts, GM |
Yes |
No |
Yes |
No |
Yes |
Not Applicable |
|
Merch Plan |
Inventory & Receipts, GM |
Yes |
No |
Yes |
No |
Yes |
Self Approval |
|
Location Target |
Not Applicable |
Yes |
Not Applicable |
Yes |
Not Applicable |
Not Applicable |
Not Applicable |
|
Location Plan |
Inventory & Receipts, GM |
Yes |
Not Applicable |
Yes |
No |
Not Applicable |
Not Applicable |
Perform the following steps to run the modularity tool to create a base MFP Retail configuration from the GA configuration.
-
Open the configuration tool and select the Utilities tab option and then select Modularity Tool.
Note:
It is not necessary to open the MFP GA configuration first, as the tool always runs against the MFP GA Retail configuration packaged with the Starter Kit.
-
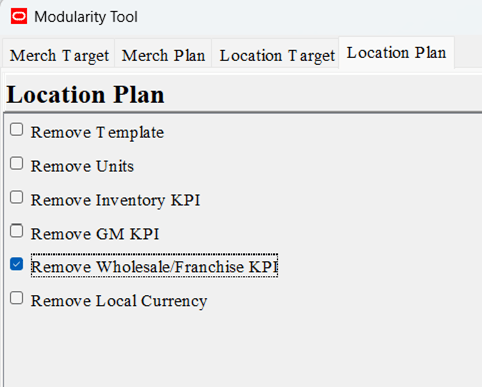
Select the modules to apply against the GA configuration from the pop-up UI for each template to satisfy the requirements for the new base configuration.
Figure B-6 Merch Target Module
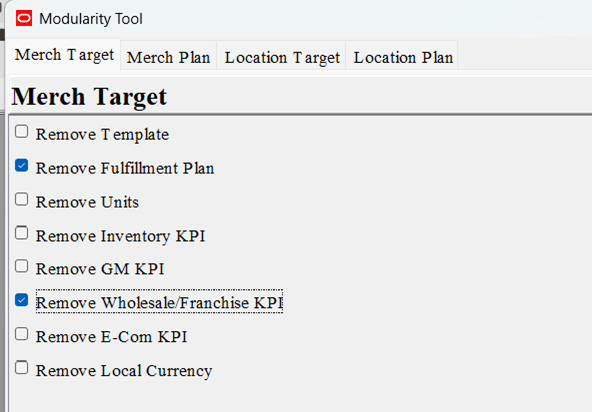
Figure B-7 Merch Plan Module
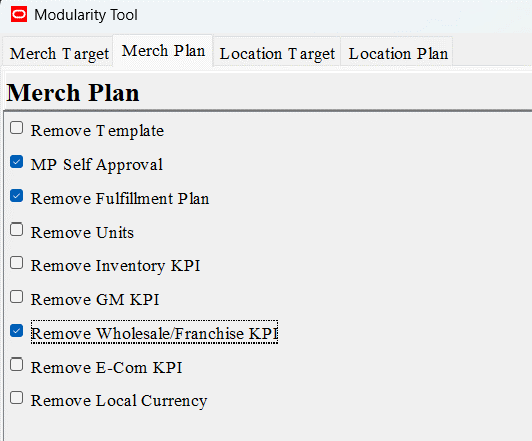
Figure B-8 Location Plan Module
-
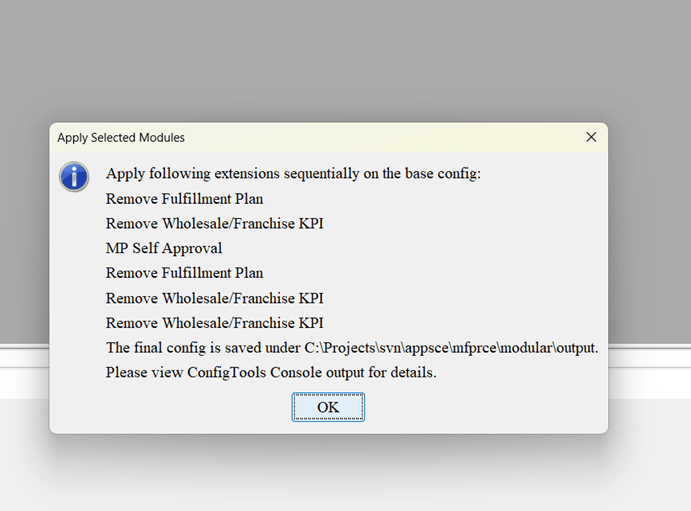
Once the modules are selected, specify the output directory for the new base configuration. Click OK after you review the Apply Selected Modules.
Figure B-9 Specify the Output Directory
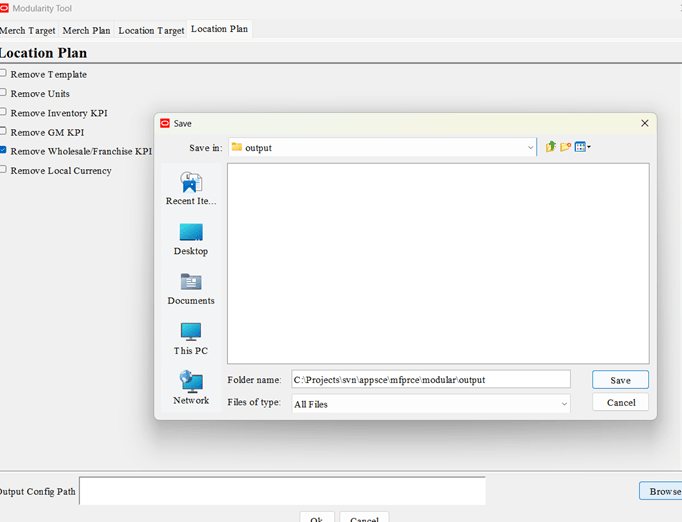
Figure B-10 Confirm the Selected Modules
-
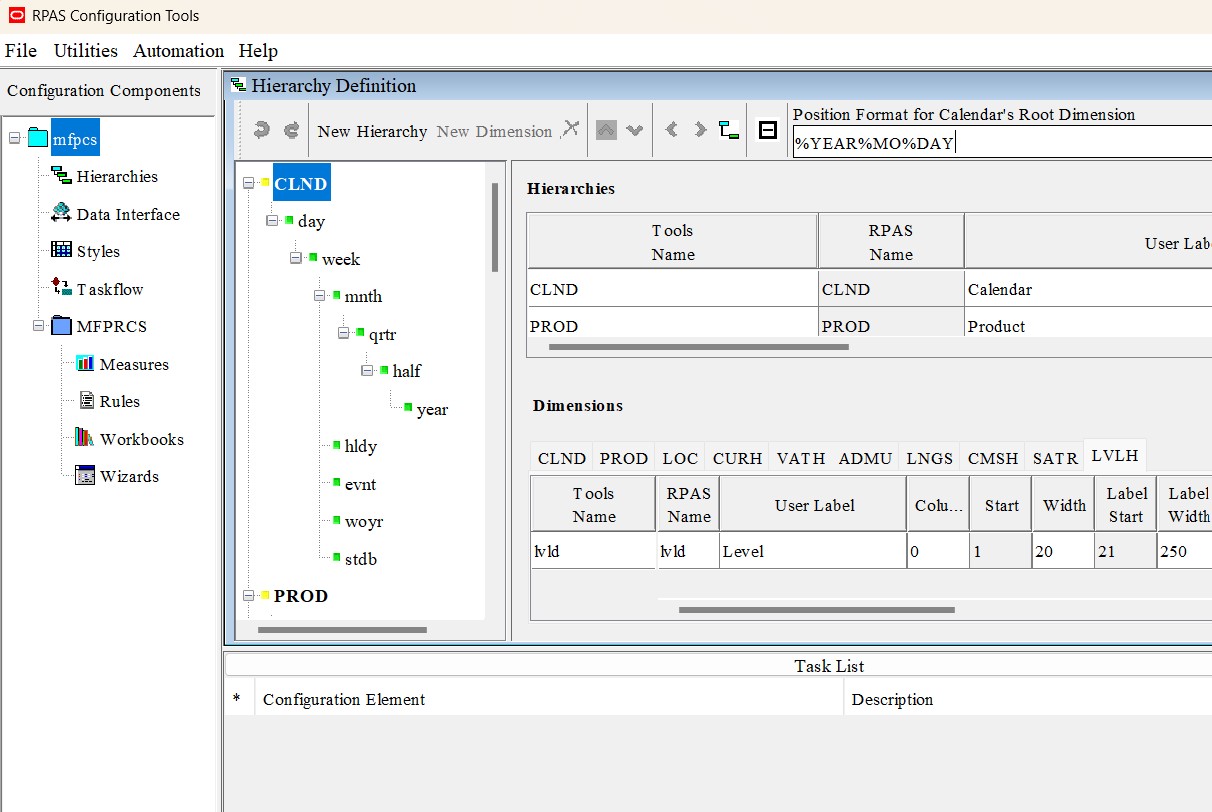
Open the new base configuration from the output saved directory and check to see if any errors or warnings exist under the Task List. No errors or warnings means that the modularity tool successfully updated the measures and rules associated with the selected modules.
Figure B-11 Check for any Errors in the Task List
-
The modularity tool currently can only make changes to the measure or rule level. Iit does not automatically make any changes to the Workbooks or Taskflow. It is up to the Implementor to make additional manual updates to both the Workbooks or Taskflow as a starting point of customization from this new base MFP configuration. Using the example use case scenario, perform the following manual updates.
Note:
The following workbook level updates are just a recommendation and it is up to the Implementor and customer to update accordingly with the labels and views required for the customer. This new simplified configuration is now the base configuration for the customer to build their custom logic and functionality on top to meet their business needs.
-
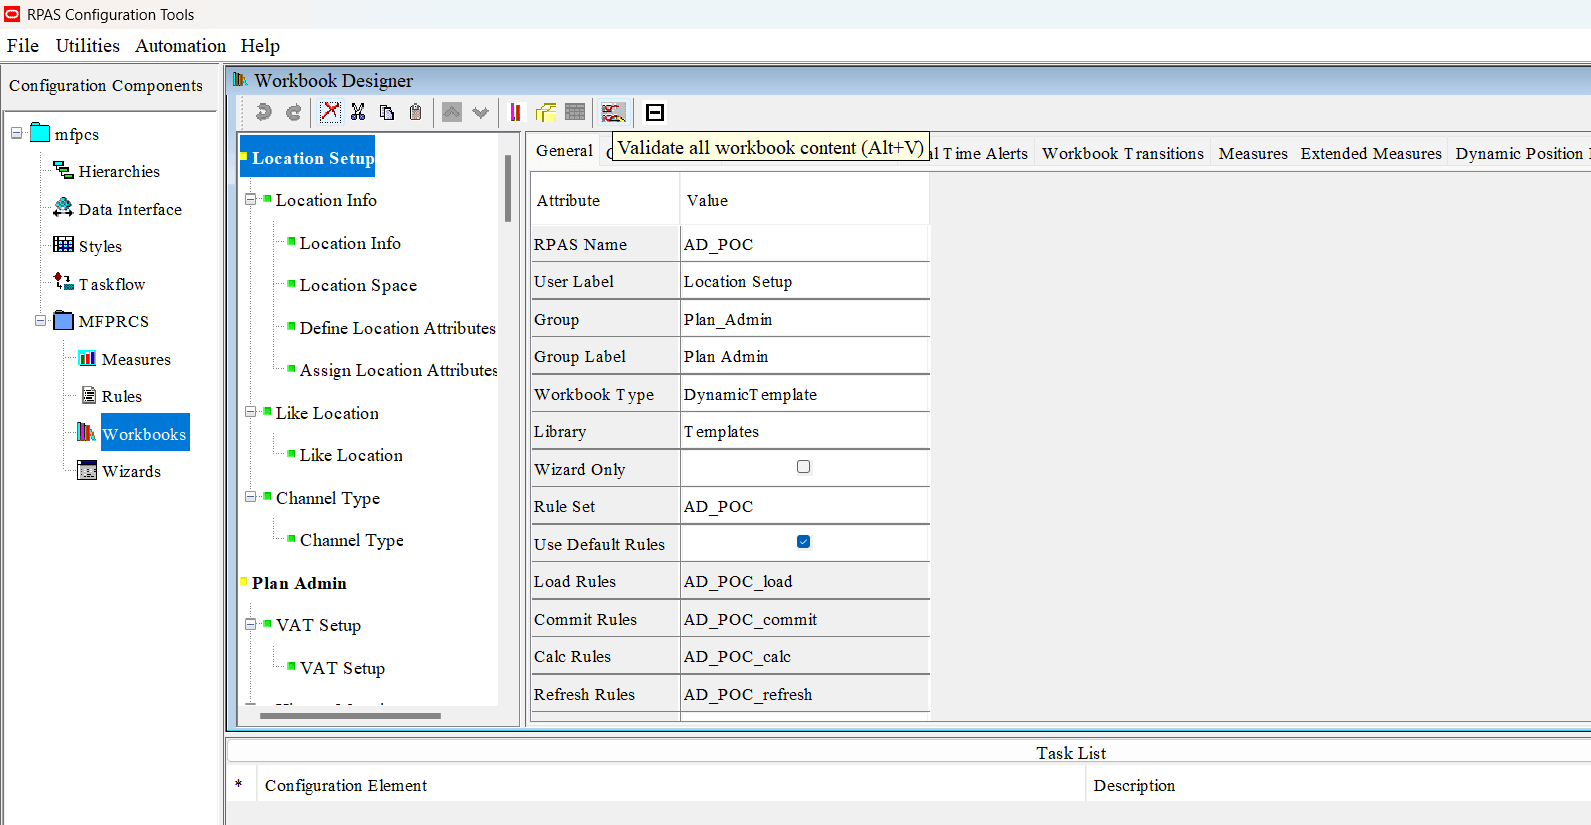
Under Workbook Designer, click the Validate all Workbook Content icon that provides all errors and warnings associated with the workbook templates. This provides descriptions of all template level errors that needs to be resolved; such as a potential error that could be unregistered measures not cleared from the worksheet view that must be manually removed or unregistered measures impacting the workbook properties like real time alerts or extended measures. .
Figure B-12 Check for any Worksheet Errors in the Task List
-
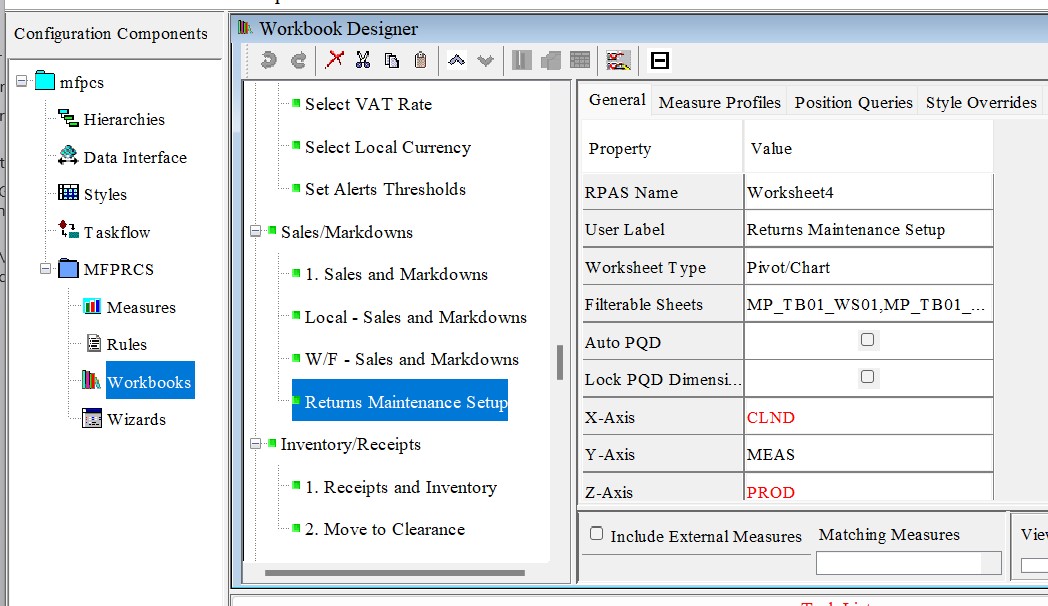
In the previous use case example, remove worksheets if associated with the module applied, such as Remove of Fulfillment and Wholesale/Franchise. These worksheets should be removed from the template or taskflow.
Figure B-13 Remove Worksheets
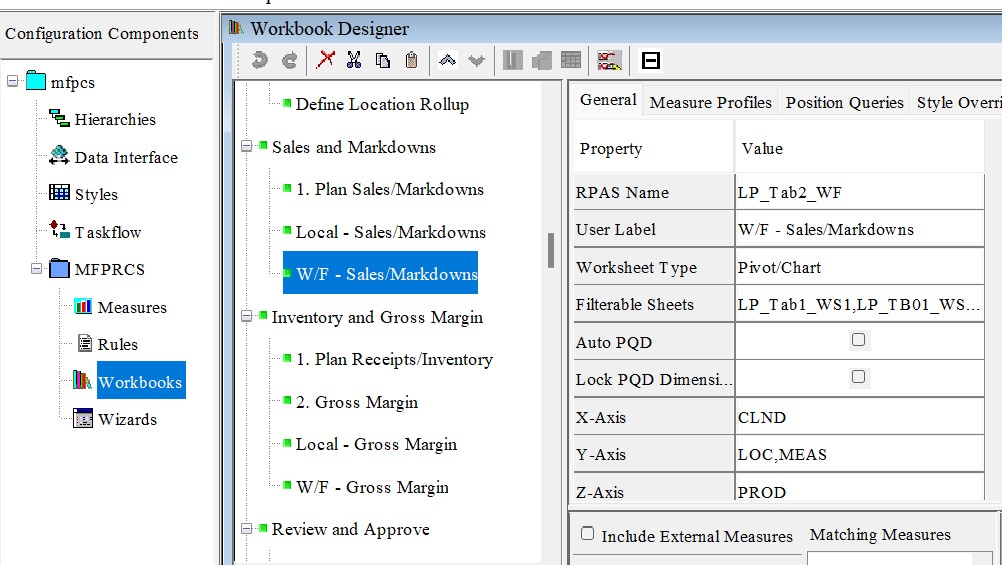
Figure B-14 Remove Worksheets from the Template or Taskflow
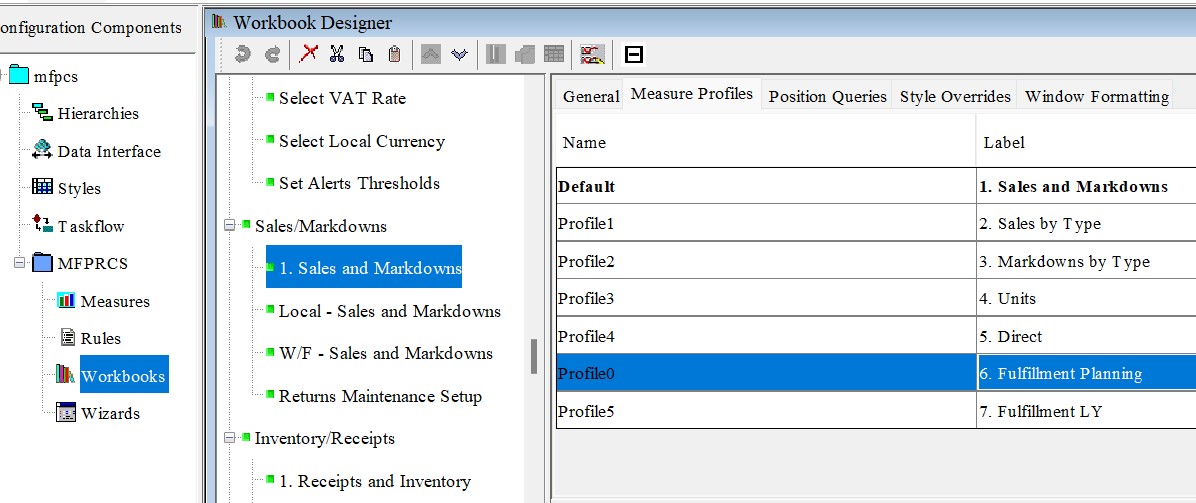
Additionally, check the Worksheet Measure Profile tab to make sure that no specific profile exists. Remove any existing profiles.
Figure B-15 Verify that No Specific Profile Exists
-
-
The Merch Plan Self Approval module is more complex in that it affects the custom menu rule groups and require more in-depth updates to the Workbooks within Merch Plan and Merch Target templates as follows.
-
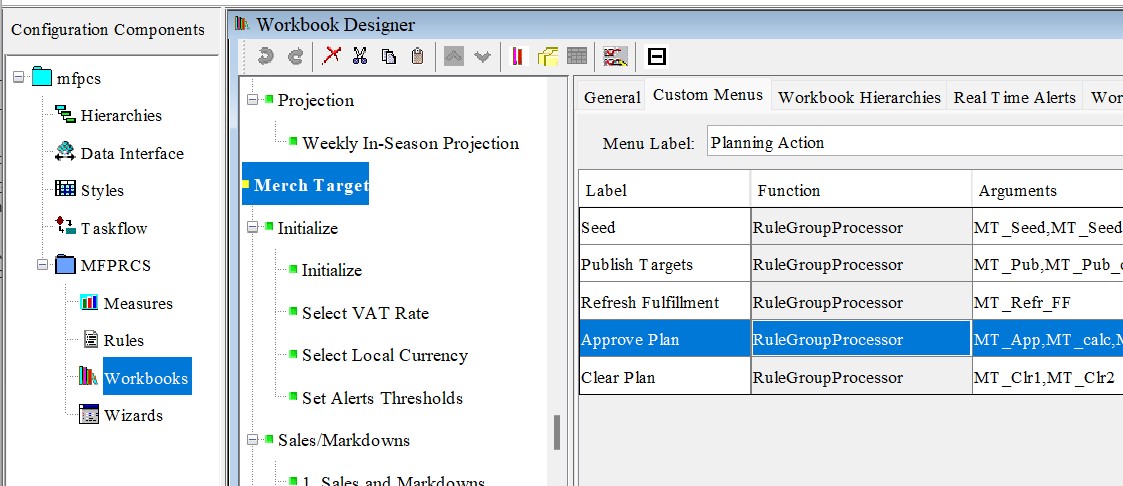
In the Workbook Designer, navigate to Merch Target and then Custom Menus. Remove Approve Plan since the Merch Plan approval is self-approval.
Figure B-16 Remove Approve Plan
-
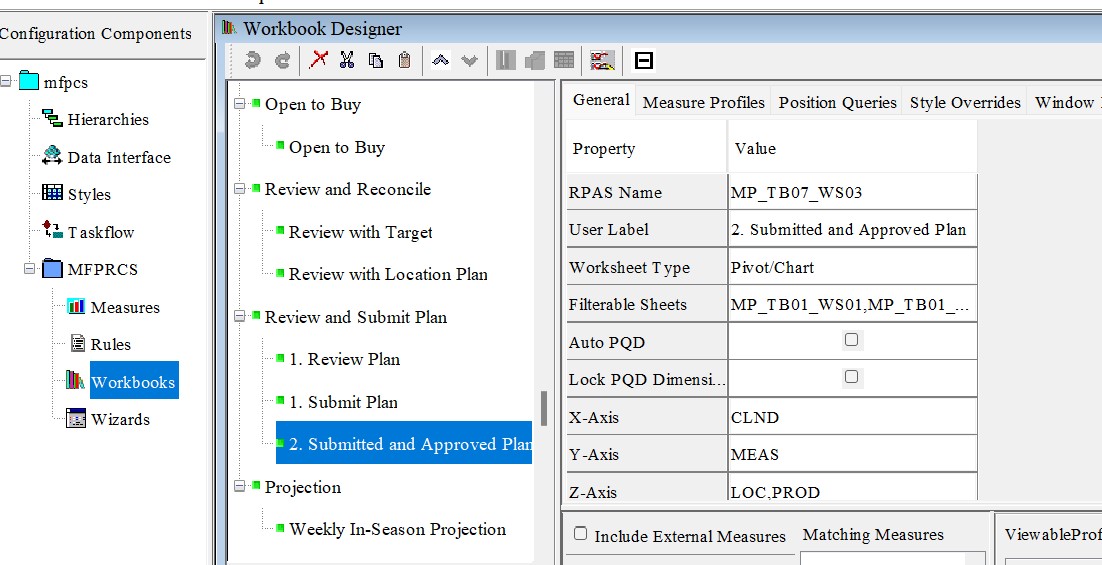
In Merch Plan, update the Review and Submit Plan tab to the Review and Approve Plan. Change Submit Plan to Approve Plan. Change Review and Submitted Plan to Approved Plan.
Figure B-17 Change Plan Names
-
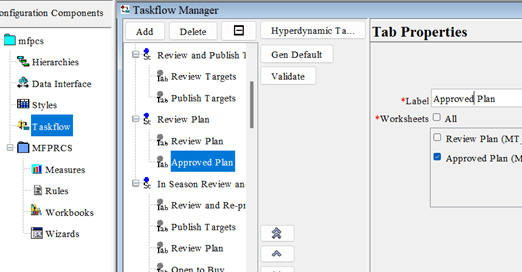
Update the Merch Target Taskflow label from Review and Approve Plan to Review Plan.
Figure B-18 Update the Merch Target Taskflow Label
-
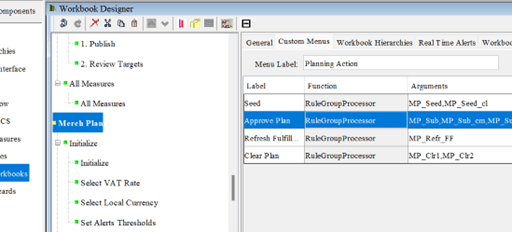
In the Workbook Designer, navigate to Merch Plan and then Custom Menus. Change Submit Plan to Approve Plan.
Figure B-19 Update the Merch Target Taskflow Label
-
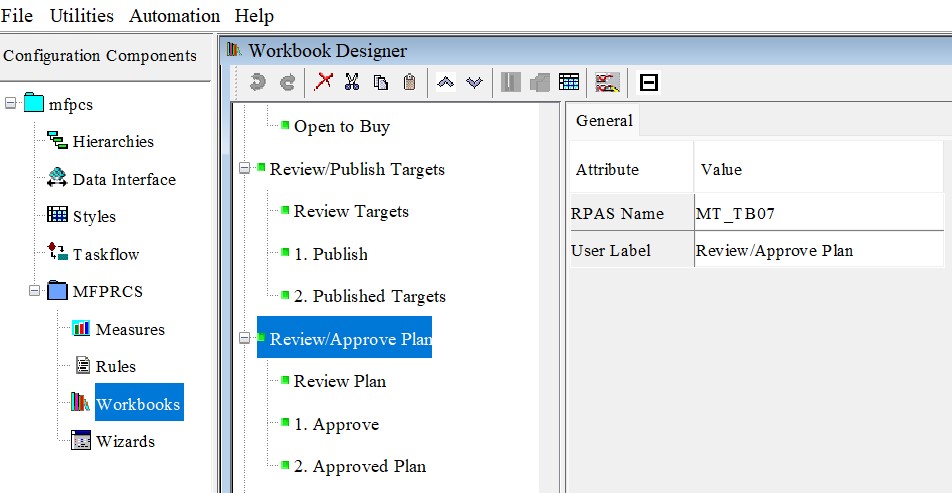
In Merch Plan, update the Review and Submit Plan tab to the Review and Approve Plan. Change Submit Plan to Approve Plan. Change Review and Submitted Plan to Approved Plan.
Figure B-20 Change Plan Names
Note:
Check all template properties for errors, especially for real time alerts, measures, and extended measures properties. Fix those errors manually.
-