7 Managing Data Visualization
All implementations of Retail Analytics and Planning applications include Oracle Data Visualization (DV) as a tool for custom analytics and reporting. Administrators should be aware of how DV is maintained as part of your Oracle Cloud environments so that they can manage user-created content and access permissions in the tool.
Accessing the Application
A sample URL to access the DV application is below. The hostname will be the same URL root as your Retail Insights (/analytics/) and AI Foundation (/rse/faces/Home/) environments, appending the /dv/ application path shown below.
https://ocacs.ocs.oraclecloud.com/{solution-customer-env}/dv/?pageid=homePermission to access DV can be granted through OCI IAM using the group DVContentAuthor. DV access is also
granted automatically if you have certain Retail Insights groups assigned, such as BIAuthors_JOB or RIApplicationAdministrator_JOB.
Managing User Content
User-created content comes in several forms and each type of content is managed separately, as defined below.
Table 7-1 DV Content Types
| Content Type | Explanation |
|---|---|
|
Projects |
DV reports and analyses are saved as Project files in the Oracle Analytics Catalog. In Oracle Retail cloud solutions,
you may only use two assigned folders in the catalog: By default, projects have their own permissions assigned and are not granted to anyone but the owner. The owner must grant the object to administrators if they want projects to be centrally managed. |
|
Datasets |
Users can create datasets by uploading Excel spreadsheets or by querying pre-defined database connections. Datasets have their own permissions assigned and are not granted to anyone but the owner by default. The owner must grant the object to administrators if you want datasets to be centrally managed. |
|
Connections |
Database connections are managed by Oracle at this time, end users are not expected to create or modify these objects. |
|
Data Flows |
Data flows are used to combine multiple datasets or perform complex transformations and data mining algorithms. Data flows cannot be seen or administered by anyone but the object owner. |
Project Permissions
By default, projects are only granted to the original owner. If a project is saved to a shared folder, then it will additionally be granted to the user groups/roles that have access to that folder. You may change the permissions on a project at any time as long as you are the owner or an application administrator. Follow the steps below to access and modify permissions on a DV project:
-
From the DV Home page, expand the navigation panel on the left and click Catalog.
-
Locate a project file within the
/Shared Folders/Custom/directory that you wish to view or modify the permissions for. -
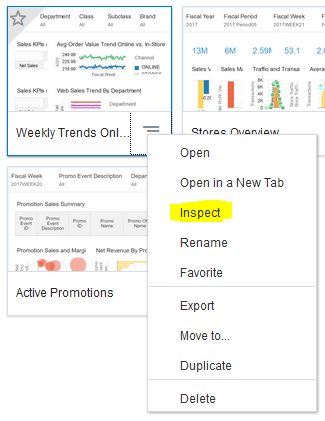
Hover over the object tile and click the menu icon that appears.
-
Select the Inspect option in the menu.

-
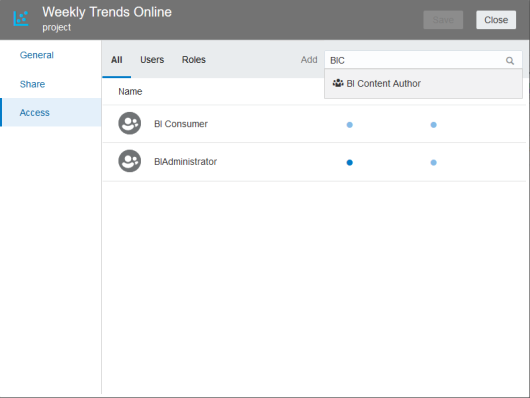
Click the Access menu to view or change permissions.
Users and roles that are not listed do not have any access to the project. Users and roles that are listed in the table may have either read-only or read-write access levels assigned.
-
To add new users or roles, click the associated tab and begin typing in the search box. A menu appears when you have entered enough characters to locate a valid user or role name. Click an item in the menu to add it to the project.

-
Hover over the list of users and roles and click the blue dots to change the assigned permission. Click the X icon to the right of the user/role to delete it.
-
When you are finished, click Save to save the changes, then click Close.
Note:
The same steps can be followed to assign permission to folders so you do not need to manage permissions on a project-by-project basis.For more information on permission management, go to the Data Visualization User Guide “Permissions” section.
Dataset Permissions
By default, datasets are only granted to the original owner. For this reason, you may prefer to have a single administrative user create all the datasets in the system and then centrally manage and grant access to them. Datasets are not shared unless they are explicitly shared with other users or roles. Follow the steps below to access and modify permissions on a DV dataset:
-
From the DV Home page, expand the navigation panel on the left and click Data.
-
Click the Datasets tab. Hover over the object tile and click the menu icon that appears.
-
Select Inspect.
-
Click the Access menu to view or change permissions.
-
Users and roles that are not listed do not have access to the project. Users and roles that are listed in the table may have full control, read-only, or read-write access levels assigned. Full control allows the user or group to manage access levels and delete the dataset.
-
To add new users or roles, click the associated tab and begin typing in the search box. A menu will appear when you have entered enough characters to locate a valid user or role name. Click an item in the menu to add it to the project.
-
Hover over the list of users and roles and click the blue dots to change the assigned permission. Click the X icon to the right of the user/role to delete it.
-
When you are finished, click Save to save the changes, then click Close.
For more information on dataset management, go to the Data Visualization User Guide “Manage Datasets” section.
Backup and Restore
Data Visualization content can be imported and exported by administrative users to maintain local copies of user content. This can be useful for migrating content between environments and maintaining backup copies in the case of user error or system failure.
For more information on Catalog management, go to the Data Visualization User Guide section “Import, Export, and Share”.
Backup
To export user content:
-
On the Home page, click Navigator then click Catalog.
-
In the Catalog page, highlight the project or folder that you want to share and click the Actions menu, then select Export to open the Export dialog.
-
For Name, keep the default name or enter a new name for the export file (.DVA file).
-
Enable the Include Data option to include the data when sharing a project or folder. This applies to Excel spreadsheets and similar datasets generated from a file.
-
Do not enable the Include Connection Credentials option: you do not have the credentials needed to copy database connections. This option is only used by Oracle at this time.
-
Enable Include Permissions to include access permission details, so that shared connections work when users import the project.
-
Click Save.
This will create a DVA file for you to download and save locally. The DVA file is an archive and may contain multiple projects or folders, but it is recommended to archive individual projects and folders where feasible, to make it easy to restore portions of a catalog.
Restore
-
Go to the Catalog main screen and click the application menu in the upper right corner.
-
Select Import Project/Flow and locate your DVA files, then click Import to load them.
The data will be loaded into the folder you are currently on in the Catalog screen.
Planning and Data Visualization
The Planning applications also allow the use of Data Visualization to review data stored in the planning domains, but the administrator needs to create the Planning Views for the fact data that they want to expose to the Data Visualization solution. There is an Online Administration Task available within Planning Solution to expose the metrics as views so that Data Visualization can be used against those metrics. Please refer to RPASCE Administration Guide for more details about exposing metrics to Data Visualization, and refer to the Configuration Guide to configure the same for customized Planning solutions.
Report Cache Management
Oracle Analytics reports have the ability to store report results into a reusable cache on the server, which can then be queried directly to return those results again on later executions of the report without accessing the database. This is an important performance feature to reduce the workload on the database, but it can also cause results to become outdated over time if the cache is no longer accurate. The cache must be erased periodically to ensure reports are always returning the most recent results. This is especially important for Retail Insights reports, which may use data that is updated every day; so a cached result from days ago would no longer be valid.
The cache cleanup process is triggered by a job in the AIF DATA nightly batch schedule in POM named OBIEE_CACHE_CLEAR_JOB. This job invokes an Oracle Analytics BI agent in your report catalog located in the folder /Shared Folders/Oracle/ and named Cache Clear Agent. It is the BI agent that is responsible for executing the cache cleanup
procedure. The POM job does not wait for the agent to complete; it will end as soon as the API is successfully invoked, but
the BI agent will continue to run in the background. The agent may take 10-15 minutes to fully clear the cache if you have
a large user base running daily reports, and this can be monitored by directly checking the run status on the BI agent from
the Analytics catalog.

If you are using any reports on the Retail Insights subject areas (even if you are not a Retail Insights subscriber) then
you need to enable and run the OBIEE_CACHE_CLEAR_JOB as part of your AIF DATA nightly batch runs. If you
do not use data from Retail Insights at all, and your reports are based only on database connections or Excel files, you do
not need this job. For those kinds of reports, click theRefresh icon in the workbook to bypass the
cache to get new results as long as your dataset is configured as a Live dataset.
The Cache Clear Agent can also be used as a mechanism for triggering other agents at the end of the nightly batch, which is useful for delivering reports by email automatically while ensuring the latest data is always used. You must take the following steps to enable this functionality:
-
Create a folder named
Oracleunder the sharedCustomfolder (with full path like/shared/Custom/Oracle/). -
Copy the Clear Cache Agent from
/shared/Oracle/to/shared/Custom/Oracle/. -
Edit the newly created agent, go to the Actions tab, and add Invoke Agent actions for each of your BI agents that you want triggered automatically any time the Cache Clear Agent executes. If you will have many linked agents, then it’s best to create a sequential chain of actions, where each agent has one action to trigger the next one, in order. Running too many agents in parallel can consume all available resources on the database, which will slow down all of the executions. When finished, be sure to save the agent before navigating away from it.
-
In POM, go to Batch Administration and select the AIF DATA Nightly Schedule. Locate the
OBIEE_CACHE_CLEAR_JOBand select the Edit Parameters option in the Actions menu. Add the path to your custom agent as the only parameter value (for example, /shared/Custom/Oracle). Do not include a trailing slash character, just the folder name and root path as shown. The folder path should not contain any spaces or special characters besides the “/” characters. -
Restart the AIF DATA schedule from Batch Monitoring by clicking the Restart Schedule button. The next time the job executes, it will use your custom version of the BI agent instead of the base version.