6 List Views
This chapter provides an overview of the List View framework used in Workspace. The following topics are covered:
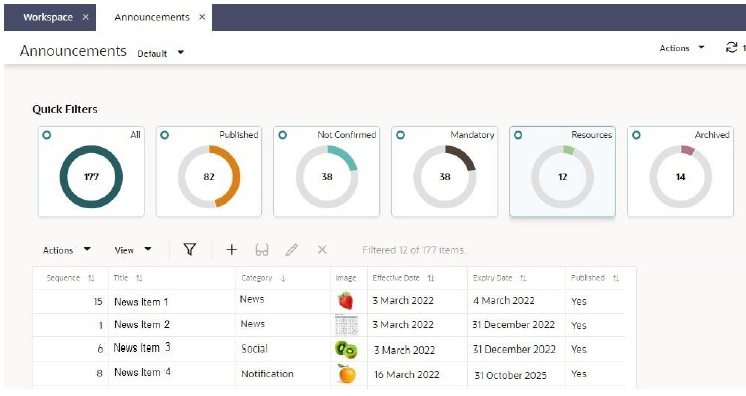
List views present collections of records, from where the records can be opened and actioned, and new records created. The contents can be filtered, sorted, and searched in order to categorize the contents or locate specific records.
The main components of a list view page are:
-
A Title bar with actions to refresh the contents, and open other related list views.
-
The list view contents, with a toolbar for applying actions and configuring the columns.
-
Filter tiles for filtering the list contents.
-
Simple and Advanced search facilities.
Figure 6-1 List View

List View Contents
The list view is a grid of rows and columns, where the rows represent individual records of a common type, and the columns represent the fields within the records.
To action a record, single-click the row; to open a record in read mode, double-click the row.
Columns can be resized by dragging the borders of the column heading; alternatively, right-click the row and use the Resize options.
Click a column heading to sort the list view contents in ascending order by that column; click again to sort in descending order. Alternatively, right-click the column and use the Sort Column options. Sorting is usually case -insensitive.
The filter tiles and searches are applied independently. If the list is filtered with a simple or advanced search, then a filter tile is clicked, the list will be refreshed based on the filter tile's criteria, and the search filter is cleared.
Columns for rich text fields truncate the content to fit the column width. Columns for Boolean fields show the true/false values as Yes/No accordingly.
Filter Tiles
A set of Quick Filter metric tiles show above the list contents. These predefined filters represent the record states, or other categorizations.
The tiles show the number of rows in the list view that match the filter, along with a graphical representation of its proportion of the full list view contents. The All tile represents the full list of all records.
Figure 6-2 Filter Tiles

Clicking a tile refreshes the list view to show records that meet the criteria of that filter.
The number of records returned by the filter and the overall total number of records is shown within the toolbar.
List View Actions
The toolbar provides a standard set of actions that can be performed on the list view.
|
The Actions menu contains actions that are relevant to the list view contents. Typical options are the New, View, Edit, and Delete for maintaining records, and any actions specific to the type of record. |
|
|
The View menu contains options:
|
|
|
The Query by Example icon enables the searching options. It places the list view in Query by Example mode and shows the Filter Options menu. See the Searches section. |
|
|
The Filter Options menu appears when the Query by Example icon is clicked, providing additional search options. See the Searches section. |
|
|
The New, View, Edit, and Delete icons are used to create a new record, or view, edit, or delete the selected record. |
|
|
If a filter tile or search is applied, the number of records returned by the filter is shown, along with the overall total number of records. |
Note:
Actions will be hidden or appear greyed out if they are inactive or not permitted.
In some cases, the Delete action will not be available from the list view, instead the record must be opened in edit mode and the form’s Delete action used.
Managing Columns
The Manage Columns option within the View menu allows you to customize the list view by adding, removing, and reordering the columns.
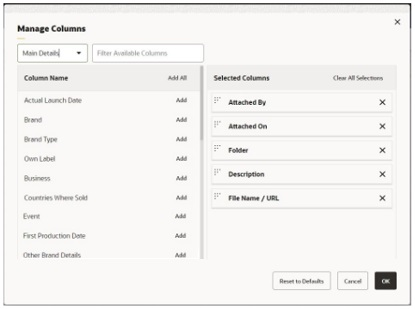
The Manage Columns dialog box presents the available columns in a left-hand pane, and the selected columns in the right-hand pane.
The list of available columns can be filtered by the field subsection grouping, or with the type-ahead text search. Click Add to select a column, or Add All to select all columns.
The list of selected columns can be reordered by clicking the handle icon and dragging and dropping to the required position. Click the X to deselect a column, or Clear All Selection to deselect all.
Figure 6-3 Manage Columns

Click OK to return to the refreshed list view. At least one column must be selected.
The Reset to Defaults button resets the column selections to the core default set.
Searches
The contents of list views can be searched using the simple and advanced search options. The simple search allows you to apply filters to the list view’s columns; the advanced search allows you to build query statements for applying more complex search criteria.
Simple Search
To perform a simple (or Query by Example) search, click the Query by Example icon, or select the Query by Example option in the View menu. This places the list view in Query by Example mode, presenting a set of input fields beneath the column headings, and the Filter Options menu.
Figure 6-4 Query by Example Mode

The input fields act as type-ahead filters. Enter values in one or more of the columns’ input fields to filter the contents of the list view accordingly. The Enter key or field exit refreshes the list view.
If values are entered in multiple columns, the filtering is applied with either AND or OR logic according to whether you select the Column Match “OR” or Column Match “AND” option in the Filter Options menu.
Columns that relate to a glossary have the search value selected from a picklist. Date columns use a date picker.
Note:
Text input is case insensitive.
A column that relates to a rich text field may return hits on text that is not visible, such as the HTML markup code used for text formatting.
The number of records returned by the filter, and the overall total number of records is shown within the toolbar.
To close the search and revert to the unfiltered list view, click the Query by Example Icon, or select the Clear Filters option in the Filter Options menu.
When Query by Example is selected, any other filters are cleared. Searches and filters cannot be applied simultaneously. Clicking a filter tile or entering Query Builder mode clears the simple search filter.
Advanced Search
To perform an advanced (or Query Builder) search, click the Query by Example icon, and select the Query Builder option in the Filter Options menu. This places the list view in Query Builder mode, presenting a query bar above the column headings.
Figure 6-5 Query Builder Mode

Click the Query Builder icon on the search bar, or select Edit Query Builder in the Filter Options menu to open the Query Builder dialog box.
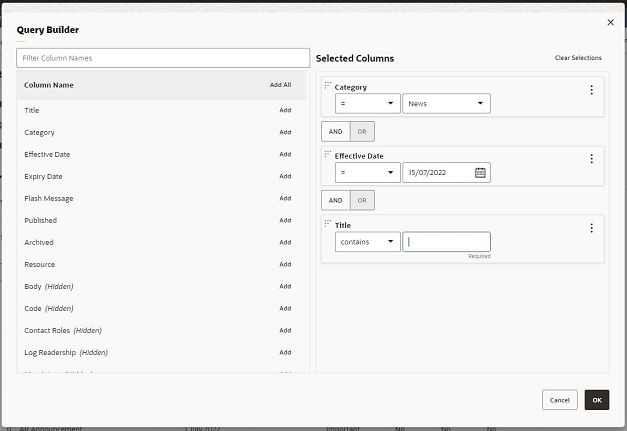
The Query Builder dialog box presents the list view columns in a left-hand pane, and the construction of the search criteria query statement in the right-hand pane.
The list of available columns can be filtered with the type-ahead text search. Click Add to select a column, or Add All to select all columns.
The selected columns can be reordered by clicking the handle icon and dragging and dropping to the required position. Click the X to deselect a column, or Clear All Selection to deselect all.
The query statement is constructed as individual clauses for the selected columns, by specifying operators and data values. For further details, see the Building Query Statements section.
Figure 6-6 Query Builder Dialog Box

Click OK to apply the query search. This closes the dialog box and refreshes the list view to filter the contents accordingly.
The query statement is shown in the list view query bar, and the number of records returned by the filter, and overall total number of records is shown within the toolbar.
To close the search and revert to the unfiltered list view, click the Query by Example Icon or the X on the query bar, or select the Clear Filters option in the Filter Options menu.
When Query Builder is selected, any other filters are cleared. Searches and filters cannot be applied simultaneously. Clicking a filter tile or entering Query by Example mode clears the advanced search filter.
Note:
Text input is case insensitive.
A column that relates to a rich text field may return hits on text that is not visible, such as the HTML markup code used for text formatting.
Building Query Statements
The query statement is constructed by specifying the search criteria for each selected column, and grouping clauses, as follows:
-
Select the column from the list of available columns by clicking Add.
-
Select the operator. The options vary depending on the column field’s data type.
The common options are:
-
Less than or equal to (<=) and Less than (<)
-
Equal to (=) and Not equal to (!=)
-
Greater than (>) and Greater than or equal to (>=)
Text and rich text fields also include a contains option for partial text matching.
Date fields also include a between option for specifying a range of dates.
Boolean (true/false or yes/no) fields, and those that relate to a glossary just have the Equal to (=) and Not equal to (!=) options.
-
-
Enter the data value.
For text, rich text, and numeric fields, enter the search value.
For fields that relate to a glossary, select from the picklist or use the type-ahead filter.
For date fields, use the date picker or enter the date. See also Date Filters below.
For Boolean fields, select or enter yes (true) or no (false).
-
If more than one column is selected, click AND or OR to set the Boolean logic for how each is compared to the next column.
As a simple example, searching for Category = ‘News’ AND Flash Message = ‘High’ would return records that have a Category of ‘News’ and a Flash Message of ‘High’; searching for Category = ‘News’ OR Flash Message = ‘High’ would return records that have a Category of ‘News’ or a Flash Message of ‘High’.
A column may be selected multiple times, for example to build a clause such as Flash Message = ‘High’ OR Flash Message = ‘Important’.
-
For more complex statements, use grouping. The Create Group, Edit Group, and Remove From Group menu options allow you to build a nested structure by grouping clauses together.
Groups are formed by clicking the handle icon and dragging and dropping a column onto another column within the right-hand pane. Multiple levels of group nesting is permitted; each group is indicated with a left-hand border.
Set the Boolean logic operator for the columns within the group, and for how the group is compared to the next column or group.
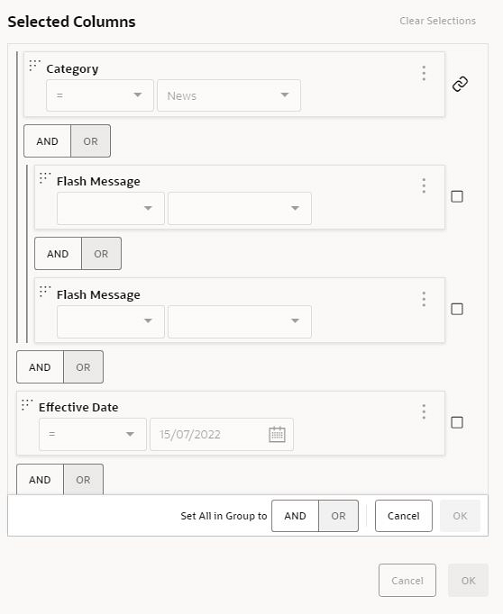
As a simple example, grouping would be used to search for records with a Category of ‘News’ and a Flash Message of ‘High’ or ‘Important’, where the expiry date is less than 08/04/2022, as:
Category = News AND (Flash Message = High OR Flash Message = High) AND Expiry Date < 8 Apr 2022
To make changes to the grouping structure, select the Edit Group option for the group and reset the Boolean logic operators relative to the selected group. The group icon indicates the selected group. Select the checkbox of a clause to have the logic reset, then click OK.
Figure 6-7 Edit Group

-
Use the Move Up, Move Down, and Remove menu options to adjust the selected rows and groups within the right-hand pane.
Date Filters
-
Some date fields are stored in the database as a timestamp, comprising the date and the time to the millisecond. In some cases, just a date may be visible within the application, however the time portion is also present. This must be taken into account when applying filters to such fields.
For example, for a field containing a timestamp of 11-12-2022 18:00, applying a search filter for date 11-12-2022 will look for an exact match on 11-12-2022 00:00, as it defaults the time as 00:00. The method of searching timestamp fields for a particular date, is to apply a range filter, for example where greater than 10-12-2022 and less than 12-12-2022.
-
In a set of records being filtered, dates that are null will be included in the results of less than and less than or equal to operations and excluded from the results equal to, greater than and greater than or equal to operations. This is because null dates are considered to be the lowest value in a range and therefore are always less than any filter value.