1 RICS implementation
When starting a Retail Predictive Application Server Cloud Edition (RPAS CE) implementation, there are a number of key considerations and actions the Customer/System Integrator will need to take to complete the new provisioning.
Pre-Provisioning
Pre-provisioning is the period after contracts are signed, but before receiving your environments, where some key activities can occur related to your upcoming implementation. For Integration Cloud Service implementations, your Customer Success Manager (CSM) will be your main point of contact for these activities.
Provisioning
Once your environments are ready for you, the person designated as your service administrator will receive a welcome e-mail: one for each cloud service and each environment (stage, production, and so on).
Follow all instructions in the Action Required: Access and Administer Production/Stage/Test Environment… e-mail.
This environment access e-mail contains critical details required for you to access and administer your Cloud Service. You will receive on e-mail for each provisioned environment. Save these e-mails.
Log in to your Cloud Service. Use the Identity Management URL, username and temporary password provided in the environment access e-mail to verify access to your service. At your first login attempt, create a new password and make note of it because at this point you are the only one with access!
You will receive a separate e-mail for each provisioned environment, and the password for each environment is maintained separately. In addition, please note that you will not be able to access the Retail applications until you grant the appropriate application roles to your user
It is recommended that you save this e-mail for future reference, because at this point the service administrator is the only person with access.
Access OCI IAM
Once you receive your welcome e-mail, it is recommended that you, as the system administrator, log into OCI IAM to verify your access and create a new password. You will also be assigned the application administrator group for each Retail Integration service in both your production and pre-production environments. Note that the group for pre-production will have an added extension (_PREPROD) in order to differentiate between the two. These should not be deleted.
It is also recommended that you add additional administrators in order to have a backup administrator and share in user management administration, as at this point no one else in your organization will have access to OCI IAM or the Retail Integration solutions. For assistance in creating users or adding them to groups, see the following documents:
-
Managing Users, User Accounts, and Roles
-
Adding Identity Domain Administrators
Note:
You may notice that there are a number of other user IDs set up in OCI IAM for Retail Integration (for example, bdi_admin, jos_admin). These users were seeded by the Oracle Cloud Operations team for use in Merchandising batch and integration processes. These users will be managed by the Oracle Cloud Operations team.
Validate Cloud Service Access
Next, you should validate that you are able to access and successfully log into each of the Retail Integration Cloud Services for which you have been provisioned using the URLs provided in the e-mail, along with the username and password.
Register Customer Support Identifier
The welcome e-mail will also include your Customer Support Identifier (CSI). This should be registered with My Oracle Support (MOS), which you will use to log questions or issues about these services. Follow link in the e-mail or access support.oracle.com to create a new account. If you already have a MOS account, remember to add your new CSI to your existing MOS account.
The first person to request access to a CSI will be checked by Oracle to ensure the domain of their e-mail address matches the domain associated with the CSI. Once approved, they will be made the Customer User Administrator of that CSI, and can approve others to use it. If someone else has already been made the administrator of that CSI, then the request will be e-mailed to him or her for approval. For more information on the Customer User Administrator, see MOS Doc ID 1544004.2.
Note:
You will not be able to register your CSI number until your production environment has been provisioned.
Create End User Accounts
Before end users can access the Cloud Service application it is necessary to provision each user access to the system, and assign roles to each user to control what functionality will be available to them. The access provisioning is done using Oracle Identity Management (OIM). Instructions for end user account creation are documented in an Administration Guide, found in an online Documentation library at this location:
http://www.oracle.com/technetwork/documentation/oracle-retail-100266.html
Post Provisioning
Once your RICS environments are ready there are addition configuration steps that are Self-Service. Many, if not most, are now Auto-Wired during the Provisioning process, the following section are a checklist of the steps for each of the RICS Product Domains that are not auto-wired.
RIB CS Self-Service instructions for SI/Customer
The following sections list by application the RIB CS Self-Service instructions for SI/Customers.
Application: rib-sim
Instructions
Not Applicable (Auto-wired)
Owner: Who configures in Production
Not Applicable
Application: rib-rms
Instructions
Not Applicable (Auto-wired)
Owner: Who configures in Production
Not Applicable
Application: rib-tafr
Instructions
Perform the following steps to Update the Facilities.
-
Go to Manage Configurations > system options tab
-
Click Add.
-
Insert a new Facility ID.
Example:
key - facility_id.PROD.12345 value - 1Note:
Update the facilities as needed using the previous steps.
Figure 1-1 Update the Facilities

Owner: Who configures in Production
Service Implementer /Customer
Application: rib-ext
Instructions
Prerequisite:
Get the Injector URL and credential details from the external apps team.
Perform the following steps to Configure External Injector Service.
-
Go to Manage Configurations >System Options tab.
-
Update the Injector Service URL with the customer provided value .
Example: Host-rgbu-phx-lbint-379.us.oracle.com Port-80
-
Click Save.
For third party integration where the injector service is hosted on OIC/on-prem, the below property in RIB_JAVA_OPTIONS needs to be added while patching the environment using RPT.
-
Doauth2.url.path.wo.vrc=<context root of injector service>
Important: context root of injector service is any word in injector service url which can identify service uniquely.
For example:
For the following injector service url https://<external-lb>/ external-injector-services/external/ribinjector/inject. The java_option would be
oauth2.url.path.wo.vrc=ribinjector
Perform the following steps to Update Creds for CustomerOwned Alias
-
Perform the following steps for Oauth2 Authentication
-
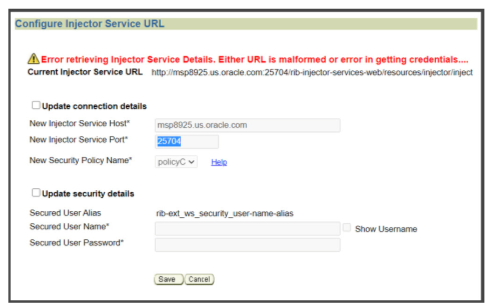
Go to Manage Configurations > Injector Service tab.
Update the Secured User Name and Secured User Password. Set username and password empty for oauth2 calls.
-
Figure 1-2 Configure External Injector Service Error
-
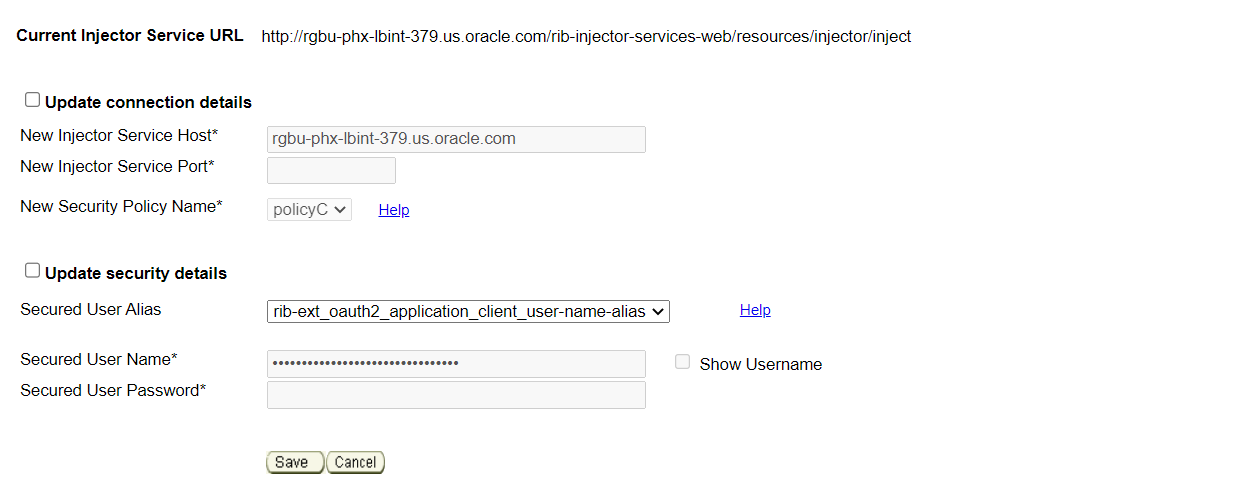
Select rib_ext_oauth2_application_client_user_name_alias from the dropdown.
-
Update the Secured User Name with Client Id and Secured User Password with the Client Secret.
Example:
User Name - 18927c74-fed6-45e9-8198-977c5a758ac5
Password - 18927c74-fed6-45e9-8198-977c5a758ac5
Figure 1-3 Secured User Name and Password
-
Click Save.
-
Update system options
-
Go to Manage Configurations > System Options tab
-
Update IDCS host url needed for oauth2 token generation and scope of access for inject calls.
Figure 1-4 Oauth2 Token Generation

-
Click Save.
Owner: Who configures in Production
Service Implementer /Customer
Application: rib-rob
Instructions
Prerequisite:
Get the Injector URL and credential details from the order broker team.
Perform the following steps to Configure ROB Injector Service
-
Go to Manage Configurations > System Options tab
-
Update the property injector.service.endpoint.url as per the following value - https://<host>:<port>/<OB_SUB_NAMESPACE>/rib-injector-services- web/orcos/resources/injector/inject

-
Click Save.
Perform the following steps to Update Creds for CustomerOwned Alias
-
Authentication (OAuth2)
-
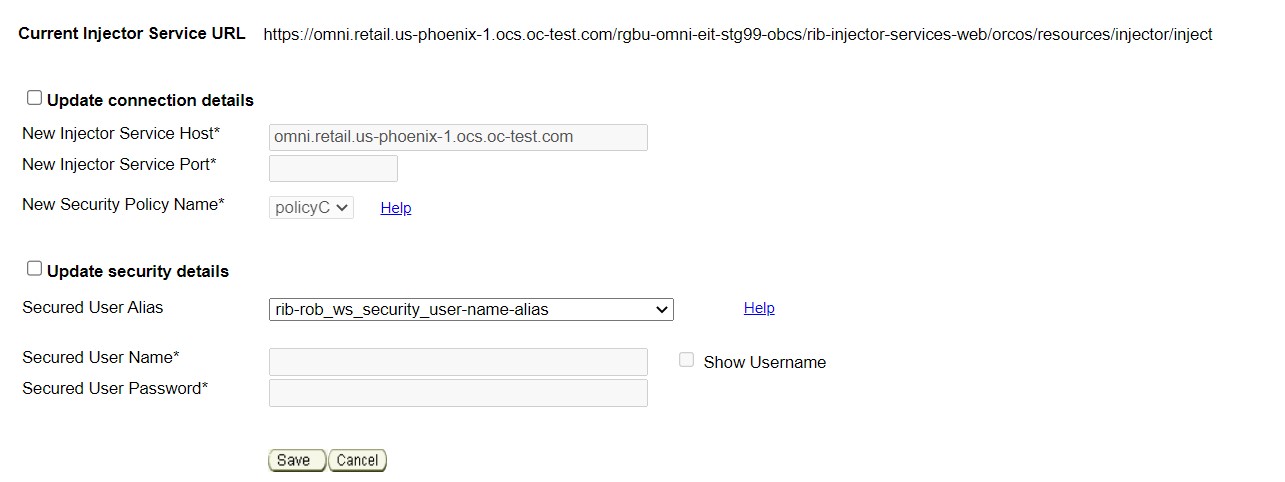
Go to Manage Configurations > Injector Service tab.
-
Select
rib_rob_ws_security_user_name_aliasfrom the dropdown. -
Update the Secured User Name and Secured User Password
-
User and Password should be set empty for OAuth2 scope.
-
Click Save.
Figure 1-5 URL Error

Figure 1-6 Configure ROB Injector Service
-
-
Oauth2 Authentication
Go to Manage Configurations > Injector Service tab
-
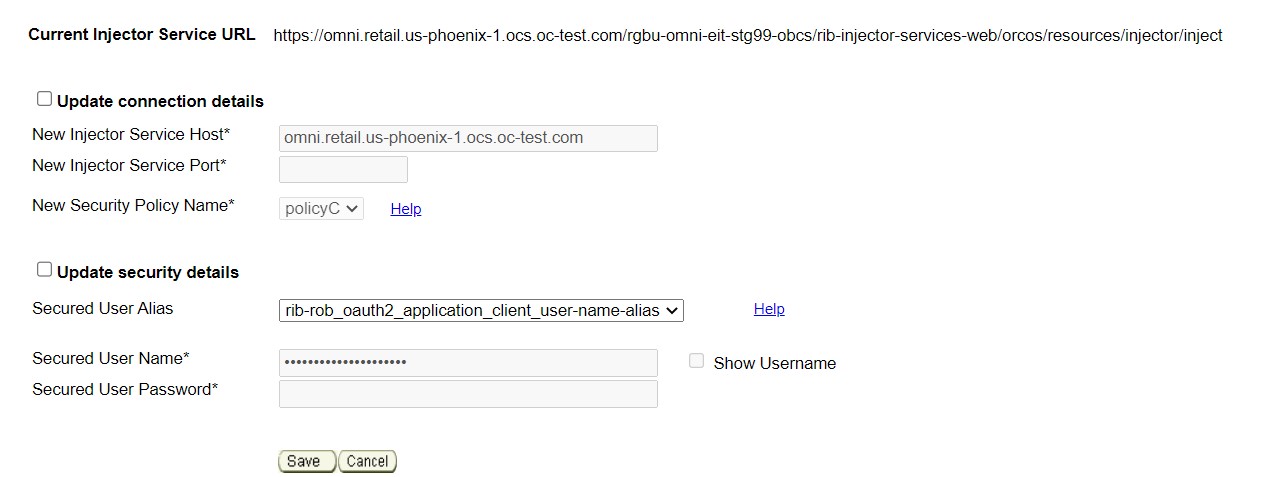
Select rib_rob_oauth2_application_client_user_name_alias from the dropdown.
-
Select
rib_rob_oath2_application_client_user_name_aliasfrom the dropdown.Update the Secured User Name with Client Id and Secured User Password with the Client Secret.
Example:
User Name -
18927c74-fed6-45e9-8198-977c5a758ac5Password -
18927c74-fed6-45e9-8198-977c5a758ac5Click Save.
Figure 1-7 URL Error
-
Owner: Who configures in Production
Service Implementer
Application: rib-lgf
Instructions
Prerequisite:
Get the credentials from the log-fire team.
Perform the following steps to Update Creds for CustomerOwned Alias
-
Authentication
-
Go to Manage Configurations > Injector Service tab
-
Update the Secured User Name and Secured User Password
Example:
User Name -
rgbu6_admPassword -
welcome1 -
Click Save.
-
Figure 1-8 Update Creds for CustomerOwned Alias
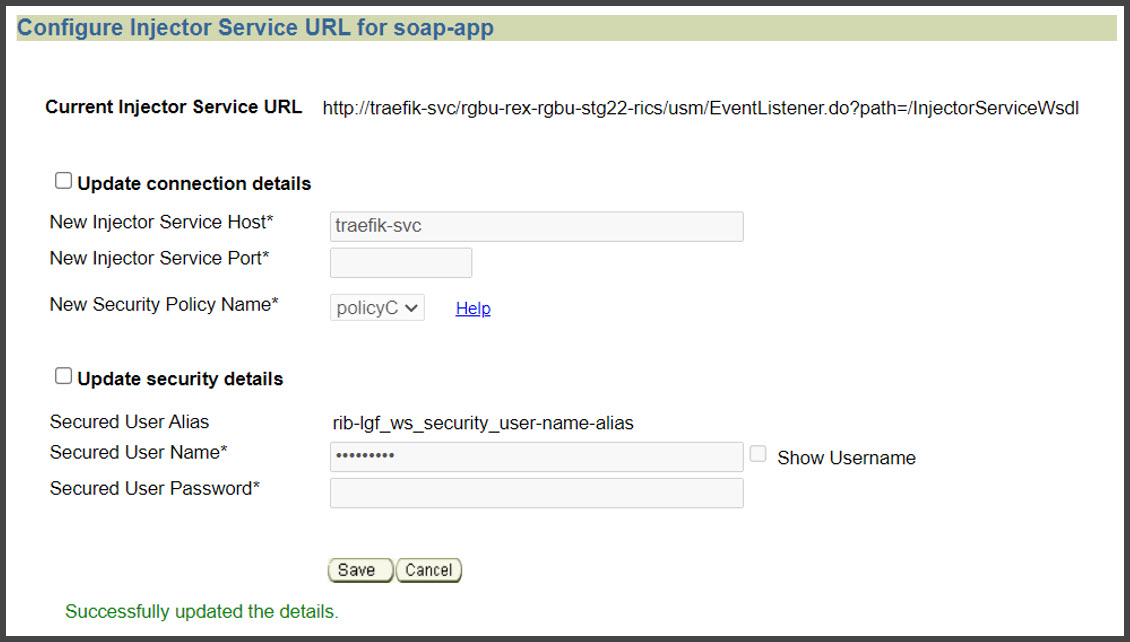
Owner: Who configures in Production
Not Applicable
Application: rib-rwms (primary)
Instructions
Instructions
Prerequisite:
Get the rib-rwms (on-premise) secondary connection details from the customer. Get the credentials for user (belonging to ribAdminGroup) on rib-rwms secondary install.
Perform the following steps to update connection details and Creds for CustomerOwned Alias
-
Authentication
-
Go to Manage Configurations > Injector Service tab
-
Update host and port to point to rib-rwms secondary
-
Update the Secured User Name and Secured User Password.
Example:
User Name - ribadmin
Password - welcome1
-
-
Click Save.
Figure 1-9 Configure Injector URL for soap-app
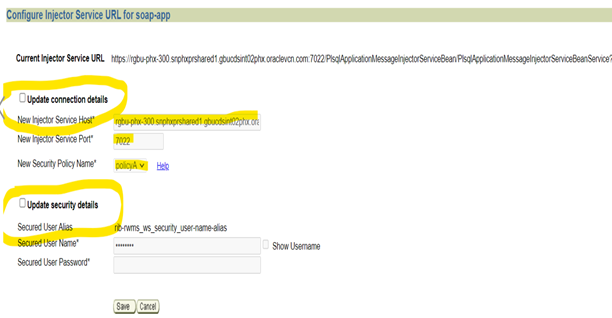
Owner: Who configures in Production
Service Implementer /Customer
Application: BDI Process-Flow
Instructions
Perform the following steps to Configure POM callbacks and update credentials for customerOwned Alias, pomCallBackServiceUr-lUserAlias, pomCallBackServiceUrl, pomCallBackServiceUrlOAuth2ApplicationClientAlias.
Go to PF UI > Manage Configurations > System Options tab.
Select pomCallBackServiceUrlUserAlias and click Edit.
Enter the Username and password provided by the POM and click Save.
Repeat the same steps for updating pomCallBackServiceUrl and pomCallBackServiceUrlOAuth2ApplicationClientAlias.
Figure 1-10 Configure POM Callbacks
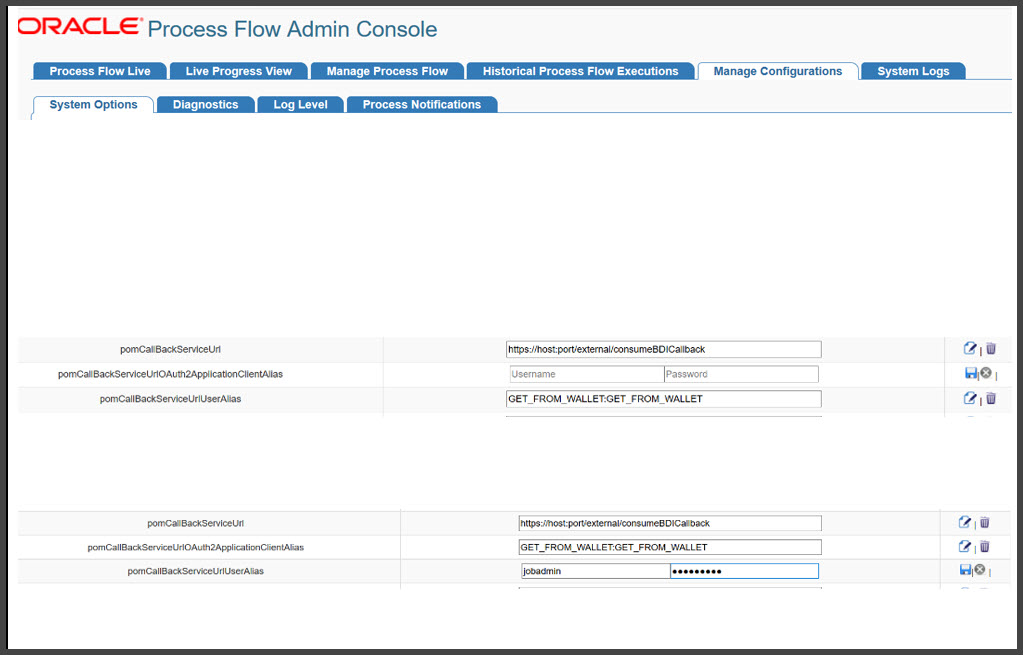
Owner: Who configures in Production
Service Implementer /Customer
This may not be needed if you use the application scope for Oauth.
RFI CS Self-Service instructions for SI/Customer
The following sections list by application the RFI CS Self-Service instructions for SI/Customer.
Application: RFI-web-app
Instructions
Perform the following steps to Update Credentials For customer Owned aliases.
-
Navigate to Manage Configurations > Service Configurations.
-
Select CFIN in the RFI Integrated application dropdown.
-
Check the Update Security Details check box.
-
In the Secured User Name enter: CFIN username.
-
In the Secured User Password enter CFIN pwd.
-
Click Save.
Figure 1-11 Update Credentials For Customer Owned aliases

Owner: Who configures in Production
Service Implementer /Customer
Instructions
Perform the following steps to Update the CFIN Integration URL
-
Navigate to Manage Configurations > Service Configurations.
-
Select CFIN in the RFI Integrated application dropdown.
-
Check the Update Connection Details check box.
-
Update the CFIN Service Host and Port.
-
Click Save.
Figure 1-12 Update the CFIN Integration URL

Owner: Who configures in Production
Service Implementer /Customer
USM CS Self-Service instructions for SI/Customer
The following sections list by application the USM CS Self-Service instructions for SI/Customer.
Application: USM-LGF
Instructions
Log in to USM UI as an admin and perform the following steps to Configure Initial Project.
-
Go to Admin > Manage Access tab.
-
Select Project: LogFireIntegration
-
Username Alias: usmAdminUiUserAlias
-
UserName: rics.admin(Give the admin username)
-
Click Save.
Figure 1-13 Configure Initial Project
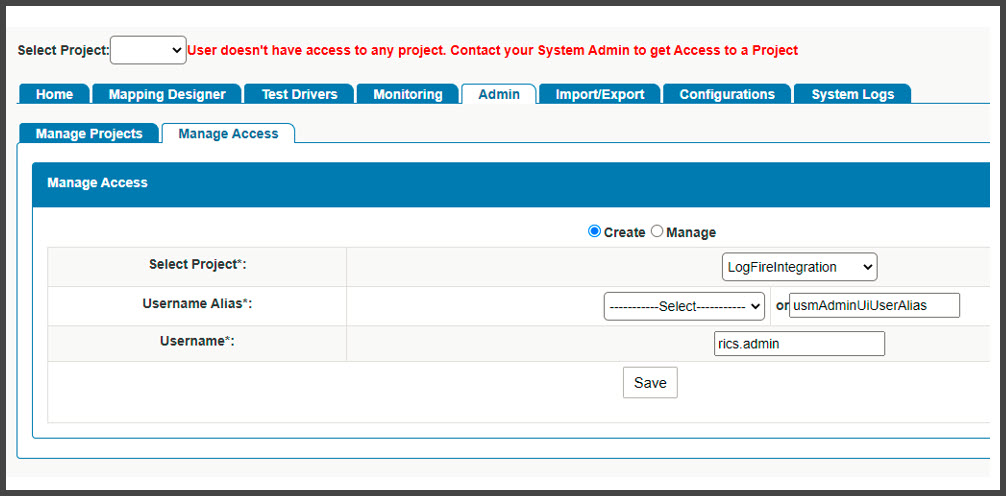
Owner: Who configures in Production
Service Implementer /Customer
Instructions
Perform the following steps for External JSON updates.
-
Go to Configurations > Edit Usm Configuration.
-
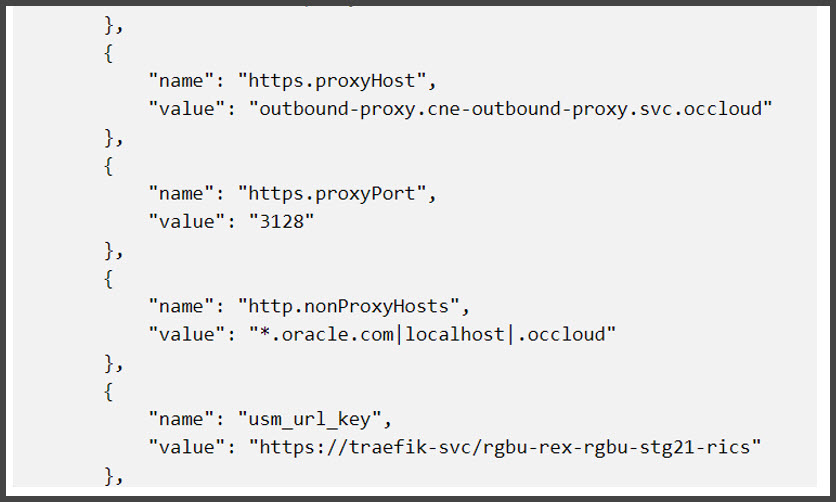
Select external_env_info.LogFireIntegration from the dropdown and click Edit.
-
Enter the following:
name: LogFire_Host_Url_Key
value: The logFire Host URL
Example:
https://intqa.wms.ocs.oraclecloud.com:443/lgf_int_qaNote:
The URL may change as per the customer's LGF instance.
-
Click Save.
Figure 1-14 Select external_env_info.LogFireIntegration

Figure 1-15 Edit USM Configuration
Owner: Who configures in Production
Service Implementer /Customer
Instructions
Perform the following steps to Update DVM.
-
Go to Configurations > Manage DVM tab.
-
Select CompanyCode_dvm.LogFireIntegration from the dropdown.
-
Click Edit on the row that you want to edit.
-
Update the value of CompanyName that is set in LogFire application
Example - CompanyName value - RGBU6
Figure 1-16 Update CompanyCode_dvm.LogFireIntegration

-
Click Save.
-
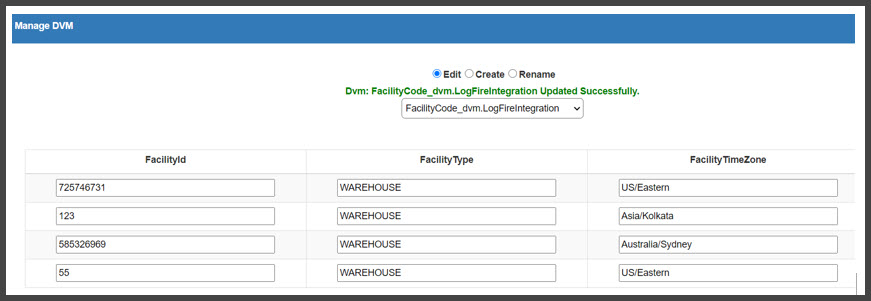
Select FacilityCode_dvm.LogFireIntegration from the dropdown.
-
Click + to add a new row with the details of FacilityId, FacilityType, and FacilityTimeZone as configured in LogFire application
Example:
FacilityId - 55
FacilityType - WAREHOUSE
FacilityTimeZone - US/Eastern
Figure 1-17 UpdateFacilityCode_dvm.LogFireIntegration
Owner: Who configures in Production
Service Implementer /Customer
The following sections list by application the RICS Tools CS Self-Service instructions for SI/Customer.
Application: DDS
Instructions
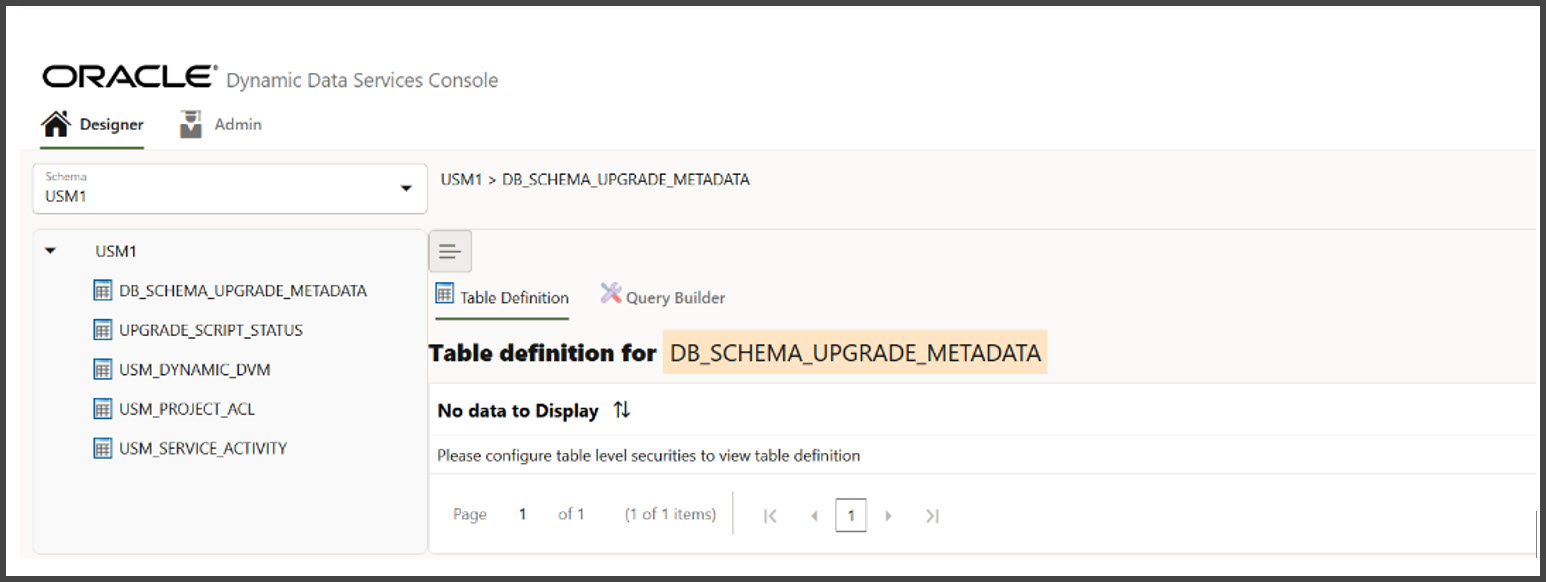
Perform the following steps to Configure Initial Security Setup.
Log in to DDS UI as an Admin and then go to the Designer tab.
Select the schema from dropdown.
Figure 1-18 Configure Initial Security Setup

Click Initial Security Setup.
All tables for the schema selected should be displayed.
Figure 1-19 Selected Schema Tables
Poison Message Processing steps for SI/Customer
In CFS, poison messages are archived and uploaded to object store periodically. The SI/Customer needs to download the archive, correct the RIBMessage and upload it back to object storage using the RetailAppsPlatformServices UI. RIB downloads the customer uploaded messages and processes it.
Below are steps:
-
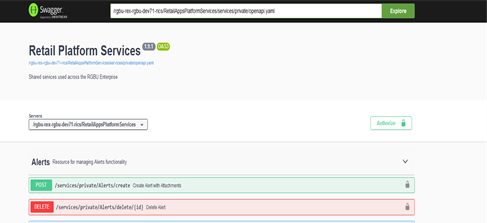
Login to RetailAppsPlatformService using IdcsUser credentials.
https:// rex.retail.us-<region>.ocs.oraclecloud.com /<subnamespace>/RetailAppsPlatformServices/swagger-ui/#/
Figure 1-20 Retail Platform Services
-
Search for FTS Wrapper Services.
Figure 1-21 FTS Wrapper Page

-
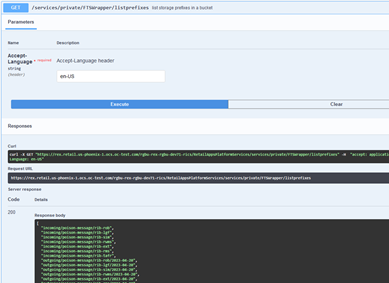
List prefixes and pick the needed prefix.
Example: If you want to download the poison message for a specific rib-ext on 2023-04-20 choose the prefix: "outgoing/poison-message/rib-ext/2023-04-20 " or under "outgoing/poison-message/rib-ext"
Figure 1-22 List of Prefixes
-
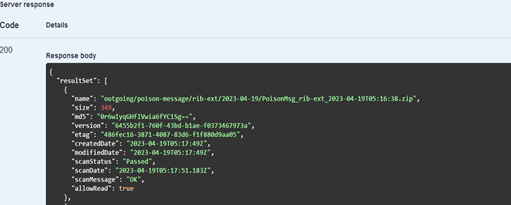
List the files to know file name to be downloaded from object store.
Input: outgoing/poison-message/rib-ext/2023-04-20(The prefix picked in step 3) and outgoing/poison-message/rib-ext
Output: PoisonMsg_rib-ext_2023-04-19T05:16:38.zip
Figure 1-23 Parameters
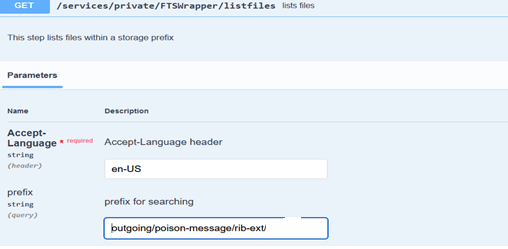
Figure 1-24 Server Response
-
Create Pre-Authenticated Request to download files.
Choose the accessUri fron json response. And this is valid for 5 mins only.
Figure 1-25 Create Pre-Authenticated Request
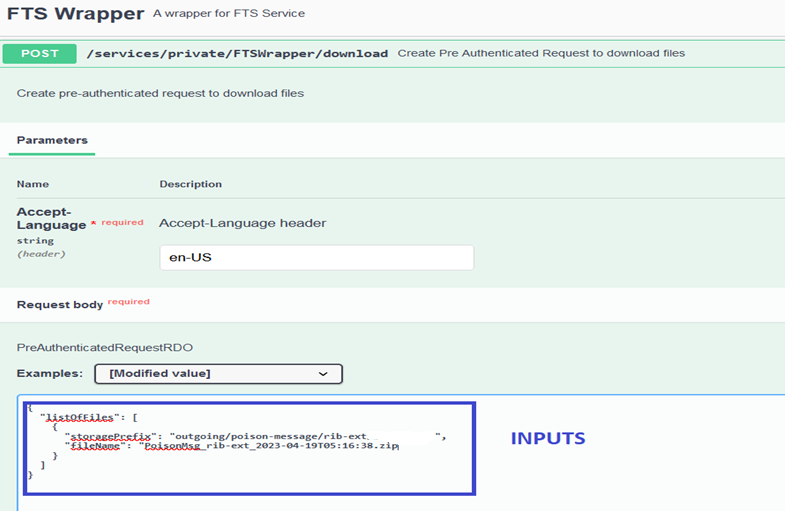
Figure 1-26 Server Response

-
Download the file.
Use the accessUri from the previous step to download the zip file.
curl <accessUri> -o <fileName>.zip
-
Extract the archive file. Do not change the file name but change extension of all files to .xml. Correct the RibMessage in each xml file. Archive the all the .xml files. This file needs to be uploaded back to object store.
-
Generate the Pre-Authenticated Request to upload files to object store.
storagePrefix pattern: incoming/poison-message/rib-<app>
Figure 1-27 Generate the Pre-Authenticated Request
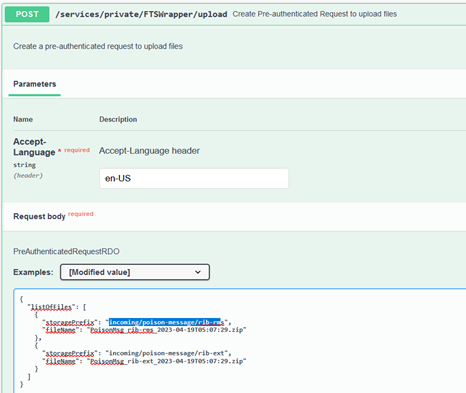
Figure 1-28 Server Response

-
Upload the files using accessUri from above response.
curl <accessUri> --upload-file <unique_filename>.zip
-
RIB periodically downloads the file from incoming/poison-message storagePrefix and extracts it to needed location in RIBDomain.
-
Subscribing retry adapter processes the RibMessage present in the extracted file.
Owner: Who configures in Production
Service Implementer /Customer
Support
Leverage Oracle Support
Attend a session on Working Effectively with Support (WEWS) to learn about support policies and best practices when working with Oracle Support. Oracle Support representatives are ready 24/7 to answer questions and address issues about your service. Access the Oracle Support Contacts Global Directory to find the Oracle Support Hotline for your country, and explore the page on Working Effectively with Oracle Support - Best Practices found on My Oracle Support under Doc ID 166650.1.
Get Connected
Register for RGBU support communities:
-
Use My Oracle Support Community (Doc ID 2299812.1) to post technical questions and get resolution on technical issues.
-
See "Getting Started" to learn how to use the Support Community.
-
Use The RACK to view informative resources and participate in discussions around Retail Solutions.
Frequently Asked Questions
OCI IAM Activation
Since the Retail Integration cloud services are installed using the activated OCI IAM details, it is important to ensure any activation concerns are resolved during the pre-provisioning/provisioning period, as making changes after your Retail Integration cloud services are provisioned may require extended downtime.
What should I do if I cannot activate OCI IAM into an existing Oracle Cloud Account?
Inform your CSM or sales representative if you run into issues, providing the following information:
-
Existing Oracle Cloud Account name
-
Subscription ID of a service in the account
-
Administrator e-mail for the account
What do I do if I experience errors or failures while attempting to activate OCI IAM?
The administrator e-mail address must match the e-mail which received the activation notification. If this does match and you are still running into issues, inform your CSM or sales representative, providing the following information:
-
Intended activation approach (new Oracle Cloud Account or activate within an existing)
-
Any error or failure messages received - include screen shots if possible
Can I use another identity management solution?
Only OCI IAM is supported in Retail Integration Cloud Service implementations, however OCI IAM could also be integrated with external identity management providers, like Active Directory, using its APIs.
I have multiple pre-prod environments and want to have different security configurations for the same users/roles in each, can I do that?
The recommended approach is to create roles in OCI IAM (and ORAAC) that reflect the configuration needs for each environment. Or you could consider creating two user IDs for the same person to reflect the different role configurations that they need to test.
Why do I see other users in my OCI IAM instance (for example, batchuser)?
The Oracle Cloud Operations team will also seed a set of integration users required by the solutions as part of the provisioning process. These are users used for integration or internally for batch and other processing and should not be deleted.