4 Implementing RIB-EXT
RIB-EXT is an Oracle Retail Integration Application that provides necessary communication channel for external applications to publish and consume message from RIB's JMS on cloud and premise.
External Application as a Publisher (rest-app) using OAuth2
For external applications to publish to the RIB JMS on cloud, it needs to use a publishing webservice provided by rib-ext.
The end point of publishing service follows below pattern:
Table 4-1 Publishing Service Pattern
| Resource | HTTP Method | Endpoint |
|---|---|---|
|
Ping |
GET |
GET http://<external_LB_url>/<rics-sub-namespace>/rib-ext-services-web/resources/publisher/ping |
|
Publish |
POST |
http://<external_LB_url>/<rics-sub-namespace>/rib-ext-services-web/resources/publisher/publish |
-
RIB-EXT publishing service REST endpoints are protected using OAuth2 token-based authentication meaning end points are accessible by sending along an access token.
-
Scope will be used for authorization of REST services. Scope for RICS is in the following format- rgbu:rics:RICS-<Environemnt Type><Environment Index> (that is, rgbu:rics:RICS-DEV1).
-
Client Credentials grant type is supported.
For getting access to RICS publishing service you need to create a client app in IDCS. IDCS app generates an access token that will be used for making publishing service calls. Follow steps for creating the client app in IDCS.
Create OAuth2 Client Application in IDCS
Use Retail Home for creating the client app in IDCS. Once app is created you will get client id and client secret both of them necessary to get access token. Follow the instructions below for generating the access token and making service call using OAuth2 token.
-
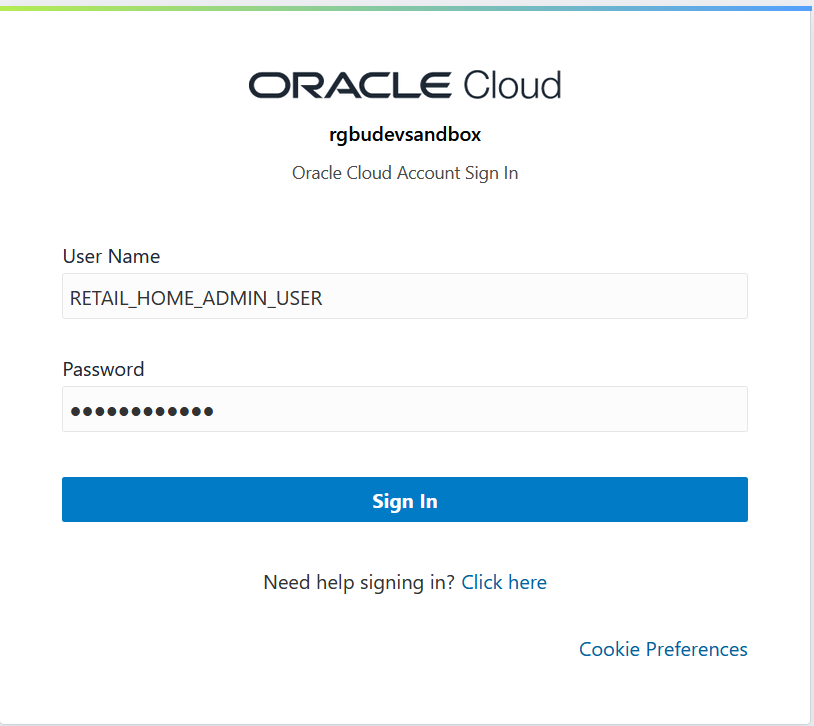
Login into retail home as retail home administrator.
-
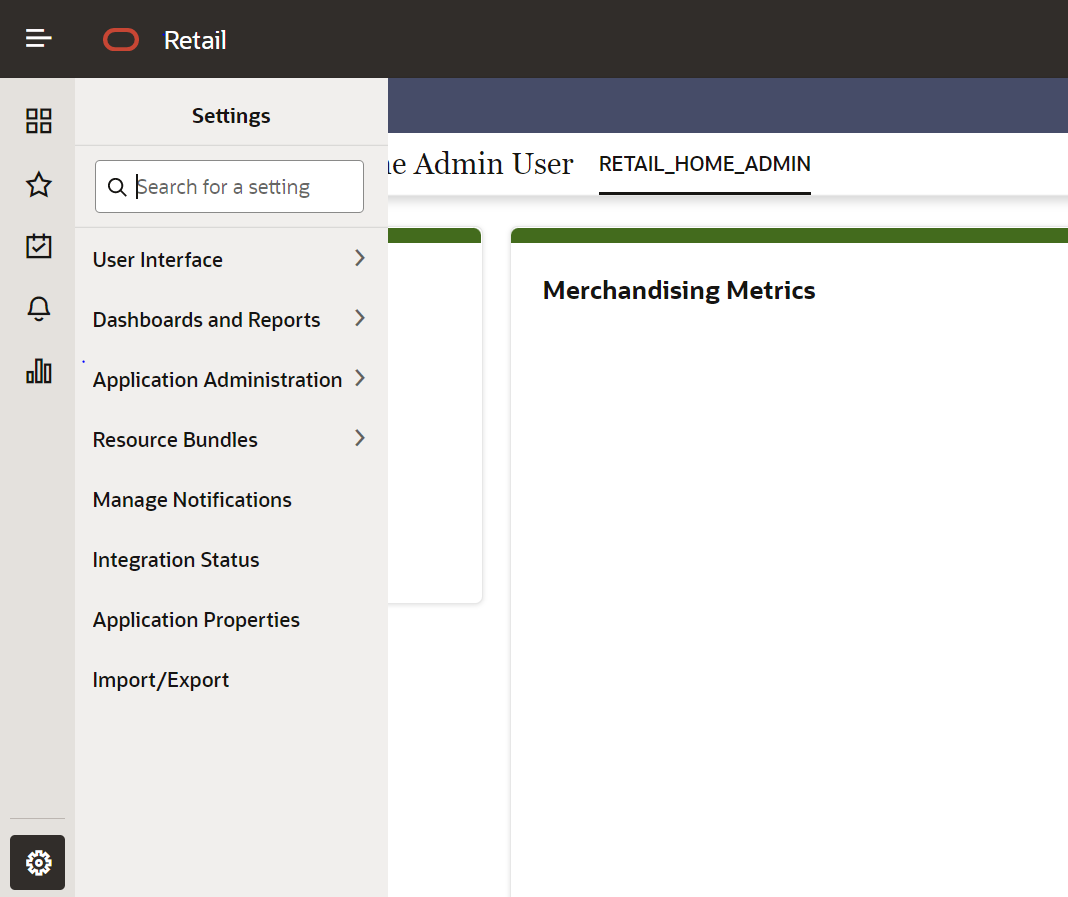
In retail home screen click on Settings menu icon on the left and then click on Application Administration.
-
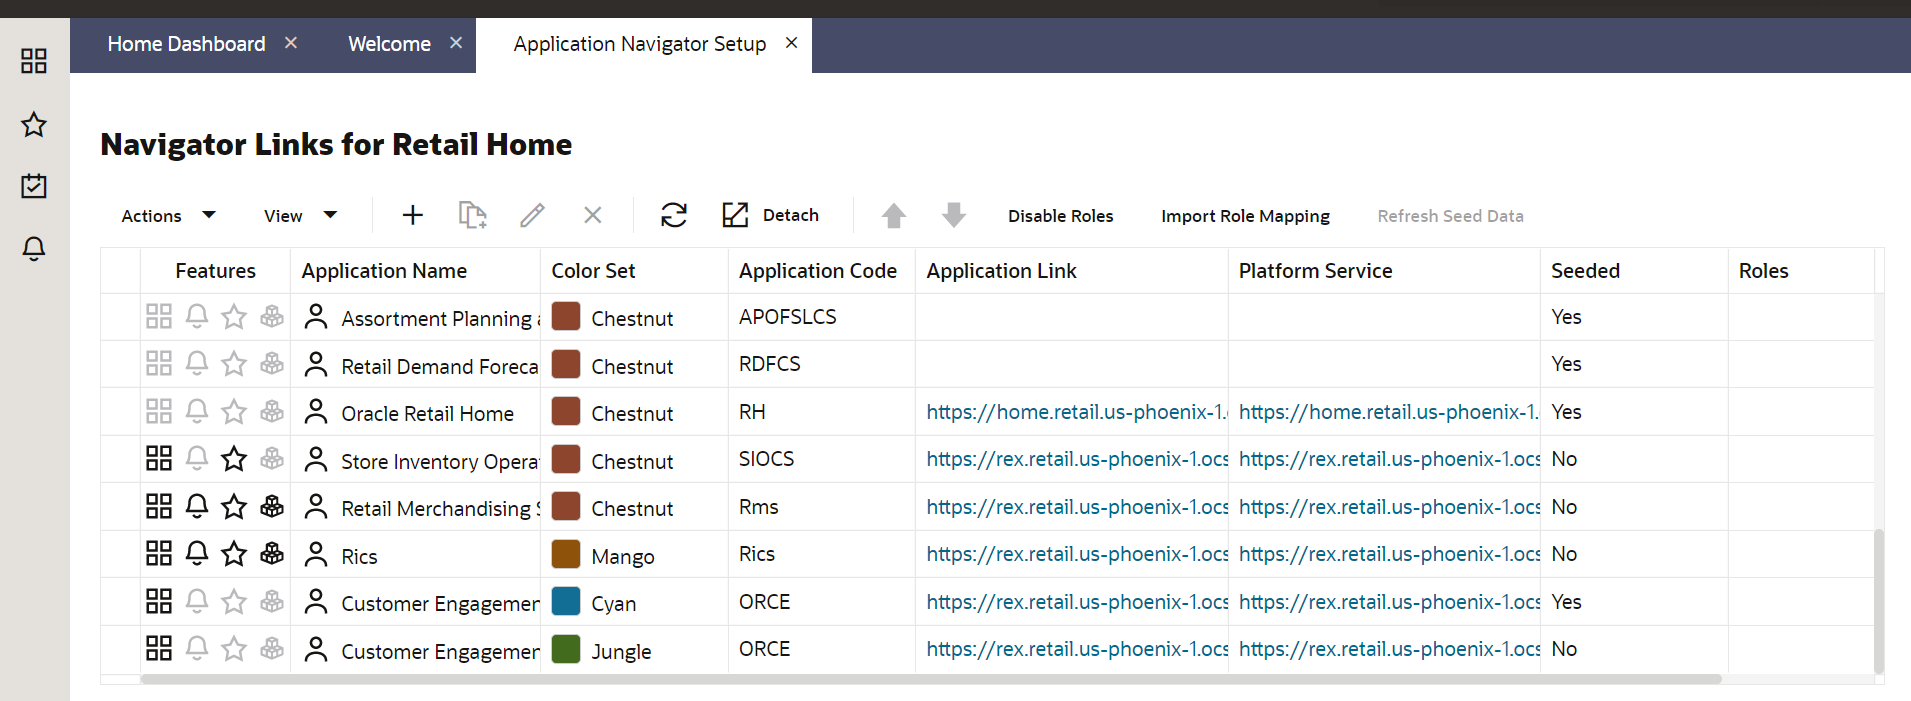
On the Application Administration menu click on Application Navigator Setup. Notice all the hosted applications are listed here with their application and plat-form service url.
Settings -> Application Administration->Application Navigator Settings
-
Look for application with name RICS. If you are not seeing RICS application try refreshing seed. Steps
-
Select the row with the application code as Rms.
-
Click the Refresh Seed Data button on top right corner of the menu.
-
Wait for some time and refresh the screen.
-
RICS should reflect now.

-
-
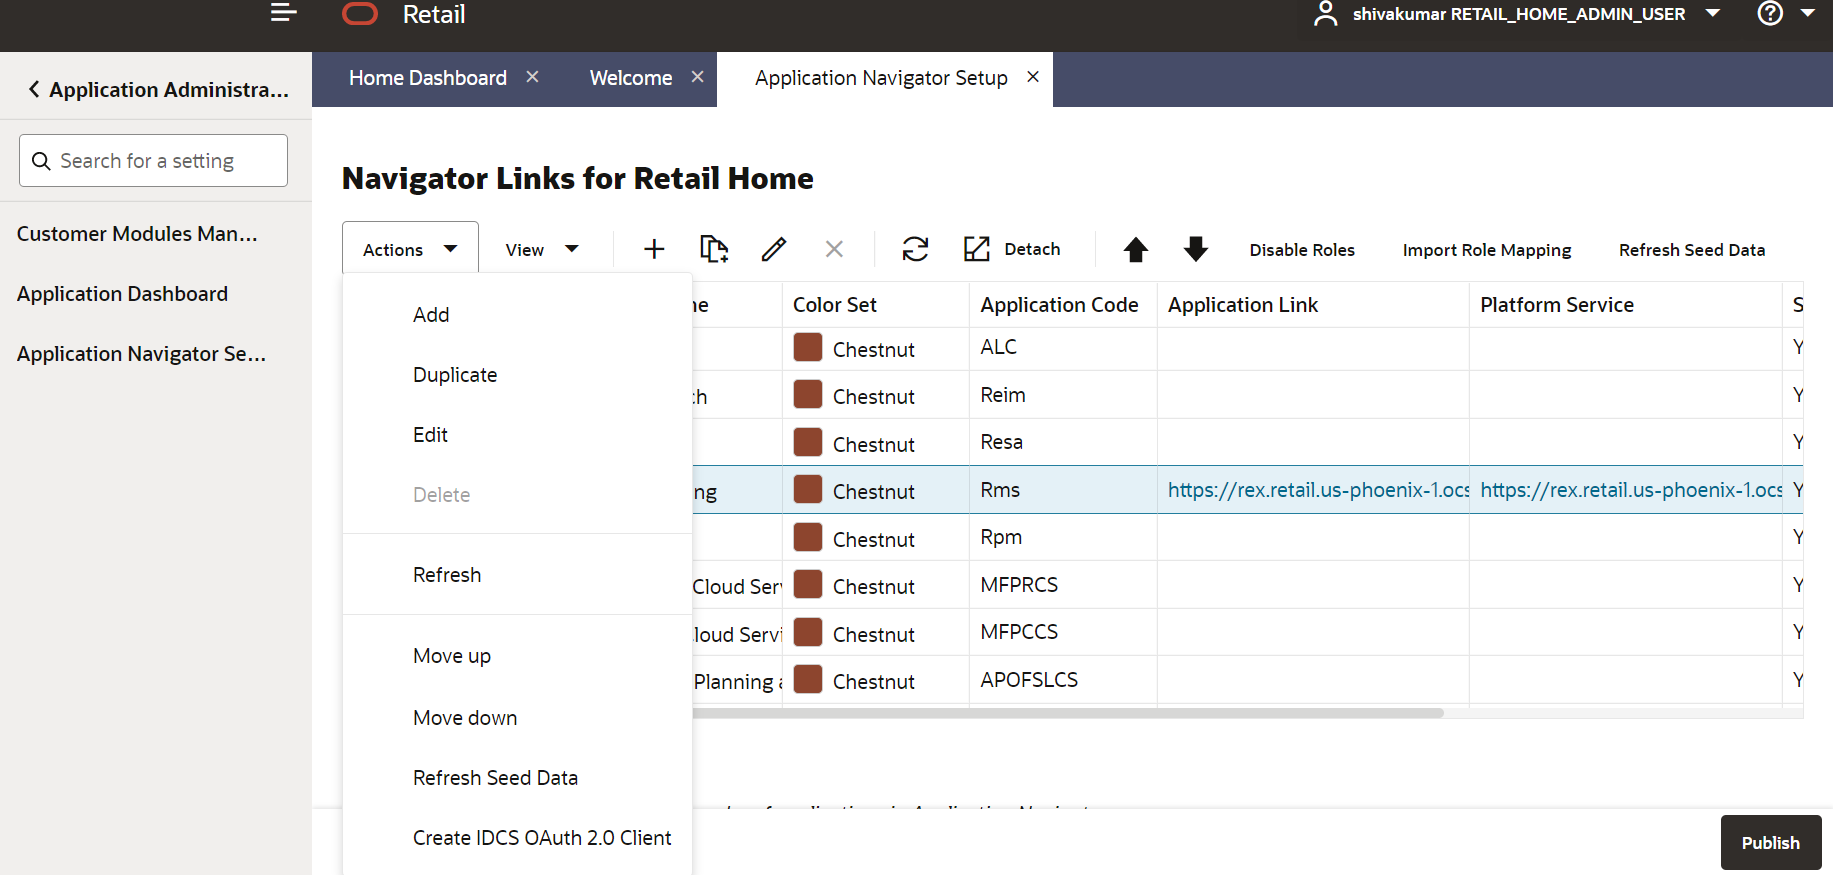
If RICS application is not reflecting even after following step 4. Select the row with the application code as Rms and click on the Actions menu on top left. Select Create IDCS OAuth 2.0 Client. A dialog will open for entering oauth2 client details.
Note:
Create IDCS OAuth 2.0 Client option is available only for applications those have platform service URL mentioned. RICS is making use of merch platform service as both the apps are sharing same IDCS tenancy.
-
Skip this step if RICS application is not showing up. One of either Step 5 or Step 6 needs to be followed.
Select a row with application code as RICS. Click on the Actions menu on top left and select Create IDCS OAuth 2.0 Client. A dialog will open for entering oauth2 client details.
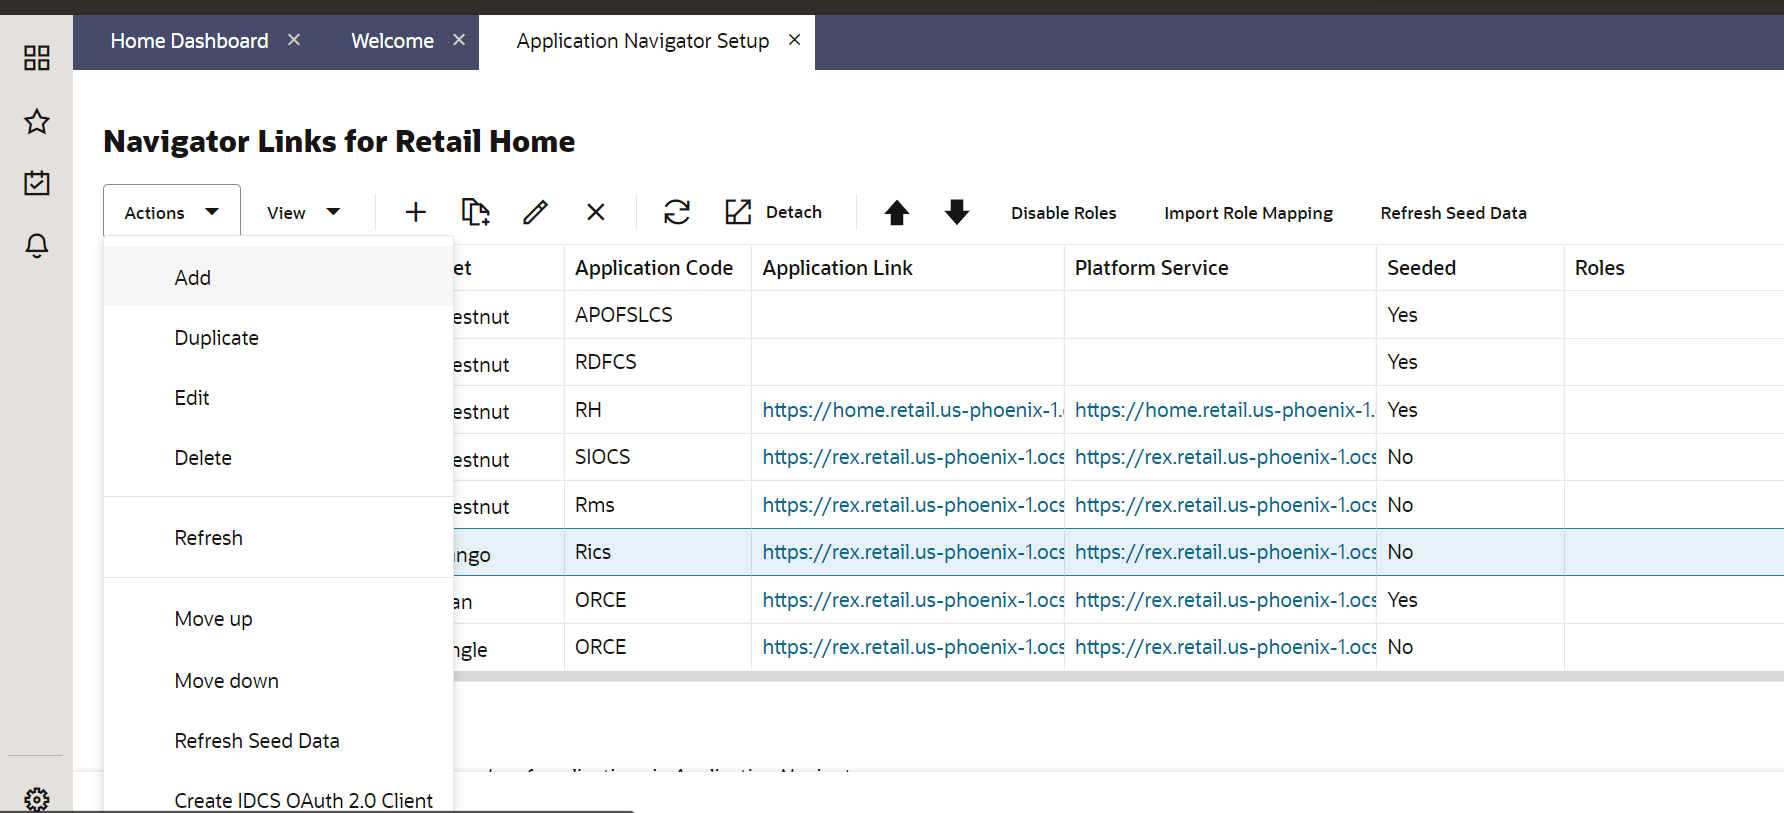
-
This dialog takes the following values:
App Name is 2-100 characters and will be used as the name in IDCS. Provide unique application name.
Description is a detailed description of the application.
Scope: <Custom environment-specific scope>
The scope pattern that is used in the RICS IDCS app creation template is rgbu:rics:<SERVICETYPE>-<ENVIRONMENT> where SERVICETYPE is RICS and ENVIRONMENT is the environment type (STG, PRD, UAT, DEV1, DEV2, and so on).
For example:
"scope": "rgbu:rics:RICS-PRD""scope": "rgbu:rics:RICS-STG"
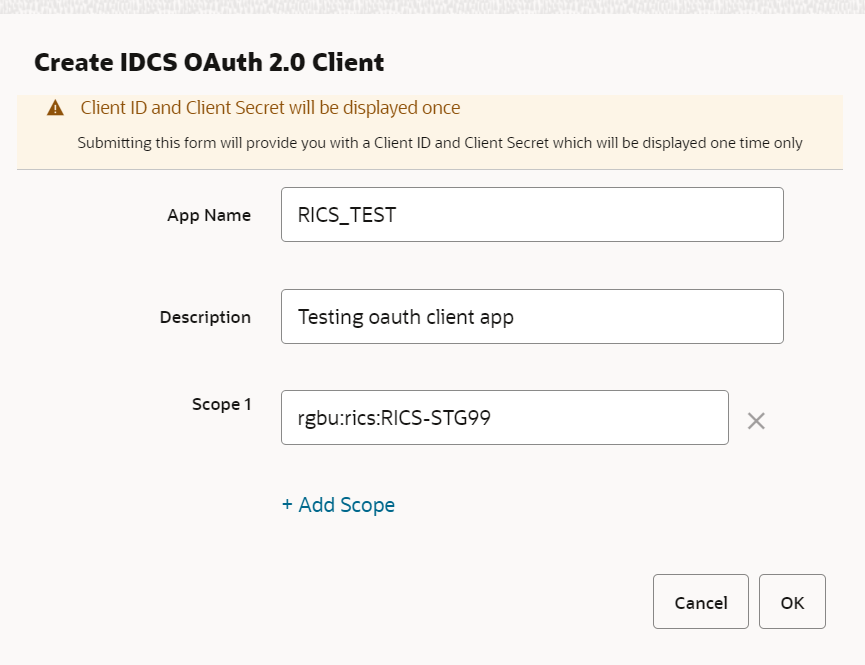
-
When the application is created, another dialog will open to show the client ID and client secret of the new application. These values should be copied down to a safe location, as they will only be shown once. Retail Home cannot retrieve the credentials again after the dialog is closed.
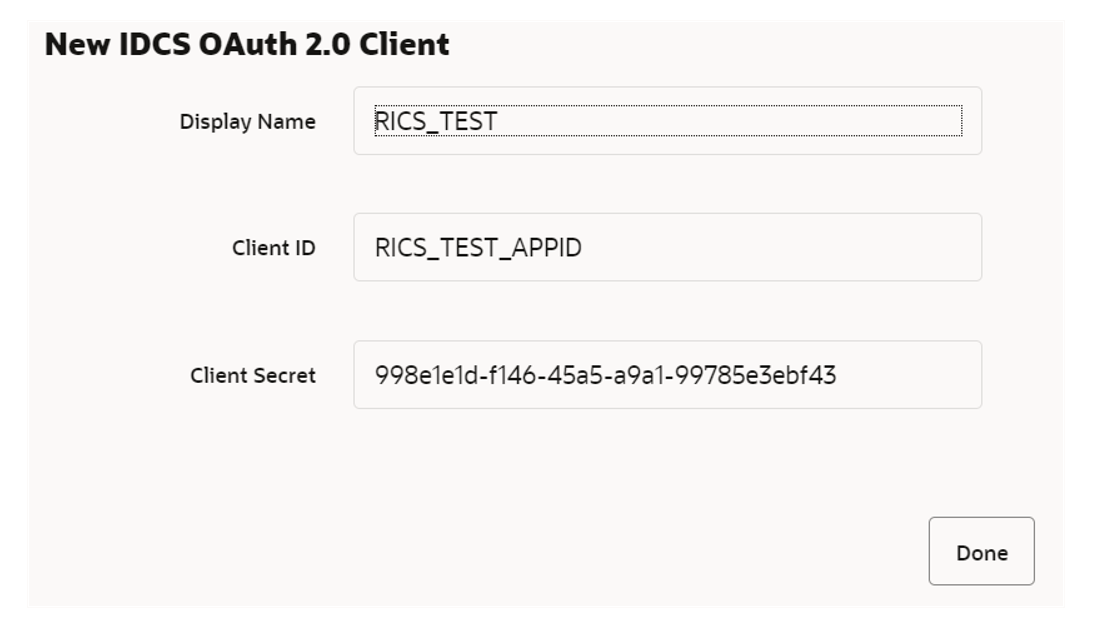
-
Client ID and Client Secret from previous step will be used for generating access token.
Sample code for generating Access Token:
clientId=RICS_TEST_APPID
clientSecret=998e1e1d-f146-45a5-a9a1-99785e3ebf43
idcsUrl=https://idcs-234e8f7334564936aa0ed93f2c39e9ca.identity.pint.oc9qadev.com
scope=rgbu:rics:RICS-STG99
ec=$(echo -n "$clientId:$clientSecret" | base64 -w 0)

AccessToken=$(curl -iv \
-H "Authorization: Basic $ec" \
-H "Content-Type: application/x-www-form-urlencoded;charset=UTF-8" \
--request POST $idcsUrl/oauth2/v1/token \
-d "grant_type=client_credentials&scope=$scope" | grep -o -P '(?<=access_token":").*(?=","token_type)')

echo $AccessToken
-
Now service call can be made by passing along the access token generated in previous step.
Here is sample curl command with Bearer token and rib-ext publisher ping
ribExtServiceUrl=https://rex.retail.us-phoenix-1.ocs.oc-test.com:443/rgbu-rex-eit-stg99-rics/rib-ext-services-web/resources/publisher/ping
curl -ivkL --noproxy '*' -H "Authorization: Bearer $AccessToken"  -H "Content-Type: application/xml" -X GET $ri-bExtServiceUrl
Sample response
{"message": "ping() was called with input String of: hello"} -
Publishing a message using access token.
Here is sample curl for publishing a message
ribExtServiceUrl=https://rex.retail.us-phoenix-1.ocs.oc-test.com:443/rgbu-rex-eit-stg99-rics/rib-ext-services-web/resources/publisher/publish curl -ivkL --noproxy '*' -H "Authorization: Bearer $AccessToken" -H "Content-Type: application/xml" -X POST $ribExtServiceUrl --data '<v1:ApplicationMessages xmlns:v1="http://www.oracle.com/retail/integration/rib/ApplicationMessages/v1"> <v1:ApplicationMessage> <v1:family>InvAdjust</v1:family> <v1:type>InvAdjustCre</v1:type> <v1:payloadXml><InvAdjustDesc xmlns="http://www.oracle.com/retail/integration/base/bo/InvAdjustDesc/v1" xmlns:xsi="http://www.w3.org/2001/XMLSchema-instance" xsi:schemaLocation="http://www.oracle.com/retail/integration/base/bo/InvAdjustDesc/v1 http://www.oracle.com/retail/integration/base/bo/InvAdjustDesc/v1/InvAdjustDesc.xsd" ;><dc_dest_id>DC_ES</dc_dest_id><InvAdjustDtl><item_id>Aline</item_id><adjustment_reason_code>stri</adjustment_reason_code><unit_qty>22.4</unit_qty> ;<transshipment_nbr>ss</transshipment_nbr><from_disposition>ss</from_disposition><to_disposition>sss</to_disposition><from_trouble_code>sss</from_trouble_code> <to_trouble_code>ss</to_trouble_code><from_wip_code>aaa</from_wip_code><to_wip_code>sss</to_wip_code><transaction_code>4</transaction_code><user_id>TestUser</user_id> <create_date>1999-10-23T20:27:56.32</create_date><po_nbr>PratapOrd96</po_nbr><doc_type>P</doc_type><aux_reason_code>string</aux_reason_code> <weight>12.4</weight><weight_uom>smn;</weight_uom><unit_cost>20.4</unit_cost><InvAdjustUin><uin>123</uin> <status>4</status></InvAdjustUin></InvAdjustDtl></InvAdjustDesc></v1:payloadXml> </v1:ApplicationMessage> </v1:ApplicationMessages>'
Sample response
{"message": "Publish done"}
External Application as a Subscriber (rest-app)
For an external application to consume the message from the RIB's JMS on cloud, it has to host the Injector Service. Injector Service is a ReST webservice that is made available as a pluggable jar.
A pluggable jar is provided which contains all the wrapper classes to help in implementing injector service. rib-injector-services-web war is the pluggable jar which can be included into the external application deployable file for example, ext-app.ear/lib. Once pluggable jar is added, endpoint for injector service will be exposed as follows:
http://<external-app-host>:<port>/ rib-injector-services-web/resources/injector/inject

Pluggable jar is provided for reference however customer can choose to write their own injector service by adhering to REST service contract detailed in next section.
Note:
For information on pluggable jar, see the Client Connector For Oracle Retail Integration Cloud Service 24.0.201.0 (Patch) available on My Oracle Support.
How to implement Injector Service (Service Contract) using ReST
Here is the Rest service contract detail:
-
Keep the path as Injector/inject.
@Path("/injector") -
Use POST for this service. As the input message object itself has identifier (message type- CRE/MOD) they don't need to use the PUT/PATCH. they can use message type to build the implementation logic.
@POST @Path("/inject") @Consumes({MediaType.APPLICATION_XML}) -
The input would be MediaType.APPLICATION_XML and the structure would be 'ApplicationMessage' object. (file attached for reference).
<xs:element name="ApplicationMessage"> <xs:complexType> <xs:sequence> <xs:element name="family" type="string25"/> <xs:element name="type" type="string30"/> <xs:element name="businessObjectId" type="string255" minOccurs="0"/> <xs:element ref="ApplicationMessageRoutingInfo" minOccurs="0" maxOccurs="unbounded"/> <xs:element name="payloadXml" type="xs:string"/> </xs:sequence> </xs:complexType> </xs:element> -
Customer can utilize the payload.properties file for validation of message family and type.
-
Return type should be JSON, see below example:
String message = "{\"message\": \"Inject successful.\"}"; return Response.ok(message, MediaType.APPLICATION_JSON).build(); -
For exception response customer needs to follow the structure of exceptionVO.
How to Secure Injector Service with Oauth2
Primary authentication mechanism in the cloud is OAuth2 using IDCS authenticator. RIB uses IDCS OAuth2 for authentication of ReST calls both inbound and outbound (publisher/injector restful services). Hence Injector service exposed by external service should be secured with OAuth2. This chapters covers the key points that should be taken into consideration while protecting the resources exposed by external application.
Prerequisites
-
IDCS should be same as RICS.
-
Use Client Credentials grant type with scope to provide access to resource.
-
Following is the screen shot of a sample IDCS app with scope added
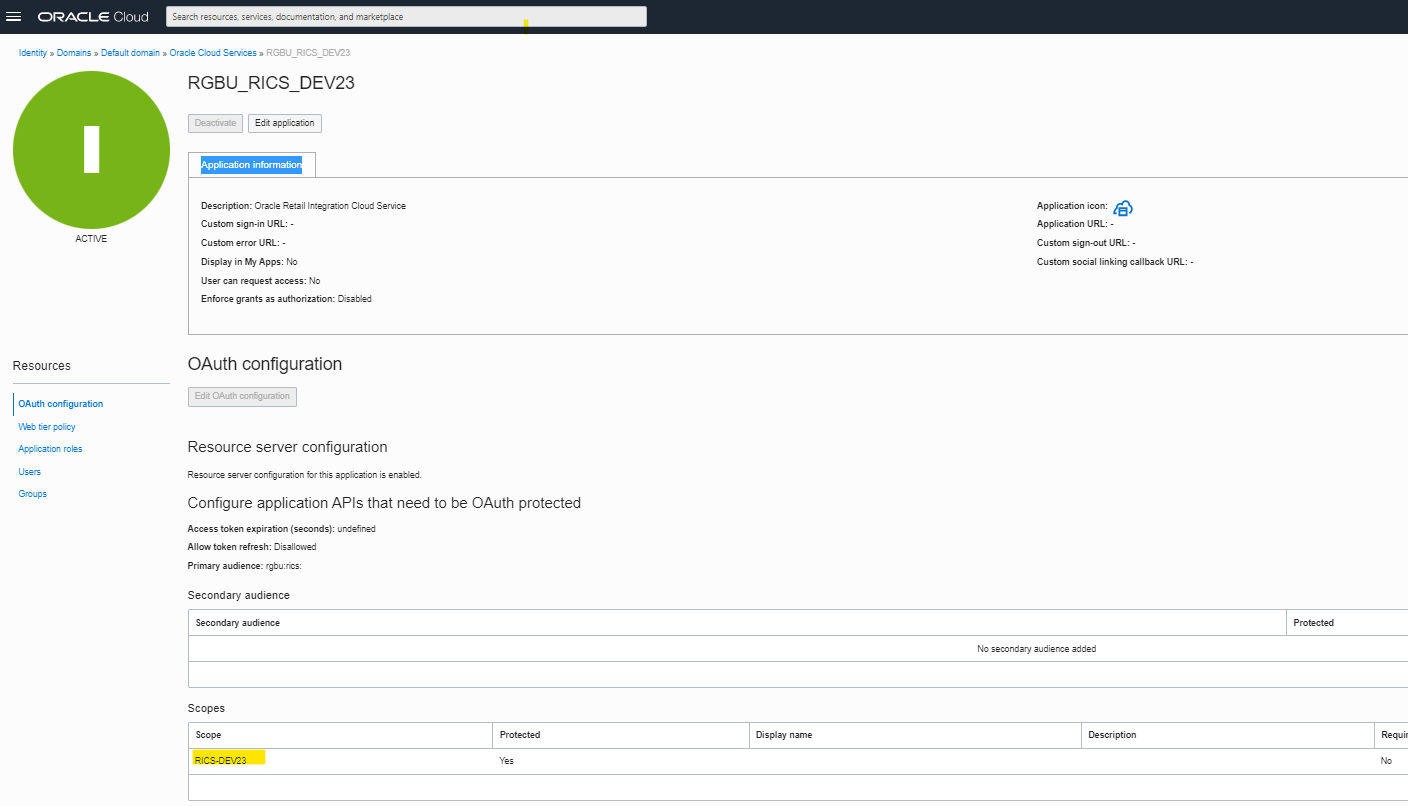
Note:
Follow IDCS documentation for detailed instruction on setup.
RIB-EXT Side of Configuration to Point to External Application
Below are the steps to point rib-ext to the correct injector service.
Table 4-2
| Category | Step | Comment |
|---|---|---|
|
Access RIB Admin GUI |
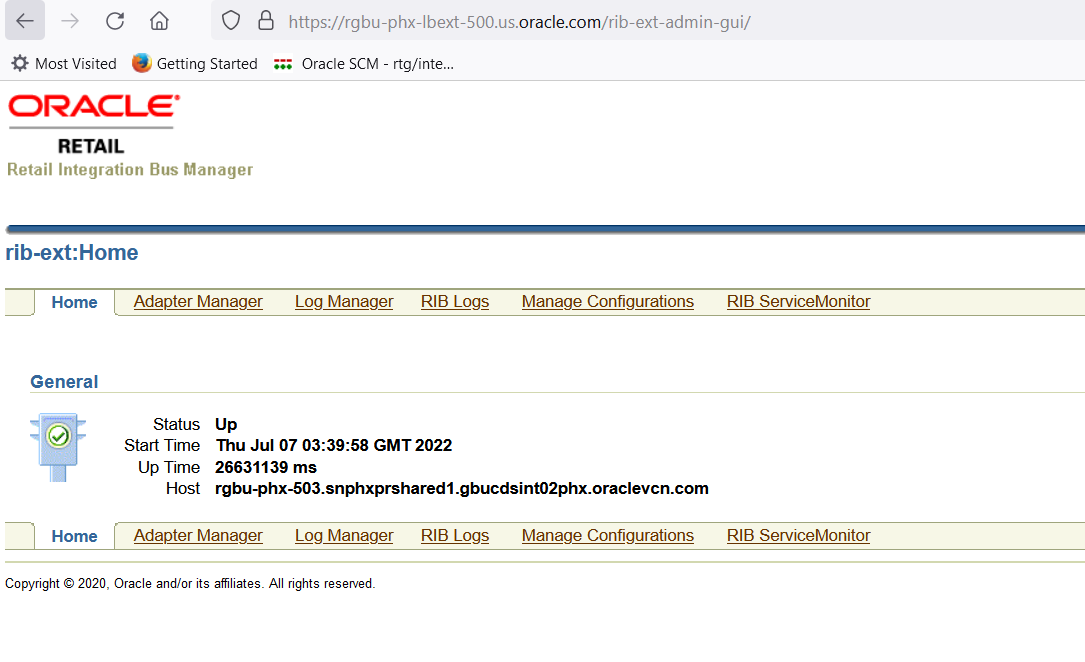
Access the rib admin GUI at https://<external-load-balancer>/rib-ext-admin-gui Log in with the admin user. |
 |
|
Verify Configuration and update |
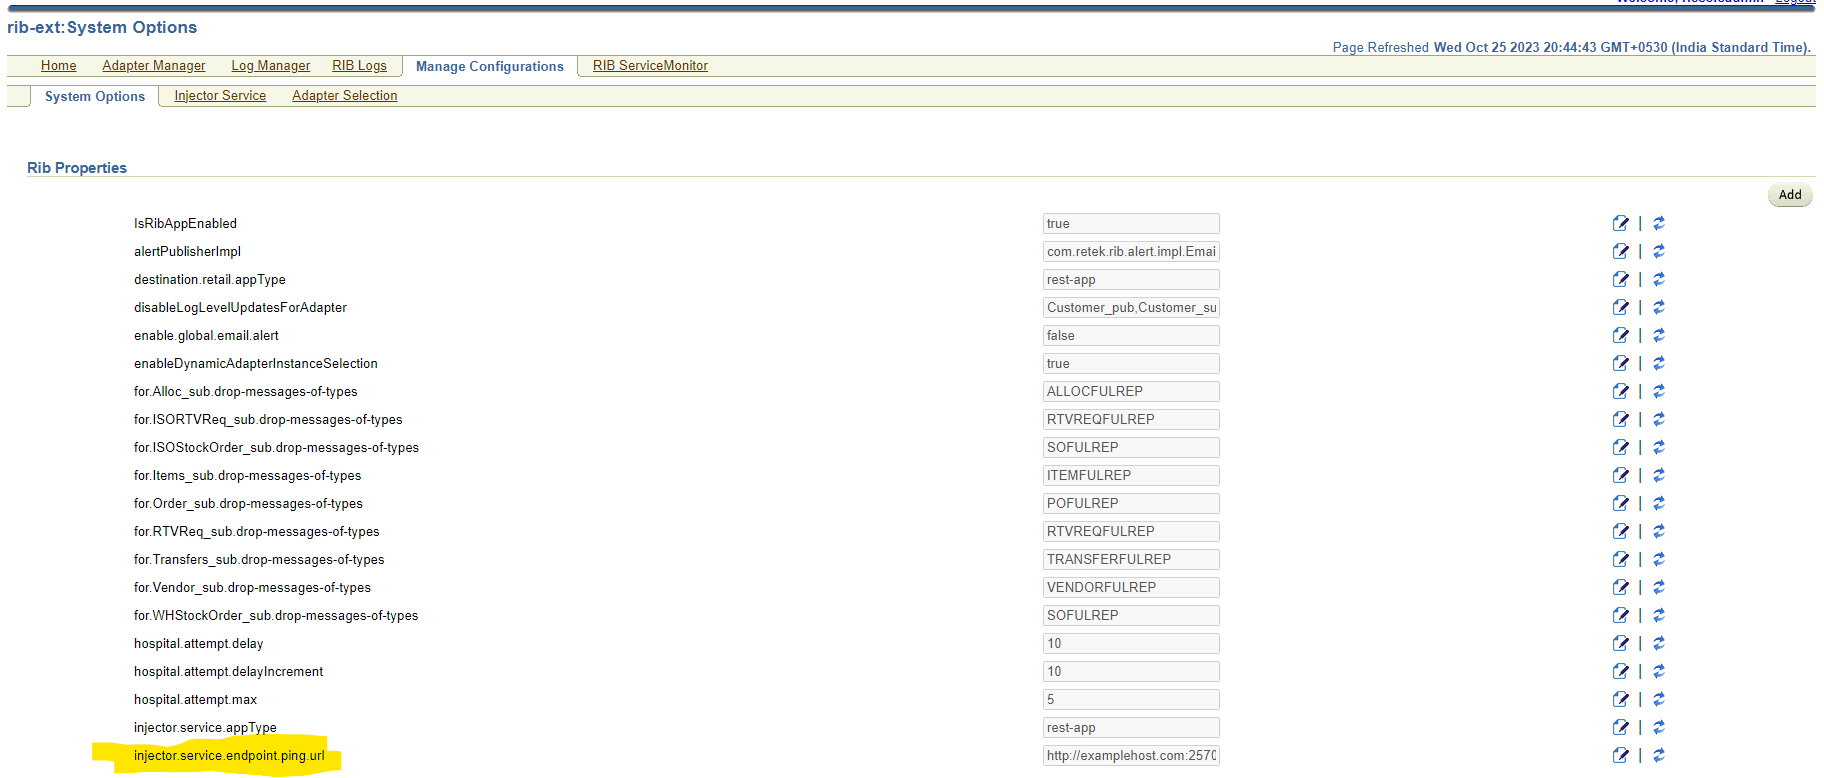
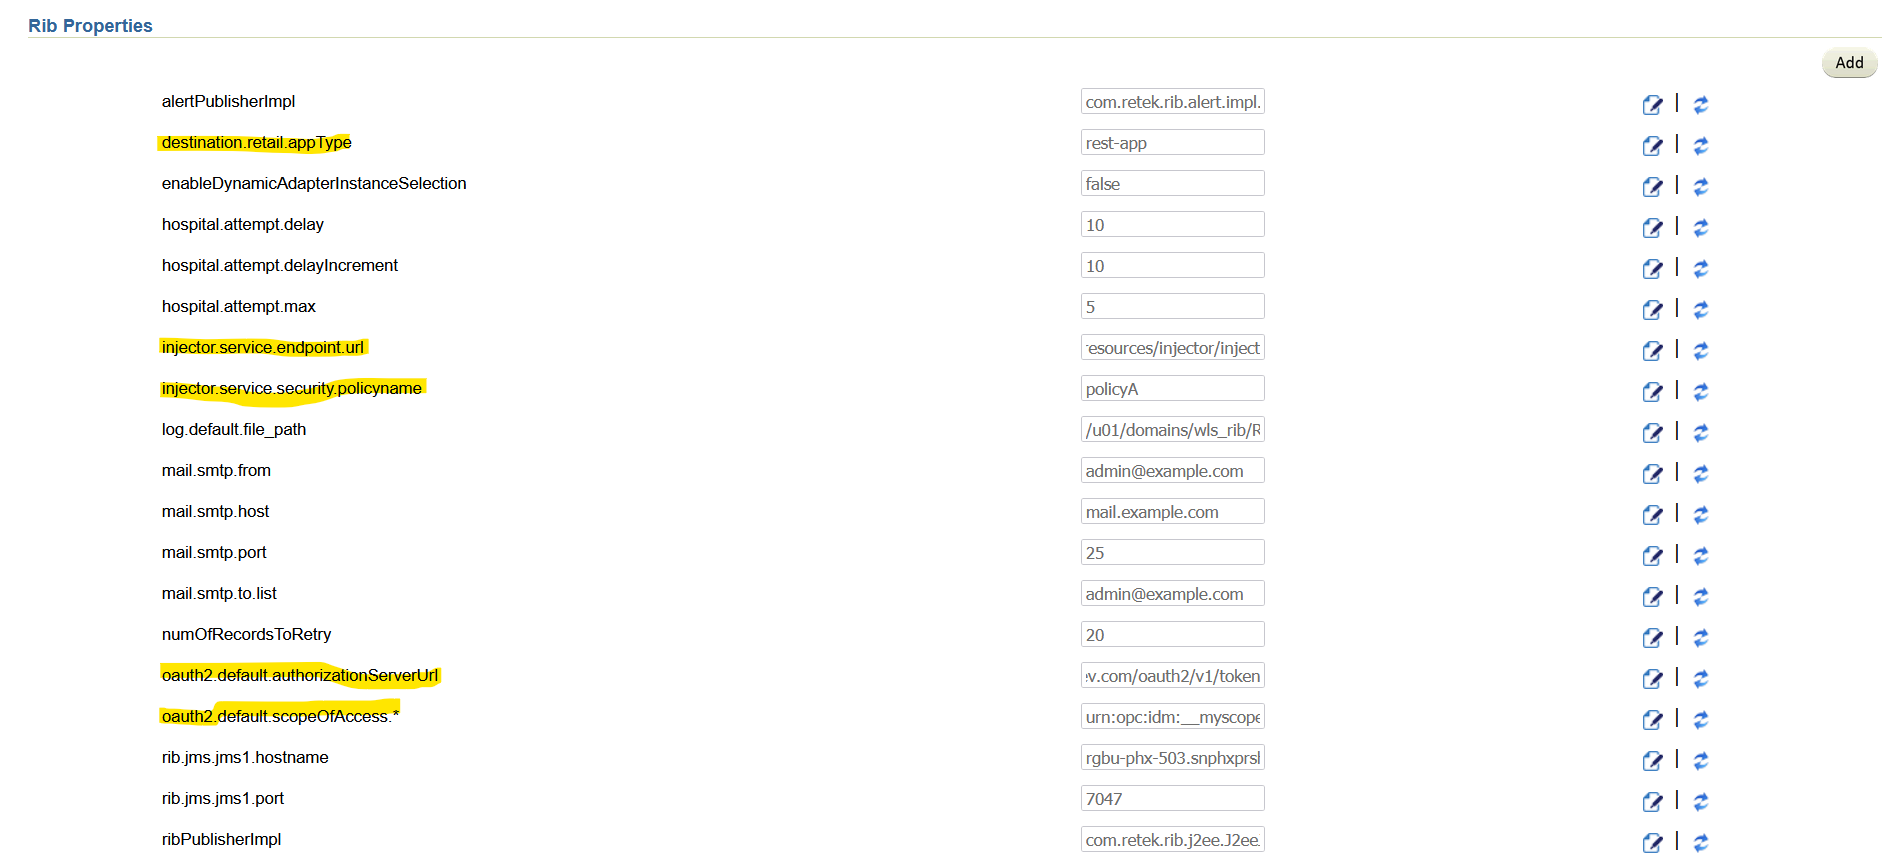
Navigate to Manage Configurations -> System options Search for and verify the following:
|
|
|
Supported Grant Types for OAuth2 |
Only client credential grant type is supported. Follow steps below. |
|
|
Update username and password to empty |
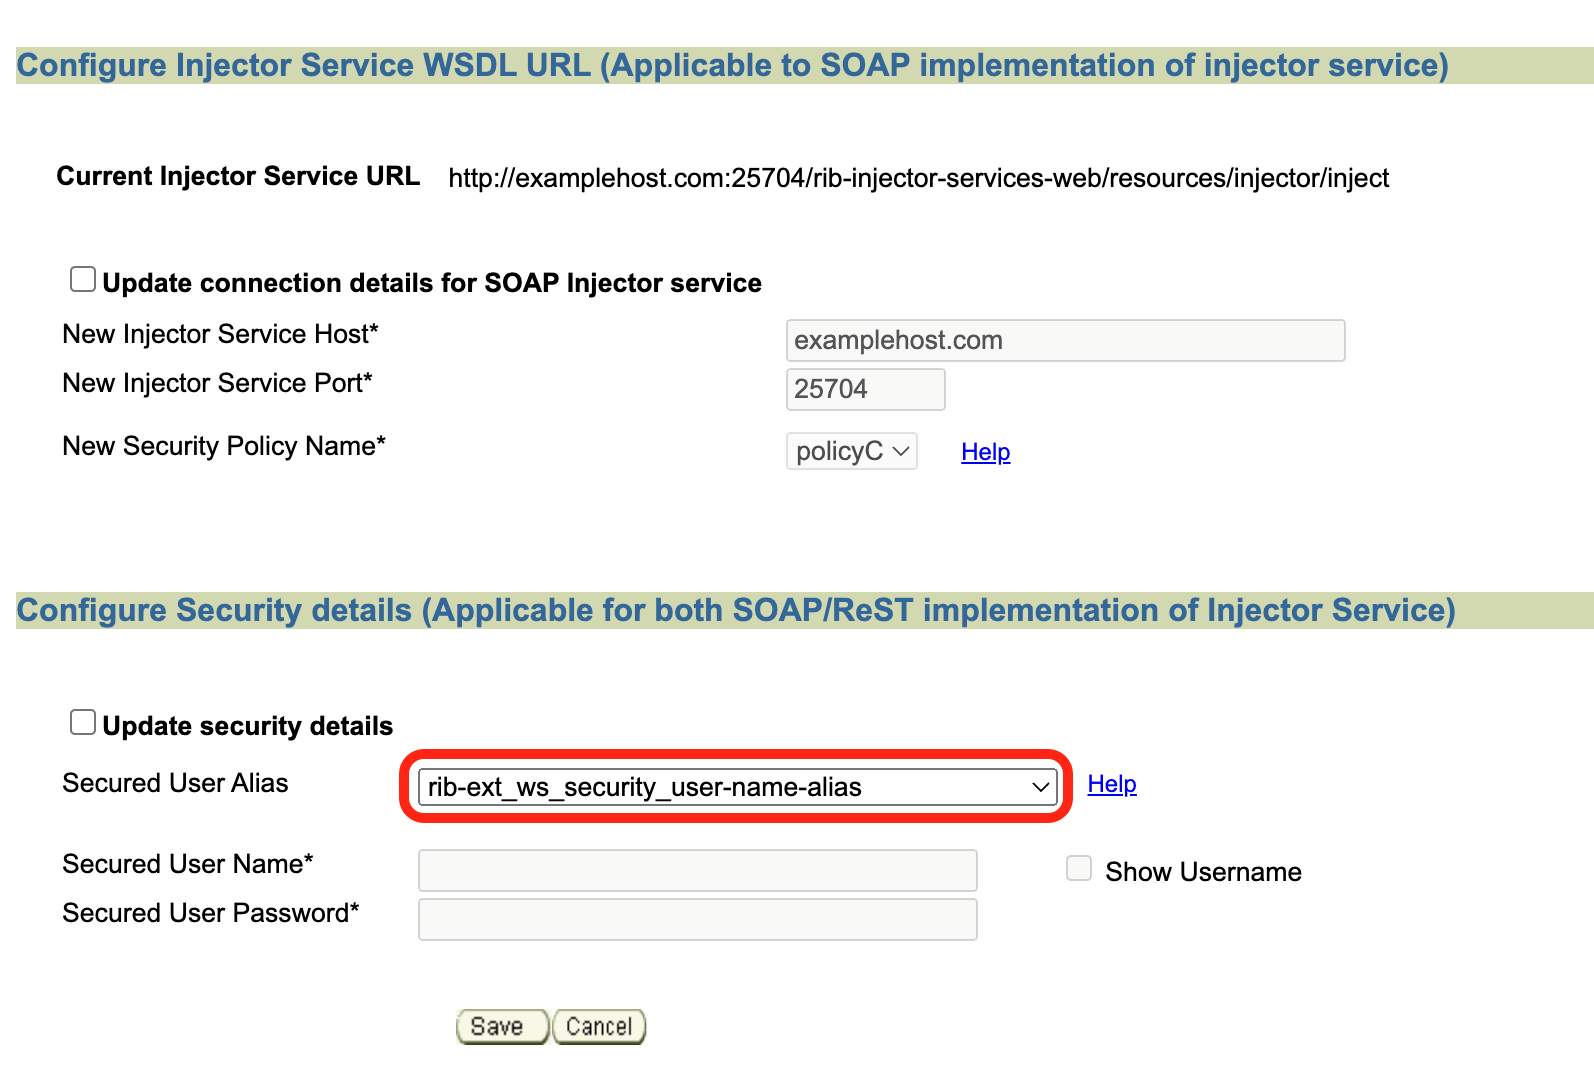
Navigate to Manage Configurations - > Injector Service Update details.
|
|
|
Update ClientID/Secret |
Navigate to Manage Configurations - > Injector Service Update details
|
|
|
Ping Test |
Navigate to Manage Configurations -> RIB Service Monitor
|
|
|
How to verify provided injector service details are correct |
Verify if the provided injector service URL and credentials are correct. |
Execute the following curl commands ClientId=56c7eb72f11b43bb98bf2570fa2353eb ClientSecret=bb18aa22-4bb4-41d1-9ed4-fea276651e28 IDCSUrl=https://idcs-24e4baae56764e91be371e6a2060d66e.identity.c9dev2.oc9qadev.com AccessToken=$(curl -i -X POST \ --user $ClientId:$ClientSecret \ -H "Content-Type: applica-tion/x-www-form-urlencoded;charset=UTF-8" \ $IDCSUrl/oauth2/v1/token \ -d "grant_type=client_credentials&scope=urn:opc:idm:__myscopes__" | grep -o -P '(?<=access_token":").*(?=","token_type)') ribExtServiceUrl=https://rgbu-phx-lbext-351.us.oracle.com/rib-injector-services-web/resources/injector/ping curl -ivkL --noproxy '*' -H "Authorization: Bearer $AccessToken" -H "Content-Type: applica-tion/xml" -X GET $ribExtServiceUrl |
How to Switch Injector Service App Type at Runtime
RIB-EXT is a rest-app by default for CFS and expects injector service also to be of ResT type. ONLY for egress/migration customers who already have injector service SOAP implementation in GBUCS they should follow these steps to switch from rest to soap based injector calls and vice-versa.
How to Change rib-ext injector-service-app-type from REST to SOAP
-
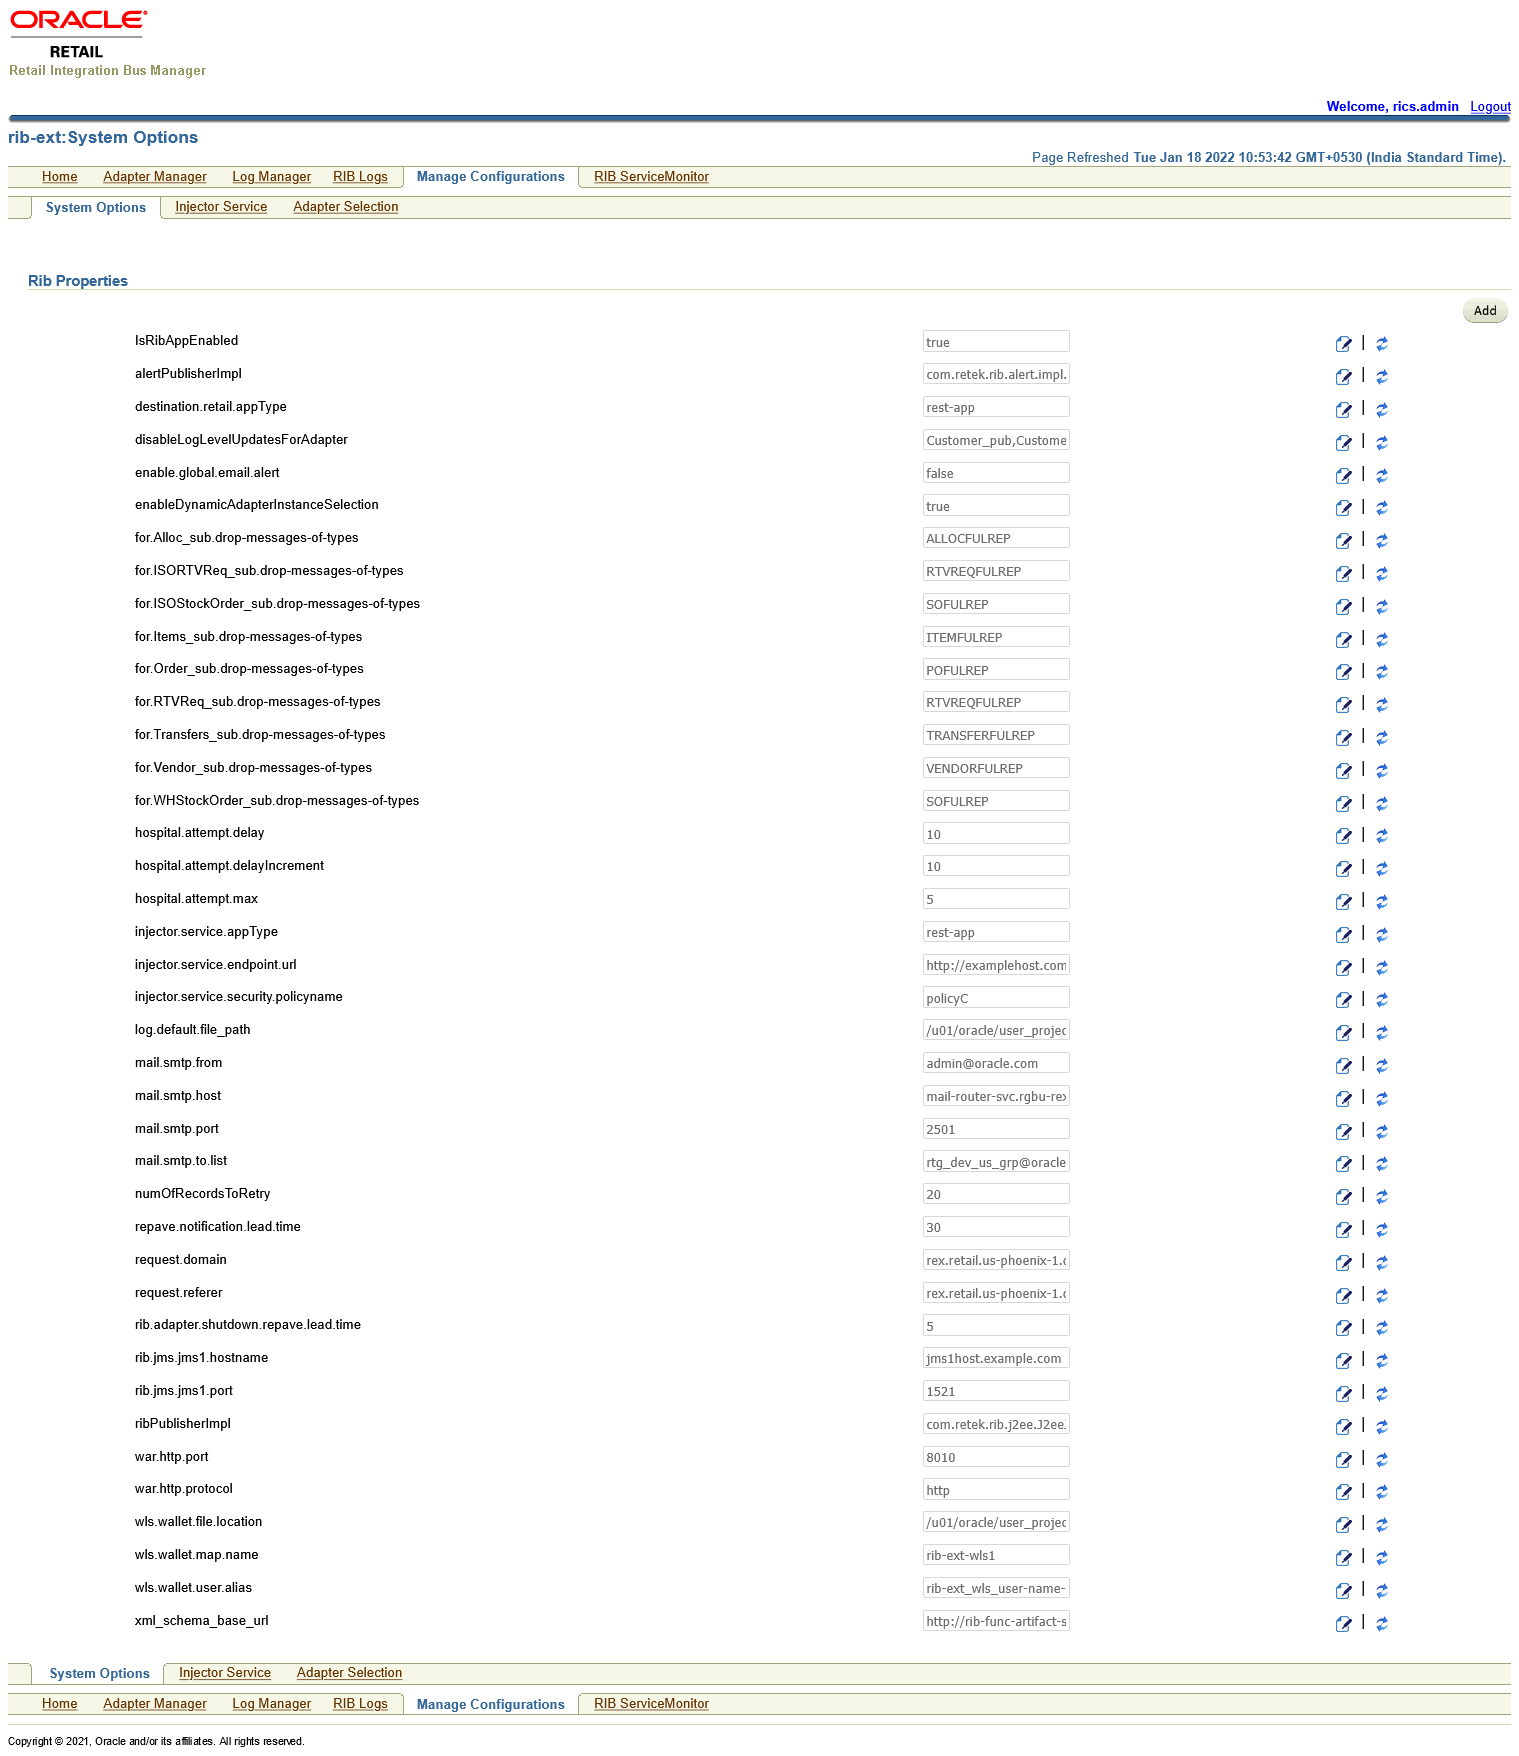
Open rib-ext admin gui. Go to Manage Configurations > System Options, observe the new property (that is,
injector-service-appType) added to allow switching injector service app-type at runtime.By default, rib-ext is deployed as rest-app so injector-service-appType is defaulted to.
-
Edit
injector-service-appTypeand update this tosoap-app. Save the changes.
-
Update the value for Ping Service URL (
injector.service.endpoint.ping.url). This URL should point to a ping service WSDL provided by external application.Note:
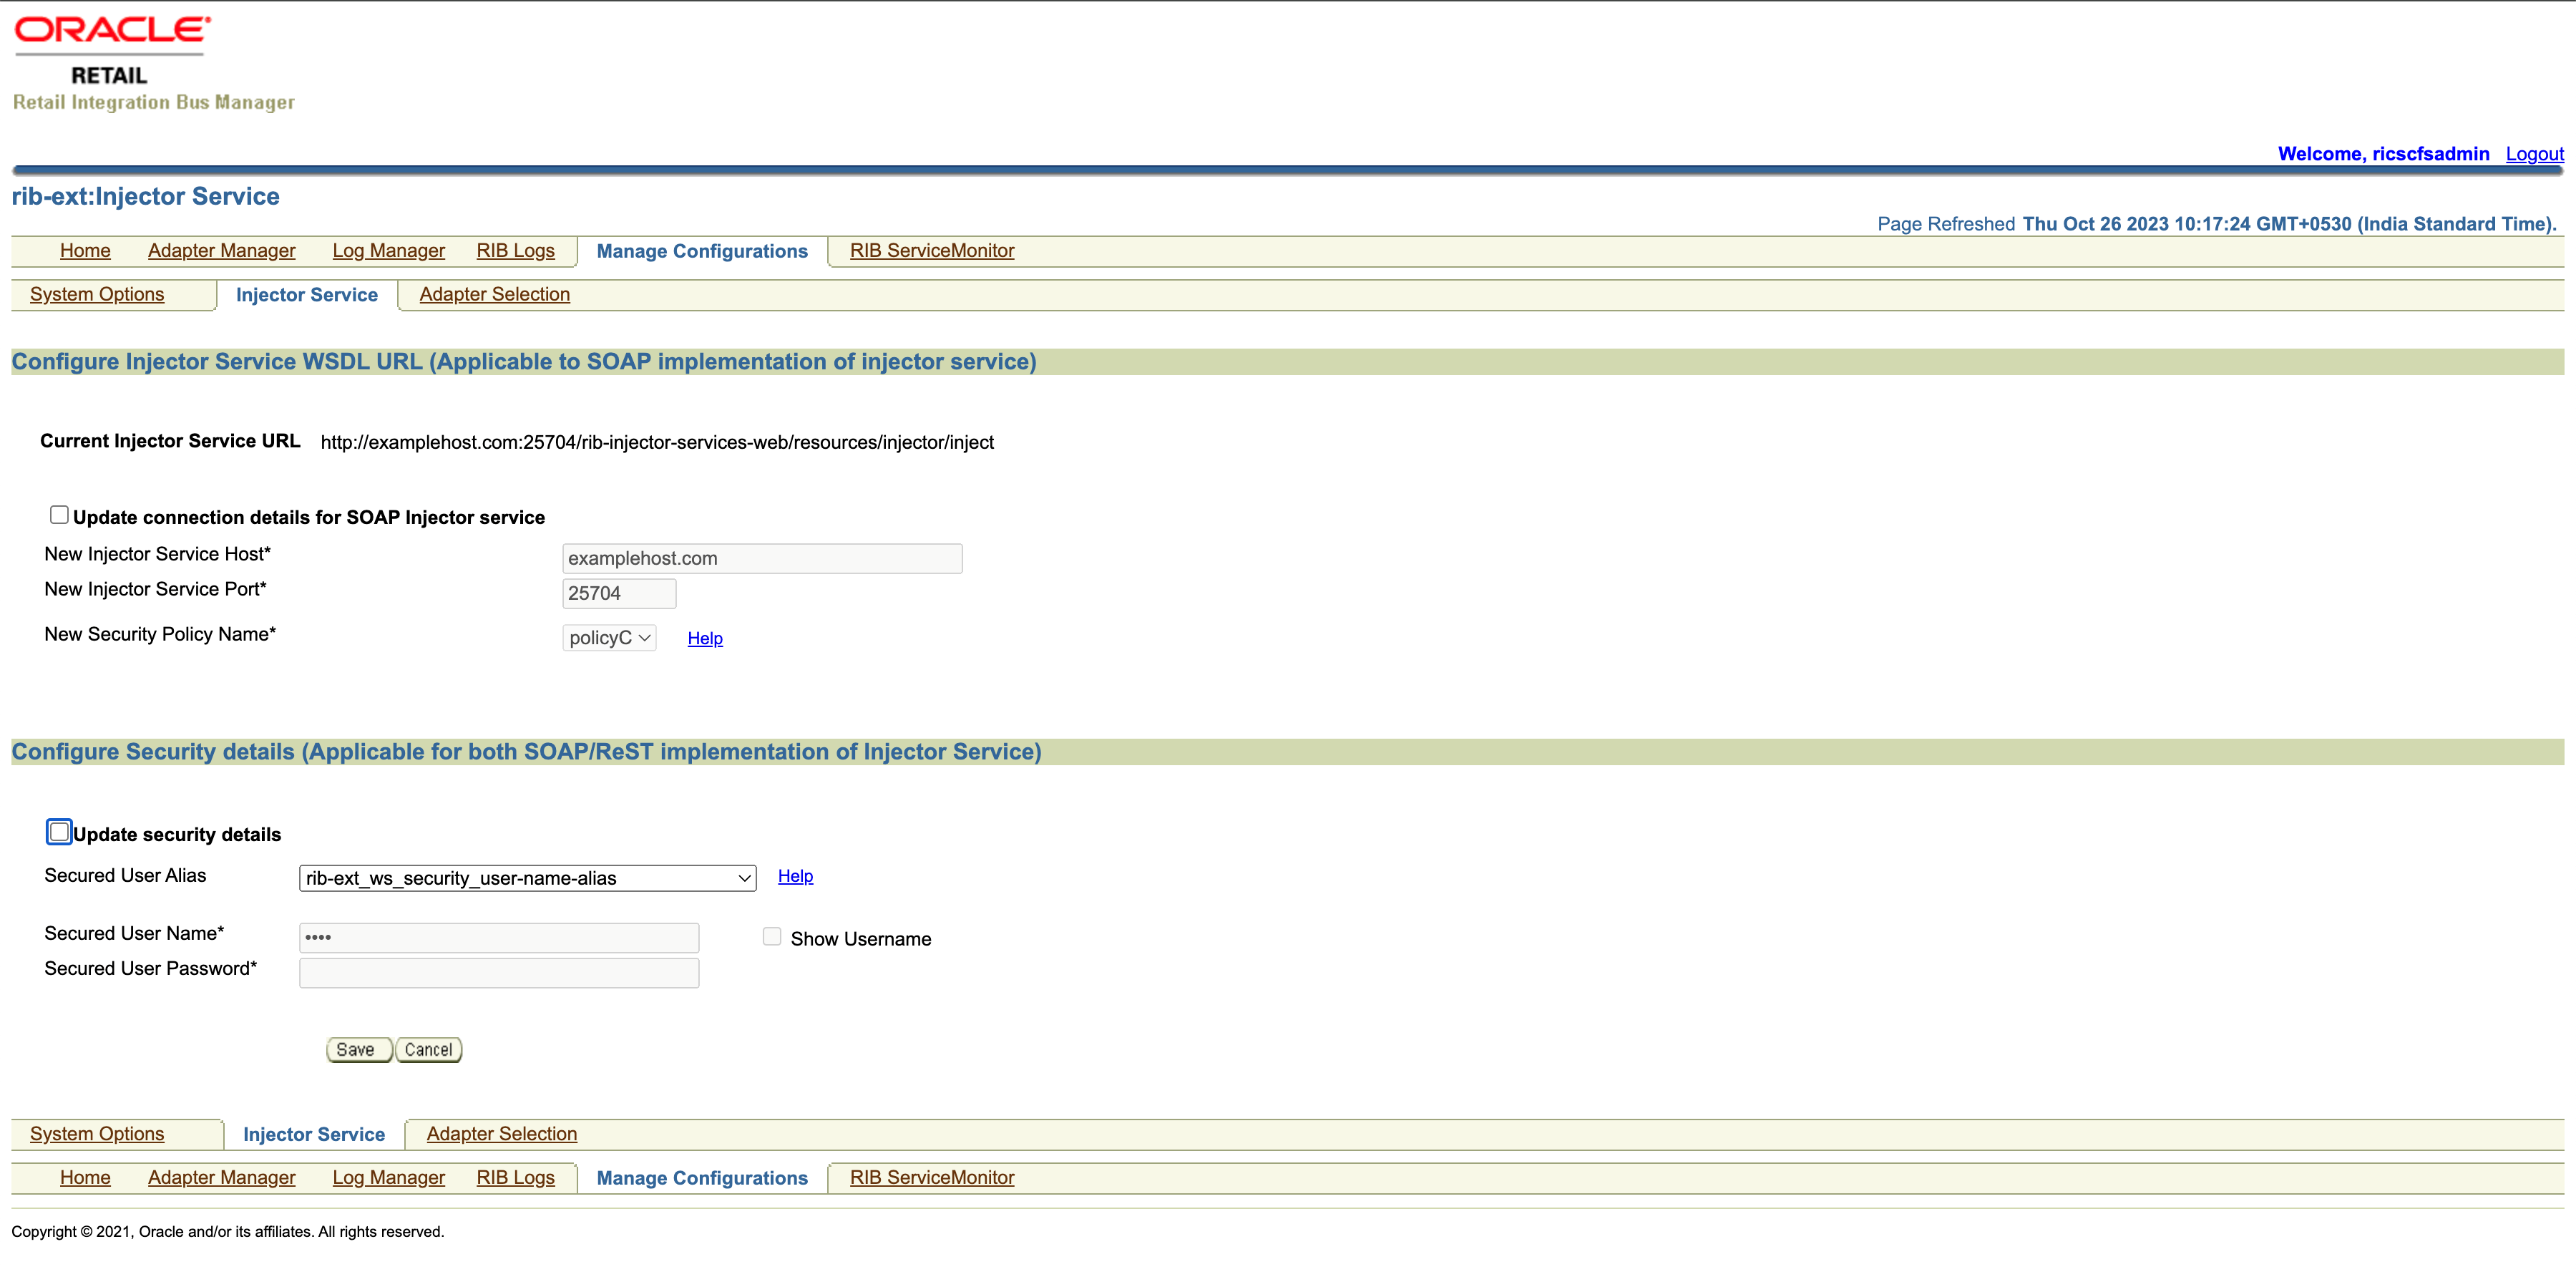
This feature allows users to provide their ping URL. The ping feature in rib-ext relies on the ping implemented on the system. Ping is typically used to test the first-time handshake between the service client and the service provider before sending the actual data over to OIC. The fact that data is moving to OIC tells us that the integration is working fine.Navigate to Manage Configurations > Injector Service tab. Check for the correctness of injector service URL, ensure it points to correct ext-app injector service.
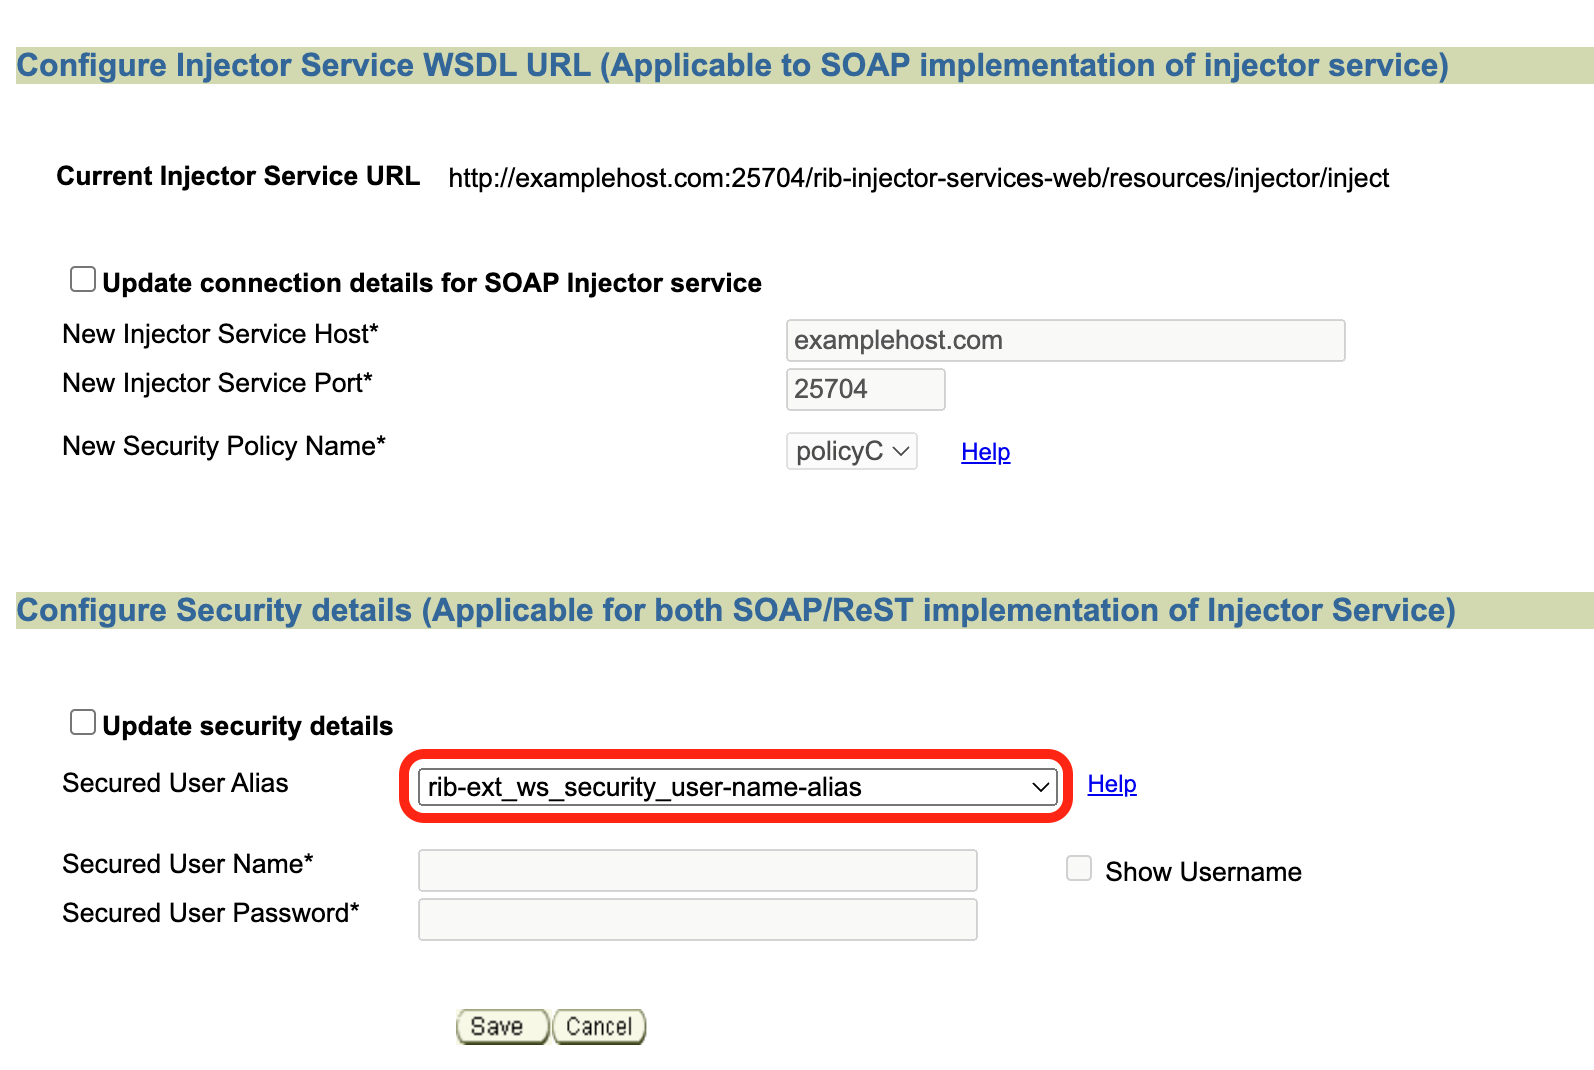
Update rib-ext_ws_security_user-name-alias with correct username/password needed to make inject call.
-
Setup is ready now. Do a ping test from RIB ServiceMonitor tab.
How to change rib-ext injector-service-app-type from SOAP to ReST
-
Navigate to Manage Configurations > System Options from admin GUI. Look for injector-service-appType, update this property to switch from SOAP to ReST.Save the changes.

-
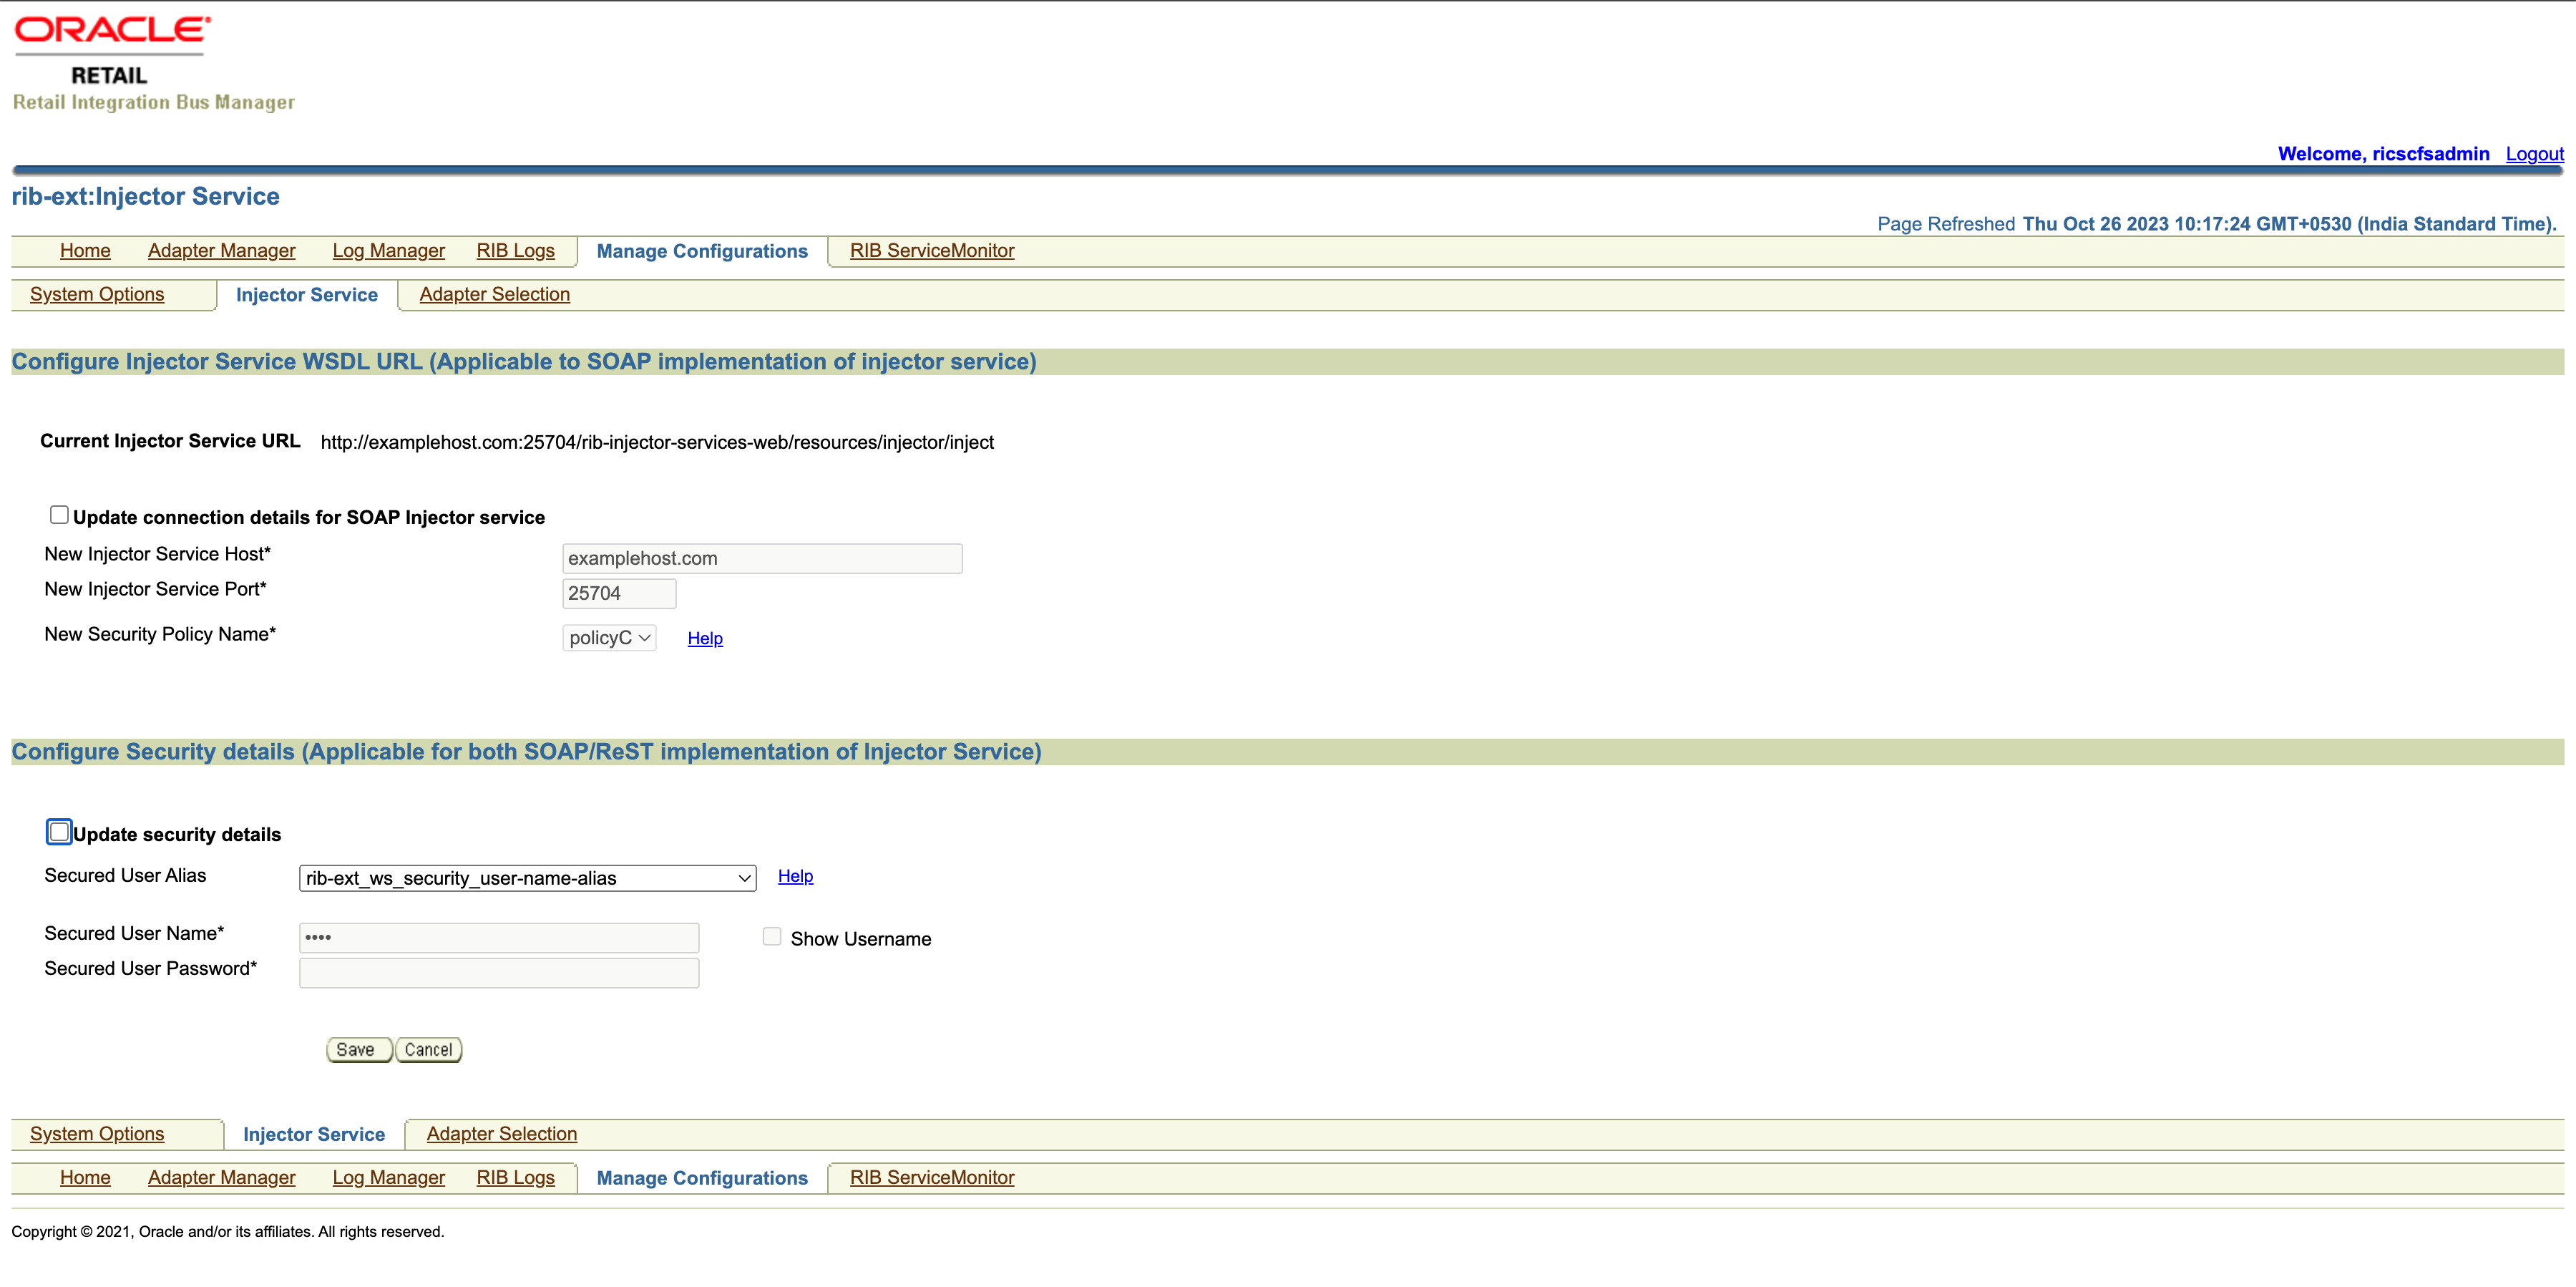
Navigate to Injector Service tab. Update host/port and security credentials (rib-ext_ws_security_user-name-alias) if needed.
-
Setup is ready now. Do a ping test from RIB Service Monitor tab.
See Sample Files (application.wadl, Resource file, Sample request/response etc.).
Note:
A Reference implementation for injector service is provided, See Reference Implementation of Injector Service Using Tomcat for details.
Error Handling
The RIB infrastructure provides a mechanism called RIB error hospital to handle and manage the error messages. When the publishing or subscription of a message fails in the rib-ext for some reason, it lands in error hospital with a reason code. The retry adapters in the rib-ext application are responsible for retrying the messages in error hospital.
Oracle RIB Hospital Administration (RIHA) is a Weblogic application that allows the management of messages in error hospital. Some of the RIHA operations include:
-
Viewing error messages
-
Editing error messages
-
Retrying error messages
-
Stopping error messages
For more information, see the Oracle Retail Integration Bus Hospital Administration Guide.
