1 Locations Destination
The Locations Destination serves as a central navigation hub for location-related foundation data within Merchandising. From the destination’s landing page, you can access major workflows such as exploring organizational hierarchy, searching for store and warehouse locations and maintaining stores.
The Locations tab at the bottom of the page is always available and when clicked will return you to the landing page.
Figure 1-1 Locations Destination Landing Page
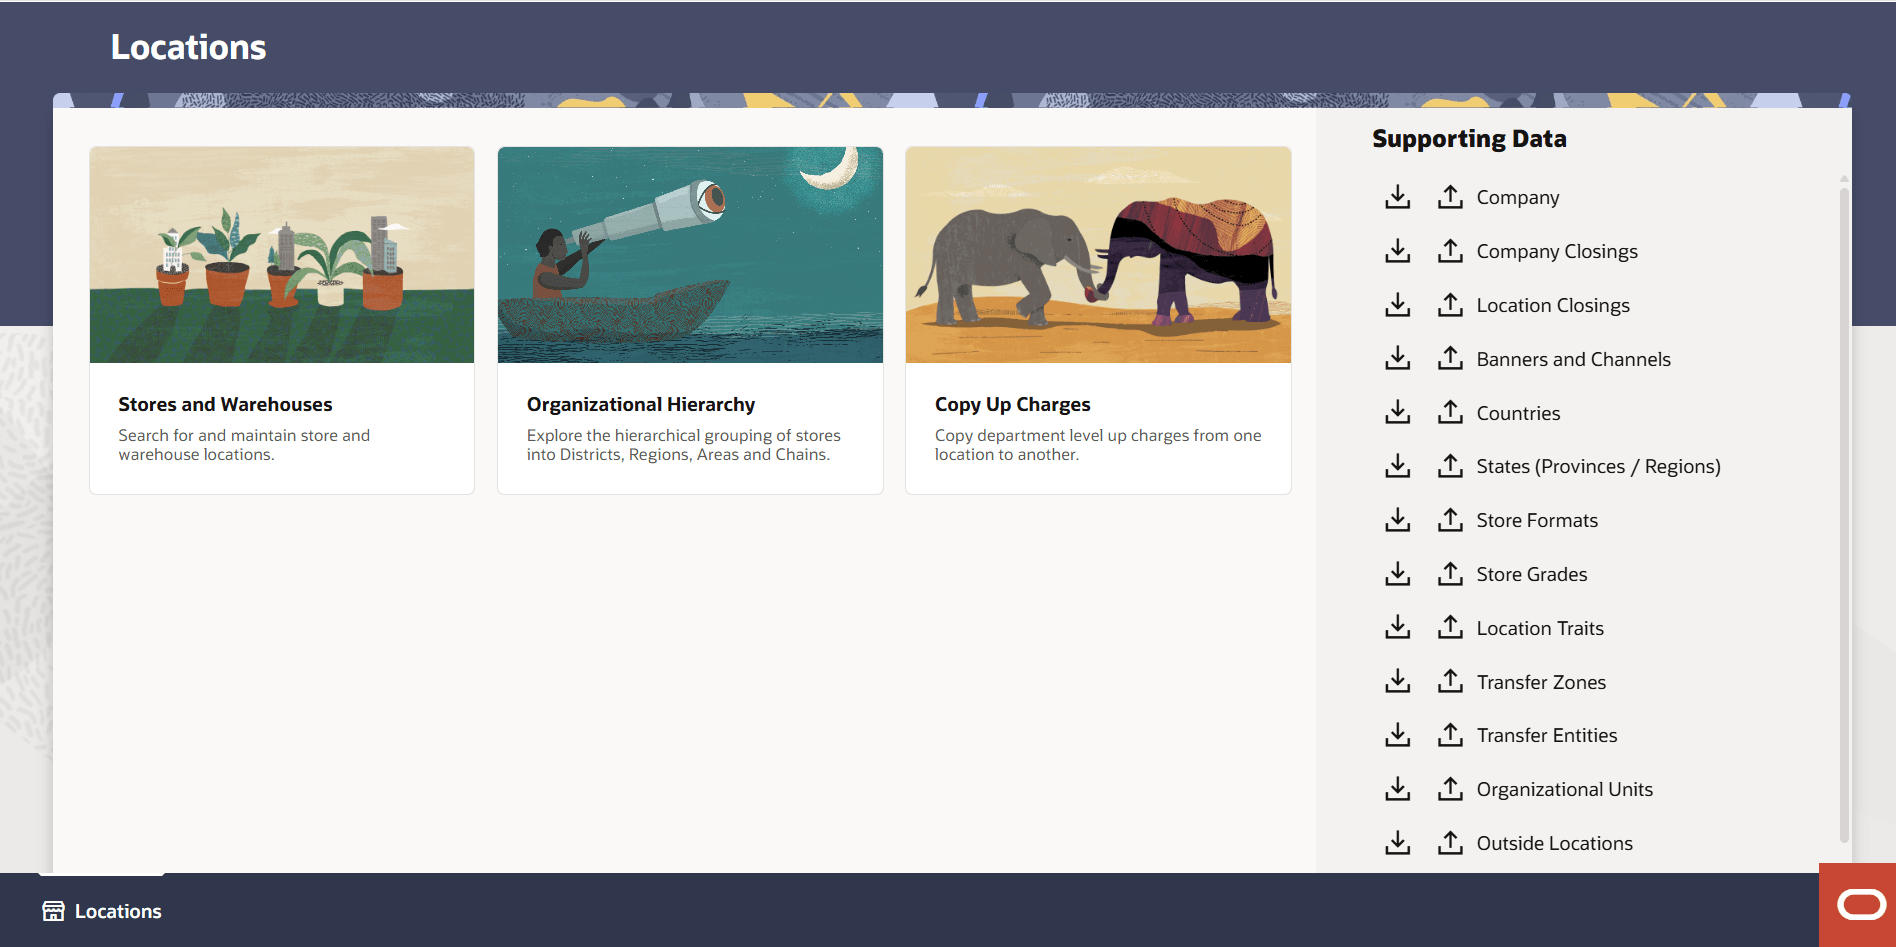
Two primary cards provide access to main workflows:
- Organizational Hierarchy Card: Explore the hierarchical grouping of stores into districts, regions, areas, and chains.
- Stores and Warehouses Card: Permits searching for store and warehouse locations, as well as creating and maintaining stores.
- Copy Up Charges: Allows you to copy department level up charges from one location to another. Up Charges can be copied between stores, virtual warehouses and external finishers.
Copy Up Charges
The Copy Up Charges feature provides a guided way to copy department up charge profiles from one location to another. The source and target locations can be stores, external finishers, or virtual warehouses, including regular warehouses, internal finishers, importers, and exporters. The copy can apply to all departments, all departments in a group, or a single department.
On the Locations Destination landing page, select the Copy Up Charges card. The Copy Up Charges drawer appears with Copy From, Copy To, and Apply To sections. The feature is also available from the Store definition page and, for virtual warehouses, in Warehouse definition page.
Figure 1-2 Copy Up Charges Drawer from Locations Destination
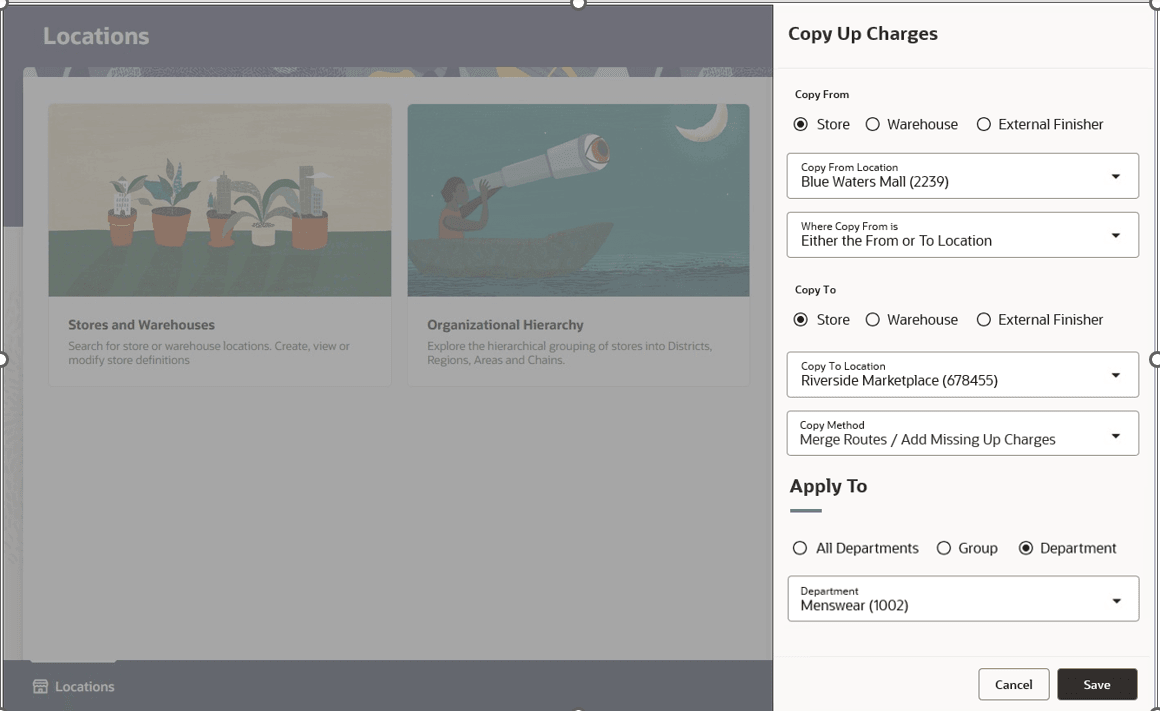
To copy up charges from one location to another, select the Copy Up Charges card on the Locations Destination landing page. Alternatively, from the Home Experience, select Copy Up Charges from the Product Map or Suggestions list.
-
Enter the Copy From, Copy To, and Apply To information. Refer to the following tables for field-level details.
-
Under Copy From, select the source location and indicate whether that source location must be the Department Up Charges From Location, To Location, or either location on the shipping route.
-
Under Copy To, select the target location along with the copy method to determine how existing shipping routes and up charges are handled.
-
Under Apply To, select the departments for which the copy should occur.
-
Click Save to copy the up charge details to the target location, or click Cancel to exit without creating a copy request.
Table 1-1 Copy Up Charges - Fields and Description
| Field | Behavior |
|---|---|
| Copy From Location Type | Select Store, Warehouse, or External Finisher. If Warehouse is selected, select the related virtual warehouse type: Warehouse, Internal Finisher, Importer, or Exporter. |
| Copy From Location | Select the source location. |
| Where Copy From is | Choose whether the source location matches the shipping route's From Location, To Location, or either. |
| Copy To Location Type | Select Store, Warehouse, or External Finisher. If Warehouse is selected, select the related virtual warehouse type: Warehouse, Internal Finisher, Importer, or Exporter. |
| Copy To Location | Select the to location. |
| Copy Method | Displayed only when existing department up charge records are found for the target location. If no records exist, the Full Replace copy method is used. Refer to the Copy Method list below for detailed descriptions of the copy methods. |
| Apply To | Indicate the department scope for the copy request. Valid choices are All Departments, all departments in a selected group, or a single department. |
Copy Methods
Table 1-2 Copy Methods
| Method | Behavior |
|---|---|
| Full Replace | Deletes the target location's department up charge shipping routes and associated up charges, then copies all applicable routes and up charges from the source location. |
| Copy Missing Shipping Routes | Keeps existing routes and up charges on the target location, and copies only source shipping routes that are missing on the target location, with their associated up charges. |
| Merge Shipping Routes / Replace Up Charges | Keeps existing routes. For a matching route, replaces target up charges with source up charges; also copies missing source routes and their associated up charges. |
| Merge Shipping Routes / Add Missing Up Charges | Keeps existing routes. For a matching route, copies only up charges missing on the target location; existing target up charges remain unchanged. Also copies missing source routes and their associated up charges. |
Supporting Data
The Locations Destination provides download and upload of location-related supporting data from its landing page. Available templates and actions are determined by security: users with maintenance privileges can download and upload, while view-only users can download only.
Note:
The templates and actions available can differ by role, assigned privileges, and implementation setup.
The following is a list of the foundation data spreadsheet templates that may be available:
-
Company – Company is the highest level of the organizational and merchandise hierarchies defined in Merchandising. Only one company can be defined, and this company is initially set up during the installation process. Since the company is required, and only one company is allowed, the Organizational Hierarchy page and the upload/download process only allow the company to be updated; you cannot add or delete a company.
-
Company Closings – Company closings define dates on which business operations are suspended across the organization. On a closed date, activities such as receiving, shipping, and sales are considered unavailable by default for all locations. Individual locations can be configured as exceptions if they remain operational on those dates such as stores that remain open for sales during the Christmas holiday.
-
Location Closings – Location closings are used to specify dates on which business operations are suspended at individual stores or warehouses. For example, a warehouse closed for scheduled maintenance. On a closed date, you can specify if the location is closed for shipping, receiving and/or sales, while all other locations continue to operate normally.
-
Banners and Channels – Channels in retail are basically different touch points from where the sales happen to customers. Examples include brick and mortar, kiosk, and web store. Banners are groupings of channels that can be used to distinguish one line of business from another.
-
Countries – Country in retail is used across applications like Merchandising to manage addresses, supplier origins, import processes, and item trade transactions.
-
States (Provinces / Regions) –States are geographical foundation data entities defined for valid countries. They provide standardized regional definitions used primarily for address configuration across organizational components..
-
Store Formats – Store formats are another optional way of classifying and grouping stores based on common characteristics.
-
Store Grades – Store grades are used for store clustering. Each store grade can be associated with a buyer and used to support distributing items on purchase orders, reporting, or mass maintenance.
-
Location Traits – Location traits are user defined classification characteristics that can be associated with a store.
-
Transfer Zones – Transfer zones are used to group stores to restrict transfers of merchandise only within a zone to optimize transportation costs.
-
Transfer Entities –A transfer entity are used to group company locations that share a single legal entity and accounting set. Transfer entities control stock movement and financial accounting Intra-company transfers happen within the same transfer entity, while inter-company transfers move inventory across different legal entities.
-
Organizational Units – Organizational Units (Org Units) are structural equivalents to Operating Units in Oracle Financials. They link retail operations—such as stores, warehouses, suppliers, and partners—to specific financial sets of books and general ledger structures.
-
Outside Locations – Used in international trade processing, which requires the definition of locations that are outside retailer's business but required for business process, such as lading and discharge ports, clearing zones, and bill-to locations.
-
Primary Ports – Provides a way to specify the primary port pairing used when ordering products between country of sourcing/import country combinations. These port pairings can be defined at a company level for each country of sourcing/import country combination used for purchasing, along with exceptions for individual supplier sites which may use different port pairings. Primary ports are referenced during the defaulting of expenses from items to purchase orders to ensure the expenses that default provide the most accurate estimated possible. For more information on primary port definitions and use, see the Import Management Reference Paper available on My Oracle Support.
Download Data
Use download when a spreadsheet copy of location-related data is needed. For most entities, selecting the download button immediately downloads the complete dataset. Entities with high data volume support or require filter criteria that limit the data queried into the spreadsheet.
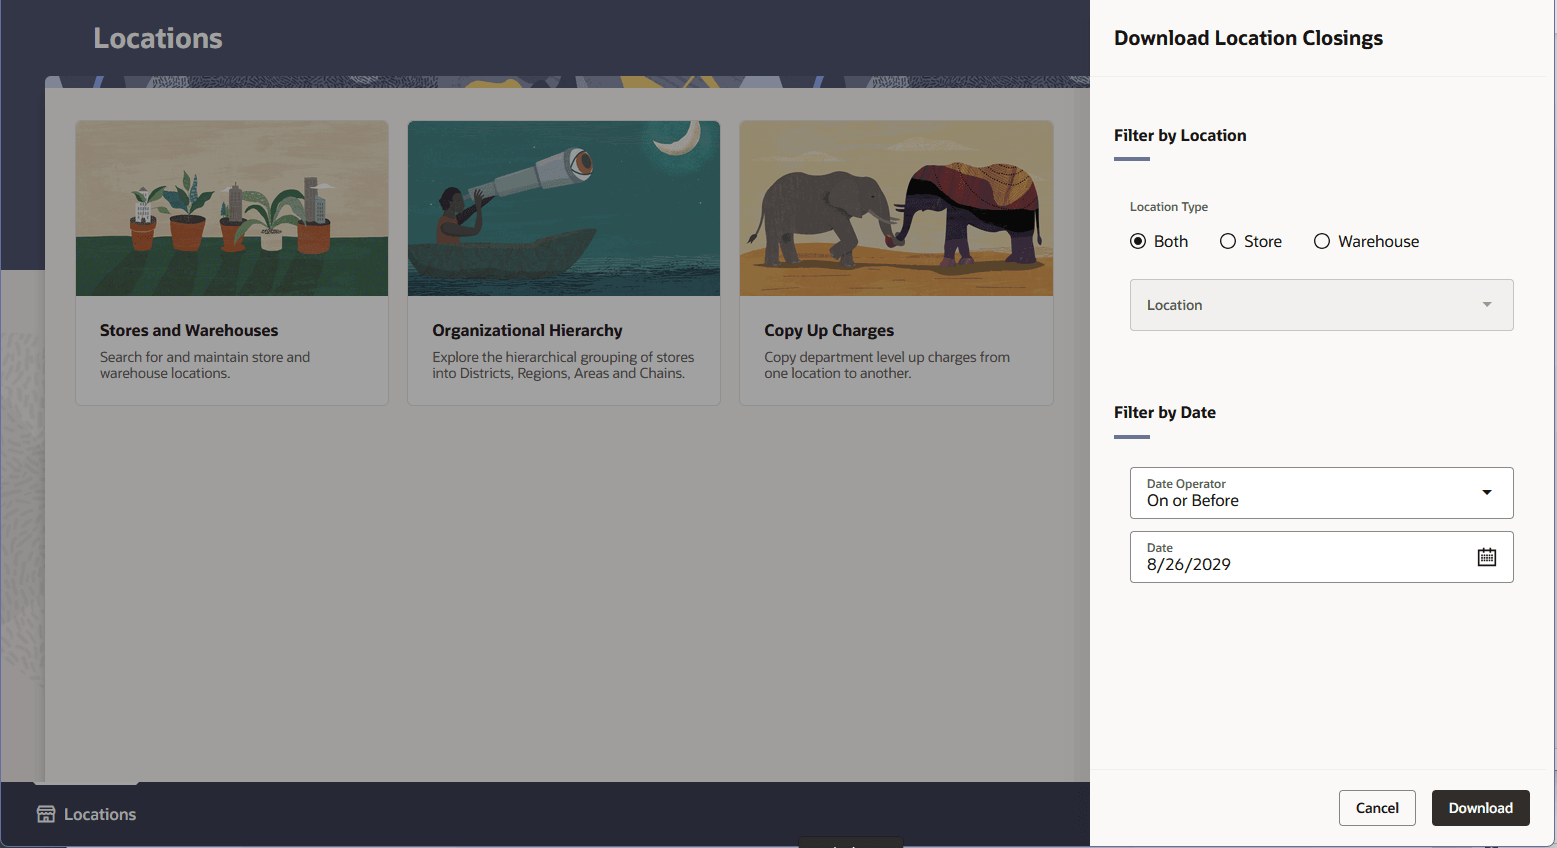
Location Closings has optional filters. Selecting its download button opens a drawer with filter options. If no filter criteria are supplied, all records are downloaded.
-
Locate the entity to download on the Locations Destination landing page and click its download action.
-
For Location Closings, optionally filter by location and/or closed date.
-
Click Download to download the data, or Cancel to return to the landing page.
-
Save or open the downloaded spreadsheet according to browser settings, then review the data as needed.
Figure 1-3 Download Location Closings
Upload Data
After making additions or updates in a downloaded spreadsheet, upload it in Merchandising to apply the changes. More than one upload can be submitted; toast messages stack vertically with the most recent message at the bottom. Error banners remain on the landing page until closed.
-
On the Locations Destination landing page, click the upload action for the entity to update.
-
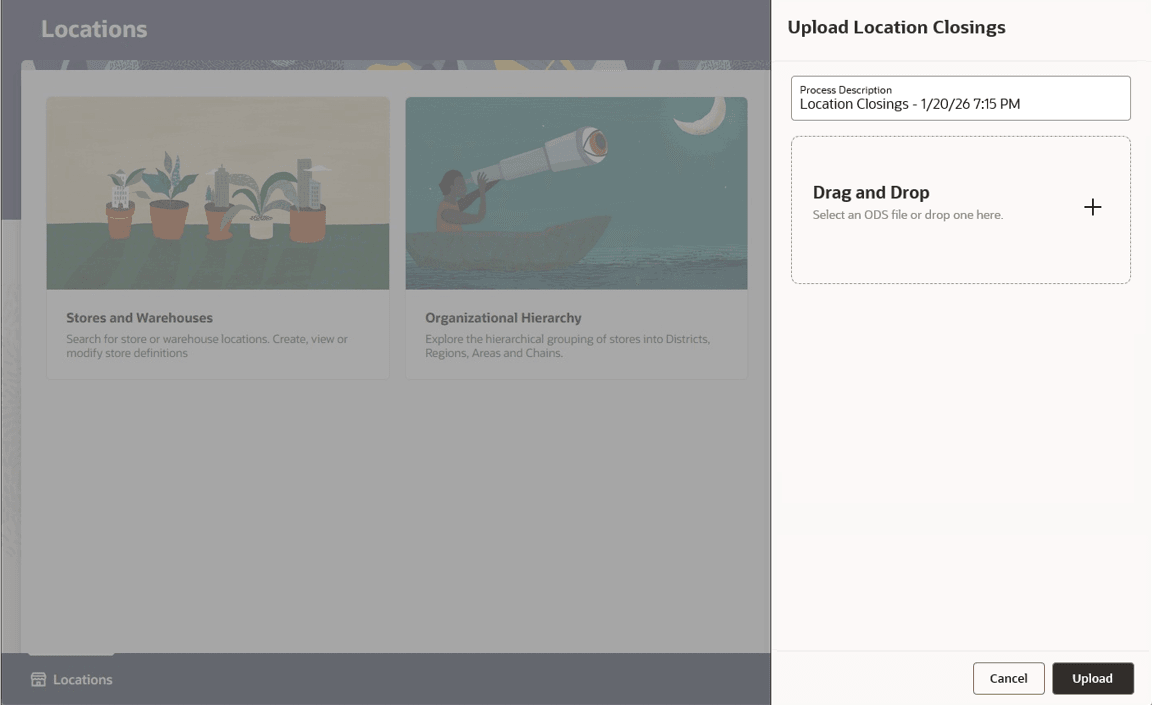
Review the generated process name and description. The process name includes a date and time stamp and can be changed.
-
Drag an
.odsfile into the attachment area, or select the plus icon to browse for one. Only one file can be attached; after attachment, the area is disabled until the file is removed. -
To replace a file, select the delete icon next to its name and choose the correct file. Unsupported files display: Try again using an .ods file type.
-
Click Upload to process the file in the background, or click Cancel to clear the inputs.
Figure 1-4 Upload Template
Note:
Upload only .ods files originally downloaded from Locations Destination. Removing worksheet tabs or columns causes upload errors; templates downloaded from the classic interface cannot be uploaded through Locations Destination.
Table 1-3 Upload Status Messages
| Toast Message | Message Description | Follow-up Action |
|---|---|---|
| Upload in progress | A message displays: Uploading <Entity Name>. | Wait for completion, or click Cancel in the toast to abort. |
| Upload canceled | A message displays: Upload canceled. | No further action is required. Start the upload again if needed. |
| Upload successful | An acknowledgement displays: Upload successful. | The message dismisses automatically. |
| Upload completed with errors | A banner indicates that the <Entity Name> upload completed with errors and includes a Learn More link. | Click Learn More to open Data Loading Status, review errors, and close the banner when finished. |
Maintain Supporting Data
Company
Company is the highest level of the organization and merchandise hierarchies defined in Merchandising. Only one company can be defined in the Merchandising and is initially setup in the installation process. Since the company is required, and only one company is allowed, the upload/download process only allows the company to be updated; you cannot add or delete a company. However, the company information can be referenced in multiple languages, so you can add, update, or remove translations of the company information through the upload/ download process.
To update the company, click download icon button for Company in the Supporting Data side panel in the Locations Destination landing page. Also see Download Data.
Updating a Company
To update a company, select the action type of Update on the populated row on the Company tab. Next, update the column you wish to change. Note that the Company column cannot be changed, but any of the other columns can be updated. Any of the entries on the company translations tab can also be updated in a similar manner. This facilitates the ability to translate the company information into multiple languages.
Adding a Company Translation
Although only a single company is allowed, the system does support translation of the company information in multiple languages. If you would like to add a company translation, then a similar process will be followed to that described above for updating the company. First, download the spreadsheet, then select the Create action from the dropdown on a blank row of the Company Translations tab. Next, select the language you wish to add from the dropdown in the language column. Enter the Company ID matching the Company ID from the Company tab, and then enter the translated company information in the remaining columns.
Removing a Company Translation
A company translation can be removed from the Merchandising system. If you would like to remove a company translation, then a similar process will be followed to that describe above for updating the company. First, download the spreadsheet, then select the Delete action on the row you which to delete on the Company Translations tab.
Uploading Changes
For all actions defined above, once all the updates have been made to the data in the spreadsheet, save the file and close it. For details on uploading changes, see the Upload Data section.
To review the status of the upload and check whether any errors occurred, see View Data Loading Status.
Company Closings
Company Closings allow you to define dates on which the entire company is closed, and to specify exceptions for individual locations that remain operational for one or more business activities, such as sales, shipping, and receiving.
Company closing dates are used to determine whether sales, shipping, and receiving activities are expected on a given date. For example, if a company closing is defined for December 25, and no location exceptions are configured, no sales transactions, shipments, or receipts are expected on that date.
Company closing dates are used by various applications to support operational planning. For example, Sales Audit uses company and location closing details related sales to determine whether to create a store/day record, while the replenishment function in Merchandising uses company and location closing details related to shipping and receiving when calculating delivery dates for replenishment orders.
Company-wide closings and any location-specific exceptions can be maintained using the spreadsheet upload/download process.
To download company closings, click download icon button for Company Closings in the Supporting Data side panel in the Locations Destination landing page. Also see Download Data.
Once opened, there will be 3 worksheets that can be modified - Company Closings, Company Closings Translations, and Company Closing Exceptions. The Company Closings will show all the existing closing dates in the system currently with their primary language descriptions. This tab allows for the update or deletion of existing closing dates or the addition of new closing dates. The Closing Dates Translations tab will show existing closing dates with their translated descriptions in other languages, as applicable, for your implementation. This tab allows for the addition of new rows, removal of existing rows, and update to existing. The Closing Dates Exceptions tab allows for the definition of exceptions for stores and warehouses. This tab also supports addition, update, and delete. Exceptions can be defined for all activities, or they can be marked as an open exception for one or more of sales, shipping, and receiving. For example, on a date when the company is closed, a particular store may be open for sales but closed for shipping and receiving.
Add a Company Closing
To add a new close date, start in the Company Closings tab and in a blank line in the template, select the action type of Create and enter the date for the new close date you wish to add, using the date format based on your language/locale setting under User Preferences accessed from the Locations Destination, and provide a description for the close date (e.g. Christmas Day). The description should be entered in the primary language as configured in the Merchandising system options and can be up to 120 characters.
To define alternate translated descriptions for this date, navigate to the Company Closings Translations tab. Select a language and enter the same date used on the Company Closings tab in the Close Date column of this tab and then enter the business description in the Close Description column. It is not required that translated descriptions be defined.
If exceptions to the company close date need to be defined navigate to the Company Closings Exceptions tab. To define an exception, in a new line in the spreadsheet select Create and then enter the Close Date from the Company Closings tab that you are defining an exception for. Next, select a location type (Store or Warehouse), and enter the store or warehouse ID in the Location column. Then, indicate which activities the store or warehouse will be open for by selecting Yes in the Sales, Receiving, and Shipping columns. If the location will remain closed for an activity select No for the appropriate column(s). In order to be a valid exception at least one of these activities must be marked as No.
Updating a Company Closing
If you would like to update any details a similar process will be followed as that described above for creating new company closing dates. First, download the Company Closings spreadsheet, and then navigate to the tab where you would like to make your updates. The following columns can be updated in each tab:
Company Closings - Close Description
Company Closing Translations - Close Description
Company Closing Exceptions – Open for Sales, Open for Receiving, Open for Shipping
In the tab where you are going to make your updates, select the action type of Update, and then correct the value in the spreadsheet. Once your updates are complete, save and close the spreadsheet.
Removing a Company Closing
If you wish to remove a company closing, select the Delete action on the row of the company closing you wish to delete on the Company Closings tab. Company closing translations and company closing exceptions can be removed in a similar manner from the Company Closing Translations and Company Closing Exceptions tabs, respectively.
Uploading Changes
For all actions defined above, once all the updates have been made to the data in the spreadsheet, save the file and close it. For details on uploading changes, see the Upload Data section.
To review the status of the upload and check whether any errors occurred, see View Data Loading Status.
Location Closings
Location Closings allow you to define dates on which specific stores or warehouses are unavailable for one or more business activities, such as sales, shipping, and receiving. For example, if a store is marked as closed for sales on December 25, sales transactions are not expected to occur on that date.
Location closing dates are used by various applications to support operational planning. For example, Sales Audit uses sales closing dates to determine whether to create a store/day record for a specific store and date. Similarly, the replenishment function in Merchandising uses shipping and receiving closing dates when calculating delivery dates for replenishment orders.
To download location closings, click download icon button for Location Closings in the Supporting Data side panel in the Locations Destination landing page. Also see Download Data.
Add a Location Closing
To add a new close date, start in the Location Closings tab and in a blank line in the template, select the action type of Create and enter the date using the date format based on your language/locale setting under User Preferences accessed from the Locations Destination, for the new close date you wish to add, select a location type of Store or Warehouse, enter a location ID, and provide a reason for the close date (e.g. Christmas Day). The reason should be entered in the primary language as configured in the Merchandising system options and can be up to 250 characters. Additionally, select Yes or No in the Closed for Sales, Closed for Shipping, and Closed for Receiving columns to indicate if the location is closed for that business activity. A value of Yes indicates it is closed.
To define alternate translated reasons for this date, navigate to the Location Closings Translations tab. Select a language and enter the same location and date used on the Location Closings tab in the Location and Close Date columns respectively of this tab and then enter the reason in the Reason column. It is not required that translated reasons be defined.
Updating a Location Closing
If you would like to update any details a similar process will be followed as that described above for creating new location closing dates. First, download the Location Closings spreadsheet, and then navigate to the tab where you would like to make your updates. The following columns can be updated in each tab:
Location Closings - Reason, Sales, Shipping, Receiving
Company Closing Translations - Reason
In the tab where you are going to make your updates, select the action type of Update, and then correct the value in the spreadsheet. Once your updates are complete, save and close the spreadsheet.
Removing a Location Closing
If you wish to delete a location close date because it is no longer applicable, update the action column to select Delete in each of the tabs where it occurs. This applies to all tabs and, if deleting a location close date, all of the corresponding translation rows must also be marked for delete.
Uploading Changes
For all actions defined above, once all the updates have been made to the data in the spreadsheet, save the file and close it. For details on uploading changes, see the Upload Data section.
To review the status of the upload and check whether any errors occurred, see View Data Loading Status.
Banners and Channels
Channels are a method of grouping like locations based on business they serve. Examples include Brick and Mortar, Kiosk, and Web Store. Channels can be added to a store or virtual warehouse as an attribute. Banners are groupings of channels that can be used to distinguish one line of business from another. Banners and Channels are maintained through the upload/ download process.
To add, update, or remove banners or channels, first download banners and channels by clicking the download icon button for Banners and Channels in the Supporting Data side panel in the Locations Destination landing page. Also see Download Data.
Add a Banner or Channel
To add a banner, select the action type of Create on an empty row of the Banners tab. Next, enter a unique number up to 4 digits in length for the Banner ID, and the description of the banner in the primary language (as defined in the Merchandising system options) of up to 120 characters. To add a channel, select the action type of Create on an empty row of the Channels tab. Next, enter a unique number up to 4 digits in length for the channel ID, along with the banner ID, channel type and a description for the channel in the primary language (as defined in the Merchandising system options) of up to 120 characters. The channel type can be selected from a dropdown which is maintained under code 'CHTY' in the Codes table. To modify the valid channel types, you can update the descriptions or add new values by accessing the Codes and Descriptions template. Adding a banner translation or channel translation can be done in a similar manner on the Banner Translations tab or Channel Translations tab, respectively. This facilitates the ability to translate the banner description or channel description in multiple languages.
Updating a Banner or Channel
If you would like to update any details for banners and channels, a similar process will be followed as that described above for creating new. First, download the spreadsheet, and then navigate to the tab where you would like to make your updates.
The following columns can be updated in each tab:
Banner – Description
Banner Translations – Description
Channel – Banner, Channel Type, Description
Channel Translations – Description
In the tab where you are going to make your updates, select the action type of Update, and then correct the value in the spreadsheet.
Removing a Banner or Channel
If you wish to remove a banner, select the Delete action on the row of the banner you which to delete on the Banners tab. Removing a banner translation, a channel, or a channel translation can be done in a similar manner on their respective tabs. Deleting a channel is not allowed if it is still associated with a store or virtual warehouse. In addition, all channels associated with a banner must be deleted before the banner can be deleted.
Uploading Changes
For all actions defined above, once all the updates have been made to the data in the spreadsheet, save the file and close it. For details on uploading changes, see the Upload Data section.
To review the status of the upload and check whether any errors occurred, see View Data Loading Status.
Countries
Countries are used throughout the application including the importing process, countries of origin and manufacture for your suppliers, and addresses. A default list of countries are loaded into Merchandising on initial installation, however modifications can be done to the list to add new values, remove values that are not used, and update descriptions. Countries are maintained through the upload/download process.
To add, update, or remove a country, download countries by clicking the download icon button for Countries in the Supporting Data side panel in the Locations Destination landing page. Also see Download Data.
Add a Country
To add a new country, select the action type of Create on an empty row on the Countries tab. Next enter up to a 3 digit code for the country, along with the country description in the primary language of up to 120 characters. The other columns in this table will generally be the same for all countries, outside of Brazil. It is recommended they be set as follows if adding a country other than Brazil:
Adding a country translation can be done in a similar manner from the Country Translations tab. This facilitates the ability to translate the country description in multiple languages.
Localized Ind = No
The following will be automatically set as follows, as they are only used when implementing in Brazil (specialized tax type)003A
Item Cost Tax Include = No
Default Purchase Cost = Base Cost
Default Deal Cost = Base Cost
Default Cost Comp Cost = Base Cost
Default Location and Default Location Type can be left blank
Adding a country translation can be done in a similar manner from the Country Translations tab. This facilitates the ability to translate the country description in multiple languages.
Updating a Country
If you would like to update any details for countries, a similar process will be followed as that described above for creating new. First, download the spreadsheet, and then navigate to the tab where you would like to make your updates.
The following columns can be updated in each tab:
Countries - Country Description, Localized Ind, Default Location, Default Location Type
Country Translations - Description
The columns Item Cost Tax Include, Default Purchase Cost, Default Deal Cost, and Default Cost Comp Cost on the Countries tab are not used.
In the tab where you are going to make your updates, select the action type of Update, and then correct the value in the spreadsheet.
Removing a Country
If you wish to remove a country, select the Delete action on the row of the country you which to delete on the Countries tab. Removing a country translation can be done in a similar manner on the Country Translations tab. Note that removing a country is not allowed if it is still in use.
Uploading Changes
For all actions defined above, once all the updates have been made to the data in the spreadsheet, save the file and close it. For details on uploading changes, see the Upload Data section.
To review the status of the upload and check whether any errors occurred, see View Data Loading Status.
.
States (Provinces / Regions)
States are defined in Merchandising for all the valid countries present in the system. By country you can specify the name of the entity that is held in the state column, such as province, region or territory. States are primarily used in Merchandising while defining addresses for various entities such as supplier sites or stores. A default list of states are loaded into Merchandising on initial installation, however modifications can be done to the list to add new values, remove values that are not used, and update descriptions.
To maintain states, the spreadsheet download and upload process is used. First, download countries by clicking the download icon button for Countries in the Supporting Data side panel in the Locations Destination landing page. Also see Download Data..
When prompted by your browser, choose to either open the .ods file that is generated or save the file and open it separately in the spreadsheet application of your choice.
Once opened, there will be 2 sheets that can be modified - States and States TL. The States tab will show all the state IDs along with its description and the ID for the country it's associated with. This tab supports addition, update and delete of States. Next, States TL tab will show the states with their translated name in other languages, as applicable for your implementation. This tab allows for the addition of new rows, removal of existing rows, and update to existing.
Add a State
To add a new State, select the States tab and in a blank line in the template, select the action type of Create and enter the state ID. The ID can be up to 3 characters. Next add the Country ID. This must be a valid country already defined in the system. Lastly, add the description of the state in the primary language (as defined in the Merchandising system options). The description can be up to 120 characters.
If you wish to add state descriptions in any other languages, then select the State TL tab and in a blank row select an action type of Create. Then, enter the translated description, the same state and country codes added in the States tab, and select the language the description is written in. The translated description can also be up to 120 characters long. This is an optional step.
Updating a State
If you would like to update any details a similar process will be followed as that described above for creating new State. First, download the States spreadsheet, and then navigate to the tab where you would like to make your updates.
The following columns can be updated in each tab:
States - Description
States TL - Description
In the tab where you are going to make your updates, select the action type of Update, and then correct the value in the spreadsheet. Once your updates are complete, save and close the spreadsheet.
Removing a State
If you wish to delete a State, update the action column to select Delete in each of the tabs where it occurs. Note that a state cannot be deleted if it is currently associated with any entity in Merchandising, so an error will be raised if this occurs when the changes are uploaded.
Uploading Changes
For all actions defined above, once all the updates have been made to the data in the spreadsheet, save the file and close it. For details on uploading changes, see the Upload Data section.
To review the status of the upload and check whether any errors occurred, see View Data Loading Status.
Store Formats
Store Formats are optional attributes of a store. Examples could include Convenience Store or Hypermarket. Store format are used in Merchandising as part of the criteria when building location lists or for reporting. Store Formats are maintained through the upload/download process. First, download store formats by clicking the download icon button for Store Formats in the Supporting Data side panel in the Locations Destination landing page. Also see Download Data.
Add a Store Format
To add a new store format, select the action type of Create on an empty row of the Store Formats tab. Next enter a unique number up to 4 digits in length for the store format along with the description in the appropriate columns. The description should be entered in the primary language (as defined in the Merchandising system options) of up to 60 characters. Adding a store format translation can be done in a similar manner on the Store Format Translations tab. This facilitates the ability to translate the store format description in multiple languages.
Updating a Store Format
If you would like to update any details for store formats, a similar process will be followed as that described above for creating new. First, download the spreadsheet, and then navigate to the tab where you would like to make your updates.
The following columns can be updated in each tab:
Store Formats – Description
Store Format Translations – Description
In the tab where you are going to make your updates, select the action type of Update, and then correct the value in the spreadsheet.
Removing a Store Format
If you wish to remove a store format, select the Delete action on the row of the store format you which to delete on the Store Formats tab. Removing a store format translation can be done in a similar manner from the Store Format Translations tab. Note that the removing a store format is not allowed if the format is still in use for a store.
Uploading Changes
For all actions defined above, once all the updates have been made to the data in the spreadsheet, save the file and close it. For details on uploading changes, see the Upload Data section.
To review the status of the upload and check whether any errors occurred, see View Data Loading Status.
Store Grades
Store Grades are a way of grouping stores together, usually as a result of store clustering. Store grade groups are associated with a buyer, as it usually represents a clustering of locations for a particular group of departments or classes in the merchandise hierarchy. Store Grades are used to support distributing items on a purchase order, for building location lists, and for reporting. Store Grades are maintained through the upload/download process. First, download store grades by clicking the download icon button for Store Grades in the Supporting Data side panel in the Locations Destination landing page. Also see Download Data.
Add a Store Grade
To add a store grade group, select the action type of Create on the Store Grade Group tab on an empty row. Next, enter a unique number with up to 8 digits. Then enter a description in the primary language (as defined in the Merchandising system options) and an existing buyer.
Note:
Valid buyers are also managed via spreadsheet download/upload in the Classic View under the Template Type of Foundation and the Template Buyers and Merchandisers (see Download/ Upload Data from Spreadsheets).
To add a store grade, select the action type of Create on an empty row of the Store Grades tab. Next, enter a newly created or a previously existing store grade group, a store grade description in the primary language of up to 120 characters, and, optionally, a comment up to 2,000 characters. This facilitates the ability to translate the store grade group descriptions in multiple languages. Finally, stores should be added for a store grade group/store grade combination using the Create action on an empty row on the Store Grade Stores tab.
Updating a Store Grade
If you would like to update any details for store grade groups or store grades, a similar process will be followed as that described above for creating new. First, download the spreadsheet, and then navigate to the tab where you would like to make your updates.
The following columns can be updated in each tab:
Store Grade Groups – Description, Buyer
Store Grade Group Translations – Description
Store Grades – Comments
Store Grade Stores – Store Grade
In the tab where you are going to make your updates, select the action type of Update, and then correct the value in the spreadsheet.
Removing a Store Grade
If you wish to remove a store grade, select the Delete action on the row of the store grade you wish to delete on the Store Grades tab. Removing an entry from the Store Grade Groups tab, the Store Grade Group Translations tab, or the Store Grade Stores tab can be done in a similar manner. Note that removing an entry that is still in use is not allowed.
Uploading Changes
For all actions defined above, once all the updates have been made to the data in the spreadsheet, save the file and close it. For details on uploading changes, see the Upload Data section.
To review the status of the upload and check whether any errors occurred, see View Data Loading Status.
Location Traits
Location traits are user defined text tags that can be associated with stores. The association of a location trait to a store is done in the Store screen. They can be used to identify common characteristics in locations, which can then be used to support various business functions such as reporting, item ranging and location list creation. Location traits are also used in Sales Audit for assigning auditors to stores. Location traits are maintained through the upload/download process. First, download location traits by clicking the download icon button for Location Traits in the Supporting Data side panel in the Locations Destination landing page. Also see Download Data.
Add a Location Trait
To add a new location trait, in the downloaded spreadsheet, select the action type of Create on an empty row of the Location Traits tab. Next enter a unique number up to 4 digits in length for the location trait, the filter organization id, and a description for the trait in the primary language (as defined in the Merchandising system options) of up to 120 characters. The filter organization ID is optional, but if used will limit the location trait from being accessed to only those that are associated with the selected organizational ID when data filtering is turned on. The organizational ID that should be entered here will be a chain, area, region, or district, depending on the system option setting of the LOV Filtering Organizational Hierarchy attribute for Location Traits. Adding a location trait translation can be done in a similar manner on the Location Trait Translations tab. This facilitates the ability to translate the location trait description in multiple languages.
Updating a Location Trait
If you would like to update any details for location traits, a similar process will be followed as that described above for creating new. First, download the spreadsheet, and then navigate to the tab where you would like to make your updates.
The following columns can be updated in each tab:
Location Traits – Description, Filter Organization ID
Location Trait Translations – Trait Description
In the tab where you are going to make your updates, select the action type of Update, and then correct the value in the spreadsheet.
To update a location trait, select the action type of Update on the row you wish to change on the Location Traits tab. Next, update the column you wish to change. Note that the Location Trait column cannot be changed, but any of the other columns can be updated. The entries on the Location Trait Translations tab can be updated in a similar manner.
Removing a Location Trait
If you wish to remove a location trait, select the Delete action on the row of the location trait you which to delete on the Location Traits tab. Removing a location trait translation can be done in a similar manner on the Location Trait Translations tab. Note that removing a location trait is not allowed if it is still in use.
Uploading Changes
For all actions defined above, once all the updates have been made to the data in the spreadsheet, save the file and close it. For details on uploading changes, see the Upload Data section.
To review the status of the upload and check whether any errors occurred, see View Data Loading Status.
Transfer Zones
Transfer zones are used to restrict transfers from store to store in a specified group of stores (zone), usually to help manage transportation costs. Zones are linked to stores as an attribute. Transfer Zones are maintained through the upload/download process. First, download transfer zones by clicking the download icon button for Transfer Zones in the Supporting Data side panel in the Locations Destination landing page. Also see Download Data.
Add a Transfer Zone
To add a new transfer zone, in the downloaded spreadsheet, select the action type of Create on an empty row of the Transfer Zones tab. Next enter a unique number up to 4 digits in length for the transfer zone, and the transfer zone description in the primary language of up to 120 characters. Adding a transfer zone translation can be done in a similar manner on the Transfer Zone Translations tab. This facilitates the ability to translate the transfer zone description in multiple languages.
Updating a Transfer Zone
If you would like to update any details for transfer zones, a similar process will be followed as that described above for creating new. First, download the spreadsheet, and then navigate to the tab where you would like to make your updates.
The following columns can be updated in each tab:
Transfer Zones – Description
Transfer Zone Translations – Description
In the tab where you are going to make your updates, select the action type of Update, and then correct the value in the spreadsheet.
Removing a Transfer Zone
If you wish to remove a transfer zone, in the downloaded spreadsheet, select the Delete action on the row of the transfer zone you which to delete on the Transfer Zones tab. Removing a transfer zone translation can be done in a similar manner on the Transfer Zone Translations tab. Note that removing a transfer zone is not allowed if it is still assigned to a store.
Uploading Changes
For all actions defined above, once all the updates have been made to the data in the spreadsheet, save the file and close it. For details on uploading changes, see the Upload Data section.
To review the status of the upload and check whether any errors occurred, see View Data Loading Status.
Transfer Entities
Transfer entities are part of the Merchandising structure around locations used to control when transfers are considered to be intra-company transfers as opposed to inter-company transfers, which indicate a sale/purchase movement between different entities in a business. Store and warehouse locations, along with external finishers, are associated with transfer entities. Business logic for transfers will look at the transfer entities for the sending and receiving locations of the transfer and this will help to determine whether a transfer is intra-company or inter-company. There is also a relationship in Merchandising between transfer entities, org units and sets of books, which is also maintained through this process. The list of valid transfer entities as well as the relationships with the org units and sets of books is managed through spreadsheet download and upload processes. First, download transfer entities by clicking the download icon button for Transfer Entities in the Supporting Data side panel in the Locations Destination landing page. Also see Download Data.
Once opened, there will be 3 sheets that can be modified – Transfer Entities and Transfer Entities Translations and Transfer Entity Set of Books. The main tab is the Transfer Entities tab, which is where new transfer entities can be created and existing transfer entities can be updated or deleted. Optionally, you can also add translated descriptions in the Transfer Entities Translations tab and set of the relationship of the transfer entity with org units and sets of books.
Add a Transfer Entity
To add a new transfer entity, start in the Transfer Entity tab, and, in a blank line in the template, select the action type of Create. Next enter the ID for the transfer entity (number up to 10 digits) as well as a Description and Secondary name in the primary language (as defined in the Merchandising system options). These values can be up to 120 characters.
If you wish to add Transfer Entity descriptions in any other languages, then select the Transfer Entity Translations tab and in a blank row select an action type of Create. Then, enter the language for the translated description, the transfer entity ID added in the Transfer Entity tab, and then translated description. The translated description can also be up to 120 characters long. This is an optional step.
Add a Transfer Entity Set of Books Relationship
Transfer entities, org units and sets of books in Merchandising are related. In general, the set of books is the highest level of the three, where a single transfer entity or org unit cannot be associated with more than one set of books. However, multiple org units or transfer entities can be associated with a single set of books. Transfer entities and org units are not necessarily related to each other and a 1-to-many or many-to-1 relationship can exist between these two entities.
To add a new Transfer Entity Set of Books relationship, start in the Transfer Entity Set of Books tab and, in a blank line in the template, select the action type of Create. Next, enter the IDs for the Transfer Entity, Org Unit and Set of Books.
Updating a Transfer Entity
If you would like to update any details for transfer entities, a similar process will be followed as that described above for creating new transfer entities. First, download the spreadsheet, and then navigate to the tab where you would like to make your updates.
Transfer Entity – Description, Secondary Name
Transfer Entity Translations – Description
In the tab where you are going to make your updates, select the action type of Update, and then correct the value in the spreadsheet.
Removing a Transfer Entity
If you wish to remove a transfer entity because it is not used by your business any longer, update the action column to select Delete in each of the tabs where it occurs. This includes the Transfer Entity and Transfer Entity Translations tabs, as well as the Transfer Entity Set of Books. Additionally, as noted above, the system generated codes cannot be deleted.
Note:
A Transfer Entity cannot be deleted if it is currently associated with a location, so an error will be raised if this occurs when the changes are uploaded.
Uploading Changes
For all actions defined above, once all the updates have been made to the data in the spreadsheet, save the file and close it. For details on uploading changes, see the Upload Data section.
To review the status of the upload and check whether any errors occurred, see View Data Loading Status.
Organizational Units
Within Merchandising, org units are an equivalent concept to Operating Units in Oracle Financials, which exists within a set of books in the General Ledger. Org units are associated with suppliers, partners, stores, and warehouses within Merchandising. The financial operating unit is generally a geographic area of a business and it allows the business to control which supplier addresses a particular operating unit and its locations can do business. Org units can be added, updated or deleted through spreadsheet download and upload processes.
First, download organizational units by clicking the download icon button for Organizational Units in the Supporting Data side panel in the Locations Destination landing page. Also see Download Data.. Once opened, there will be two sheets that can be modified – Org Units and Org Units TL
Add an Org Unit
To add a new org unit, start in the Org Units tab, and, in a blank line in the template, select the action type of Create. Next enter a unique org unit ID (up to 15 numbers, no spaces), enter the General Ledger set of books ID for the new org unit to reside under, along with a description for the org unit in the primary language (as defined in the Merchandising system options) of up to 120 characters.
If you wish to add translations for the org unit in languages other than the primary language, this can be done in the Org Units TL tab. Navigate to a blank row and select the action type of Create and the language in which the translated description will be entered. Then, enter the org unit for which the translation applies. Finally, enter the translated description. The translated description can also be up to 120 characters long. This is an optional step
Updating an Org Unit
If you would like to update any details for existing org units, a similar process will be followed as that described above for creating new org units. First, download the spreadsheet, and then navigate to the tab where you would like to make your updates.
The following columns can be updated in each tab:
Org Units – Description
Org Units TL - Description
In the tab where you are going to make your updates, select the action type of Update, and then correct the value in the spreadsheet.
Removing an Org Unit
If an existing org unit is not referenced by a supplier, partner, store, or warehouse it can be deleted by selecting the Delete action type for the row containing the org unit you wish to delete.
Uploading Changes
For all actions defined above, once all the updates have been made to the data in the spreadsheet, save the file and close it. For details on uploading changes, see the Upload Data section.
To review the status of the upload and check whether any errors occurred, see View Data Loading Status.
Outside Locations
Outside locations are locations used in the import process to define external locations, such as lading and discharge ports, clearing zones, and bill-to locations. Outside Locations are maintained through the upload/download process. First, download outside locations by clicking the download icon button for Outside Locations in the Supporting Data side panel in the Locations Destination landing page. Also see Download Data.
Add an Outside Location
To add a new outside location, select the action type of Create on an empty row of the Outside Locations tab. Next enter a unique 5 character field for the location field. The description for the outside location must be entered in the primary language (as defined in the Merchandising system options) of up to 150 characters. The secondary name is not required, but is intended to be used to store the Roman lettering for Japanese descriptions of up to 150 characters. The location type is required, and can be selected from a dropdown, which is maintained using the 'LOCT' Code type in the Codes table. To modify the valid outside location types, you can update the descriptions or add new values by accessing the Codes and Descriptions template (see Download/Upload Data from Spreadsheets). The country and VAT region are required for all location types. Currency is required for location types: Bill to Location, Discharge Port, and Routing Location. The rest of the address fields are optional including: Address 1, Address 2, City, State, Postal Code, Contact Name, Contact Phone, Contact Fax, Contact Telex, Contact E-mail, and Jurisdiction.
The Primary column is only used when the outside location type is Clearing Zone, otherwise it should be set to No. When location type is Clearing Zone, one row per country should have primary set to Yes. If only one Clearing Zone is added for a country, the Primary column will automatically be set to Yes. Subsequently, if a new clearing zone is added or updated for the country with the Primary column set to Yes, the existing primary clearing zone for the country should be updated to change Primary to No.
Adding an outside location translation can be done in a similar manner on the Outside Location Translations tab. This facilitates the ability to translate the outside location address information in multiple languages.
Updating an Outside Location
If you would like to update any details for outside locations, a similar process will be followed as that described above for creating new. First, download the spreadsheet, and then navigate to the tab where you would like to make your updates.
The following columns can be updated in each tab:
Outside Locations – Outloc Description, Currency, Address 1, Address 2, City, State, Country, Postal Code, VAT Region, all contact columns, secondary name, jurisdiction, primary flag
Note:
If the primary flag is changed from Yes to No on a Clearing Zone location type, ensure that another Clearing Zone for the same country is selected as primary or an error may occur. Similarly, if changing from No to Yes, then make sure to also update the currently flagged location for the country to not be the primary.
Outside Location Translations – Outloc Description, Address 1, Address 2, City, Contact Name, Secondary Name
In the tab where you are going to make your updates, select the action type of Update, and then correct the value in the spreadsheet.
Removing an Outside Location
If you wish to remove an outside location, select the Delete action on the row of the outside location you which to delete on the Outside Locations tab. Removing an outside location translation can be done in a similar manner on the Outside Location Translations tab. Note that the removing an Outside Location is not allowed if it is still in use.
Uploading Changes
For all actions defined above, once all the updates have been made to the data in the spreadsheet, save the file and close it. For details on uploading changes, see the Upload Data section.
To review the status of the upload and check whether any errors occurred, see View Data Loading Status.
Primary Ports
Primary lading port/discharge port combinations is used when moving goods ordered from a country of sourcing to a country of import. Primary ports can be defined at two levels, Company or Supplier Site. A single Company level port paring can be for a given country combination, with exceptions managed at a supplier site level. Expense defaulting logic will first look for a record for the order’s supplier site, and if not found, the system will use the company level pairing. There can be only one company level primary lading port/primary discharge port defined for each country of sourcing/import country combination and there can only be one primary lading port/primary discharge port defined for each supplier site/country of sourcing/import country combination. In order to utilize these ports for defaulting expenses on domestic orders, the country of sourcing and country of import can be the same country.
Add Primary Ports
To add a new primary port, first download primary ports by clicking the download icon button for Primary Ports in the Supporting Data side panel in the Locations Destination landing page. Also see Download Data. Then, select the action type of Create on an empty row of the Primary Ports tab. Next select the level i.e. Supplier Site/ Company. Next enter the 10 digit supplier site id if Supplier Site is selected as the level. Next enter Country of Sourcing,Import Country,Lading Port and Discharge Port details.
Updating Primary Ports
If you would like to update any details for primary ports, a similar process will be followed as that described above for creating new. First, download the spreadsheet, and then navigate to the row where you would like to make your updates. The updates ports will become applicable to the future purchase orders.
Removing Primary Ports
If you wish to remove a landing and discharge port set up made for a supplier site or country, select the Delete action on the row which you which to remove on the Primary Ports tab.
Uploading Changes
For all actions defined above, once all the updates have been made to the data in the spreadsheet, save the file and close it. For details on uploading changes, see the Upload Data section.
To review the status of the upload and check whether any errors occurred, see View Data Loading Status.