Execute Jobs Using the UI
Users with the required permission are able to execute jobs:
- From the side menu, choose Quality Control to open the Dashboard Screen.
- Search for the job to execute and click the link to open the Manage Job screen.
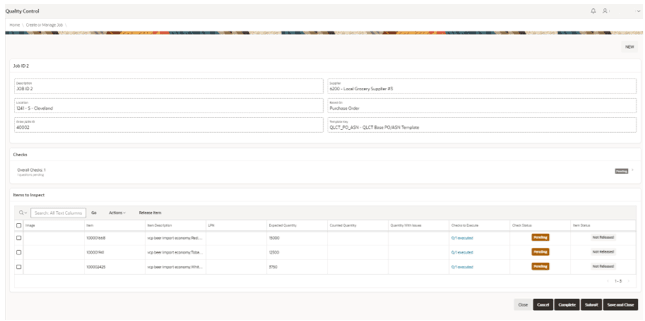
- The user can view the header fields but cannot edit during the job execution.
- Depending on the job, overall checks may be available to be executed:
- If available, the user can click the Overall Checks link to open the execution. The dialog box for overall checks is displayed.
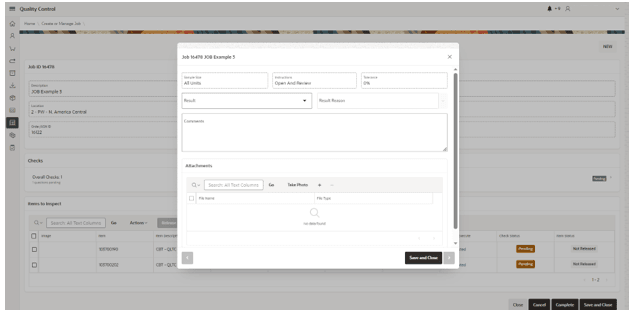
- The user is able to view the following fields:
- Inspection Sample Size (Read only)
- Instructions (Read only)
- Tolerance (Read only)
Note:
These fields will be populated automatically based on the configuration in the job template applied to the job.
- The user is able to edit the following fields:
- Result:
- OK
- Not OK
-
Result Reason
Enabled and mandatory if the result is set to NOT OK.
Note:
Result Reasons are configurable. For more details, see the Oracle Retail Supply Chain Collaboration Cloud Service Implementation Guide. - Comments
-
Quantity Counted
Is visible and mandatory if required in the template used for the check.
Note:
The template job checks are defined in the Template Management screen.
- Result:
- The user is able to view the following fields:
- Additionally, it is possible to add, remove, or download attachments.
- Take photos by clicking Take Photo.
- Attach a file by clicking the + .
- Remove attachments by clicking the – .
- Download the file by clicking the link in the File Name column.
- The user is able to navigate to the previous or next inspection by clicking
 .
.
Note:
The user can navigate between checks even if not completed.
If the user needs to change from the overall checks to the item checks, it is necessary to close the overall checks dialog box and open the item checks.
- The user can close the inspection form by clicking Save and Close.
Note:
There is a system parameter configuration that allows for a job to be completed if the overall checks are NOT OK without completing the Item Checks inspection.
- If available, the user can click the Overall Checks link to open the execution. The dialog box for overall checks is displayed.
- For item checks, the Jobs to Inspect grid displays the items to be inspected:
- Image (Not Editable)
- Item (Not Editable)
- Item Description (Not Editable)
- LPN (Editable)
- Expected Quantity (Editable)
- Total Counted Quantity (Editable if the count is required)
- Total Quantity with Issues (Editable if exists Item checks with result Not OK)
- Checks to Execute (Shows how many checks were executed and is the link to execute the check)
- Check Status
Check Status Description Pending There are the checks pending execution. Completed All the checks have been executed and without issues. Completed with issues All the checks have been executed and one or more have issues. - Item Status
Item Status Description Released The item has been released.
Released items that have been released with the action Release and the items Released through the Complete Inspection.
Not Released The item is not released yet.
Note:
Additional Custom View Only fields can be added to display additional information. To enable this feature, a Custom View needs to be modified and the additional fields enabled. See the Oracle Retail Supply Chain Collaboration Cloud Service Implementation Guide for the views available. For information on how to enable the additional fields, see the Oracle Retail Merchandising Cloud Extensions Framework Implementation Guide on My Oracle Support. - By clicking the link available in the item table in the column Checks to Execute, a dialog box is displayed. The user can execute the Item checks:
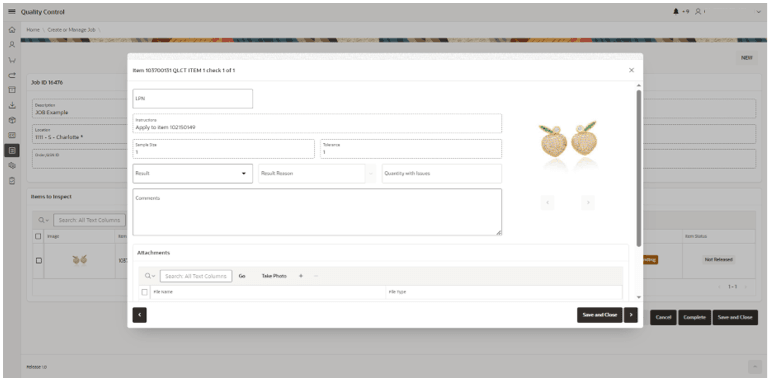
- The following fields are only available to view:
- Inspection Sample Size
- Instructions
- Tolerance
- Item Images:
- The user can navigate between the item images by clicking the previous and next.

- The user can open the image on a separate tab by clicking it.
- The user can navigate between the item images by clicking the previous and next.
- The following fields are editable:
-
LPN
Text field not mandatory.
Note:
If the item has more than one check, the user can modify the LPN at any moment during the item check execution. - Result
- OK
- Not OK
-
Result Reason
Only available and mandatory if the result is set to Not OK.
-
Defect Classification
Optional classification of the defect.
- Comments
-
Quantity Counted
Mandatory if required in the job template used in the item.
-
Quantity with issues
Visible only if the result is set to Not OK.
Note:
After the dialog box is closed and if the same item has different quantities within quantity issues or counted quantities between the different checks, the Item to Inspect table is updated with the higher value set in the item checks for each one of the quantities.
It is the user’s responsibility to validate if this value is correct or needs to be updated, as the maximum value of the checks may not be the correct total overall counted or with issues (depending on the purpose of each check).
-
- Attachments can be added, removed, or downloaded:
- Take photos by clicking Take Photo.
- Attach a file by clicking the + .
- Remove attachments by clicking the – .
- Download the file by clicking the link in the File Name column.
- To navigate between the checks, users can select previous or next.

Note:
The user can navigate between item checks without restriction.
Clicking next or previous will also change the item to be checked in a continuous flow.
- The user can close the inspection form by clicking Save and Close.
Note:
If checks are executed for more than one item, the data of all checked items is saved.
- The following fields are only available to view:
- By clicking Close in the Manage Job screen, a confirmation dialog box is displayed:
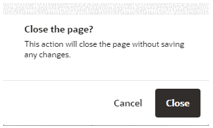
- If the user clicks Close, the job execution is closed.
Note:
If an item was released during the execution, this action is not reverted even if the user confirms to exit without saving. - If the user clicks Cancel, the dialog box closes and the user can continue with the execution process.
- If the user clicks Close, the job execution is closed.
- Clicking Save and Close in the Manage Job screen displays a confirmation dialog box:
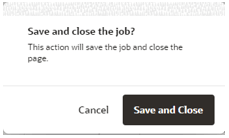
- If the user clicks Save and Close, the job execution is closed.
- If the user clicks Cancel, the dialog box closes, and the user can continue with the execution process.