1 Feature Summary
This chapter describes the feature enhancements in this release.
Noteworthy Enhancements
This guide outlines the information you need to know about new or improved functionality in the Oracle Retail Store Inventory Operations Cloud Services update and describes any tasks you might need to perform for the update. Each section includes a brief description of the feature, the steps you need to take to enable or begin using the feature, any tips or considerations that you should keep in mind, and the resources available to help you.
Column Definitions
-
Feature: Provides a description of the feature being delivered.
-
Module Impacted: Identifies themodule impacted associated with the feature, if any.
-
Scale: Identifies the size of the feature. Options are:
-
Small: These UI or process-based features are typically comprised of minor field, validation, or program changes. There fore, the potential impact to users is minimal.
-
Larger: These UI or process-based features have more complex designs. Therefore, the potential impact to users is higher.
-
-
Delivered: Is the new feature available for use immediately after upgrade or must the feature be enabled or configured? If no, the feature is non-disruptive to end users and action is required (detailed steps below) to make the feature ready to use.
- Customer Action Required: You must take action before these features can be used. These features are delivered disabled and you choose if and when to enable them.
Table 1-1 Noteworthy Enhancements
| Feature | Module Impacted | Scale | Delivered | Customer Action Required? |
|---|---|---|---|---|
|
SOCS |
Larger |
Grant Permissions |
Yes |
|
|
EICS and SOCS (JET) |
Small |
N/A |
No |
|
|
SOCS |
Small |
Turn on configuration. |
Yes |
|
|
EICS and SOCS |
Small |
Train users on new mobile features. |
Yes |
|
|
EICS |
Small |
Turn off if not used. |
Yes |
|
|
EICS |
Small |
N/A |
No |
|
|
SOCS |
Small |
Grant Permissions |
Yes |
|
|
SOCS |
Small |
Turn on parameter. |
Yes |
|
|
SOCS |
Larger |
Train users on new |
Yes |
|
|
EICS |
Small |
Enable new groups as required. |
Yes |
New Feature Descriptions
This section describes the new features.
Store Orders
Store Orders allows a store to request items to be ordered to the store. The items being requested may come from a supplier or a warehouse. The system allows a user to capture items and their quantities to be ordered as well as define restrictions for the store order. The inventory is sourced to the store based on the corporate replenishment setup. This can be either a delivery from a warehouse or a drop ship from the supplier. The actual sourcing, delivery timings, and final quantities remain a function of the replenishment system. Store Orders may be created manually on the mobile application. They may also come in from an external system through a web service and the user can enter quantities against the external order quantity.
Features:
-
Create a new store order
-
View or edit an existing store order
-
Delete an In Progress store order
-
Copy a Completed store order
-
Print Store Order report
Business Case Examples
-
A retailer has milk and eggs that are set up on semi-auto replenishment. The Purchase Order gets generated in merchandising for the milk and eggs and comes to SIOCS. The store manager opens the store order for the milk and eggs within the Store Orders dialog. The manger updates the quantities and approves the store order.
-
A retailer has a need to order more cornflakes due to the high demand of a current promotion. A retailer creates a store order for more boxes of cornflakes.
Store Orders Mobile Screen Flow
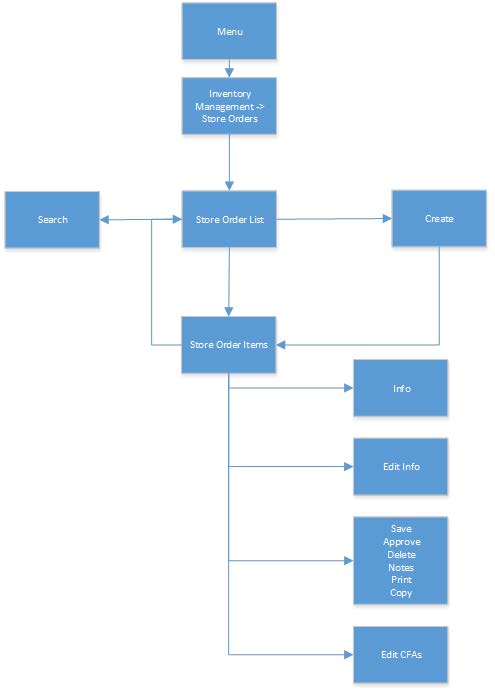
Store Orders are accessed within the Inventory Management menu by selecting Store Orders. Selecting the Store Orders menu option takes you to the Store Orders List screen. On this screen, you have the option to search for existing store order records. You can create, edit, or view a store order. When creating, editing, or viewing a store order, you are first directed to the list of items on the Store Order Items screen. You can add, view, and edit the details of the items on the Item Detail screen. You can specify values for the Custom Flexible Attributes (CFAs) setup for the store order by using the Edit CFAs screen.
Store Order List Screen

When navigating to Store Orders, the Store Order List screen displays the New and In Progress store orders as the default list. A red '!' icon will be displayed for those store orders that have a requested date before today. Store orders that have an origin of manual, meaning it was created manually in the system, will be listed. Those that have an origin of External and were created in an external system, such as a merchandising or forecasting system, will also be displayed.
You can use the search criteria eye glasses to navigate to the Search Criteria (Store Orders) screen to enter search criteria for store orders. When scanning/entering an item in the scan bar, the system adds the item to the entered search criteria and narrows down the current list of store orders based upon the scanned/entered item.
Creating a new store order directs you to the Create Store Order popup to build a new store order. Selecting a store order from the list navigates you to the details for that existing store order.
Search Criteria for Store Orders
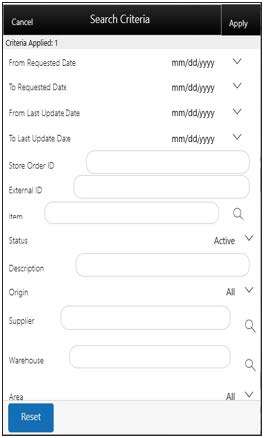
The Store Orders Search Criteria screen is accessed by the eye glasses on the Store Order List screen. After applying the search criteria, the results are listed on the Store Order List screen and the criteria applied is shown. Search Criteria includes: From/To Requested Date, From/To Last Update Date, Store Order ID, External ID, Item, Status, Description, Origin, Supplier, Warehouse, Area, Context, and User. There is a search limit that will be used to return a set number of records; this is defaulted based on a system admin setting.
Create Store Order
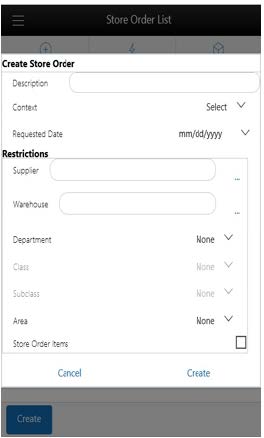
The Create Store Order screen is used when creating a new Store Order. It is accessed when selecting Create from the Store Order List screen. All store orders created on mobile will have an origin of manual. A user must have create permissions to create a new store order.
Every newly created store order will have a system-generated unique store order ID. The user may also choose to give the store order a description. The description is an optional text field to describe the store order. An optional context can be assigned to the store order. The context types are populated at setup within the Code Info dialog on the desktop. The last field in the header is the Requested Date, which is when the store order is wanted by. Requested Date is required and must be greater than or equal to today. The Requested Date may have additional date validations later on in the store order process (when adding items or at time of approval) depending on if the item is a Store Order replenishment item.
Restrictions
The last piece of the create process is the Restrictions section that is used to define what items the store order is restricted to, in other words, what items are allowed to be added to the store order. Restrictions can be defined by one or more of the following:
-
Supplier
-
Warehouse
-
Merchandise Hierarchy
-
Area
-
Store Order replenishment items
More than one restriction can be defined for a store order.
Example: A restriction of Supplier 1212-Soda Supplier and Store Order Items of checked would mean that all items added to the store order must be a Store Order item for Supplier 1212-Soda Supplier.
-
Enabled and optional
-
Enabled and required
-
Not displayed if not used
The Supplier has one additional store configuration, DSD Delivery Supplier for Store Order, to check. If it is set to No, no additional validation is needed and the supplier can be added as a restriction. If it is set to Yes, when adding the supplier as a restriction, the DSD Allowed Indicator on the supplier must be set to Yes in order to add the supplier. If the supplier indicator is set to No, a store order cannot be created for that supplier.
An Area is set up on the desktop in the Area dialog. Areas can be used as restrictions on store orders if the store is configured to Yes for Enable Area for Store Orders.
Merchandise Hierarchy and Store Order Replenishment items are always available to be selected for restrictions.
Store Order Items Screen
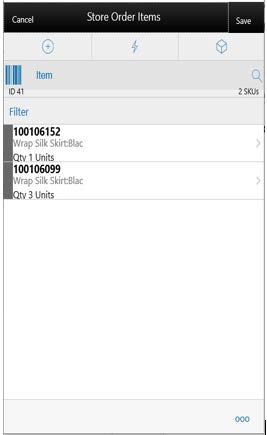
Initially, if the user is creating a new store order, this items screen will not have any items. When selecting an existing store order from the Store Order List screen, this screen will be displayed with the items for the store order. Line items appear in a list and selecting a line item navigates to the item details of that item.
Fields include, item, item description and item image depending on the system configuration. The quantity for the item on the store order will display once a quantity has been added for the item. If the store order is from an External origin, there will also be an external quantity representing the suggested quantity to be ordered.
If an item has been changed in the current session, it is indicated by a bar on the left of the item. Scrolling in the list of items displays a filter. The filter can be used to narrow down the list of items. Filtering can occur by item ID and description.
Items can be removed by swiping. Items added by the user will be flagged for removal. Items that were on the store order from an External origin will have their store order quantity set to zero.
The ellipsis in the lower right-hand corner accesses the footer menu which contains all of the functions that can be performed on the store order.
Item Validations
-
Scanning or entering an item in the scan bar navigates you to the Item Detail screen for that item. The quantity may be updated depending on the scan mode.
-
Items scanned will be restricted to those defined in the restrictions on create:
-
Supplier - restricts the store order to items only for that supplier.
-
Warehouse - restricts the store order to items only for that warehouse.
-
Merchandise hierarchy - restricts the store order to items only for that merchandise hierarchy.
-
Area - restricts the store order to items only defined for that area.
-
Store Order replenishment items - when this restriction is checked, the system restricts the store order to items that are only store order replenishment items.
-
- Store Order Allowed - There is a store re-orderable indicator that is sent on from merchandising (ItemLocVirt). This must be Yes for the item to be put on the store order. If it is set to No, the user will get an error and the item cannot be store ordered.
-
If the item is a Store Order (SO) replenishment item and it has a store order reject indicator set to Yes, the Request Date for the store order must be greater than or the Next Delivery Date for that item:
-
If it is not, the item cannot be added to the store order.
-
Note: The SO replenishment method, store order reject indicator and the next delivery date are defined in the merchandising system for the item and held in EICS on the item/store record.
-
-
UINS or GS1 databar data (extended attributes) are not captured in Store Orders.
External Store Orders
If the store order is an external store order, unexpected items (those not originally on the external store order), can only be added if the store order has the Add Items indicator checked to Yes. If it is set to No, the user will only be able to enter/scan items and quantities against the items that were originally on the store order from the external system.
Footer Menu
The footer menu is accessed from the ellipsis footer menu on the Store Order Items screen. The menu functions include the following:
-
Info: Accesses the Info popup.
-
Notes: Accesses the notes dialog to capture notes.
-
Refresh Cost: If the user has permission for cost to display in the store order, selecting this button will go out and grab the latest costs for the items to be used in the Total Estimated Cost on the Store Order Info screen.
-
Default Qty: The Default Qty will update the store order quantities for all line items on the store order that do not have a quantity:
-
For manually created store orders, the quantity will be set to the last requested quantity from the most recent approved store order.
-
For externally created store orders, the quantity will be set to the external quantity.
-
-
Edit CFA: Lets the user enter values for the CFAs that are set up for store orders.
-
Approve: Approves and completes the store order. The store order is published
-
Save: Saves the store order in In Progress status to be completed later.
Saving a store order does not publish anything out; it simply saves it. The Save button can be used to implement a Save and Approval process.
-
Delete: Marks the store order to Canceled status.
-
Cancel: Exits the store order; changes made in that session are not saved.
-
Print: Displays the common print dialog to print the store order report.
-
Copy: The copy function is only available for those store orders in a completed state which is Approved or Canceled status. It takes the current store order, copies the items and quantities (not external quantities), and creates a new editable store order with a new ID. It references the copied store order's ID.
Item Detail Screen
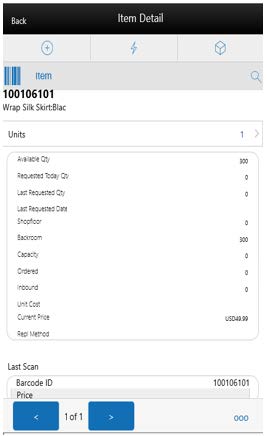
The Item Detail screen is used for selecting or scanning an item from the Store Order Items screen. Scanning or entering an item on this screen in the scan bar, updates the quantity per the scan mode and refreshes the Item Detail screen for the item and quantity scanned. The item rules and validations will be the same as that on the Store Order Items screen.
The quantity can be edited and updated manually if permissions allow.
The item information including the image (which is system configured) displays in the header. The bottom portion of the screen contains various read-only fields about the item to assist in creating the store order.
Additional Fields include:
-
External Order Qty - if the order was from an external origin. This is the quantity that is suggested to order (ROQ) by the external system.
-
Available - available stock on hand for the item at the user's store.
-
Requested Today Qty - sum of all requested quantities on all Approved store orders for today's date for the item at the user's store.
-
Last Requested Qty - the store order quantity for the last/most recent Approved store order for the item at the user's store.
-
Last Requested Date - the approved date for the store order that has the last requested quantity.
-
Next Delivery Date - the next delivery date for the item at the user's store.
-
This field is populated on the item location record from the merchandising system and only for Store Order (SO) replenishment type items.
-
Shopfloor - Shopfloor inventory for the item at the user's store. Only displayed if store is configured to display shopfloor/backroom.
-
Backroom - backroom inventory for the item at the user's store. Only displayed if store is configured to display shopfloor/backroom.
-
Capacity - the total summed up capacity for the item. Only displayed if store is configured to display sequence fields.
Note:
Capacity is set up / defined through a third-party upload. -
Ordered - the total remaining ordered quantity for the item at the store. This is for transfers, allocations, and purchase orders.
-
Inbound- the total quantity approved to be sent to the user's store. This is for store to store transfers, warehouse and finisher deliveries, and RTV shipments.
-
Unit Cost - the unit cost for the item. Only displayed if user has the proper permission.
Note:
Unit cost will not be displayed if the currency of the store is different than that of the supplier (in the case that a supplier restriction is set up). -
Price - current price for the item.
-
Replenishment Method - the replenishment method for the item at the user's store, such as Store Order, Min Max, and so on.
-
Last Scan - displays the details that are from the barcode:
-
GS1 - will display the barcode, GTIN, and the contents of the barcode such as price, UIN, and so on.
-
Type 2 - will display the barcode and the price.
-
All other barcodes - will display the barcode.
-
The footer menu, ellipsis button, contains a reset function as well as remove and restore functions. You can page through existing items on the store order using the arrows on the bottom.
Edit Store Order Screen

The Edit Store Order screen is used to edit header level information about the store order. Edit Store Order is accessed by selecting Edit Store Order from within the footer menu of Store Order Items. A user must have proper permissions. The fields are the same as those on the Create Store Order screen and include: description, context, and request date.
Request Date - If there are no Store Order (SO) items on the store order, the request date needs to be greater than or equal to today. If there are SO items that have a Store Order Reject indictor of Yes, the request date needs to be greater than the latest Next Delivery Date of the SO items on the store order. This gets validated also upon approval of the store order.
Edit CFAs Screen
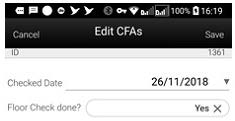
The Edit CFAs screen displays the list of CFAs (flexible attributes) that have been set up for Store Orders on the desktop, and lets you enter values for them. The CFAs that are set up as Required, must have a value entered for it before approving the store order. The value can be one of the following: Date, Text, Decimal, Long depending on the data type set up for the CFAs, while creating them on the desktop. Appropriate security permission is needed for entering CFA values.
Info Screen
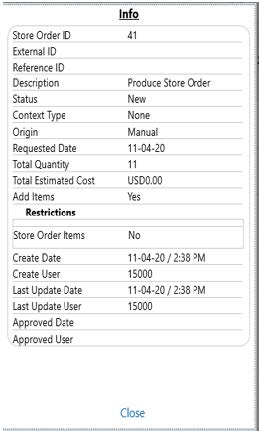
The Info screen is an informational popup that contains read-only information about the header level of the store order.
Fields include:
-
ID - system-generated ID for the store order.
-
External ID - the ID from the external system for externally created store orders.
-
Reference ID - ID associated to the store order that was copied.
-
Description - description of the store order.
-
Status - status of the store order: New, In Progress, Approved, and Canceled.
-
Context - the context type associated to the store order.
-
Origin - where the store order originated: manual or external.
-
Requested date - the requested date for the store order.
-
Total quantity - total quantity of all items on the store order.
-
Total estimated cost - total cost of all items on the store order. This field is only displayed if user has the proper permission.
-
Add items - has a value of Yes or No and defines if items can be added to the store order. For manually created store orders, this is defaulted to Yes. For store orders that are from an external system, this may be set to Yes or No. Yes means that items can be added to the external store order, whereas No means that items cannot be added and only the items originally on the store order can be ordered.
-
CFAs - each CFA attribute and value for the store order.
-
Restrictions - the restrictions that were defined for the store order.
Supplier, warehouse, merchandise hierarchy, area, and store order items.
-
Create Date
-
Create User
-
Last Update Date
-
Last Update User
-
Approved Date
-
Approved User
Integration
Manually created - Those store orders that did not originate from an external system, but were created manually on the mobile, will be sent out through Retail Integration Cloud Service (RICS) once approved. Any items with a zero quantity will not be sent. Non-inventory items will be sent based upon a publish non-inventory items configuration. If there are no items with quantities on the store order to send, the store order will not be sent. CFAs are also published based upon a publish attribute defined on the setup of the CFA. Items will be sent and grouped together as being SO items or non-store order items.
Externally Created - Store orders can come from an external system into SIOCS through a web service. These store orders will have an external order quantity to be used as a suggested order quantity. The user will enter/scan a store order quantity for the actual order quantity. The order will also indicate if additional items can be added to the store order by the user.
Those store orders that originated from an external system will be sent out through a web service. All items will be sent out, those that were originally on the store order from an external system as well as those added by the user. Items with a zero quantity will also be sent back to the external system to indicate no quantities are required. The rules for non-inventory and CFAs are the same as that above for manually created store orders.
Retail Merchandising Foundation Cloud Service Processing for SIOCS Created Orders
A user is able to use store order functionality to request items regardless of the replenishment type normally used by the merchandising system to replenish the item. All items are sourced from either a warehouse or through a supplier depending on the sourcing parameters for the item specified in the replenishment system. Items specified as using Store Order replenishment (or items that are not set up for auto-replenishment at all) are sourced through the creation of one-off purchase orders or warehouse transfer requests only after the store has requested inventory using the Store Order functionality.
There is no correlation between the purchase order/transfer and the item request. Any quantities requested for items that have a replenishment type other than Store Order are added above and beyond the quantity that is normally sourced through the replenishment system on the item's next replenishment review date. However, if the requested delivery date falls prior to the item's next replenishment review date, the request is sourced through the creation of a one-off purchase order or warehouse delivery instead. All inventory requested is sourced to the store at the earliest possible date given the replenishment review date, the supplier or warehouse lead time, and any other factors that may influence the time it takes for a delivery to reach the store.
Externally Created Store Orders
There are web services for creating, updating, and deleting of store orders. The create allows for externally created store orders to come into SIOCS and simulates the SOCS store order create functionality. In addition, it also has an external order number, external order quantity, and add items indicator. The add items indicator is used to determine if additional items can be added the store order when editing it within SOCS.
Note:
At this time, there is not a base integration for externally created store orders from Retail Merchandising Foundation Cloud Service.JET Common Components Favorites
To facilitate quick access on the desktop Jet client, a new common component called Favorites has been added. Favorites allows the user to add buttoned links on the side of the menu page to quickly jump to a specific dialog
Favorites

A favorite is a way of creating a shortcut for a task/menu that the user frequently uses. A user's favorites are accessed by selecting the Favorites (star) option. The system will list all of the favorites. Selecting a favorite will navigate into that dialog. The user can also search for a favorite and select the searched favorite and navigate into the dialog.
Adding/Removing Favorites
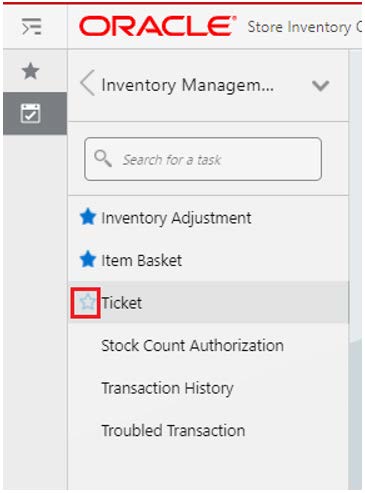
A favorite can be added by hovering over the task menu option. The unselected star will appear. Selecting the star will mark that task as a favorite and it will appear in the favorites list. Unselecting the star will remove the task from the favorites list. In the screenshot above, you can see that Inventory Adjustment and Item Basket are already favorites. The user has hovered over Ticket and can select that star to add Ticket to the favorites.
Pinning Favorites
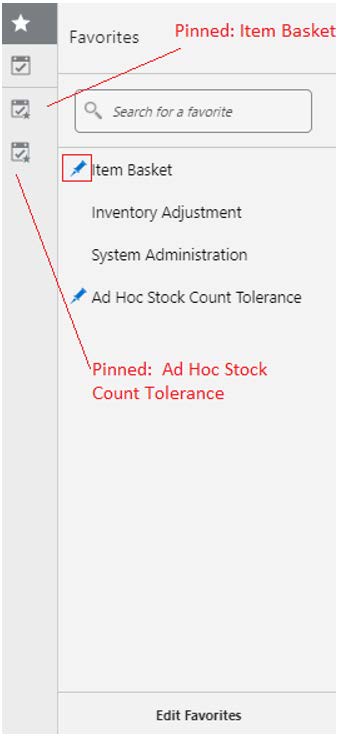
A favorite can be pinned, as you can see by the pin icon (Item Basket and Ad Hoc Stock Count Tolerance have pins). A favorite that is pinned will appear as its own menu option below the tasks. To pin a favorite, you hover over the favorite and the pin icon will appear. It can then be selected. To unpin a favorite, you unselect the pin.
Editing Favorites

The Edit Favorites screen is accessed by selecting the Edit Favorites option from the bottom of the favorites list. On the screen, the user can:
-
Rename a Favorite - it will only rename the item in the favorites list not in the task list.
-
Reorder the Favorites.
-
Remove a Favorite.
-
Pin and Unpin Favorites.
-
Create folders to group Favorites.
-
Reorder Pins.
JET Common Components MAF Camera Button
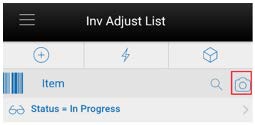
On the MAF UX, this release allows a user to scan barcodes with the camera.
If the system configuration Enable Device Camera Barcode Scan is set to Yes and a camera is detected on the device, the camera icon will be available. The camera icon will allow for scanning in the barcode using the camera on the device. The barcode will be parsed and processed the same as if the scanner was utilized.
Ticket Printing
In release 19.1, ticket printing on the mobile and desktop client was introduced. With this release, several features have been added:
-
The MAF client will allow the user to select several new attributes when printing. Instead of everything being pre-defined, the user can select the template, quantity, type of price event, override price, country of origin, and printer.
-
To facilitate ticketed printing for the mobile user, it will be possible to select one of two modes. Manually allows the user to change attributes after a scan or automatic, which means attributes have been preset and after every scan the item will automatically print based on the selected criteria.
-
On the desktop client, the user will be able to upload multiple ticket templates. These templates can then be assigned to a printer and given a different label name for easier user access and store specific ticket or label printing.
-
The desktop client also will allow the user to define a default printer for ticket or label printing.
-
Finally, when printing multiple tickets from the desktop, the user will now be able to perform mass updates before printing, such as setting a new template, or update the quantity to print.
Desktop Client
Ticket and Label Default Printer Setup
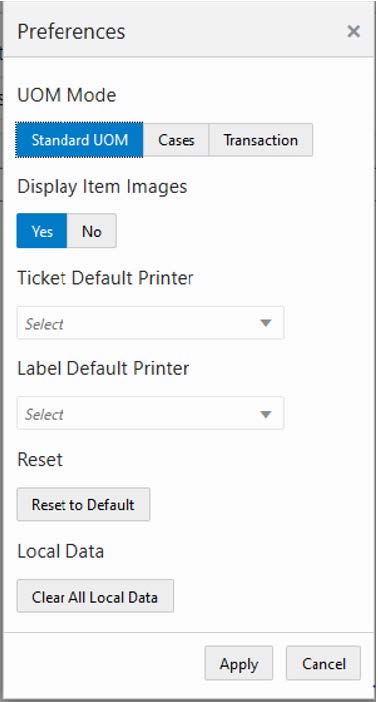
The Preferences menu option is located within the menu in the upper right-hand corner labeled with your name. The Preferences menu contains option such as the UOM mode, display item images, Ticket default printer, and Label default printer.
The ticket and label printer set as default here for the respective type is used in the application and shown as the default printer.
Import Ticket Template Screen
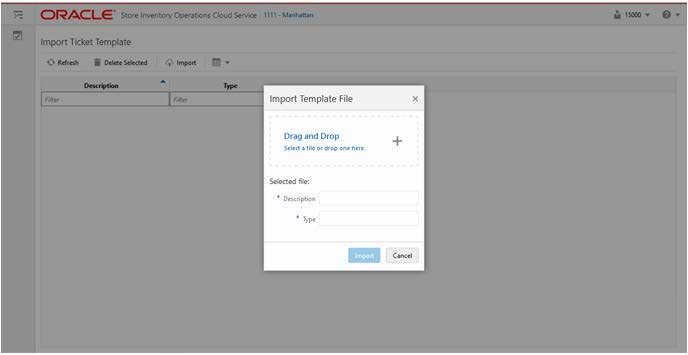
This screen can be accessed in the desktop application from the Technical Maintenance/Import Ticket Template menu.
This screen is for the user to import the third-party file templates such as ZPL for ticket printing.
The imported files contain the format/layout design for the ticket. It will be used in the application when sending the print jobs to the printer based on the format to which the file is assigned.
These files are created using the external application and uploaded for the system to understand the design layout of the ticket.
On this screen, the user can import multiple template files and assign it to the ticket format on the Ticket Print Format screen.
When the user selects the Import button, the system allows to drag and drop or select a file, provide the description, and enter the free text, and import the file.
These files are listed on the Ticket Print Format screen.
The delete option allows the user to delete a file which is not used.
Note:
The system does not validate the content of the file whether it is per the standard of the printer. It just validates to make sure the Non-ASCII file is not allowed to importTicket Print Format Screen
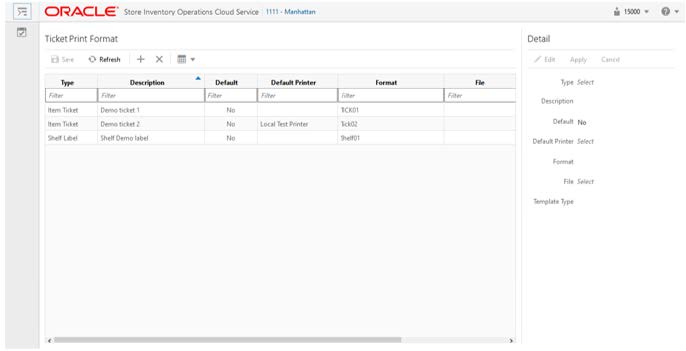
The Ticket Print Format screen is accessed from the Technical Maintenance /Ticket Print Format menu.
The Ticket Print Format screen is an administrative screen used to set up item tickets and shelf labels formats to support ticket printing.
The purpose of this screen is to create a new ticket format by specifying a format name, associate to Item Ticket or Shelf Label, and optionally associate a third-party template file, such as, ZPL file to it. File layout contains the layout of the tickets is to support the specific third-party printer. The screen also allows a user to select a default format and default printer for each type of format. The template files uploaded using the Import Ticket Template option will be listed here.
The system allows only one default format/printer to be set up for a specific format type. An error message will display if the user has selected more than one format as the default format. This is set up by store location. A user should select a default printer, if the default printer is not selected.
Ticket List Screen
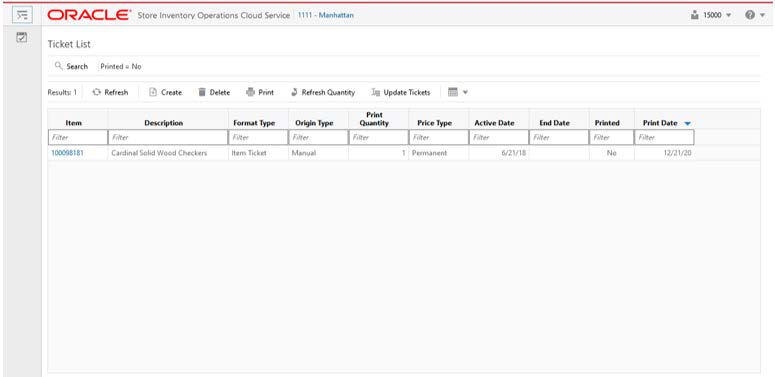
The Ticket List screen is accessed from the Inventory Management-Ticket menu.
From the Ticket List screen, the user has the ability to perform numerous tasks. The user can create, edit, delete, refresh the quantity, and print a ticket. Search Criteria will automatically display when the user enters the screen. Once the user has entered the screen, the filter option is available to further filter on the item tickets displayed.
The Refresh Quantity button can refresh the ticket quantity based on the current SOH. The status of the item ticket may be identified using the Printed field which indicates whether Printed Yes or No.
The Update Tickets button takes the user to a dialog to update various ticket components as described below.
When the user selects to print the tickets, the system displays a popup for the user to select the printer to which the print must be submitted and to indicate whether the quantity must be refreshed before submitting. The system will display the user preferred printer set by default and allow to change.
The detail fields on this screen includes: Item, Description of item, Format Type, Origin Type, Print Quantity, Price Type, Active Date, End Date, Printed Status, and Print Date.
Update Tickets Screen
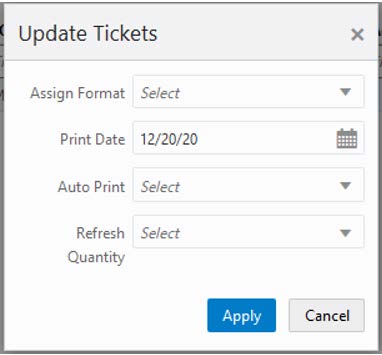
The Update Tickets screen is accessed when the user selects one or more tickets and then selects the Update Tickets button on the Ticket List screen.
On this screen, the user can update the format assignment, print date, indicate whether to auto print, and refresh the quantity based on the current SOH for the selected tickets.
The Auto Print field is for future use.
Mobile Ticket Printing
Auto Print Item Screen
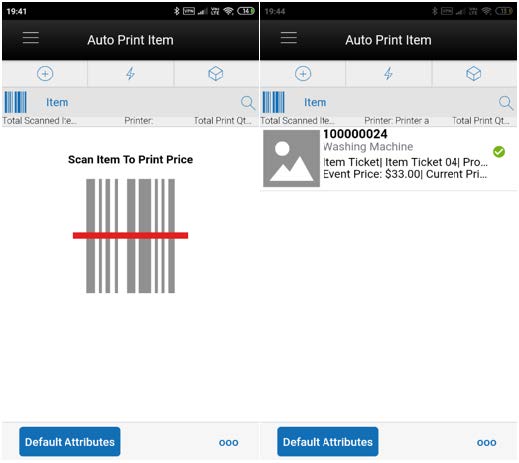
This screen is accessed from the Print Item menu under the Inventory Management in the SOCS application. Auto Print Item mode is the default mode when the user enters the dialog.
This screen allows the user to scan the items and submit the tickets for printing automatically.
The system by default sets the type to Item Ticket, default format set for the type, Price type based on the Print Item Events store parameter, and quantity to 1. This helps the user to start scanning the items right from the time entering the screen.
The user can select the Default Attributes option to change the attributes. The system starts using the attributes set in this screen from the time the user has changed until the dialog is closed.
Based on the events configured in the Print Item Events store parameter or the values set in the default attributes, the system determines what tickets need to be submitted by looking at the item meeting the configured event as described below.
Always Print: This option will always print a ticket regardless if there is a price change.
Clearance: Only print a ticket if on the specific date any clearance event is effective. So, for Clearance say 2, that means today's date + 2 days, if the item on that day has a clearance going on, the system prints the ticket.
Promotion: Only print a ticket if on the specific date any promotion event is effective.
Regular or Clearance: Only print a ticket if on the specific date any Regular or Clearance event is getting effective.
Regular: Only print a ticket if on the specific date any Regular even of getting effective.
Any Price Event: Based on the date selected, if any price event goes into effect (clearance, promotion or regular price) a ticket is generated. If there is no price event goes into effect, the system prints nothing.
The system needs a printer to be set as default. If no printer is set as default, the user is shown an error on the first scan and can select the printer using the Select Printer option from the footer menu.
If there are any overlapping events, the system displays a popup with the events and allows the user to select.
On this screen, the system displays the total scanned items, the printer assigned, and total print quantity.
The user can change the mode to Manual Print on the Default Attributes screen.
On each row, the system displays the Item Image if configured, Item Id, Description, print status, type, format assigned, price type, effective date, event price, current price, override price if any, quantity, and error if any.
The system generates the ticket after a valid scan and submits it to the assigned printer.
Manual Print Item Screen
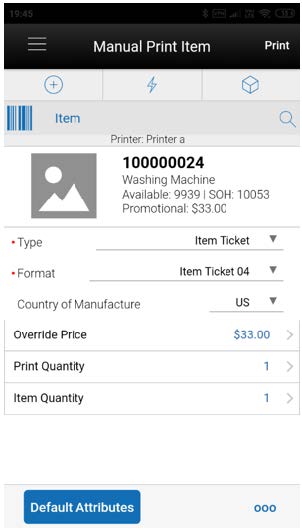
This screen appears when the user changes the mode to Manual using the Default Attributes screen.
The user can scan or enter the item for which the ticket or label must be printed.
On this screen, the user can edit the type, format, country of manufacture, override price if permission allowed, and enter the quantities or use the default values and print the ticket.
The system displays the country of manufacture of the item scanned and allows to edit.
On the first scan after entering on to the manual mode, the system displays an error if the default printer is not set. The user can change the printer using the Select Printer option from the footer menu.
The user can access the Default Attributes screen anytime to change the mode and set the default attributes.
The system displays the Stock on Hand, Available, Event, and price along with the item information above the editable fields.
Default Attributes Screen
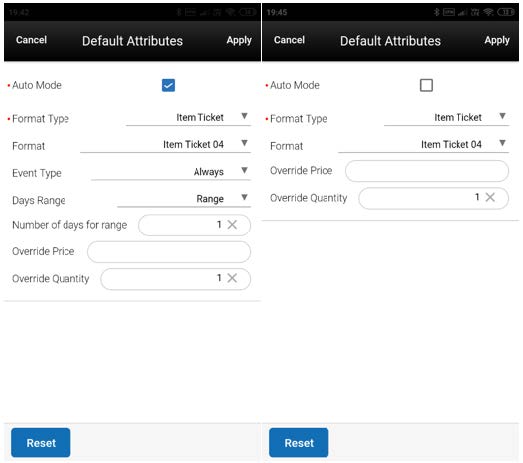
This screen is used by the user to set the default attribute values for the ticket generation for the Auto and Manual mode of printing. This screen is accessed when the user selects the Default Attributes button on the Auto or Manual Print Item screen.
For the Auto Mode, the user can set the format type, format, event type, days range, number of days for range, override price, and quantity.
The Event type field consists of following options: Always, Promotion, Clearance, Permanent, Clearance or Permanent, and Any Price Event. The default value shown here is set from the Print Item Events store parameter.
The Days Range option includes: Specific Date, Range, Past, and Future. For all the options, the range cannot be more than 3 days.
Based on the range selected, the system determines whether the scanned item falls in the selected event and if an event exists, the system generates the ticket and submits to print.
For the Manual mode, the user can set the format type, format, override price and the override quantity.
For the both the modes, the system considers the override price and quantity and sets the value when the ticket is generated.
For the Manual mode, the override price and quantity are populated and allowed to edit on the Manual Print Item screen.
Select Printer Screen
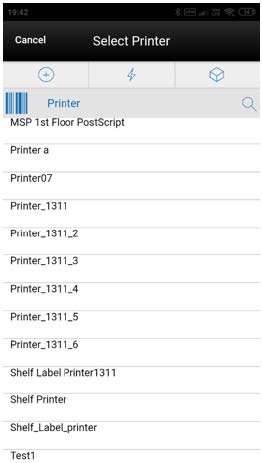
This screen is for the user to select or scan the barcode of the printer and submit the tickets for printing.
This screen is accessed from the Select Printer option on the Auto and Manual Print Item screens.
This screen lists all the printers that are available in the system for the item tickets and label type.
The selected printer is displayed on the Auto Print Item and Manual Print Item screens for the user to know to which printer the tickets/labels are submitted for printing.
The user can also define a logical or IP address for the printer not listed. This information can be used by the third-party application to print to a local printer. Unlike the pre-defined printers, this would not require set up on the desktop.
Barcode Parser
Two new barcode parsers have been added, GS1 12 and GS1 13.
Industry standard tags are defined as 12-digit UPC and 13-digit EAN.
SIOCS 19.1 supported the GS1-14 standard or 14 digits SKU. Example: 12345678901234
When active, the basic GS1 will find a 14-digit item number in the database. Example: 12345678901234
When active, the basic GS1-13 will find a 13-digit item number in the database. Example: 1234567890123 (however, when building the actual GS1 barcode itself, the item will have a leading 0 to fill out to 14 digits, which is mandatory). For example: if you have a barcode (01)01234567890123, it will search for 1234567890123 in the database.
When active, the basic GS1-12 will find a 12-digit item number in the database. Example: 123456789012 (however, when building the actual GS1 barcode itself), the item will have two leading 0s to fill out to 14 digits which is mandatory). For example: if you have a barcode (01)00123456789012, it will search for 123456789012 in the database.
List of Barcode Processors
These barcode processors are inserted through the data setup script.
| Name | Description | Active | Process Sequence |
|---|---|---|---|
|
SKU |
SKU |
Y |
10 |
|
GS1 |
GS1 |
Y |
20 |
|
GS1 12 |
GS1 12 |
Y |
23 |
|
GS1 13 |
GS1 13 |
Y |
26 |
|
VPLU_A |
Type 2A |
Y |
30 |
|
VPLU_B |
Type 2B |
Y |
40 |
|
VPLU_C |
Type 2C |
Y |
50 |
|
VPLU_D |
Type 2D |
Y |
60 |
|
VPLU_E |
Type 2E |
Y |
70 |
|
VPLU_F |
Type 2F |
Y |
80 |
|
VPLU_G |
Y |
90 |
|
|
VPLU_H |
Type 2H |
Y |
100 |
|
VPLU_I |
Type 2I |
Y |
110 |
|
VPLU_J |
Type 2J |
Y |
120 |
|
VPLU_K |
Type 2K |
Y |
130 |
|
VPLU_L |
Type 2L |
Y |
140 |
|
UPC_E |
UPC E |
Y |
150 |
|
UIN |
UIN |
Y |
160 |
|
VPN |
VPN |
Y |
170 |
|
RFID |
RFID |
Y |
180 |
|
RFID GTIN 12 |
RFID 12 |
Y |
183 |
|
RFID GTIN 13 |
RFID 13 |
Y |
186 |
Item Scan Number Type
The Item Scan Number Lookup dialog in EICS helps the retailers, particularly the telecom retailers, to maintain the multiple identification numbers of a single item. Release 19.2 will allow a user to define the type of ISN they want to use. In the prior release, this was fixed to four types.
ISN Type Setup
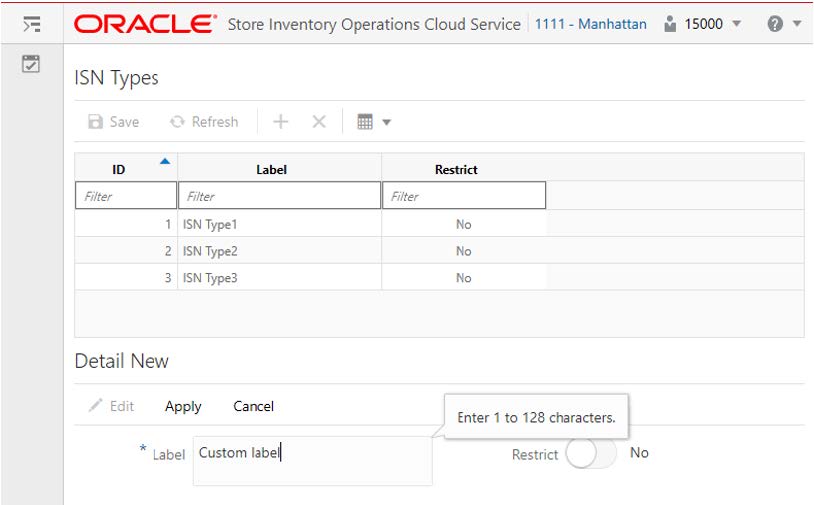
General Requirements
-
The purpose of this screen is to create user-defined ISN types in the system and ISNs created through an external system or using the ISN Lookup screen can be associated to the types created here.
Examples: Serial Number, Part Number, IMEI, Key Number, and so on.
-
This screen can be accessed from the Data Setup menu on EICS.
-
The user needs proper permission to access this screen.
Grid Bar/Buttons
- Title - ISN Types.
-
Save will save any changes that have been made on the screen and update/refresh the grid.
Only enabled once a change in the detail block has been made.
-
Refresh - See JET/LUX - Screen Patterns.
-
+ (add) - Allows for the addition of a new Item Scan Number Type. See JET/LUX - Screen Patterns.
-
X (Remove) - Allows for removal of the ISN Type. See JET/LUX - Screen Patterns:
-
If the does not have any ISN Type selected to delete there will be an error message, EM1.
-
If the type is being used, the ISN type cannot be deleted. The user will get an error message, EM2.
-
Multi-select - If any of the selected type detail cannot be deleted per the requirements above, an error will be given to the user. Note that it will be the first error the system hits. None of the ISN type details will be deleted.
-
-
Filter - See JET/LUX - Screen Patterns.
-
Check Box - See JET/LUX - Screen Patterns.
Grid (List) Fields
-
The list of ISN Types.
-
View only.
-
Once creating/editing/deleting a type, the list will be updated.
-
See the Detail Block for details and validations of these fields.
-
ID - This is system generated at the time of creating a new type.
-
Label- User-defined label of the ISN type.
-
Restrict:
-
This indicates whether the ISN belonging to this type is Personal Information
-
This restrict flag is filtering the Personal Information data.
-
On the ISN Lookup screen, the ISN data will get filtered based on the restrict flag of the ISN type associated with the ISN record.
-
Detail (Apply) Block
-
Edit - Will allow for the selected row (upon clicking edit) in the grid to be editable in the Detail block.
-
Apply - All values are required. If the label is not entered, the system should display a missing required data message. EM3.
-
Will take the entered or edited values and update the grid.
-
If there are fields that need to be unique, the system validates at the time of selecting the apply button. EM4.
-
-
Cancel - Will clear out the Detail Block. No updates are made.
-
Label - User-defined description of type:
-
Text entry field.
-
Description entered by the user. It will be in the language of the user.
-
The type is unique.
-
Default will be set to blank.
-
Required field.
-
Editable when creating and editing a type.
-
-
Restrict - Defines whether the ISN type created is of restricted type or not:
-
Switch
-
Values: On=Yes, indicates it is restricted. Off=No, indicates it is not restricted.
-
Editable.
-
Defaults is No
-
Use of ISN Type
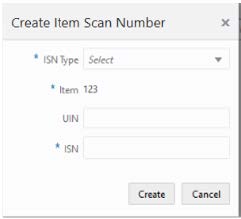
The ISN Type dropdown displays the list of ISN Types available in the system. The list is populated from the ISN Type screen where the user creates/manages various ISN types. The system has four pre-defined ISN types, 1 to 3 for the retailer to fit to represent the unique identifiers based on the industry. For example, the telecom retailer could use the ISN type 1 and ISN type 2 for any unique identification number of the mobile devices. The user can also create more ISN Types through the ISN Type screen.
Allow PO Over Receiving
When receiving a direct delivery, the user must have the proper permission to be able to over receive. This release adds the restriction for a user to over receive at the PO level.
This means SIOCS can be restricted to limited over receiving at:
-
ASN
-
PO
Permissions
| Permission | Topic | Active |
|---|---|---|
|
Allow PO Over Receiving |
DSD Receiving |
For POs with and without an ASN:
|
Details
The validation occurs as the item is scanned and the quantity is updated or when the quantity is manually updated. The permissions are:
- Allow ASN Over Receiving - when receiving against an ASN, the
system will check if the received quantity is greater than the expected
quantity (ASN quantity):
-
If the user does not have this permission, the user will be given an error and must update the quantity.
-
If the user does have this permission, there will be no error and it is permitted to have a received quantity greater than the ASN.
-
-
Allow PO Over Receiving - when receiving against a Purchase Order with OR without an ASN, the system will check if the received quantity is greater than the expected quantity (PO remaining quantity):
-
If the user does not have this permission, the user will be given an error and must update the quantity.
-
If the user does have this permission, there will be no error and it is permitted to have a received quantity greater than the PO remaining quantity.
-
Assuming the user has proper permission to over receive (as stated above), when receiving the user will be able to receive more than the expected quantity (ASN quantity / PO Remaining quantity) during the receiving process. Once confirming the container, the system will remove the over received quantities. There are two store configurations that are used:
-
Direct Delivery Auto Remove Over Received Quantity - at confirmation of the container, any quantity received over the expected quantity will result in a prompt to the user and the overages will be removed by the system.
-
Direct Delivery Auto Remove Damaged Quantity - at confirmation of the container, any damaged quantity received will result in a prompt to the user and all damaged quantities will be removed by the system.
Stock Counts - Multi-User Counting
Retailers now have the ability to allow multiple users to execute the same child count.
Details
Unguided Stock Count Allow Multiple Users
-
This system parameter will determine whether an unguided stock count will allow more than one user to scan simultaneously against the same stock count.
-
Valid values are Yes and No.
-
If set to Yes, SIOCS will allow more than one user to access the same child stock count.
-
Default: No
-
Editable: Yes
-
Topic: Stock Count
Customer Order Status Flow
To provide a better user experience and understanding of what is going on with a customer order, SIOCS is introducing a new status mechanism. States will be set based on a variety of factors, such as options if picking is required, or a delivery has been created to inform the user what the next appropriate action is that they should take.
Customer Order Status Flow when Picking is Required
This flowchart shows a simple, straightforward status flow of a customer order when picking is required.
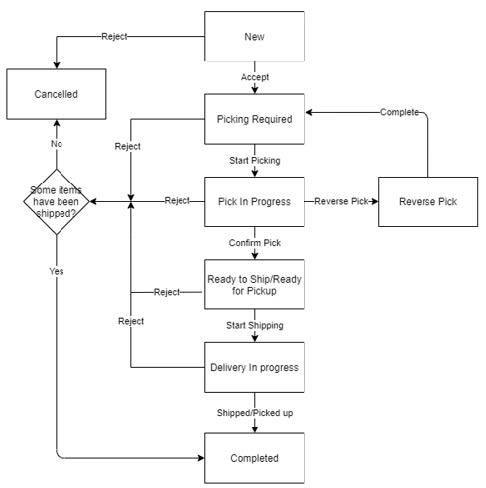
Following are the different statuses that a customer order can take when picking is required for the customer order:
-
New:
The order has just got created and not been accepted yet at the store.
-
Picking Required:
When no open pick exists, and the Picked quantity is less than the Remaining quantity and Picking is required.
-
Pick In progress:
If a pick is open for an order, the order goes to Pick In Progress status.
-
Reverse Pick:
If a reverse pick is open for an order, the order goes to Reverse Pick status.
-
Ready to Ship:
If the Picked quantity >= Remaining quantity and the order is not fully shipped yet and the order is of type Ship to Customer.
-
Ready for Pickup:
If the Picked quantity >= Remaining quantity and the order is not fully picked up yet and the order is of type Customer Pickup.
-
Delivery In progress:
If at least one delivery is available which is either saved or submitted but not dispatched yet.
-
Complete:
This is one of the final states of a customer order. When the customer order is fully shipped or picked up, it goes to Completed status.
-
Cancelled:
This is also one of the final states of a customer order. When the customer order is rejected or cancelled, it goes to Cancelled status.
Customer Order Status Flow when Picking is not Required
This flowchart shows a simple, straightforward status flow of a customer order when picking is not required.
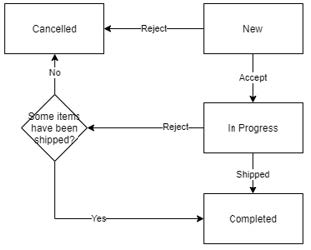
-
New
The order has just got created and not been accepted yet at the store.
-
In progress
A customer order gets this status when it is being looked at and the order is not fully shipped by the store or picked up by the customer.
-
Completed
This is one of the final states of a customer order. When the customer order is fully shipped or picked up, it goes to Completed status.
-
Canceled
This is also one of the final states of a customer order. When the customer order is rejected or cancelled, it goes to Cancelled status.
Customer Order Status Update Logic
When the Store Parameter Picking Required for Customer Orders is set to Yes, the status of customer orders will need to be checked for update whenever any of the following events occur on the customer order:
-
When the customer order is accepted at the store.
-
When a Reverse pick is saved, completed or cancelled, both internally in the system and externally.
-
When a pick is created, saved, completed, or cancelled.
-
When a delivery record is created, cancelled, saved, submitted, or partially/fully dispatched.
-
When POS sends a fulfilment record against the customer order, which partially/completely fulfilled the order.
-
When the customer order is rejected by the store or cancelled by the user or at Order management system.
Note:
These events can be a manually created, system generated, internally created or externally created event.After any of the events mentioned above occur, do the following.
For the Customer Order, check if there is at least one open reverse pick exists.
If Yes, update the status of the customer order to Reverse Pick.
If No, check if there is a Pick in progress, that is, Pick's status = New or In progress:
- If Yes, update the status of the customer order to Pick In Progress.
-
If No, check if there is a Delivery In Progress, that is, at least one delivery which is either saved or submitted and not dispatched yet. If Yes, update the status of the customer order to Delivery In Progress. If No, check the Picked Qty of the items on the customer order.
-
If Allow Partial Delivery = No and if at least one item is not completely picked, update the status to Picking Required. If all items are picked completely, and if the order is of type Ship to Customer, update the status of customer order to Ready to Ship. If the order is of type Customer Pickup, update the status of customer order to Ready for Pickup.
-
If Allow Partial Delivery = Yes and if no item is picked yet, update the status to Picking Required. If at least one item is picked partially or completely picked, and the order is of type Ship to Customer, update the status of customer order to Ready to Ship. If the order is of type Customer Pickup, update the status of customer order to Ready for Pickup.
-
When the Store Parameter Picking Required for Customer Orders is set to No, the following is true:
-
If the store has decided to not pick the items before shipping. If the Customer Order is accepted, the status will show In Progress.
-
If the store has decided to formally pick the items and ship. The status should be derived per the rules that apply when Picking required is set to Yes.
Completed and Cancelled are the final states of a customer order, irrespective of whether picking is required or not.
The customer order moves into Completed status when:
-
A customer order is completely shipped by the store or picked up by the customer.
-
A customer order is rejected and some items have been delivered already.
The customer order moves into Cancelled status when:
-
A customer order is rejected and none of the items have been delivered.
-
A customer order is cancelled by the user or at the Order management system.
The customer order will become read only once it reaches either Completed or Cancelled status
The Customer Order List screen is accessed by selecting the Customer Order menu option from within the Customer Order Management menu in the drawer/menu. When the store parameter Picking Required for Customer Orders is set to No, the screen will display the Active status customer orders by default which is all customer orders which are in New or In Progress status. If the store parameter Picking Required for Customer Orders is set to Yes, the screen will display the Active status customer orders by default which is all customer orders which are in one of the following statuses: New, Picking Required, Pick In Progress, Reverse Pick, Ready to Ship, Ready for Pickup, Delivery In Progress.
Security Groups
Several new group permissions have been added to help with creating a more granular security permissions model.
Full Permission: The group sim_full_permission_users grants the user all permissions without a role assignment, however it does not grant all data permissions. It is enough for a cloud operator or customer administrator to create a user with only IDCS app roles and not needing to set up anything in the SIOCS database in order to log in and perform usual administrative tasks.
Retail Home: The group sim_retail_home_users is required for users that want to access SIOCS features in the Retail Home application.
Users: The group sim_users is required for all SIOCS client user access, that is, desktop or mobile client, not integration users.
Note:
All existing users must be migrated to the new IDCS Application Roles before they can access SIOCS. For details on the IDCS application roles and options available to migrate existing users, refer to the following sections of Oracle Retail Enterprise Inventory Cloud Service Security Guide:-
User Types with IDCS Application Roles
-
Oracle Identity Cloud Service Access Management
-
Bulk IDCS Application Role Membership Update (Optional)
Technical Enhancements
-
Oracle Mobile Application Framework (MAF) 2.6.3 (minor version update)
-
Ability for the Customer Security administrator to assign the same user to different roles based on deployment type (that is, STAGE, PROD, and so on)
Instead of IDCS groups, SIOCS now creates 11 IDCS application roles used for special purpose access.
These IDCS Application Roles are scoped to the EICS application on IDCS.
Since a new EICS application will be provisioned on IDCS for each deployment type (STAGE, UAT, PROD, and so on), there will not be any overlap in IDCS Application Roles between different deployment types. This allows a Customer Security Administrator to assign an IDCS Application Role to a user on one deployment type and not on others.