9 Shipping and Receiving Common Components
Overview
The shipping and receiving functions in the mobile application have several common components. The following functional areas are included: Customer Order Deliveries, Return to Vendor Shipments, and Transfer Shipping/Receiving for store, warehouse, and external finisher. They include tasks usually performed by shipping or receiving associates. This also includes integrating to a third-party manifesting system for rate shopping to find the least expensive delivery method.
The feature of shipping and receiving available in mobile is:
-
Manifest web services for rate shopping
Manifesting
Manifesting systems help retailers create manifest documents, Bill of Lading (BOL), shipping container labels for shipments, and reduce cost through rate shopping by finding the least expensive delivery method for the given shipping criteria.
For larger shipments, multiple containers may exist and each container requires a separate tracking ID. For RTV Shipment and Transfer Shipment, the manifesting service will be called when confirming each container. The carrier and service are required to be the same for all containers within the same shipment. The container and shipment are all inclusive for Customer Order Deliveries.
Business Case
A user creates a shipment (store, warehouse, finisher, customer order delivery, or return to vendor) and enters in the package type of "Small" and Weight of 2.3 lbs. The Manifesting system will do the rate shopping for the carrier and service and automatically print out a label for the package.
Figure 9-1 Integration - Flow-Ship Container
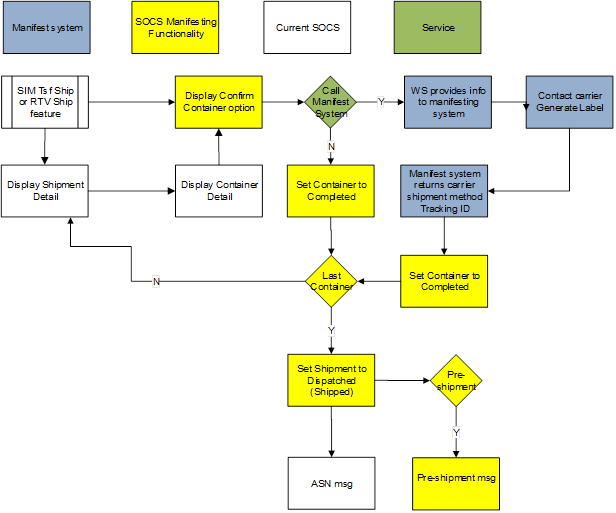
The above flow shows the confirmation of a container and how a call is made to the manifest system. The flow is highlighted in different colors to help identify different integration points.
When you confirm each container for an RTV or Transfer shipment, the system can invoke the web service to provide the required shipment details to the manifesting system and subsequently return a tracking ID for each container.
After all containers have received their tracking ID, you can ship the shipment, or an external system indicates to the Store Inventory system that the shipment is dispatched.
Note:
Customer Order Deliveries only use the web service at submit or dispatch since the shipment will always be a single container.
If the Store Inventory system is configured to publish a pre-shipment, it sends the pre-shipment notice to the pre-shipment system.
If the carrier must be changed for the shipment with transfer shipment or RTV shipment, you adjust the carrier, which will cause all containers to move back to 'In Progress'. Once the shipment has been dispatched, you will no longer be able to adjust the carrier.
Figure 9-2 Customer Order Delivery Flow
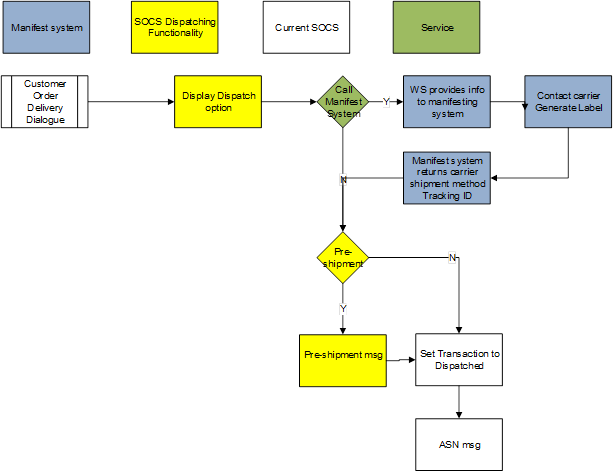
The above flow represents when a Customer Order Delivery is dispatched and a call is made to the manifest system. The flow is highlighted in different colors to help identify different integration points.
Mobile
Features:
-
Enter Carrier BOL Information
-
Enter Container ID, Weight, Package Type, and Tracking ID
-
View Carrier BOL Information
-
Set External Printer
-
Print Reports
You have the ability to enter the carrier details for Transfer Shipments, RTV Shipments and Customer Order Deliveries. You can access the Edit Shipment screen by navigating to the Shipment and selecting Edit Shipment from the Footer menu.
Edit Shipment
Figure 9-3 Edit Shipment Screen
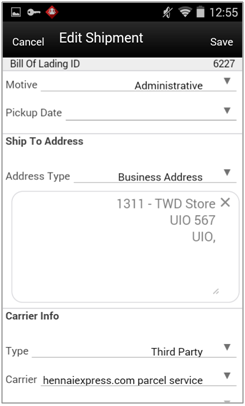
For Transfer Shipments, if the shipment is for sending items to a warehouse or finisher, you have the option to enter an Authorization Number. This is not applicable to Transfer to Store or Customer Order Deliveries. Security permissions exist to enter an Authorization Number.
In order to prepare the shipment for manifesting, you are required to enter the carrier information on this screen. When the carrier Type is Third Party and the Carrier Service is a (P) parcel service, the manifesting service is called when you confirm the container. Security permissions exist for you to edit the Carrier BOL information.
Motive
The motive for the shipment is based on the functional area and sequence number. The code with the sequence of 1 will be displayed by default. You can create and manage Motives through the desktop application.
Carrier and Service Selection
The carrier type is defaulted based on the store parameter 'Carrier Default' set up for each type of transaction (store, finisher, warehouse, and RTV).
| Delivery Type | Default Carrier |
|---|---|
|
Customer Order Delivery |
Third Party if the customer has identified a carrier to use on the customer order. If no carrier is identified on the customer order the Sender. |
|
Ship To Customer |
Sender |
|
Pick Up |
Receiver |
If the carrier type is Third Party, the Carrier is available for selection. This field may be overwritten by the manifesting system when used. You may select Other from the list of carriers. If Other carrier is selected, the Carrier Name and Address will be enabled.
When a carrier is selected, a list of services available for the carrier will be selectable. This field may be overwritten by the manifesting system when used in addition to the Carrier. The manifesting service call made can include checking for the best rate and will override what was selected by you.
Shipment Carriers, Shipment Carrier Services, Shipment Weight UOM, and Shipment Package Sizes are setup and maintained in the desktop application.
Each Carrier will have one of three manifest types: (P) Parcel, (H) Home Fleet, and (O) Other. Only carriers with a manifest type of (P) Parcel will be used with the manifesting integration service. Depending on the carrier service, weight and package size may be required. The system will alert you when the information is missing.
Adjust Carrier (Transfer Shipment and RTV Shipment Only)
The BOL Details for a shipment gets frozen once the first container is confirmed and cannot be changed without moving all the containers for the shipment back to an 'In Progress' state. This is done by using the Adjust Carrier feature. The BOL Details can be adjusted until the shipment is dispatched if you have the appropriate permissions. Once you select Adjust Carrier, a new carrier may be selected and each container will need to be reconfirmed to manifest again.
Edit Container
Figure 9-4 Edit Container Screen
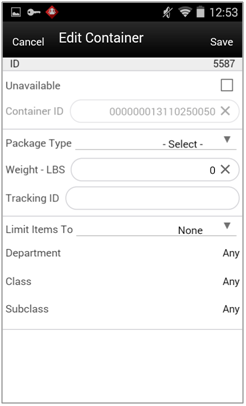
The Edit Container screen is only applicable to Transfer Shipments and RTV Shipments, since Customer Order Deliveries shipment and container is all inclusive. You will enter the package type, weight, and other container details from this screen. Security permissions exist for you to edit this screen. If manifesting is used, the manifesting service will return the tracking ID. The Edit Container screen is accessed from the Footer menu of Transfer/RTV Ship Container screen, RTV Ship Container Screen, and Transfer Receiving Container screens. Since the Edit Shipment screen defines the entire shipment, the Edit Container screen is used to identify the package type, weight, and tracking ID for each individual container.The customer order feature does not use this screen. For customer order deliveries, the package type weight and tracking ID are entered directly on the Edit Shipment screen. The Transfer Receiving feature also uses this screen to enter Reference Container ID, Damage Reason. The tracking ID may also be captured on this screen.The validations listed below apply to Transfer Shipments, RTV Shipments, and Customer Order Deliveries. The validations for Transfer Shipments and RTV Shipments are performed at the time of confirming the container, while Customer Order Deliveries performs the validations upon submit or dispatch of the shipment.
Weight and Package Validation
The weight field is used to enter in the weight of the package. The weight will be entered in the unit of measure based on the store admin Manifest weight UOM.
The package type is used to define the dimensions of package such as Large Envelope, Small Box, Medium Box, and so on. The package type will be selected from a defined list of packaged types in the Carton Dimension table.
Depending on the carrier/service selected for the shipment, the package type and weight may be required (this is only validated when the manifesting system is called). The Shipment Carrier Service table identifies when the weight and package type is required. This table is populated from a data script.
Note that when creating a transfer shipment container or RTV shipment container on the mobile, the carrier is defaulted based upon a store setting, Carrier Default. When the setting is Third Party, the carrier is Other and the service is blank. Therefore, you are not prompted for the weight and/or package type unless the carrier /service had been set as something different.
Tracking ID
The Tracking ID will contain a single ID for tracking the package; it can be entered by you, come from the manifesting system or come from the shipping ASN. It may get overwritten/updated by an external manifesting system. The tracking ID entered within the Transfer Receiving dialog can be leveraged to find a container.
External Printing
Figure 9-5 External Printing Screen
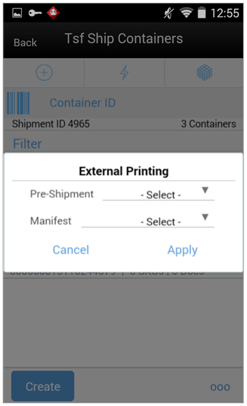
This screen can be accessed within the Shipments by selecting External Printing from the Footer menu of Transfer/RTV Ship Containers screen. The external printer can be defined for the pre-shipment and manifest documents. These settings will remain until you log out of the application. This setting is applicable across all functional areas within the mobile application that use the Pre-Shipment and Manifest documents. If the printer is selected for Transfer Shipment, the same printers will be set for Customer Order Deliveries dialog and RTV Shipment and vice versa.
Figure 9-6 Print
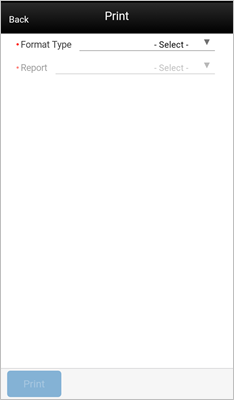
The Print dialog is accessed when selecting print within the mobile application. It is available when selecting print from the footer menu within a transaction.
The transaction format type or types that are applicable to the functional area will be available for selection. For example in Customer Order Deliveries, there may be format types of Customer Order Delivery and BOL. If there is only one applicable format type for the functional area it will be defaulted.
Once a format type is selected, the system will list all of the reports that are available to print for that format type. The report will default based upon the default format type. You can choose to select a different report format to print if other report formats exist for this format type transaction. Once print has been selected for the report, the PDF is retrieved based upon the report format.
EWay Bill (Fiscal Document)
E-Way Bill( Electronic Way bill) is a document that is required for transporting goods in certain countries. It is be generated through the government portal for the shipment. The E-way bill is required to ship all the goods except those exempted under the notifications or rules pertaining to the country. The retailers can configure SIOCS using store configurations to incorporate obtaining the E-way bill document in the shipment process if E-way bill is mandatory in the country where they are operating. SIOCS uses a generic term called ‘Fiscal Document’ to refer to ‘E-Way bill’ document and ‘Fiscal Doc ID’ to refer to ‘E-way bill ID’. The areas where E-Way bill ID is used are Transfer Shipment, RTV Shipment and Customer Order Deliveries.
The basic workflow is as follows:
-
When the shipment is submitted in SIOCS, the Fiscal Document Generator(FDG) system picks up the shipment submitted and sends the shipment details along with tax-related information to a 3rd party system, which in turn sends the details to the government system.
-
The government system validates the details submitted and sends the Fiscal Document ID back if the shipment has been approved. Once this ID reaches SIOCS, the shipment is ready to be dispatched.
Fiscal Document for Shipments Workflows
The following is the detailed process for obtaining Fiscal Documents for shipments (Transfer, RTV and Customer Order Deliveries) :
Capturing Vehicle/Driver Details
-
The vehicle number, vehicle country of the vehicle used for the shipment, driver name and driver license number should be captured before submitting, if configured. The retailers have the flexibility to configure which one of these details need to be captured, depending on the rules and regulations applicable in the country where the store is operating in. These configurations are done at store level.
-
These details are captured in the Edit Shipment screen of the respective transactions.
On Submit of the shipment
The process of requesting a Fiscal Doc ID for the shipment starts when the user submits the shipment. Once the submit is done:
-
The Fiscal Doc ID request gets a unique 'Request ID'.
-
Once the request is made, there should be NO change in the shipment details (items, quantities, etc.).
-
The status of the shipment will be 'Submitted', the status of the Fiscal Doc request will be 'Waiting for Fiscal Doc ID'.
-
The request ID and status of the request can be viewed from the Info screens of the respective transactions.
-
SIOCS should not be able to move shipments from submit to dispatch unless the Fiscal Doc ID has been received.
-
However, if the user has 'Allow dispatch without Fiscal Doc ID' security permission, the shipment can be shipped without the Fiscal Doc ID
Once the Fiscal Doc ID is Received
-
Once the 'Fiscal Doc ID' is available for the shipment, The status of the request is updated to 'Fiscal Doc Approved' and the shipment can be dispatched.
-
The Fiscal Doc ID will be associated with the shipment only if the shipment is in 'Submitted' status or in 'Dispatched' status(if the user had override permission to dispatch before the Fiscal Doc ID arrived).
-
A notification will be created informing the user that the shipment is now ready for dispatch, if the shipment has not been dispatched already.
-
Fiscal Doc Link — When the Fiscal Doc ID is communicated to SIOCS, there is a possibility that an external link(URL) will also be sent. This URL enables the retailer to print the Fiscal Document, whenever needed. Any user with ‘Access Fiscal Doc URL’ security permission can access this URL.
Cancelling the Request
If the User does a 'Cancel Submit' of the shipment, the Fiscal Doc ID will become invalid if there is already one. In case the Fiscal Doc ID is received post 'Cancel Submit', it will be rejected/ignored. The Shipment has to go through the 'Submit' process again, obtain the new Fiscal Doc ID in order to be dispatched.
Transfer and Vendor Deliveries — The warehouse and supplier will also need to obtain Fiscal Doc ID before they dispatch the shipment. SIOCS is able to leverage the Fiscal Doc ID from the deliveries sent from a warehouse and also for the deliveries from vendors.
Scan Bar — SIOCS will allow a user to scan the Fiscal Doc ID and retrieve the transaction with it, similar to ASN, Container etc., in the Transaction List screens of Transfer Shipment, RTV Shipment, Customer Order Deliveries, and Transfer Receiving and DSD Receiving.
Configurations
The Store Inventory system provides retailers with great flexibility to handle Fiscal Doc mandate based on the rules and regulations prevailing at the location of the store. The configurations are set at store level and further at the Transaction type level.
Configurations to Enable Obtaining Fiscal Doc
Restrict Shipment Dispatch After Submit
A shipment cannot be dispatched without a Fiscal Doc ID. The system automatically requests for Fiscal Doc ID on Submit when this store parameter is set to ‘Yes’. Once the Fiscal Doc ID is available, the user is notified and the shipment can be dispatched. This parameter is available separately for each transaction type (Transfer shipment, RTV Shipment, Customer Order Delivery). This allows the user to set the Fiscal Document mandate only for the transaction for which it is necessary.
Capture Vehicle Details on Submit
The details related to the vehicle and the driver used for the transportation of the items must be sent to the government in order to obtain the Fiscal Doc ID. In SIOCS, this can be achieved by setting the store parameter ‘Capture Vehicle Details on Submit.’ This configuration can be set at Transaction Type level (Transfer Shipment, RTV Shipment, Customer Order Delivery) and the values for these fields can be captured through the respective ‘Edit transaction’ screens. The value captured for these fields are not persisted in SIOCS DB due to PII regulations.
The retailers are offered the flexibility to make all or some of these details mandatory to be captured based on the rules and regulations of the store location. The store parameters that enable the retailer to configure this for Transfer Shipment are as follows:
-
Vehicle Number Required for Transfer Shipment
-
Vehicle Country Required for Transfer Shipment
-
Driver Name Required for Transfer Shipment
-
Driver License Number Required for Transfer Shipment
Similar list of configurations are also available for RTV Shipment and Customer Order Delivery. This means that the configurations mentioned above can be set at different Transaction Type levels, which offers more flexibility.
View Fiscal Doc Information
The user can view the Fiscal Doc Request ID, Request Status, Reject Reason (if rejected), Fiscal Doc ID and Fiscal Doc Link in the Info screen of the respective transactions.
Search Criteria Screen
Fiscal Doc related fields are also included as part of Search Criteria screens of Transfer Shipment, RTV Shipment, Customer Order Deliveries, Transfer Receiving and DSD Receiving.
To better understand how the Fiscal Doc related fields are accommodated in the screens, please refer to the respective shipping areas in this User Guide.