Install Admin Tool
This page will guide you in installing the Oracle Utilities Analytics Warehouse Admin Tool component.
Note: All the tasks below need to be followed in sequential order.
On this page:
Prerequisites
Before installing the OUAW Admin Tool component, verify the following:
-
Ensure that the Admin Tool installation is performed both on the database and the application servers.
-
Ensure Oracle Database Server Enterprise is installed on the database server.
-
Ensure Java is installed both on the database and the application servers.
-
Ensure Oracle Fusion Middleware Infrastructure is installed on the application server.
-
Ensure Oracle APEX is installed on the application server.
-
Ensure Oracle REST Data source (ORDS) is installed on the application server.
See Perform Pre-Installation Steps for OUAW for more information.
Install APEX on the Database Server
Note: Make sure the same OS user installs all software, and replace all parameters enclosed in <> with actual values.
-
Navigate to the Apex extracted directory. Example: </u01/ouaw/apex>
-
Connect to the Oracle Utilities Analytics Warehouse Database with sys user and execute the following commands in order:
-
sqlplus sys/<SYS USER PASSWORD>@<DATABASE SERVICE NAME> as sysdba
-
@apxrtins.sql <Tablespace name> <Tablespace name> <Temp Tablespace name> /i/
-
@apxrtins.sql <CISTS_01> <CISTS_01> <TEMP> /i/
-
@apxchpwd.sql
A sample output for @apxchpwd.sql is shown below. Provide the inputs and store it for future reference.
CopySQL> @apxchpwd.sql
...set_appun.sql
================================================================================
This script can be used to change the password of an Application Express instance
administrator.
If the user does not yet exist, a user record will be created.
================================================================================
Enter the administrator's username [ADMIN]
User "ADMIN" does not yet exist and will be created.
Enter ADMIN's email [ADMIN] <admin email id>
Enter ADMIN's password [] Created instance administrator ADMIN. -
ALTER USER APEX_PUBLIC_USER ACCOUNT UNLOCK;
-
ALTER USER APEX_PUBLIC_USER IDENTIFIED BY APEX_PUBLIC_USER;
-
@apex_rest_config.sql
A sample output for @apex_rest_config.sql is shown below. Provide the inputs and store it for future reference.
CopySQL> @apex_rest_config.sql
Enter a password for the APEX_LISTENER user []
Enter a password for the APEX_REST_PUBLIC_USER user []
...set_appun.sql
...setting session environment
...create APEX_LISTENER and APEX_REST_PUBLIC_USER users SQL>
-
Note: Make sure that you save the passwords for APEX_Listener user and APEX_REST_PUBLIC_USER.
Configure APEX Workspace for OUAW
On the database server, navigate to the AdminTool directory from the installer zip file (Oracle Utilities Analytics Warehouse V2.8.0.0 Multiplatform.zip), connect to the database with the sys user, and execute the following scripts in order:
-
To connect to the database with the sys user:
Copysqlplus sys/<SYS USER PASSWORD>@<DATABASE SERVICE NAME> as sysdba -
To create a workspace and configure the users:
Copy@CreateAppWorkspace.sql -
To import the OUAW application run:
Copy@DeployAdminApp.sql -
To deploy supporting objects:
Copy@DeploySupportingObjects.sql
Install ORDS on the Application Server
-
Navigate to the ORDS extracted directory on the application server and make sure that the APEX extracted directory is available in the location where the Admin tool is set up.
Example: </u01/ouaw/ords> -
Create a directory on the application server to configure Apex.
Example: mkdir -p </u01/ouaw/apex_configuration> -
Navigate back to the ords directory where Oracle REST Data source (ORDS) was extracted.
Example: cd </u01/ouaw/ords> -
To perform an advanced installation, execute the following commands:
Copyexport JAVA_HOME=</u01/ouaw/java>
export PATH=$JAVA_HOME/bin:$PATH
java -jar ords.war install advancedNote: See below an example of the command prompt, in which default options will appear enclosed in square brackets [ ]. Use these options or provide the necessary inputs for your requirement.
CopySpecify the database connection type to use.
Enter number for [1] Basic [2] TNS [3] Custom URL [1]:
Enter the name of the database server [localhost]:<target.dbserver.host>
Enter the database listen port [1521]: <target database port>
Enter 1 to specify the database service name, or 2 to specify the database SID [1]:
Enter the database service name:<target database service name>
Enter 1 if you want to verify/install Oracle REST Data Services schema or 2 to skip this step [1]:
Enter the database password for ORDS_PUBLIC_USER: <ORDS_PUBLIC_USER user password>
Confirm password: <ORDS_PUBLIC_USER user password>
Requires to login with administrator privileges to verify Oracle REST Data Services schema.
Enter the administrator username:sys
Enter the database password for SYS AS SYSDBA:
Confirm password:
Connecting to database user: SYS AS SYSDBA url: jdbc:oracle:thin:@//<targetdatabase.host>:<target database port>/<target database service name>
Retrieving information.
Enter the default tablespace for ORDS_METADATA [SYSAUX]:
Enter the temporary tablespace for ORDS_METADATA [TEMP]:
Enter the default tablespace for ORDS_PUBLIC_USER [SYSAUX]:
Enter the temporary tablespace for ORDS_PUBLIC_USER [TEMP]:
Enter 1 if you want to use PL/SQL Gateway or 2 to skip this step.
If using Oracle Application Express or migrating from mod_plsql then you must enter 1 [1]:
Enter the PL/SQL Gateway database user name [APEX_PUBLIC_USER]:
Enter the database password for APEX_PUBLIC_USER:
Confirm password:
Enter 1 to specify passwords for Application Express RESTful Services database users (APEX_LISTENER, APEX_REST_PUBLIC_USER) or 2 to skip this step [1]:
Enter the database password for APEX_LISTENER:
Confirm password:
Enter the database password for APEX_REST_PUBLIC_USER:
Confirm password:
Enter a number to select a feature to enable:
[1] SQL Developer Web (Enables all features)
[2] REST Enabled SQL
[3] Database API
[4] REST Enabled SQL and Database API
[5] None
Choose [1]:
2021-08-20T04:32: 54.083Z INFO reloaded pools: []
Installing Oracle REST Data Services version 21.1.3.r1531102
... Log file written to /scratch/gbuora/ords_install_core_2021-08-20_043254_00335.log
... Verified database prerequisites
... Created Oracle REST Data Services proxy user
... Created Oracle REST Data Services schema
... Granted privileges to Oracle REST Data Services
... Created Oracle REST Data Services database objects
... Log file written to /scratch/gbuora/ords_install_datamodel_2021-08-20_043351_00796.log
... Log file written to /scratch/gbuora/ords_install_apex_2021-08-20_043355_00541.log
Completed installation for Oracle REST Data Services version 21.1.3.r1531102.
Elapsed time: 00:01:05.850
Enter 1 if you wish to start in standalone mode or 2 to exit [1]:2 -
Navigate to the ORDS directory.
Example: cd </u01/ouaw/ords> -
Run the following command after setting JAVA HOME and add the following PATH:
Copyjava -jar ords.war static </u01/ouaw/apex>/apex/imagesNote: The command will create an i.war file in the ords folder.
Create the Apex Domain
This section describes how to create the apex domain. The apex domain is configured on the application server using the ords.war and i.war files generated in the previous procedure.
-
Navigate to the following directory: <FMW HOME>/oracle_common/common/bin.
-
Add JAVA_HOME/bin to the PATH variable.
Copyexport JAVA_HOME=<JAVA HOME PATH>
export PATH=$JAVA_HOME/bin:$PATH -
Execute the following command to launch the Oracle Fusion Middleware Configuration Wizard for <apex_domain> configuration:
Copy./config.sh -
On the Welcome screen, select Create a new domain, and click Next.

Field Name and Description
Value
Domain Location: Enter the location where the apex_domain can be created.
Example: </u01/ouaw/domains/apex_domain>
-
On the Templates page, under the Available Templates list, select Basic WebLogic Server Domain and click Next.

-
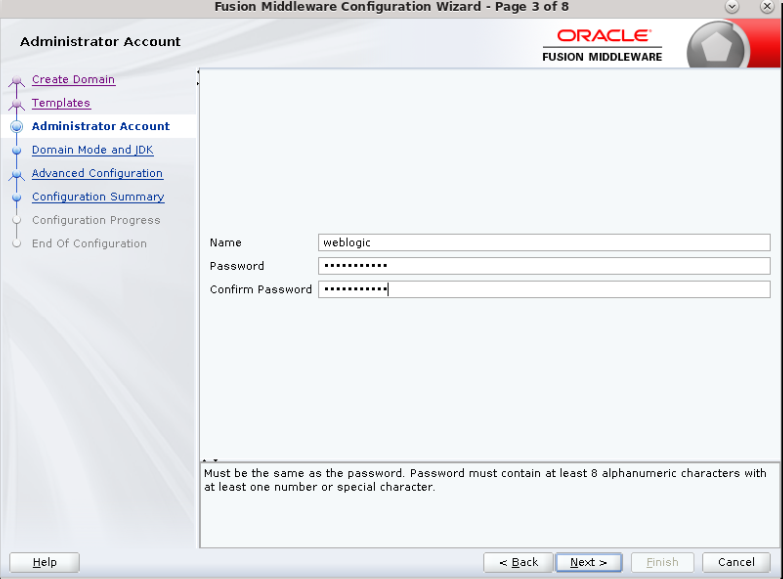
On the Administrator Account page, enter the following values and click Next.
Field Name and Description
Value
Name: Enter the user name.
weblogic
Password: Enter the WebLogic user password.
<weblogic user password>
Confirm Password: Enter the same WebLogic user password as above.
<weblogic user password>
-
On the Domain Mode and JDK page, enter the following values and click Next.

Field Name and Description
Value
Domain Mode: Select the appropriate domain mode.
Production mode
JDK: Select the JDK location using a browser.
Example: <JAVA HOME
-
On the Advanced Configuration page, select Administration Server and Topology.

-
On the Administration Server page, enter the following values and click Next.

Field Name and Description
Value
Server Name: Enter the Admin server name.
AdminServer
Listen Address: Enter the listen address.
All local addresses
Listen Port: Enter the listen port number.
Example: <12000>
-
On the Managed Servers page, enter the following values to add a managed server. Click Next.

Field Name and Description
Value
Server Name: Enter the managed server name.
Example: <apex_server1>
Listen Address: Enter the listen address.
All local addresses.
Listen Port: Enter the listen port number.
Example: <12001>
-
Click Next on the Clusters, Server Templates, Machines, Virtual Targets and Partitions pages respectively. There is nothing to add or change to these pages.
-
On the Configuration Summary page, click Create .

-
On the Configuration Progress page, wait until the progress bar is 100% complete and then click Next.

-
On the End Of Configuration page, you will find the domain path and the administration server URL that will be used in the next steps. Click Finish.

Start the Apex Domain
-
Navigate to the appropriate <apex_domain>.
Example: cd <apex_domain> -
Create the boot.properties file under the Adminserver and Managedserver '<APEX DOMAIN>/server' location.
Copymkdir -p Adminserver/security
mkdir -p apex_server1/security -
Enter the following lines to
boot.properties:Copyusername=weblogic
password=weblogic123 -
Start the administration server and managed server apex_server1.
Copycd <APEX DOMAIN>/bin
nohup ./startWebLogic.sh > adminserver.log 2>&1 &
nohup ./startManagedWebLogic.sh apex_server1 > apex_server1.log 2>&1 &
Install the ords.war and i.war Files
-
Log in to the <apex domain> WebLogic administration console and click the Lock & Edit button located in the Change Center.
-
On the Domain Structure panel, select Deployments and then click Install.

-
Enter the appropriate path and then select the ords.war file. Click Next.
Example: </u01/ouaw/ords> -
Select the deployment target as <apex_server1>.

-
Enter the following information on the application assistant:

Field Name and Description
Value
Name: Enter the deployment name.
ords
Security: Select the security model to be used.
Select the Custom Roles option.
Source accessibility: Select the source accessibility option.
Select the Use the defaults defined by the deployment's targets option.
-
The location of ords.war file and target will appear on the Summary section. Click Finish.

-
After saving the ords.war deployment, click on the Activate Changes button located in the Change Center.
-
Repeat the above steps to deploy the i.war file.
-
On the WebLogic administration console, navigate to Deployment > Control .
-
Select i and ords, and then click Start > Servicing All Requests.
-
Restart the administration and managed servers.
Access the AdminTool
-
Access the AdminTool from the following URL: http://<hostname>:<apex_server1_port>/ords/f?p=104
-
Provide the following credentials to access the Admin Tool. Note: After logging in to the application for the first time, you will be asked to change your password.
Username: Admin
Password: Admin_123
-
After logging in, you can get the following Admin Tool access to ETL Configuration and ETL Job Execution.

Change Default Password of the Admin User
This section describes the APEX API used to change the password of the admin user. This script should be run after connecting to the database as user SYSTEM. Replace the string New password below with the new password for the admin account before running the script.
begin

wwv_flow_api.set_security_group_id(p_security_group_id=>nvl(wwv_flow_application_install.get_workspace_id,2090606133849294));end;
/
begin
apex_util.edit_user(
p_user_id => '1467765078687596',
p_user_name => 'ADMIN',
p_web_password => 'New password',
p_new_password => 'New password'
);
end;
/
commit;
/Note: It is strongly recommended that you change the default password after logging in.